이미지 압축 연구를 하면서 논문에 자주 등장하는 전통적인 방법인 JPEG, JPEG2000, BPG 등의 방법도 있지만 이 방법들 보다는 뒤에 나온 방법들도 존재한다.
딥러닝 기반 압축 논문을 읽으면 보았던
1. WebP
2. H.264 (AVC)
3. H.265 (HEVC)
4. JPEG-XL
이렇게 네 방법들이 동영상 & 이미지 압축 방법에 비교 방법론으로 종종 등장한다.
이 방법들도 RD-Curve에 값을 넣으려면 압축을 하고 bpp도 계산하고, 압축을 해제하고 PSNR을 계산하는 일련의 프로세스를 다 구현해야한다.
이전에 JPEG, JPEG2000, BPG처럼 네 가지 압축 방법을 RD-Curve로 구현해보려 합니다.
리눅스에서 해당 과정을 재현하는데 실패하여 OS는 MacOS에서 진행하였습니다.
그리고 압축에 대한 이론 보다는 실제 코드 구현에 집중했습니다.
([Warning] GPT에 의존을 많이한 코드여서 세부 파라미터는 틀린 정보가 포함될 수 있습니다.)
WebP
# WEBP 압축 함수
import os
import numpy as np
from PIL import Image
import matplotlib.pyplot as plt
import io
import subprocess
import tempfile

def compress_image_webp(image, quality):
    buffer = io.BytesIO()
    image.save(buffer, format="WEBP", quality=quality)
    buffer.seek(0)
    compressed_image = Image.open(buffer).convert('RGB')

    mse = np.mean((np.array(image) - np.array(compressed_image)) ** 2)
    if mse == 0:
        return compressed_image, 100, buffer.tell()
    psnr = 20 * np.log10(255 / np.sqrt(mse))
    return compressed_image, psnr, buffer.tell()

# 압축 quality에 따른 RD-Curve 그래프 출력 함수
def process_images_in_folder_for_format(folder_path, compress_function, format_name):
    image_files = [os.path.join(folder_path, file) for file in os.listdir(folder_path) if file.endswith(('png', 'jpg', 'jpeg'))]

    if format_name == "JPEG" or format_name == "JPEG2000" or format_name == "WEBP":
        qualities = list(range(5, 101, 5))
    else:
        qualities = list(range(5, 52, 5))
    psnr_values_all = []
    bits_per_pixel_all = []

    for image_file in image_files:
        original_image = Image.open(image_file).convert('RGB')
        width, height = original_image.size
        total_pixels = width * height

        psnr_values = []
        sizes = []

        for quality in qualities:
            _, psnr, size = compress_function(original_image, quality)
            psnr_values.append(psnr)
            sizes.append(size)

        bits_per_pixel = [size * 8 / total_pixels for size in sizes]

        psnr_values_all.append(psnr_values)
        bits_per_pixel_all.append(bits_per_pixel)

    psnr_values_avg = np.mean(psnr_values_all, axis=0)
    bits_per_pixel_avg = np.mean(bits_per_pixel_all, axis=0)
    filtered_bpp_psnr = [(bpp, psnr) for bpp, psnr in zip(bits_per_pixel_avg, psnr_values_avg) if bpp <= 1]
    bits_per_pixel_avg, psnr_values_avg = zip(*filtered_bpp_psnr)

    return bits_per_pixel_avg, psnr_values_avg

# 이미지 처리 및 비교 RD-Curve 그래프 출력 함수
def process_and_plot_comparison(folder_path):
    webp_bpp, webp_psnr = process_images_in_folder_for_format(folder_path, compress_image_webp, "WEBP")
    print(webp_bpp, webp_psnr)
    plt.figure(figsize=(10, 5))
    plt.plot(webp_bpp, webp_psnr, marker='o', label='WebP')
    plt.xlabel('Bits Per Pixel (bpp)')
    plt.ylabel('PSNR (dB)')
    plt.legend(loc='lower right')
    plt.grid(True)
    plt.show()

# Example usage
folder_path = 'FOLDER_PATH' # 이미지가 있는 폴더 경로로 변경
process_and_plot_comparison(folder_path)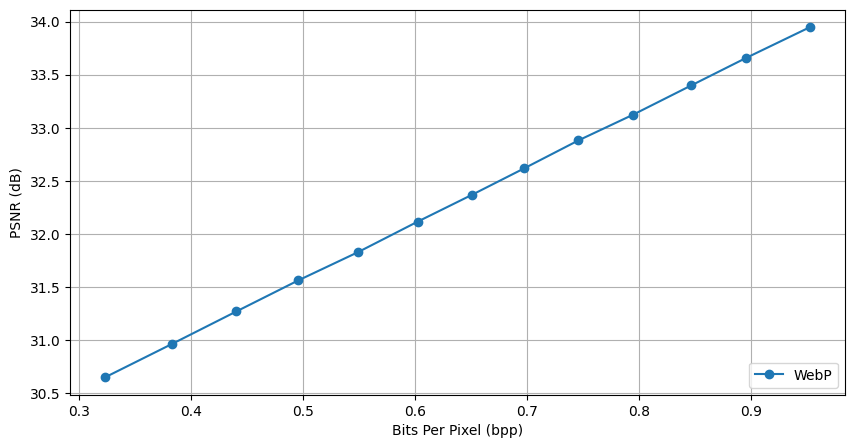
WebP의 경우 별다른 셋팅 필요없이 해당 코드에 폴더 경로만 맞춰주면 정상적으로 RD-Curve가 실행됩니다.
AVC, HEVC, JPEG-XL
세 방법을 실행하려면 우선 Homebrew를 통해 ffmpeg와 jpeg-xl을 설치하셔야 합니다.
brew install ffmpeg
brew install jpeg-xl
jpeg-xl 깃허브
https://github.com/libjxl/libjxl
ffmpeg 깃허브
https://github.com/FFmpeg/FFmpeg
import os
import numpy as np
from PIL import Image
import matplotlib.pyplot as plt
import tempfile
import subprocess

# PSNR 계산 함수
def calculate_psnr(original_image, compressed_image):
    mse = np.mean((np.array(original_image) - np.array(compressed_image)) ** 2)
    if mse == 0:
        return 100
    psnr = 20 * np.log10(255 / np.sqrt(mse))
    return psnr

# H.264 (AVC) 압축 함수
def compress_image_h264(image, quality):
    with tempfile.NamedTemporaryFile(delete=True, suffix=".png") as temp_input:
        image.save(temp_input.name)
        temp_output = temp_input.name.replace('.png', '.h264')
        temp_decoded = temp_input.name.replace('.png', '_decoded.png')

        # 압축
        subprocess.run(['ffmpeg', '-y', '-i', temp_input.name, '-c:v', 'libx264', '-crf', str(quality), '-pix_fmt', 'yuv444p', temp_output], check=True)
        # 디코딩
        subprocess.run(['ffmpeg', '-y', '-i', temp_output, temp_decoded], check=True)

        # 디코딩된 이미지 로드
        compressed_image = Image.open(temp_decoded).convert('RGB')
        size = os.path.getsize(temp_output)

    # PSNR 계산
    psnr = calculate_psnr(image, compressed_image)
    return compressed_image, psnr, size

# H.265 (HEVC) 압축 함수
def compress_image_h265(image, quality):
    with tempfile.NamedTemporaryFile(delete=True, suffix=".png") as temp_input:
        image.save(temp_input.name)
        temp_output = temp_input.name.replace('.png', '.h265')
        temp_decoded = temp_input.name.replace('.png', '_decoded.png')

        # 압축
        subprocess.run(['ffmpeg', '-y', '-i', temp_input.name, '-c:v', 'libx265', '-crf', str(quality), '-pix_fmt', 'yuv444p', temp_output], check=True)
        # 디코딩
        subprocess.run(['ffmpeg', '-y', '-i', temp_output, temp_decoded], check=True)

        # 디코딩된 이미지 로드
        compressed_image = Image.open(temp_decoded).convert('RGB')
        size = os.path.getsize(temp_output)

    # PSNR 계산
    psnr = calculate_psnr(image, compressed_image)
    return compressed_image, psnr, size

# JPEG XL 압축 함수
def compress_image_jpegxl(image, quality):
    with tempfile.NamedTemporaryFile(delete=True, suffix=".png") as temp_input:
        image.save(temp_input.name)
        temp_output = temp_input.name.replace('.png', '.jxl')
        temp_decoded = temp_input.name.replace('.png', '_decoded.png')

        # 압축
        subprocess.run(['cjxl', temp_input.name, temp_output, '-q', str(quality)], check=True)
        # 디코딩
        subprocess.run(['djxl', temp_output, temp_decoded], check=True)

        # 디코딩된 이미지 로드
        compressed_image = Image.open(temp_decoded).convert('RGB')
        size = os.path.getsize(temp_output)

    # PSNR 계산
    psnr = calculate_psnr(image, compressed_image)
    return compressed_image, psnr, size

# 이미지 폴더 내 모든 이미지 처리 함수
def process_images_in_folder_for_format(folder_path, compress_function, format_name):
    image_files = [os.path.join(folder_path, file) for file in os.listdir(folder_path) if file.endswith(('png', 'jpg', 'jpeg'))]

    if format_name == "H.264" or format_name == "H.265" :
        qualities = list(range(5, 51, 5))  # 품질 범위 조정
    elif  format_name == "JPEG XL":
        qualities = list(range(5, 101, 5))
    psnr_values_all = []
    bits_per_pixel_all = []

    for image_file in image_files:
        original_image = Image.open(image_file).convert('RGB')
        width, height = original_image.size
        total_pixels = width * height

        psnr_values = []
        sizes = []

        for quality in qualities:
            _, psnr, size = compress_function(original_image, quality)
            psnr_values.append(psnr)
            sizes.append(size)

        bits_per_pixel = [size * 8 / total_pixels for size in sizes]

        psnr_values_all.append(psnr_values)
        bits_per_pixel_all.append(bits_per_pixel)

    psnr_values_avg = np.mean(psnr_values_all, axis=0)
    bits_per_pixel_avg = np.mean(bits_per_pixel_all, axis=0)

    # 1.5 bpp 이하의 값만 필터링
    filtered_bpp_psnr = [(bpp, psnr) for bpp, psnr in zip(bits_per_pixel_avg, psnr_values_avg) if bpp <= 1.5]
    if filtered_bpp_psnr:
        bits_per_pixel_avg, psnr_values_avg = zip(*filtered_bpp_psnr)
    else:
        bits_per_pixel_avg, psnr_values_avg = [], []

    return bits_per_pixel_avg, psnr_values_avg

# RD-Curve 그래프 출력 함수
def process_and_plot_comparison(folder_path):
    h264_bpp, h264_psnr = process_images_in_folder_for_format(folder_path, compress_image_h264, "H.264")
    print("H.264 Results:", h264_bpp, h264_psnr)

    h265_bpp, h265_psnr = process_images_in_folder_for_format(folder_path, compress_image_h265, "H.265")
    print("H.265 Results:", h265_bpp, h265_psnr)

    jpegxl_bpp, jpegxl_psnr = process_images_in_folder_for_format(folder_path, compress_image_jpegxl, "JPEG XL")
    print("JPEG XL Results:", jpegxl_bpp, jpegxl_psnr)

    # 그래프 출력
    plt.figure(figsize=(10, 5))
    plt.plot(h264_bpp, h264_psnr, marker='o', label='H.264 (AVC)')
    plt.plot(h265_bpp, h265_psnr, marker='o', label='H.265 (HEVC)')
    plt.plot(jpegxl_bpp, jpegxl_psnr, marker='o', label='JPEG XL')
    plt.xlabel('Bits Per Pixel (bpp)')
    plt.ylabel('PSNR (dB)')
    plt.legend(loc='lower right')
    plt.grid(True)
    plt.show()

# Example usage
folder_path = 'FOLDER_PATH'  # 이미지가 있는 폴더 경로로 변경
process_and_plot_comparison(folder_path)
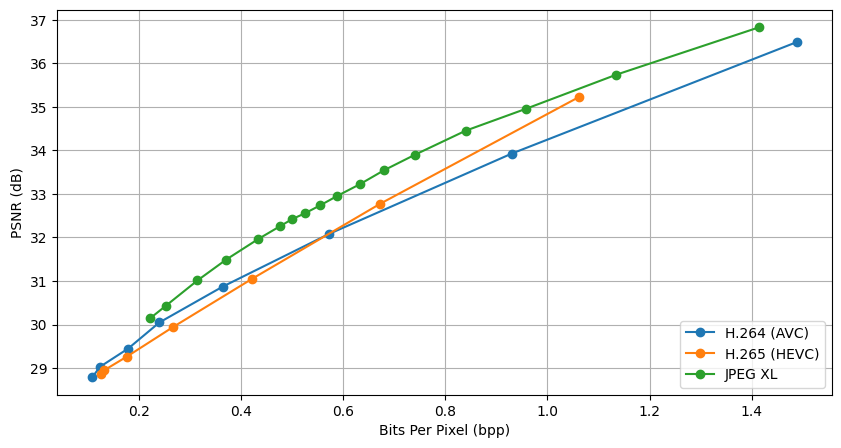
위 코드를 실행하면 다음과 같이 RD-Curve가 그려집니다.
AVC와 HEVC는 yuv444p 서브샘플링 파라미터를 사용했습니다. 디폴드 값은 yuv420p인 것 같습니다.
이미지 품질을 조절하는 qualities변수는 JPEG의 경우 AVC,HEVC와 JPEG-XL은 범위가 달라서 조건문을 통해 조절해줬습니다.
딥러닝 방법의 경우 보통 아무리 람다 값이 커도 bpp가 1.5미만으로 형성이 되기 때문에 1.5 이하만 남기도록 설정했습니다.
이제 JPEG, JPEG2000, Webp, BPG, H.264, H.265, Jpeg-XL, H.266(VVC)까지 딥러닝을 사용하지 않는 압축 방법을 모두 살펴봤습니다.
(이제 삽질한만큼 제 졸업 논문의 RD-Curve가 더욱 풍족해지겠군요...하하...)
GPT의 도움을 받았기에 분명 틀린 정보도 존재할 수 있습니다. 세부 파라미터는 반드시 공식 깃허브 참고하여서 셋팅하시면 될 것같습니다.