
1. 앤서블(ansible)

- 앤서블 구성
- 앤서블 본체 : 서버 클라이언트 구성과 같은 형태를 취하지 않고 상주 프로세스를 둘 필요가 없다
- 인벤토리 : 관리 대상이 되는 서버 접속 정보를 표시하는 정의, 여러 개의 서버를 그룹화하여 정의하거나 각각의 서버와 그룹에 대한 변수를 사용한 파라미터를 설정할 수 있다.
- 모듈 : 앤서블에서 실행된 하나하나의 명령과 같은 것으로 다음과 같은 작업을 간단히 수행할 수 있다.
- OS 내의 작업 (패키지 설치와 서비스, 사용자관리)
- 파일 작업 ( 복사와 편집, 템플릿 열기)
- 데이터베이스 작업
- 클라우드 서비스 작업 (AWS, Azure, GCP, Openstack 등)
- 네트워크 장비 작업
- 플레이 북 : 모듈이 앤서블에서 명령이라고 하면 플레이북은 앤서블에서 스크립트(코드)이며 앤서블을 사용할 때 필요한 작업은 플레이북의 구현과 실행이라고 할 수 있다. 프로그래밍 대신 yaml을 사용한다.
2. 실습하기
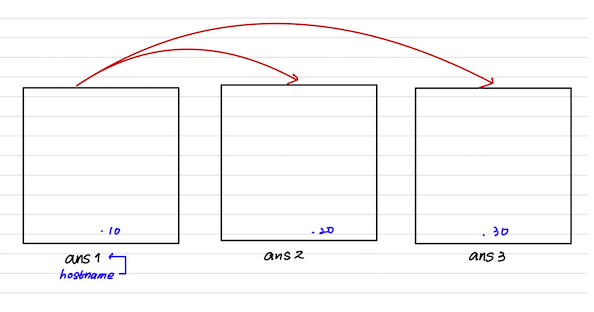
- CentOS_temp 3 개 clone
ans1, ans2, ans3 (IP 10, 20, 30)
hostname, vmname = ans1, ans2, ans3
[root@ans1 ~]# systemctl stop firewalld
[root@ans1 ~]# systemctl disable firewalld
[root@ans1 ~]# systemctl stop NetworkManager
[root@ans1 ~]# systemctl disable NetworkManager
[root@ans1 ~]# yum -y update
[root@ans1 ~]# yum -y install epel-release
[root@ans1 ~]# yum -y install ansible
앤서블 설치
앤서블을 설치하게 되면 기본적으로 default 인벤토리 파일이 존재한다
여기서 관리할 호스트를 지정한다 ( 관리하고 싶은 서버의 목록)
[root@ans1 ~]# vi /etc/ansible/hosts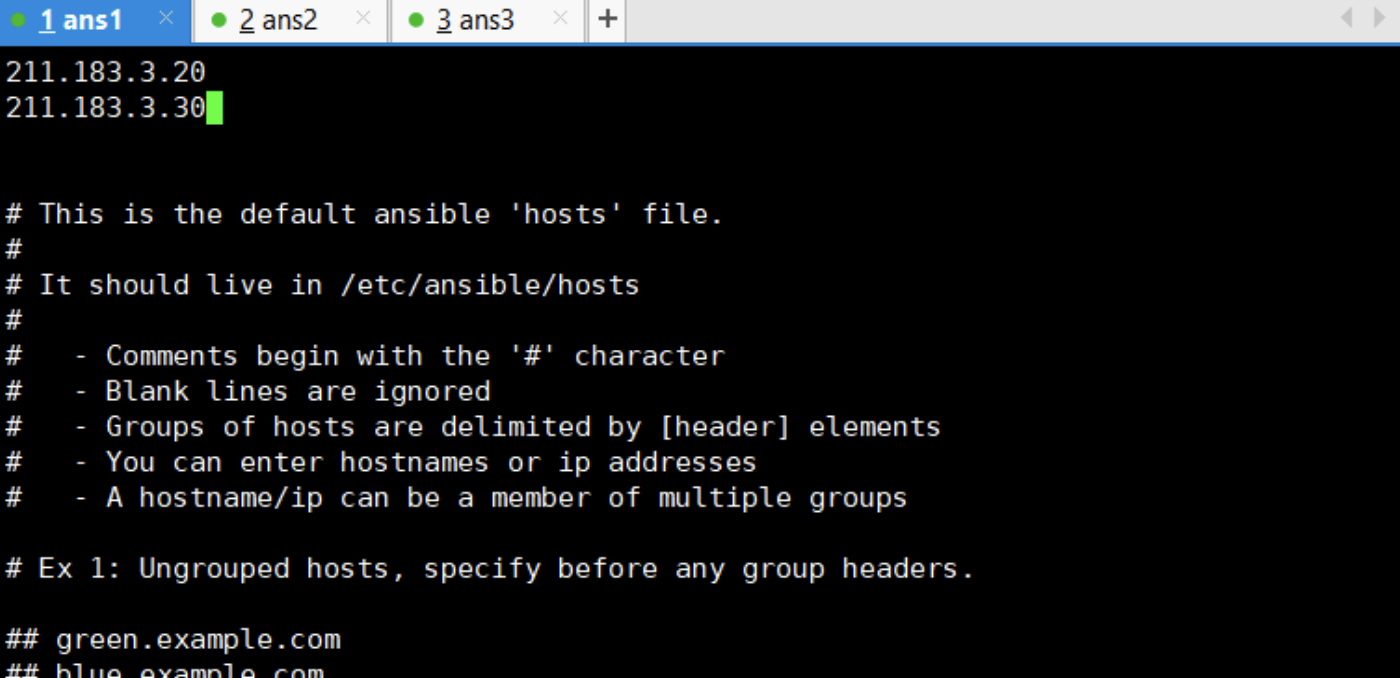
연걸됐는지 ping 쳐보기
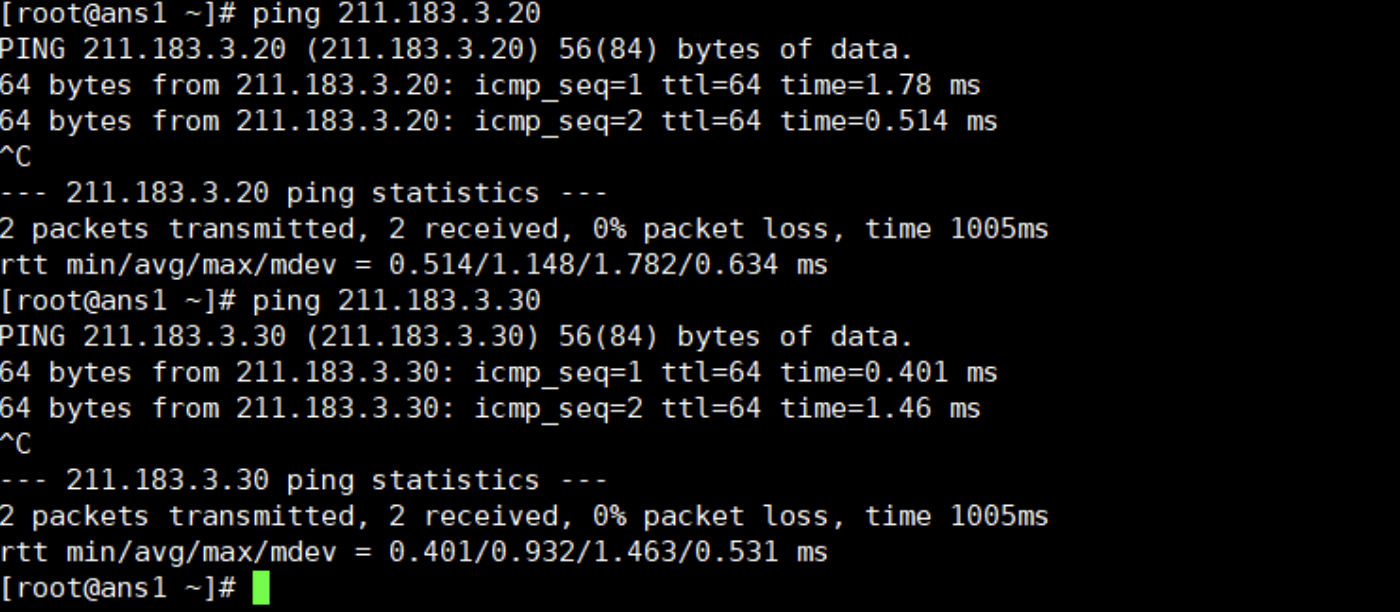
앤서블 호스트들이랑 연결성을 확인해보고싶다면?
ping - pong 쳐보기!
[root@ans1 ~]# ansible all -m ping -k
패스워드로 인증할 것 -k 옵션 , 모듈을 사용할 것이다 -m 옵션
두 개의 호스트(서버)에 웹서버를 설치하고 싶다면?
일단 yum 이라는 모듈을 사용할 것이고 패키지는 httpd 이며 present한 상태로 둘 것이다
present : 패키지가 없다면 설치할 것이고, 있으면 설치를 하지 않는다.
[root@ans1 ~]# ansible all -m yum -a "name=httd state=present" -k
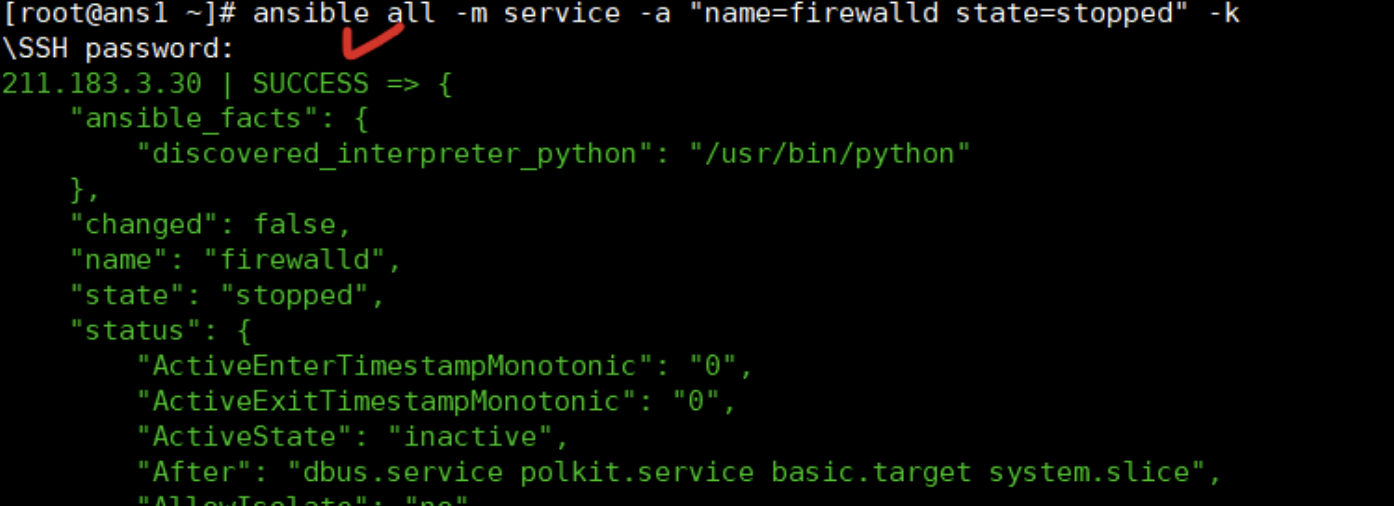
< 이어서 방화벽도 stopped 해주자>
[root@ans1 ~]# ansible all -m service -a "name=firewalld state=stopped" -k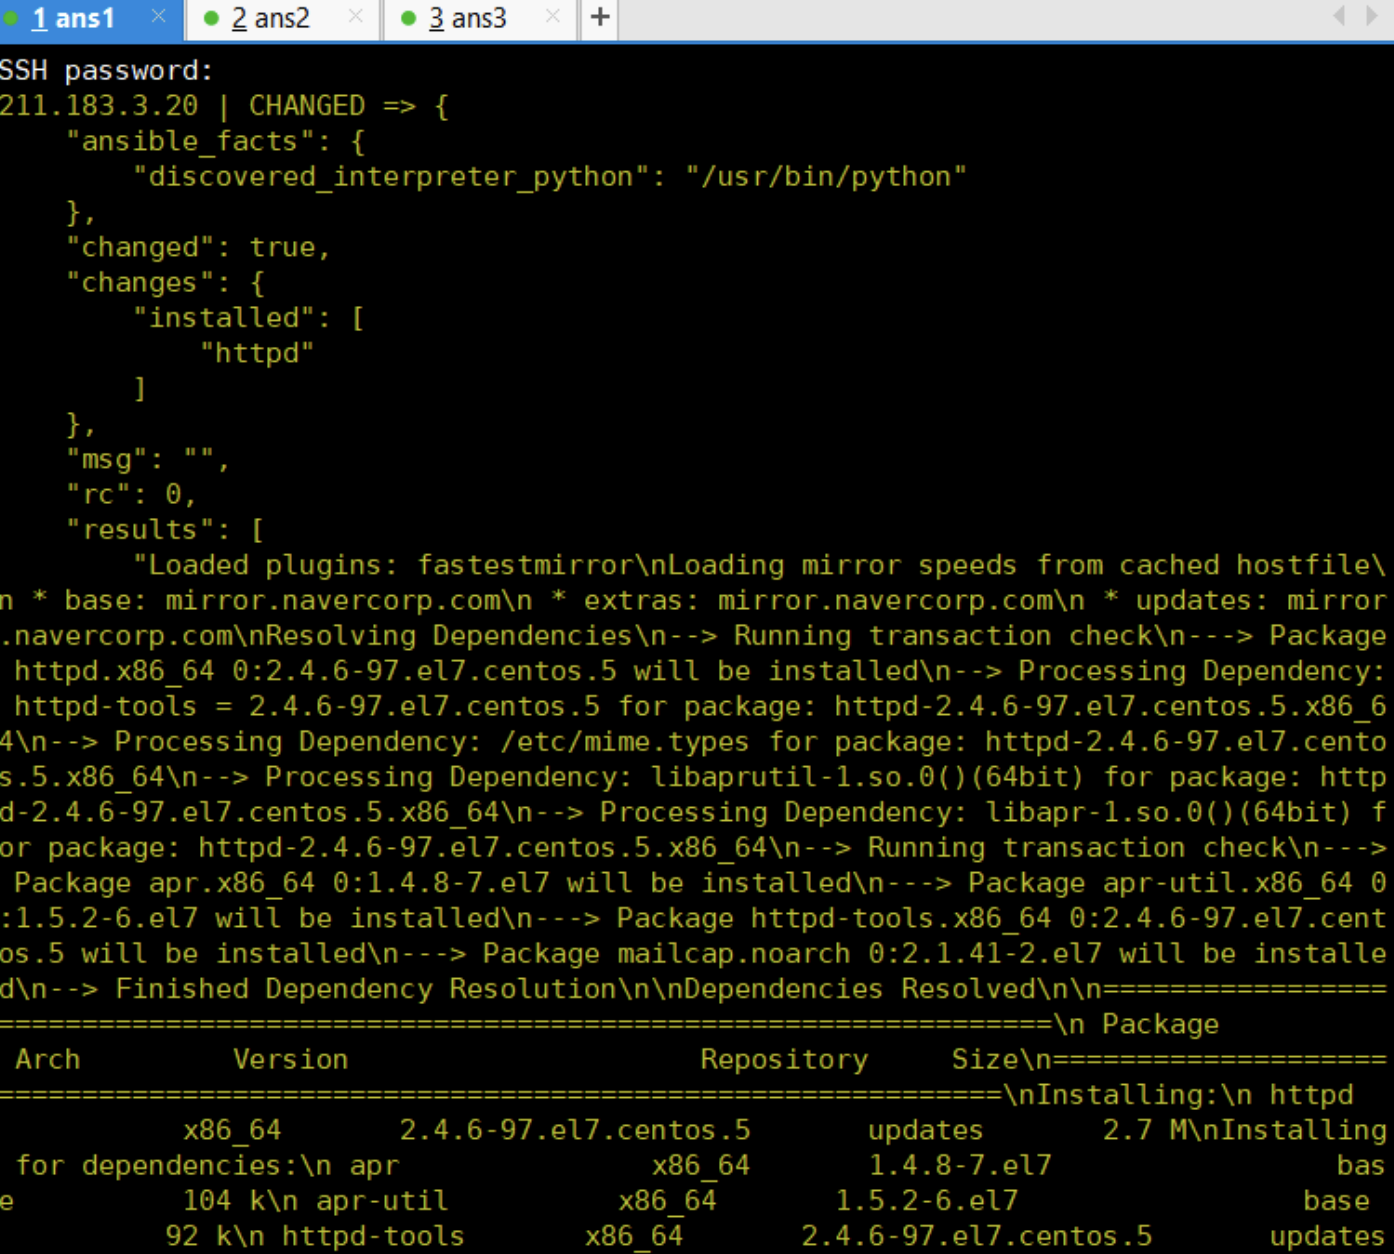
httpd 패키지를 설치했으면 동작(enable)을 시켜야 한다
httpd 라는 데몬을 서비스하고 상태를 started로 해주자
[root@ans1 ~]# ansible all -m servicce -a "name=httpd state=started" -k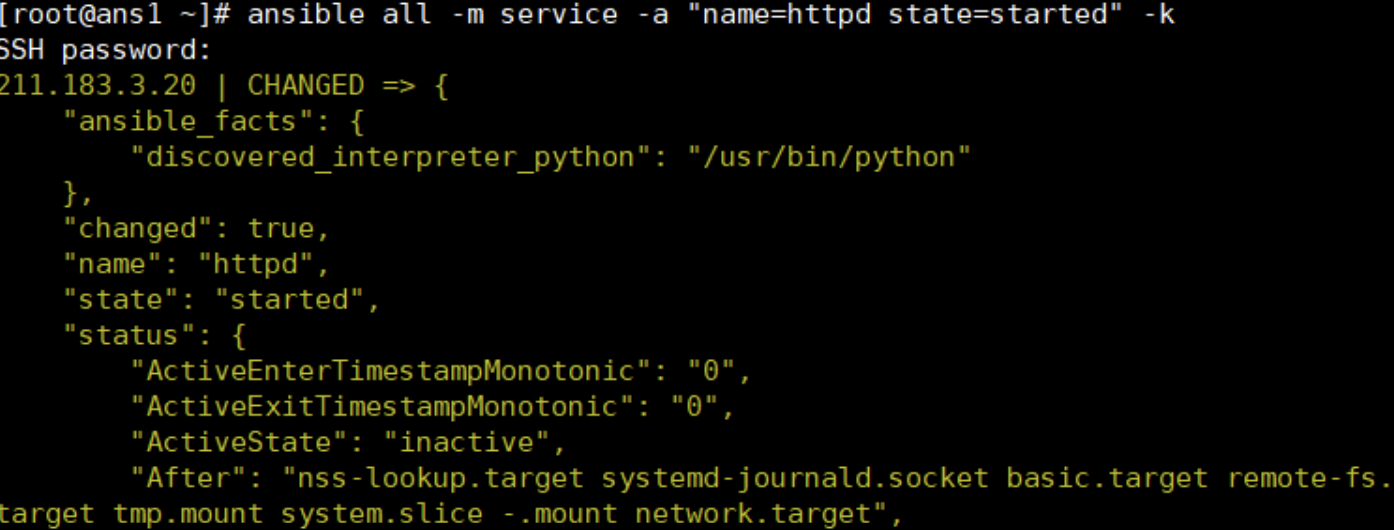

- 인벤토리 목록 만들기 - 디렉토리를 생성하고 이동하여 txt 파일을 생성해보자
[root@ans1 ~]# mkdir /ansible
[root@ans1 ~]# cd /ansible/
[root@ans1 ansible]# vi my_inven.txt
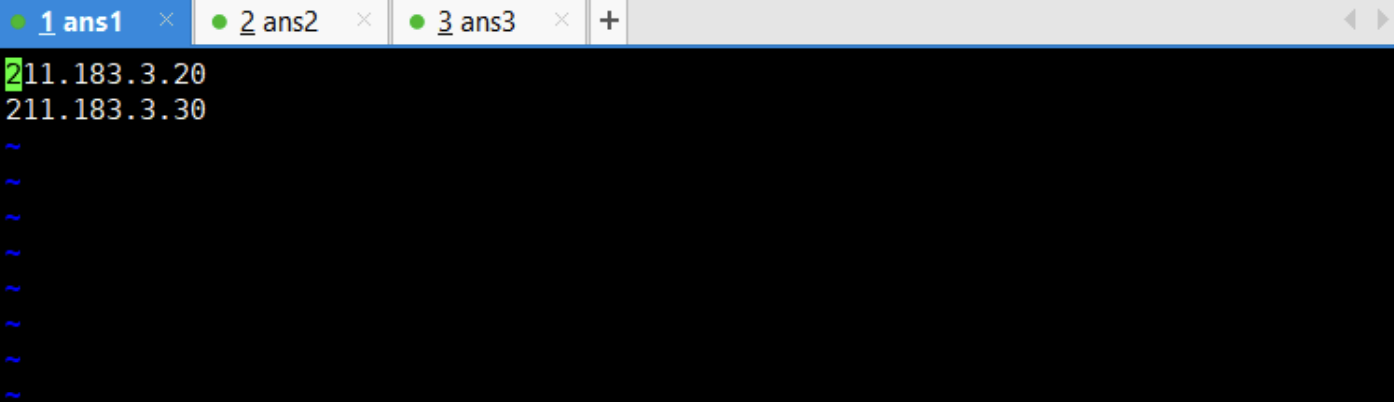
인벤토리를 지정할 수 있고 지정한 서버들에게 ping이라는 모듈을 사용할 수 있다.
[root@ans1 ansible]# ansible all -i my_inven.txt -m ping -k
SSH password:
211.183.3.30 | SUCCESS => {
 "ansible_facts": {
 "discovered_interpreter_python": "/usr/bin/python"
 },
 "changed": false,
 "ping": "pong"
}
211.183.3.20 | SUCCESS => {
 "ansible_facts": {
 "discovered_interpreter_python": "/usr/bin/python"
 },
 "changed": false,
 "ping": "pong"
}

연습하기 : httpd 를 제거하고 nginx 를 설치 후 활성화 하시오. 또한 서버가 잘 동작을 하는지 테스트도 해볼 것
- httpd를 제거하는 이유는 nginx 랑 포트충돌이 일어날 수 있기 때문
삭제
[root@ans1 ansible]# ansible all -m yum -a "name=httpd state=removed" -k
설치
[root@ans1 ansible]# ansible all -m yum -a "name=epel-release state=present" -k
[root@ans1 ansible]# ansible all -m yum -a "name=nginx state=present" -k
실행
[root@ans1 ansible]# ansible all -m service -a "name=nginx state=started" -k
- 인벤토리도 섹션(Section) 을 나눌 수 있다.
[root@ans1 ansible]# vi my_inven.txt 
seoul 섹션에 ping-pong 쳐보기
[root@ans1 ansible]# ansible seoul -i my_inven.txt -m ping -k
SSH password:
211.183.3.20 | SUCCESS => {
 "ansible_facts": {
 "discovered_interpreter_python": "/usr/bin/python"
 },
 "changed": false,
 "ping": "pong"
}
- 플레이북 작성하기
플레이북 - docker compose 로 여러개의 컨테이너들을 띄우 듯이 모듈들을 플레이북으로 작성해서 모듈들을 모을 수 있다
[root@ans1 ansible]# vi site.yml
<site.yml>
- name: playbook
hosts: all
tasks:
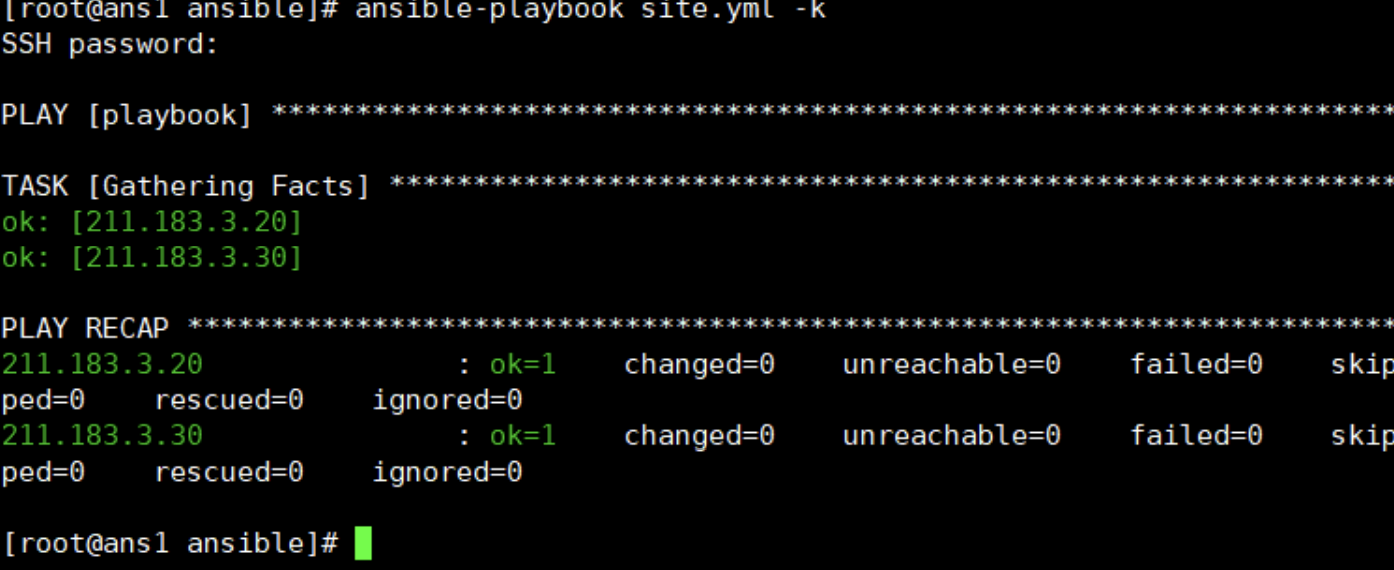
[root@ans1 ansible]# ansible-playbook site.yml -k
SSH password:
PLAY [playbook] *******************************************************************
TASK [Gathering Facts] ************************************************************
ok: [211.183.3.20]
ok: [211.183.3.30]
PLAY RECAP ************************************************************************
211.183.3.20 : ok=1 changed=0 unreachable=0 failed=0 skipped=0 rescued=0
ignored=0
211.183.3.30 : ok=1 changed=0 unreachable=0 failed=0 skipped=0 rescued=0
ignored=0
<site.yml>
- name: playbook
 hosts: all
 gather_facts: false
 become: true
 tasks:
 - name: epel-release install
 yum:
 name: epel-release
 state: present
 - name: nginx installation
 yum:
 name: nginx
 state: present
 - name: nginx start
 service:
 name: nginx
 state: started
 enabled: true # 변경

 [root@ans1 ansible]# ansible-playbook site.yml -k
 SSH password:
PLAY [playbook] *******************************************************************
TASK [epel-release install] *******************************************************
ok: [211.183.3.20]
ok: [211.183.3.30]
TASK [nginx installation] *********************************************************
ok: [211.183.3.20]
ok: [211.183.3.30]
TASK [nginx start] ****************************************************************
changed: [211.183.3.30]
changed: [211.183.3.20]
PLAY RECAP ************************************************************************
211.183.3.20 : ok=3 changed=1 unreachable=0 failed=0 skipped=0 rescued=0
ignored=0
211.183.3.30 : ok=3 changed=1 unreachable=0 failed=0 skipped=0 rescued=0
ignored=0

- shell 명령을 내리고 싶다?
[root@ans1 ansible]# vi shell.yml

<shell.yml>
- hosts: all
 become: true
 tasks:
 - name: execute
 shell: echo hello

 [root@ans1 ansible]# ansible all -m shell -a "echo hello" -k
SSH password:
211.183.3.20 | CHANGED | rc=0 >>
hello
211.183.3.30 | CHANGED | rc=0 >>
hello
- 가령 예를 들자면 [root@ans1 ansible]# ansible all -m shell -a "systemctl restart httpd" -k 이렇게 쓸순 있지만, 멱등성을 보장 못한다.
동일한 요청을 한 번 보내는 것과 여러 번 연속으로 보내는 것이 같은 효과를 지니고, 서버의 상태도 동일하게 남을 때, 해당 HTTP 메서드가 멱등성을 가졌다고 말한다.
- 아이템 넣기
[root@ans1 ansible]# vi shell.yml

<shell.yml>
- hosts: all
 become: true
 tasks:
 - name: execute
 shell: "{{ item }}"
 with_items:
 - "mkdir /remote"
 - "touch test.txt"

[root@ans1 ansible]# ansible-playbook shell.yml -k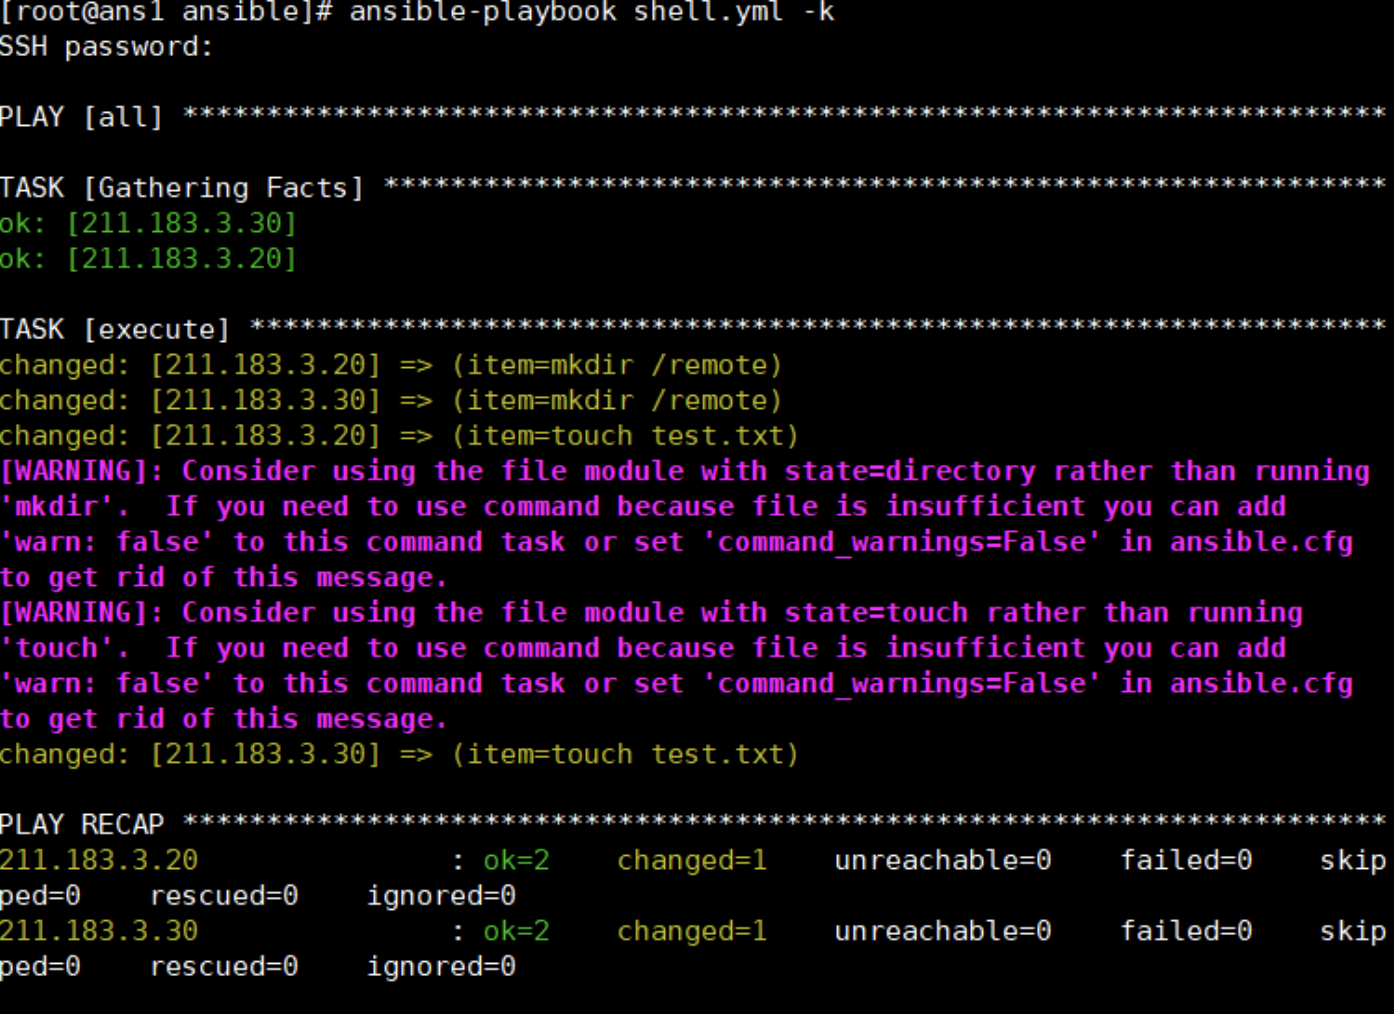
- ans2, ans3 에 txt파일이 존재하는지 확인

- 파일 복사하기
[root@ans1 ansible]# vi copy.yml
<copy.yml>

- hosts: all
 become: true
 tasks:
 - copy:
 src: "./site.yml"
 dest: "/remote/site.yml"

[root@ans1 ansible]# ansible-playbook copy.yml -k

- 연습 문제 : ansible playbook 을 사용하여 wordpress를 설치.
데이터 베이스는 mysql 으로 수동설치 하고 db도 수동으로 생성하시오
[root@ans1 ansible1]# cat wp.yml

<wp.yml>

- name: Setup For Wordpress
  hosts: wp
  gather_facts: no
  become: yes
  tasks:
    - name: install httpd
      yum:
        name: httpd
        state: present
    - name: install wget
      yum:
        name: wget
        state: present
    - name: install unzip
      yum:
        name: unzip
        state: present
    - name: install epel-release
      yum:
        name: epel-release
        state: present
    - name: install remirepo
      yum:
        name: http://rpms.remirepo.net/enterprise/remi-release-7.rpm
    - name: install yum-utils
      yum:
        name: yum-utils
        state: present
    - name:
      shell: "yum-config-manager --enable remi-php73"
    - name: install php
      yum:
        name: php
    - name: install php-mysql
      yum:
        name: php-mysql
    - name: get wordpress
      get_url:
        url: https://wordpress.org/latest.zip
        dest: ./latest.zip
    - name: unzip
      shell: "{{ item }}"
      with_items:
        - "unzip ./latest.zip"
        - "mv ./wordpress/* /var/www/html"
        - "cp /var/www/html/wp-config-sample.php /var/www/html/wp-config.php"
        - "sed -i s/database_name_here/wpDB/g /var/www/html/wp-config.php"
        - "sed -i s/username_here/wpuser/g /var/www/html/wp-config.php"
        - "sed -i s/password_here/1234/g /var/www/html/wp-config.php"
        - "sed -i s/localhost/211.183.3.20/g /var/www/html/wp-config.php"
    - name: restart httpd
      service:
        name: httpd
        state: started

무럭무럭 자라볼까