1. Vagrant (Docker의 VM Version)

Vagrant 란 VirtualBox 등 가상화 소프트웨어를 GUI 가 아닌 CUI로 조작하기 위한 소프트웨어이고, 가상환경 소프트웨어가 설치되어 있지 않다면 Vagrant는 사용할 수 없다.
- 커맨드 하나로 가상 구축이 완료
- 가상 머신의 설정이 간단
- 설정 정보의 공유가 가능
- 환경 구축의 자동화
2. 실습
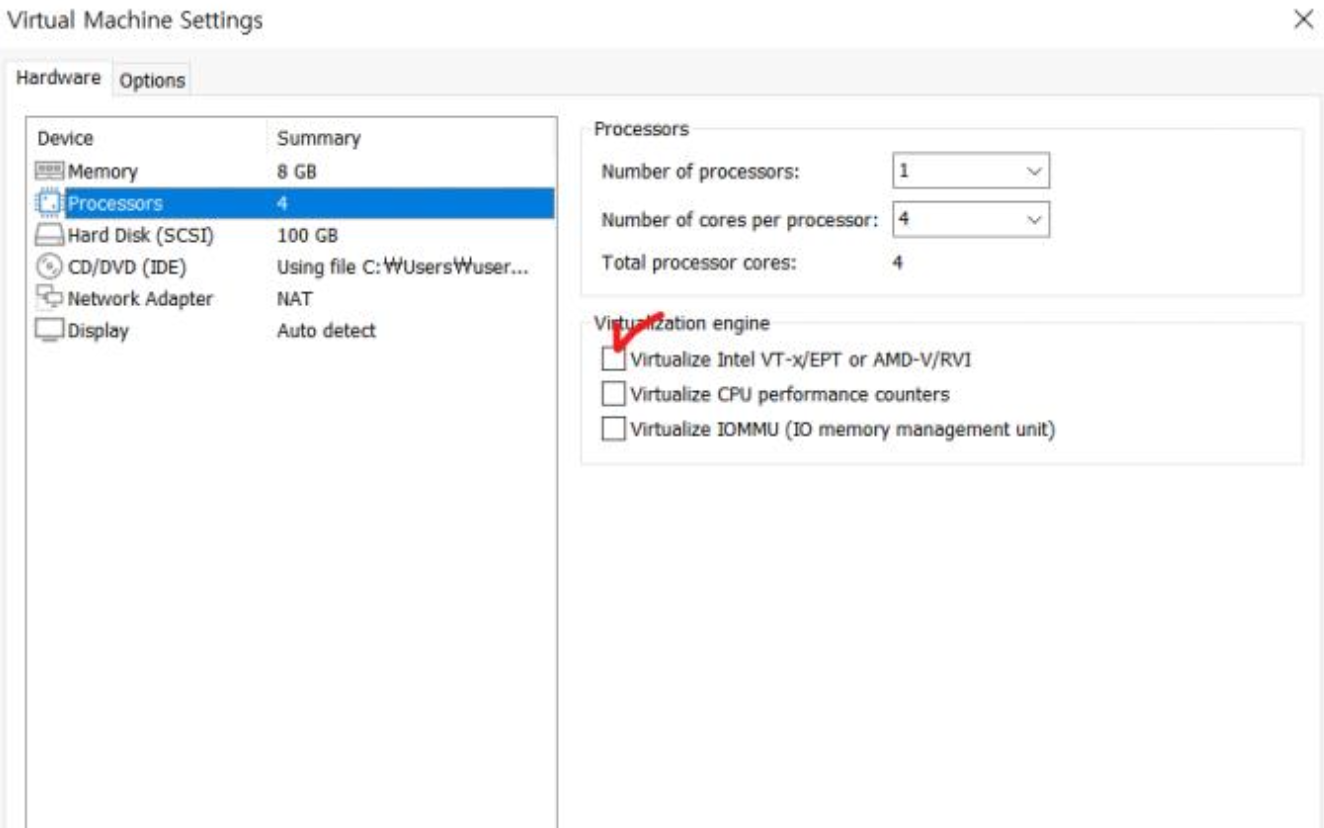
- Virtual Machine 생성
- Core: 4
- RAM : 8GB
- Disk : 100GB
- IMG File: CentOS DVD
- Software Selection : server with GUI
<기본적인 설정>
[root@vagrant ~]# systemctl stop firewalld
[root@vagrant ~]# systemctl disable firewalld

<networkt Manager off>
[root@vagrant ~]# systemctl stop NetworkManager
[root@vagrant ~]# systemctl disable NetworkManager

<셀리눅스 off>
[root@vagrant ~]# vi /etc/selinux/config
[root@vagrant ~]# init 6

<기본적인 패키지 설치>
[root@vagrant ~]# yum -y update
[root@vagrant ~]# yum -y install epel-release
[root@vagrant ~]# yum -y install ansible
[root@vagrant ~]# yum -y install qemu-kvm libvirt virt-install openssh-askpass

[root@vagrant ~]# yum -y install https://dl.fedoraproject.org/pub/epel/epel-release-latest-7.noarch.rpm
[root@vagrant ~]# yum -y install https://github.com/kimchi- project/kimchi/releases/download/2.5.0/wok-2.5.0-0.el7.centos.noarch.rpm
[root@vagrant ~]# yum -y install https://github.com/kimchi- project/kimchi/releases/download/2.5.0/kimchi-2.5.0-0.el7.centos.noarch.rpm

[root@vagrant ~]# systemctl daemon-reload
[root@vagrant ~]# systemctl restart wokd
[root@vagrant ~]# systemctl enable wokd

<주석 user="root" / group="root" 해제>
[root@vagrant ~]# vi /etc/libvirt/qemu.conf

[root@vagrant ~]# systemctl restart libvirtd
[root@vagrant ~]# systemctl enable libvirtd
[root@vagrant ~]# yum -y install libguestfs-tools libguestfs-xfs virt-top커스텀 이미지를 만들어보자 (centos-7.5 기반)
[root@vagrant ~]# export LIBGUESTFS_BACKEND=direct
[root@vagrant ~]# virt-builder centos-7.5 --format qcow2 --size 10G -o centos01.qcow2 --root- password password:test123

- Virtualization 탭이 생성되어야 정상적으로 구동한것이다.
- 이제 다운받은 centos 이미지( centos7.5 -> centos01.qcow2) 로 VM 3개를 생성해볼 것이다.
[root@vagrant ~]# mkdir /sim
디렉토리 생성
[root@vagrant ~]# cp centos01.qcow2 /sim/centos01.qcow2
[root@vagrant ~]# cp centos01.qcow2 /sim/centos02.qcow2
[root@vagrant ~]# cp centos01.qcow2 /sim/centos03.qcow2
각자 이름이 다른 이미지로 복사
[root@vagrant ~]# cd /sim/

[root@vagrant sim]# ls
centos01.qcow2 centos02.qcow2 centos03.qcow2

<VM 생성>

[root@vagrant sim]# virt-install --name centos1 --ram 1024 --disk path=./centos01.qcow2 --vcpus 1 -- graphics none --serial pty --console pty --import &

[root@vagrant sim]# virsh list
Id Name State ----------------------------------------------------
3 centos1 running

[root@vagrant sim]# virt-install --name centos2 --ram 1024 --disk path=./centos02.qcow2 --vcpus 1 -- graphics none --serial pty --console pty --import &

[root@vagrant sim]# virsh list
Id Name State ----------------------------------------------------
3 centos1 running
4 centos2 running

[root@vagrant sim]# virt-install --name centos3 --ram 1024 --disk path=./centos03.qcow2 --vcpus 1 -- graphics none --serial pty --console pty --import &

[root@vagrant sim]# virsh list
Id Name State ----------------------------------------------------
3 centos1 running
4 centos2 running
5 centos3 running- 3대의 NAT 대역의 VM
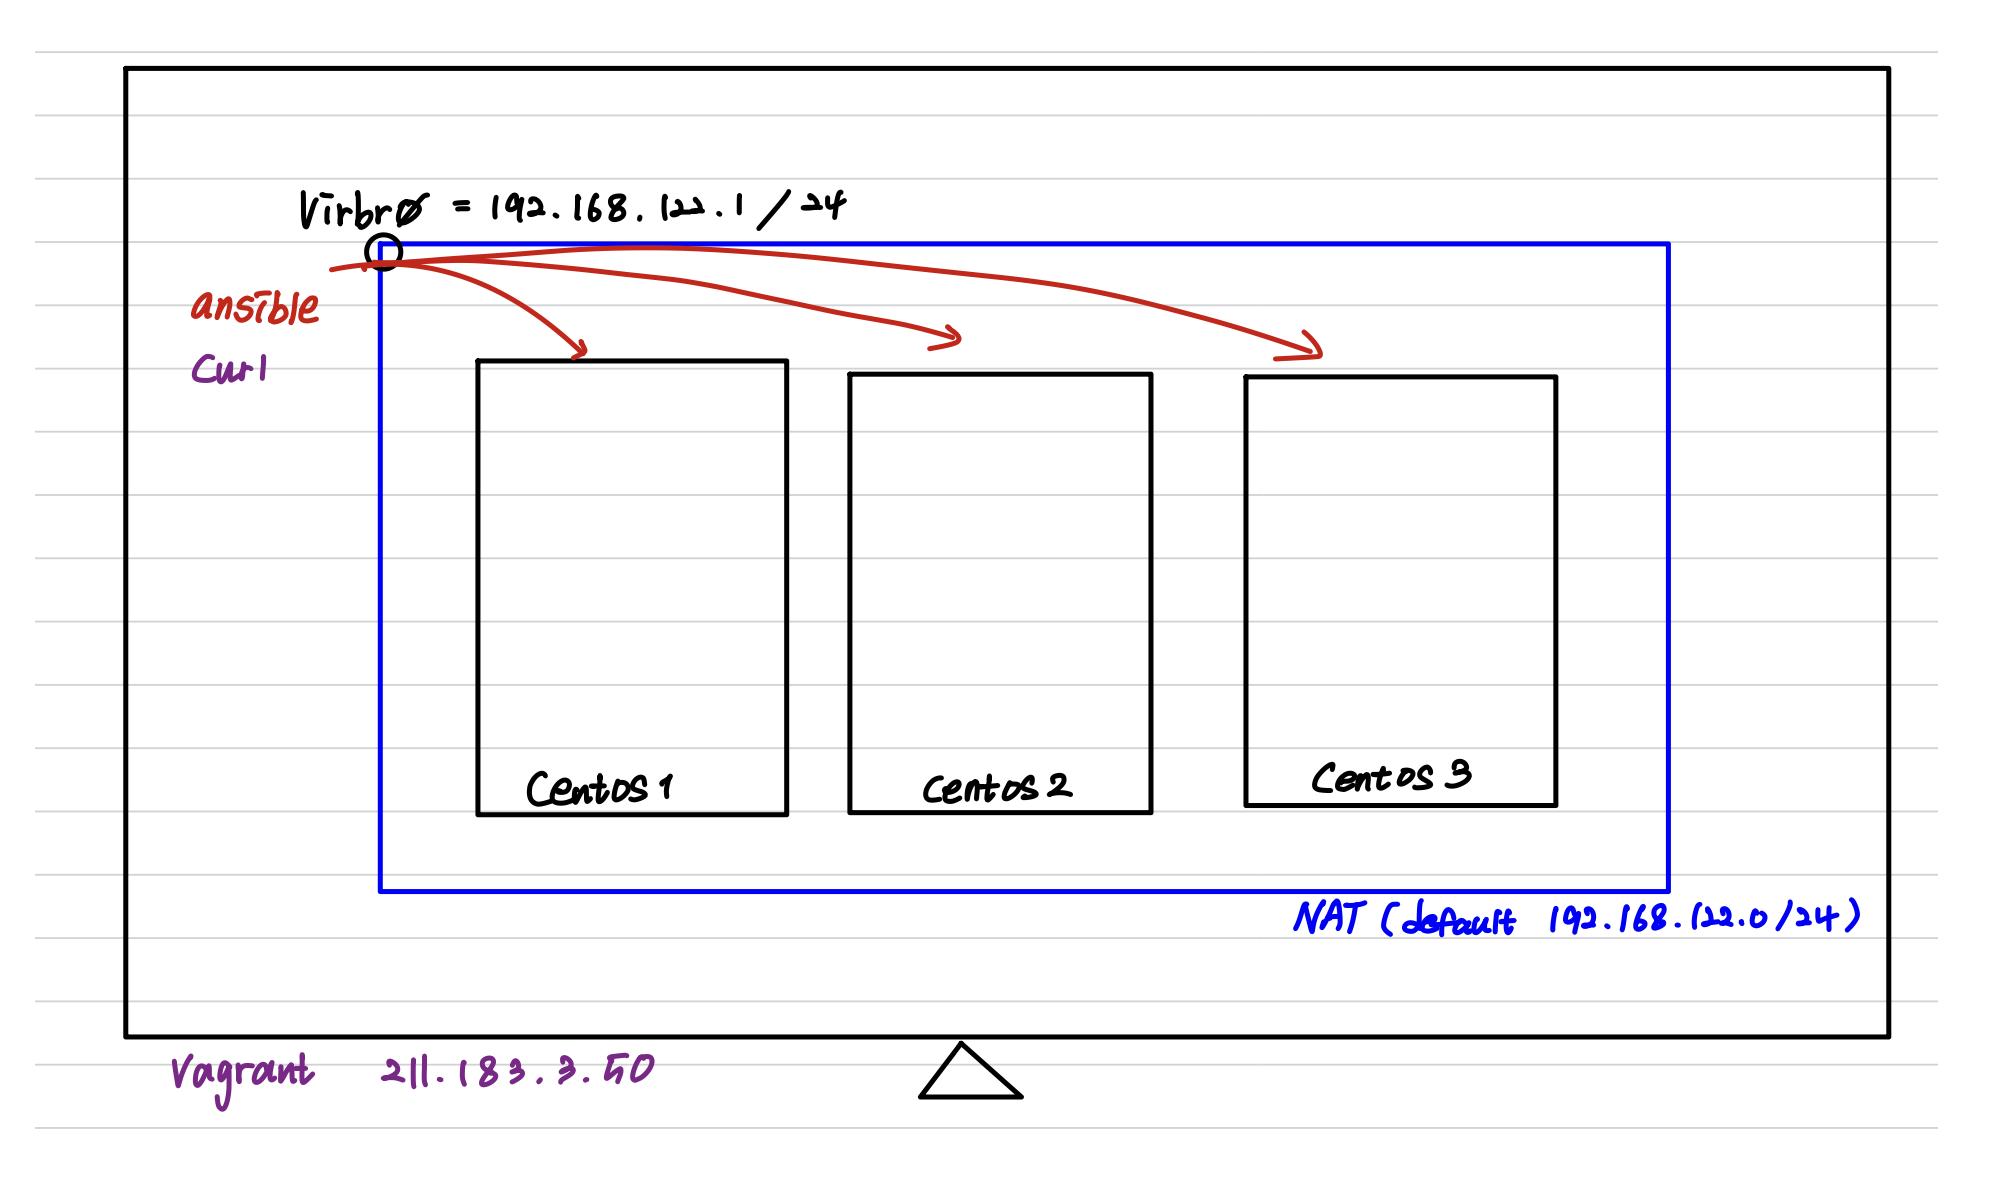
- virsh console 명령어를 통해 각각의 VM 에 들어가서 IP 확인해야 한다
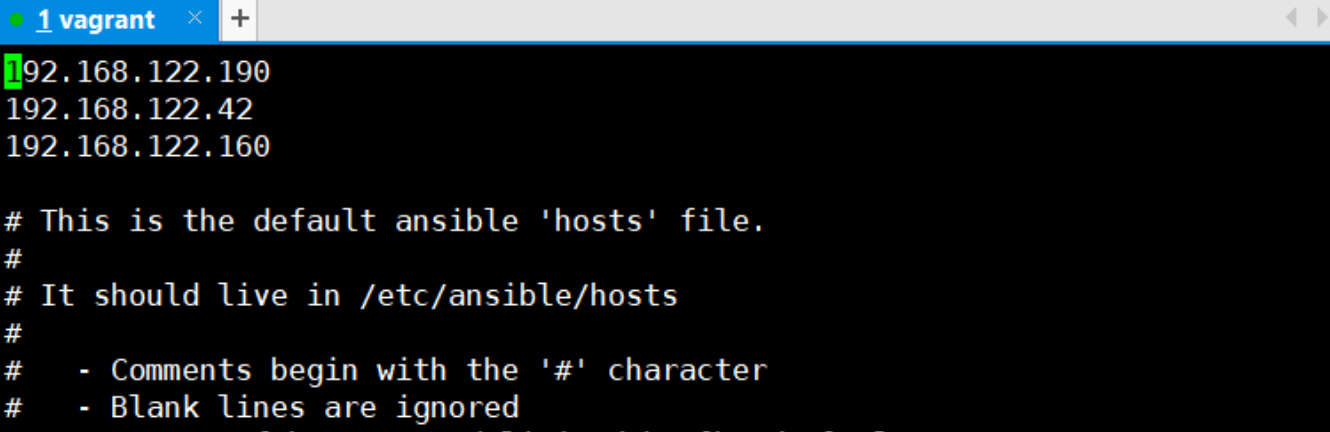
[root@vagrant sim]# virsh domifaddr centos1
vnet0 52:54:00:f7:f4:3a ipv4 192.168.122.190/24

[root@vagrant sim]# virsh domifaddr centos2
vnet1 52:54:00:22:88:93 ipv4 192.168.122.42/24

[root@vagrant sim]# virsh domifaddr centos3
vnet2 52:54:00:9a:13:f0 ipv4 192.168.122.160/24- IP확인을 했으면 ansible 의 기본적인 hosts(인벤토리)를 등록하자
- ping
오해할 수 있지만, ping 모듈은 일반적인 ICMP를 보내는 방식이 아니라, 지정된 노드에 로그인이 가능한지여부와 파이썬 설치 여부를 확인할 수 있는 모듈이다. 정상적인 상태확인이 되었다면 결과는 ”pong"을 확인할 수 있다. 목적지가 윈도우일 경우에는 “win_ping"을 라우터와 같은 네트워크 장비일 경우 ”net_ping" 모듈을 대신 사용할 수도 있다.
- ping 모듈을 사용해서 접속을 확인
[root@vagrant sim]# ansible all -m ping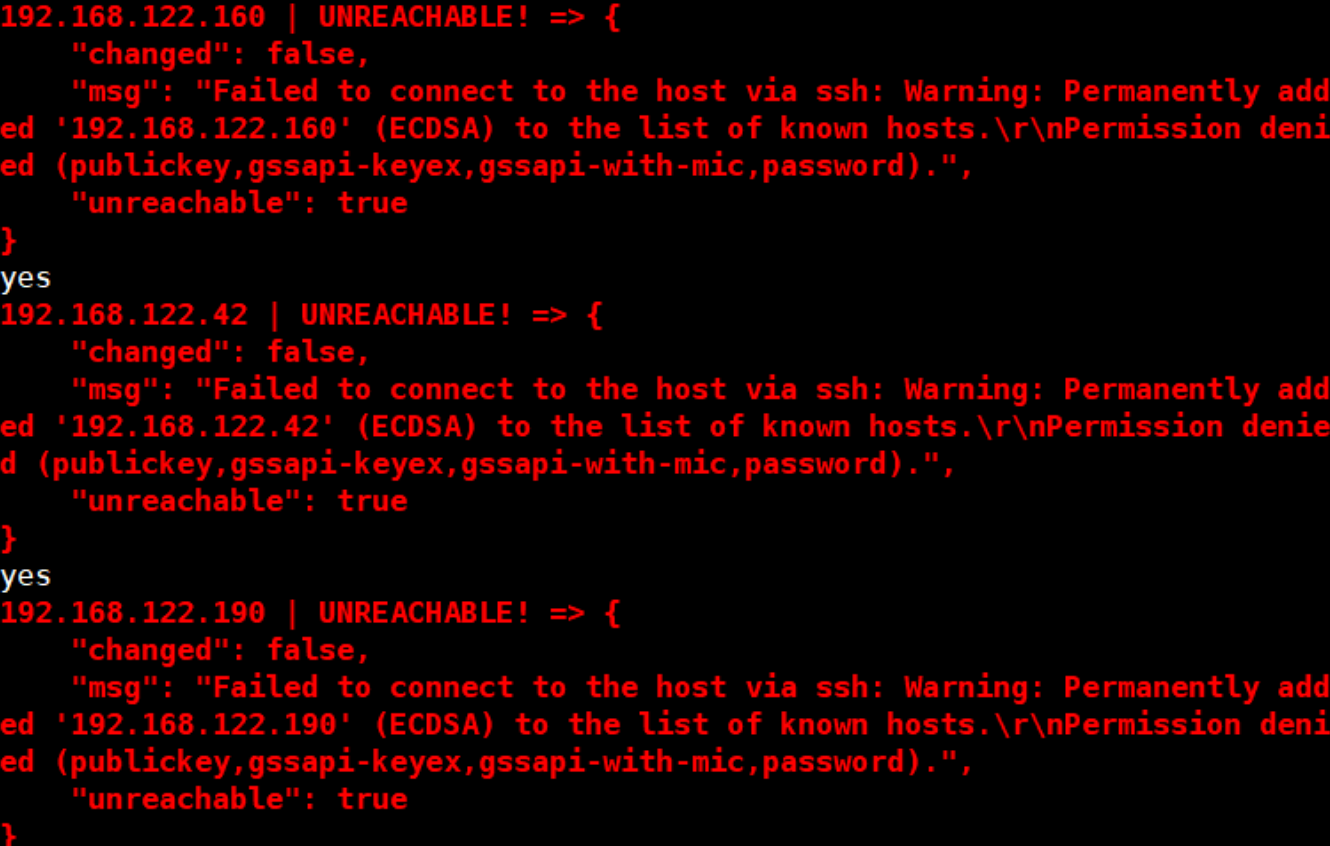
- 비밀번호를 설정한 ping 모듈로 다시 확인
[root@vagrant sim]# ansible all -m ping -k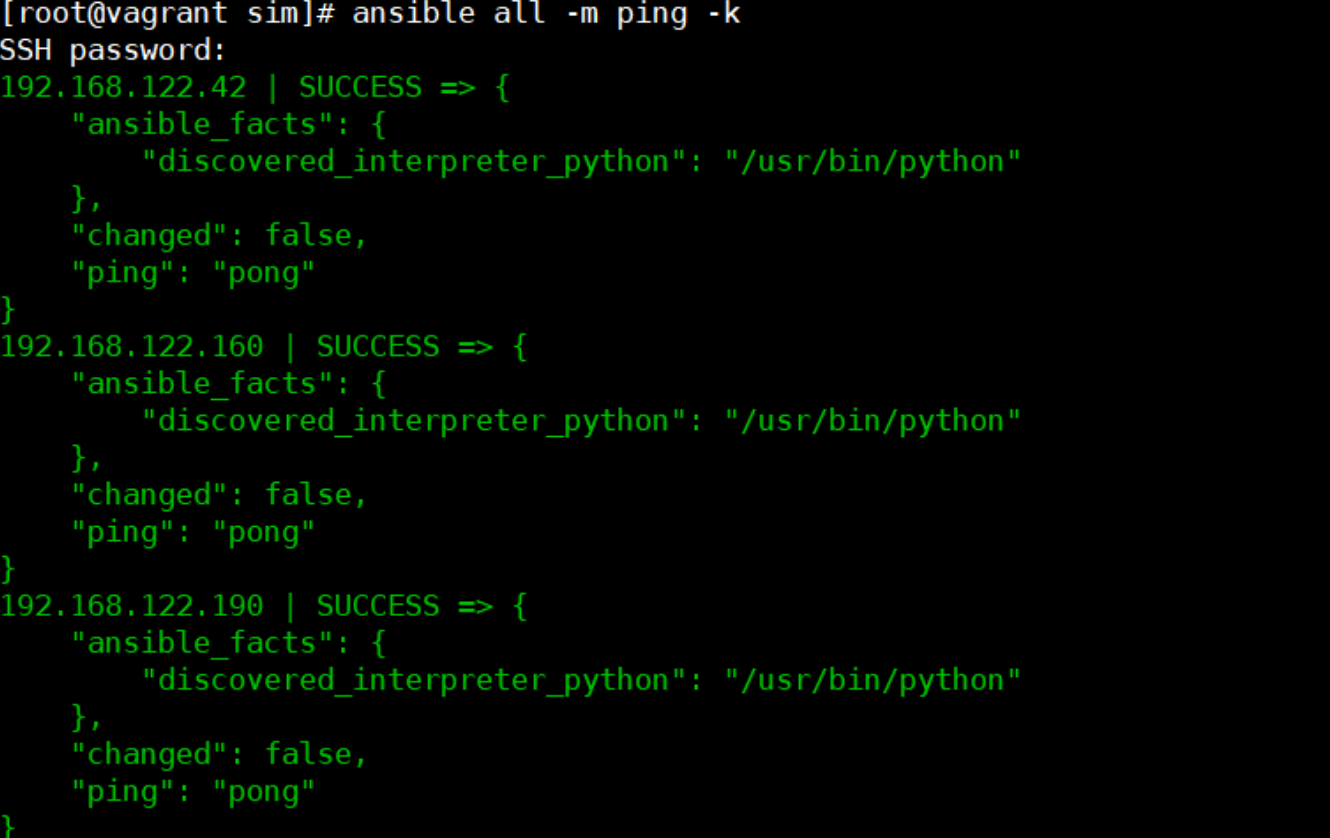
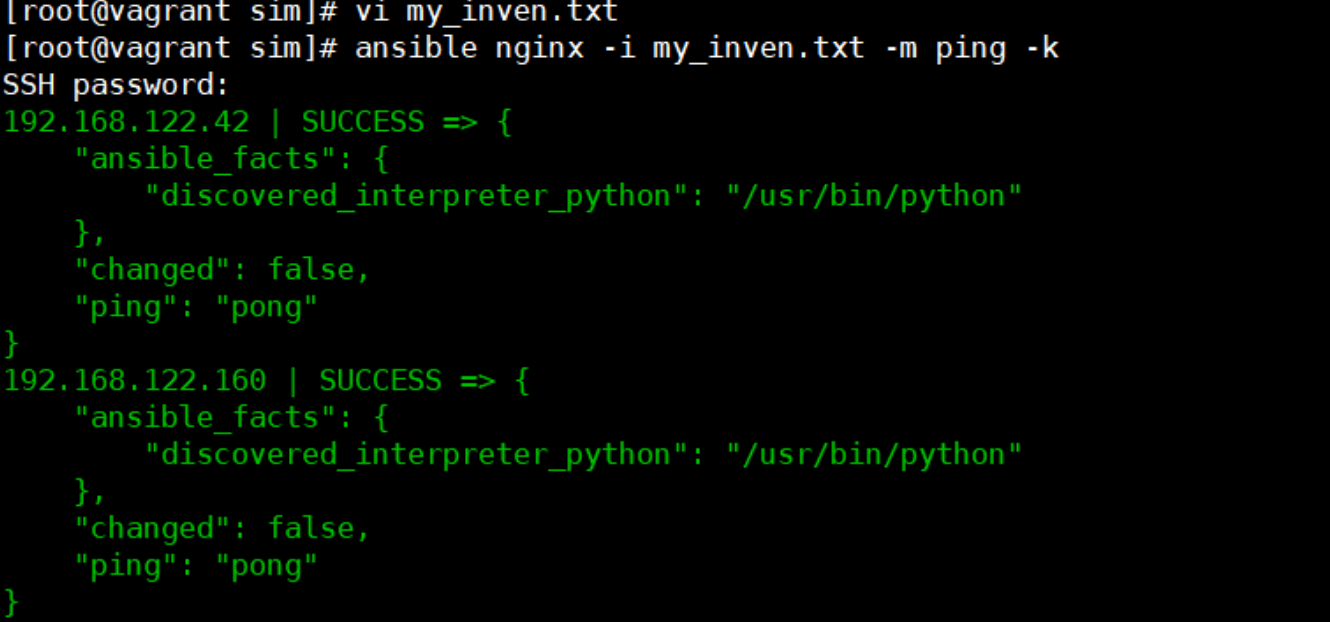
- 자신의 인벤토리 txt 파일을 가지고 다뤄보자
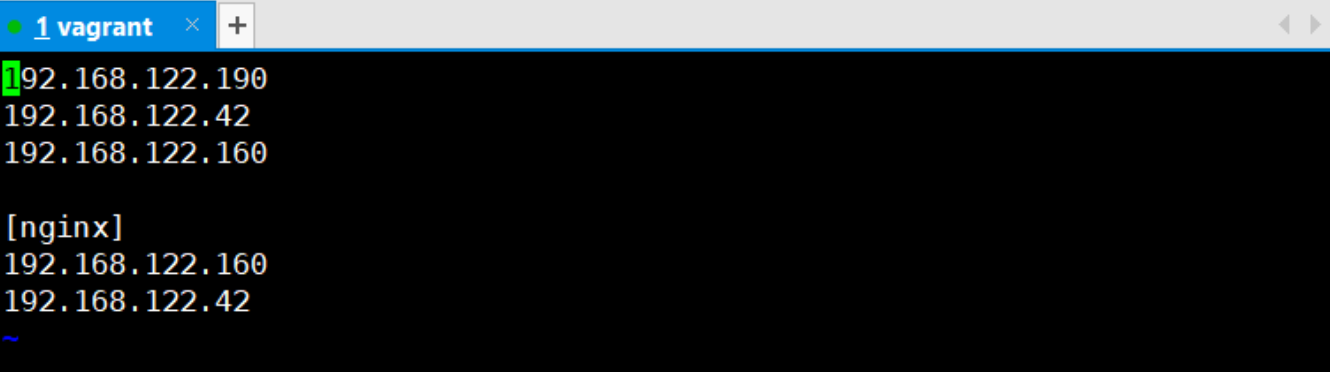
[root@vagrant sim]# vi my_inven.txt
커스텀 인벤토리 생성

[root@vagrant sim]# ansible nginx -i my_inven.txt -m ping -k
인벤토리 파일을 가지고 ping 모듈 사용
- user
- 사용자를 생성, 삭제, 수정할 수 있는 모듈이며 윈도우 노드의 경우에는 “win_user"를 대신하여 사용할 수있다. 아래와 같이 노드에 사용자를 생성할 수 있다.
- 사용자를 삭제하고 싶다면 계정을 지정하고 state=absent를 이용하여 삭제가 가능하다
[root@vagrant sim]# ansible all -m user -a "name=user1" -k
[root@vagrant sim]# vi /etc/passwd
[root@vagrant sim]# ansible all -m shell -a "cat /etc/passwd | grep user1" -k
SSH password:
192.168.122.160 | CHANGED | rc=0 >>
user1:x:1000:1000::/home/user1:/bin/bash
192.168.122.190 | CHANGED | rc=0 >>
user1:x:1000:1000::/home/user1:/bin/bash
192.168.122.42 | CHANGED | rc=0 >>
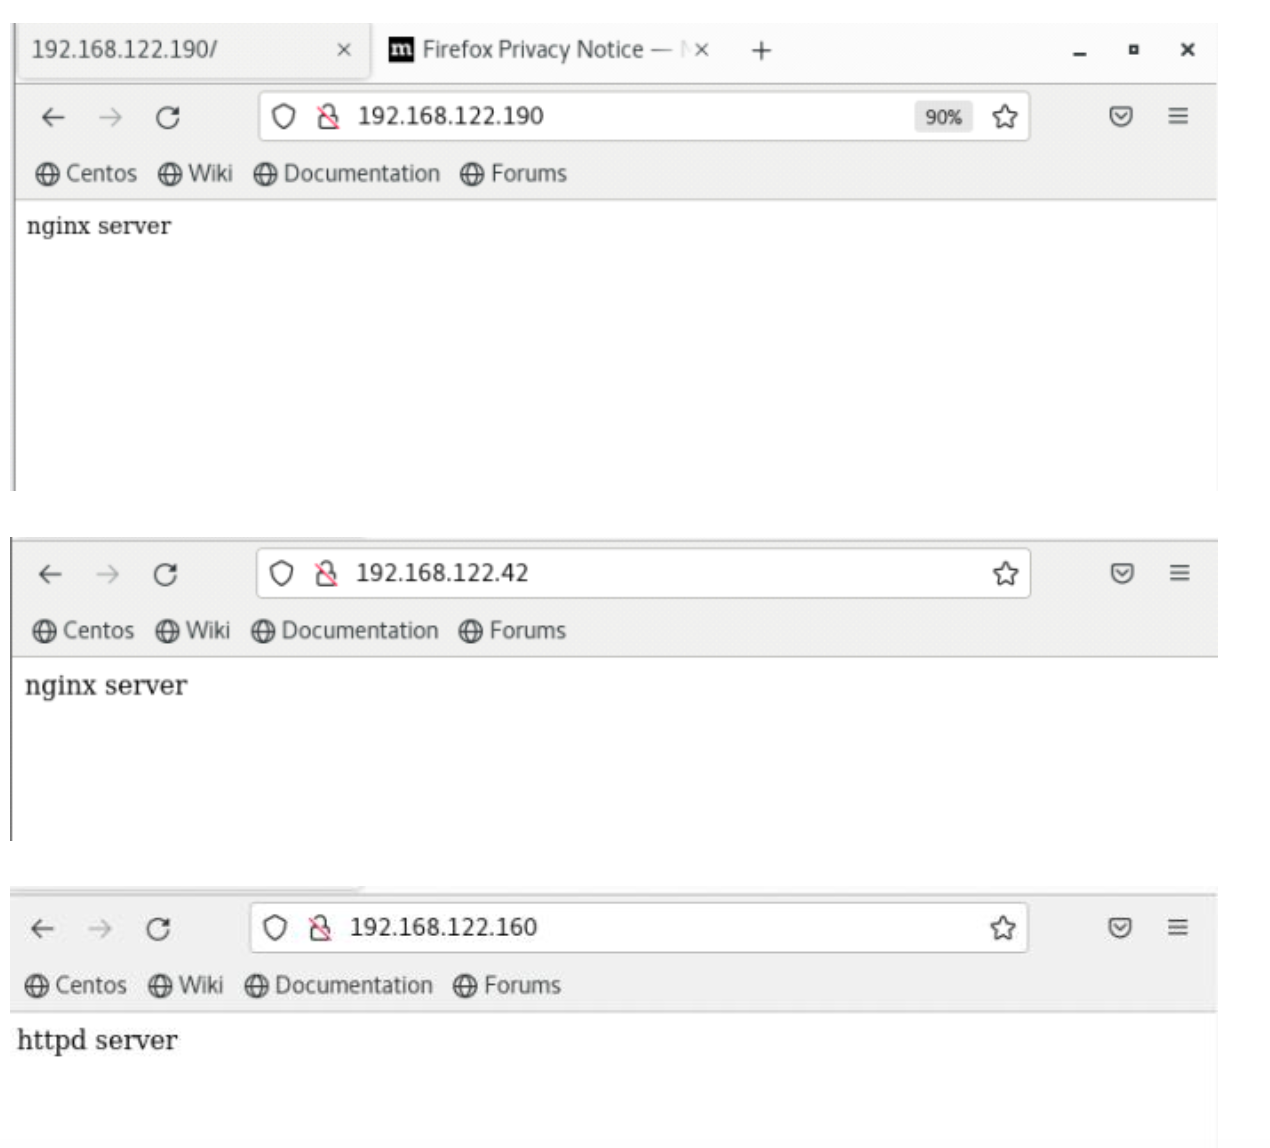
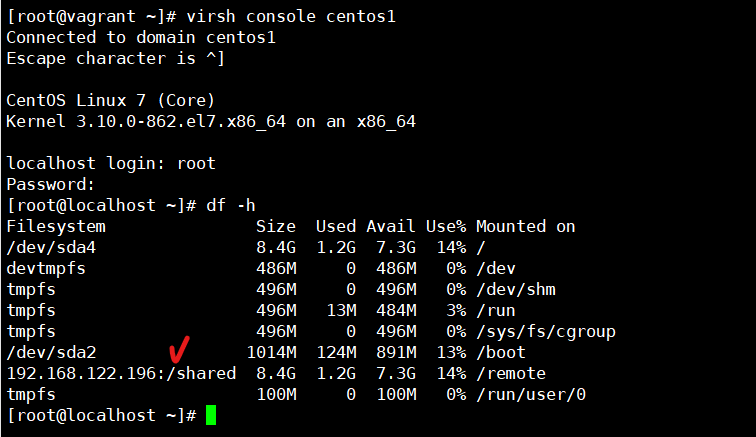
user1:x:1000:1000::/home/user1:/bin/bash- web_inven.txt를 만들어서 centos1 및 centos에는 nginx를 설치 centos3 에는 httpd를 설치하여 접속을 확인해보자.
- 인벤토리 작성
[root@vagrant sim]# vi web_inven.txt

<web_inven.txt>
***
192.168.122.190
192.168.122.42
192.168.122.160
[nginx]
192.168.122.190 192.168.122.42
[httpd]
192.168.122.160
***- yaml 파일 작성
[root@vagrant sim]# vi site.yml

<site.yml>
- name: playbook
  hosts: nginx gather_facts: false
  become: true
  tasks:
	- name: epel-release
      yum:
		name: epel-release
		state: present
	- name: nginx_install
      yum:
		name: nginx
        state: present
	- name: nginx_start
  	  service:
		name: nginx
        state: started
        enabled: true
	- name: firewalld.stop
      service:
     	name: firewalld
        state: stopped
        enabled: false

[root@vagrant sim]# vi httpd.yml

<httpd.yml>
- name: playbook
  hosts: httpd
  gather_facts: false
  become: true tasks:
	- name: epel-release
      yum:
		name: epel-release
		state: present
	- name: httpd_install
      yum:
		name: httpd
        state: present
	- name: httpd_start
      service:
		name: httpd
        state: started
        enabled: true
	- name: firewalld.stop
      service:
		name: firewalld
        state: stopped
        enabled: false


[root@vagrant sim]# ansible nginx -i web_inven.txt -m service -a "name=nginx state=started" -k
[root@vagrant sim]# ansible httpd -i web_inven.txt -m service -a "name=httpd state=started" -k
[root@vagrant sim]# ansible all -i web_inven.txt -m service -a "name=firewalld state=stopped" -k

- 플레이북으로 작성하여 httpd 서버에서는 "httpd server", nginx에서는 "nginx server" 가 나오도록 해보기
[root@vagrant sim]# cat web.yml

<web.yml 플레이북>

- name: Install Epel-release & Stop Firewalld
  hosts: all
  gather_facts: no
  become: yes

  tasks:
    - name: install Epel
      yum:
        name: epel-release
        state: present
    - name: stop firewalld
      service:
        name: firewalld
        state: stopped
        enabled: false

- name: Nginx Install & Start
  hosts: nginx
  gather_facts: no
  become: yes

  tasks:
    - name: install nginx
      yum:
        name: nginx
        state: present
    - name: start nginx
      service:
        name: nginx
        state: started
        enabled: true
    - name: copy nginx-index.html
      copy:
        src: ./nginx-index.html
        dest: /usr/share/nginx/html/index.html

- name: httpd Install & Start
  hosts: httpd
  gather_facts: no
  become: yes

  tasks:
    - name: install httpd
      yum:
        name: httpd
        state: present
    - name: start httpd
      service:
        name: httpd
        state: started
        enabled: true
    - name: copy httpd-index.html
      copy:
        src: ./httpd-index.html
        dest: /var/www/html/index.html

-
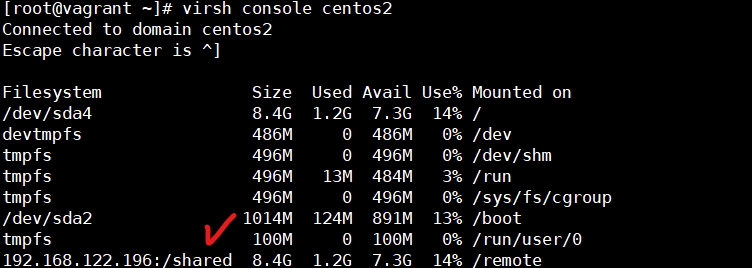
centos 1, 2 는 nfs client 서버로 , centos 3는 nfs 서버로 플레이북을 작성하여 구성하시오
df-h 명령어를 이용하여 마운트 상태를 확인해야 한다. -
기존의 centos 1,2,3 은 삭제하고 구성하시오
1. cp 명령어를 이용하여 centos 이미지 3개를 생성

2. virt install 을 이용해 vm 3 개 생성

3. virsh console 명령어를 이용하여 IP 추적

4. 디폴트 인벤토리 작성 /etc/ansible/hosts/

5. ansible all -m ping

6. ansible all -m ping -k

7. 인벤토리.txt 파일 작성 client , nfs 존 설정

8. nfs.yml 파일 작성
<nfs.yml>

- name: Stop Firewalld
  hosts: all
  gather_facts: no
  become: yes

  tasks:
	- name: stop firewalld
	  service:
		name: firewalld
        state: stopped
        enabled: false

- name: Nfs utils install
  hosts: all
  gather_facts: no
  become: yes

  tasks:
	- name: nfs-utils down
      yum:
		name: nfs-utils
        state: present

- name: nfs_settings
  hosts: nfs
  gather_facts: no
  become: yes

  tasks:
	- name: make nfs_shared directory
		file:
	 	  path: /shared
		  state: directory
          mode: 0777

	- name: add exportfs
 	  lineinfile:
   	 	path: /etc/exports
  	  	line: /shared *(rw)

- name: nfs server restart
  hosts: all
  gather_facts: no
  become: yes

  tasks:
	- name: restarting nfs server
      service:
		name: nfs-server
        state: restarted
        enabled: true

- name: mount
  hosts: client
  gather_facts: no
  become: yes

  tasks:
	- name: making remote directory
		file:
	      path: /remote
          state: directory

	- name: mount
      mount:
		path: /remote
		src: 192.168.122.196:/shared
        fstype: nfs
		opts: nfsvers=3
		state: mounted

무럭무럭 자라볼까