인선미 강사님
그라디오(Gradio) 란,, 사용자가 손쉽게 머신러닝 모델을 웹 인터페이스로 배포할 수 있는 강력한 Python 라이브러리이다. (출처: ChatGPT)
기본 라이브러리 설정
import gradio as gr
from PIL import Image, ImageDraw, ImageFilter
import requests
import io
from dotenv import load_dotenv
from azure.ai.vision.imageanalysis import ImageAnalysisClient
from azure.ai.vision.imageanalysis.models import VisualFeatures
from azure.core.credentials import AzureKeyCredential
import os
라이브러리를 먼저 살펴보면
1. gradio: 오늘의 주인공. 머신러닝 애플리케이션을 간단히 웹으로 배포할 수 있게 해준다. 강사님 피셜 프로토타입으로 써볼만한 라이브러리.
2. PIL (Pillow): 이미지를 처리하고 편집하기 위한 Python 라이브러리.
3. requests: Beautifulsoup 때도 많이 봤던 HTTP 요청 시 사용하는 라이브러리.
4. dotenv: .env 파일에서 환경 변수를 쉽게 불러오는데 도움을 준다. API 키 등 민감한 정보를 안전하게 저장하기 위해 사용. (1차 프로젝트 때 원*은 동기님께 배웠다. ㅎㅎ)
5. azure.ai.vision.imageanalysis: Azure 이미지 분석 서비스랑 상호작용하기 위한 모듈.
- ImageAnalysisClient: Azure 클라이언트로, 이미지를 분석하는 작업 수행.
- VisualFeatures: 어떤 시각적 특징을 분석할지 정의.
6. AzureKeyCredential: Azure API를 사용하기 위해 필요한 인증 객체 제공.
7. os: 환경 변수나 파일 경로 등 운영체제와 관련된 작업을 처리. (임*건 동기님 감사해요우,,)
.env로 보안 강화하기
지금 우리야 공용 아이디(?)를 사용하고 있어서 큰 상관이야 없겠다만, Azure 같은 서비스들은 사용한 만큼 과금이 되기도 하고 중요한 정보를 코드에 직접 작성하는 것(어제 김*영 동기님께 배운 하드코딩)은 보안상 매우 위험하므로 .env 파일을 사용하여 민감한 데이터를 안전하게 관리한다.
load_dotenv()
endpoint = os.getenv("AI_SERVICE_ENDPOINT")
key = os.getenv("AI_SERVICE_KEY")load_dotenv(): 프로젝트 루트 디렉토리에 있는.env파일을 불러온다.os.getenv(): 불러온 환경변수에서 특정 값을 가져온다.
.env파일 작성 방법AI_SERVICE_ENDPOINT=https://<내 ai service>.cognitiveservices.azure.com/ AI_SERVICE_KEY=<내 key>
이거는 최근에 알게된 사실인데 .env 파일은 git 사용시 항상 .gitignore에 추가해서 깃 저장소에 업로드되지 않도록 해야 한다고. (뭐 당연한 거긴 한데 새삼 새롭게,,)
Azure 클라이언트 초기화
client = ImageAnalysisClient(endpoint=endpoint, credential=AzureKeyCredential(key))ImageAnalysisClient: Azure의 이미지 분석 클라이언트endpoint: 우리가 연결할 Azure AI 서비스의 URLAzureKeyCredential(key): API 요청 시 인증을 위한 객체. Azure 포털에서 제공하는 API 키로 올바른 키를 제공하지 않으면 Azure 서비스에 접근할 수 없다.client: 이제client객체를 사용해 Azure AI 서비스의 여러 기능을 호출할 수 있다. (client는 내가 지정한 이름이므로 원하는 이름으로 바꿀 수 있다.)
쉽게 말하자면 클라이언트 초기화를 통해 AI 서비스와 대화를 시작할 준비를 완료한 것.
이미지 분석 함수 만들기
def analyse_image(image_file, detect_objects, detect_people):image_file: 분석할 이미지 파일detect_objects: 객체 감지를 수행할지 여부를 결정하는 Boolean 값detect_people: 사람 감지를 수행할지 여부를 결정하는 Boolean 값
이미지 데이터 읽기
with open(image_file, "rb") as f:
image_data = f.read()- 이미지 파일을 바이너리 데이터로 읽어온다. 이 데이터는 Azure 클라이언트로 보내져 분석될 예정.
VisualFeatures
features = [VisualFeatures.CAPTION]
if detect_objects:
    features.append(VisualFeatures.OBJECTS)
if detect_people:
features.append(VisualFeatures.PEOPLE)VisualFeatures: Azure 이미지 분석에서 사용할 시각적 기능을 지정하는 옵션.
-CAPTION: 이미지에 대한 간단한 설명(캡션)을 생성.OBJECTS: 이미지 속 객체를 감지.PEOPLE: 이미지 속 사람을감지.
if문을 사용해서 사용자가 객체 감지를 활성화했는지, 사람감지를 활성화했는지에 따라 기능을 추가하도록 수업 때 작업했었다.
Azure 클라이언트로 보내기
result = client._analyze_from_image_data(image_data=image_data, visual_features=features)- Azure 클라이언트의
_analyse_from_image_data메서드를 사용해 이미지를 분석. - 클라이언트는 지정된
features(아까 VisualFeatures 기능을 features에 저장했었음) 옵션에 따라 결과를 반환한다.
이미지 분석 결과
여기는 아직 나도 잘 모르고 공부 중이라서 간단하게만 작성.
image = Image.open(image_file)
draw = ImageDraw.Draw(image)- 분석할 이미지를 열고, 결과를 시각적으로 표시하기 위해
ImageDraw객체를 생성한다.
if result.caption:
output_text.append(f"Caption: {result.caption.text} (Confidence: {result.caption.confidence:.2f})")- AI가 생성한 이미지 캡션과 신뢰도를 텍스트로 저장.
if detect_objects and result.objects:
    output_text.append("Objects:")
    for obj in result.objects.list:
        output_text.append(f"  - {obj.tags[0].name} (Confidence: {obj.tags[0].confidence:.2f})")
        box = obj.bounding_box
        draw.rectangle(
            [(box.x, box.y), (box.x + box.width, box.y + box.height)], outline="yellow", width=3
)- 감지된 객체의 이름과 신뢰도를 텍스트로 추가.
- 객체의 바운딩 박스 정보를 사용해 이미지 위에 노란색 상자를 그린다.
if detect_people and result.people:
    output_text.append("People:")
    for person in result.people.list:
        output_text.append(f"  - Confidence: {person.confidence:.2f}")
        box = person.bounding_box
        draw.rectangle(
            [(box.x, box.y), (box.x + box.width, box.y + box.height)], outline="magenta", width=3
)- 감지된 사람들의 신뢰도를 텍스트로 추가.
- 감지된 사람의 위치를 표시하기 위해 보라색 박스를 그린다.
return image, "\n".join(output_text)image: 분석 결과(바운딩 박스)가 그려진 이미지.output_text: 이미지 분석 결과가 포함된 텍스트.
이미지 배경 제거
def remove_background(image_file, mode):image_file: 배경을 제거할 이미지 파일.mode: 배경 제거 방식.
- Azure API의 "backgroundRemoval" or "foregroundMatting" 모드를 설정한다.backgroundRemoval: 배경을 제거한 이미지를 반환.foregroundMatting: 객체 분리
RestAPI 설정
마침 오늘 처음으로 포스트맨에 성공해서 기분이 좋음.
url = f"{endpoint}/computervision/imageanalysis:segment"
headers = {"Ocp-Apim-Subscription-Key": key, "Content-Type": "application/octet-stream"}
params = {"api-version": "2023-02-01-preview", "mode": mode}url: Azure 비전 API의 segment url. 이 API로 이미지에서 배경을 제거하거나 객체를 추출할 수 있다.headers:
-Ocp-Apim-Subscription-Key: Azure API 인증에 필요한 키.Content-Type: 전송할 데이터 형식 지정. 여기서는 이미지를 바이너리 데이터로 보낸다. (application/octet-stream)
params:
- API 호출 시 사용할 쿼리 매개변수.api-version: 사용 중인 API 버전.mode: 배경 제거 방식(backgroundRemoval vs. foregroundMatting)
이미지 데이터 읽기
with open(image_file, "rb") as f:
image_data = f.read()- 이미지를 바이너리 형식으로 읽어온다. 이 데이터는 Azure API에 전송된다.
API 호출
response = requests.post(url, headers=headers, params=params, data=image_data)requests.post:
- API에 HTTP POST 요청을 보낸다.- 필요한 헤더, 매개변수(params), 이미지 데이터를 함께 보낸다.
배경 제거
if response.status_code == 200:
    return Image.open(io.BytesIO(response.content))
else:
    return None
response.status_code == 200:
- API 요청 성공 시 배경 제거 결과 이미지 반환.BytesIO를 통해 메모리 내 바이너리 데이터를 읽어서 Pillow 객체로 변환한다.
- 요청이 실패한 경우 None을 반환한다.
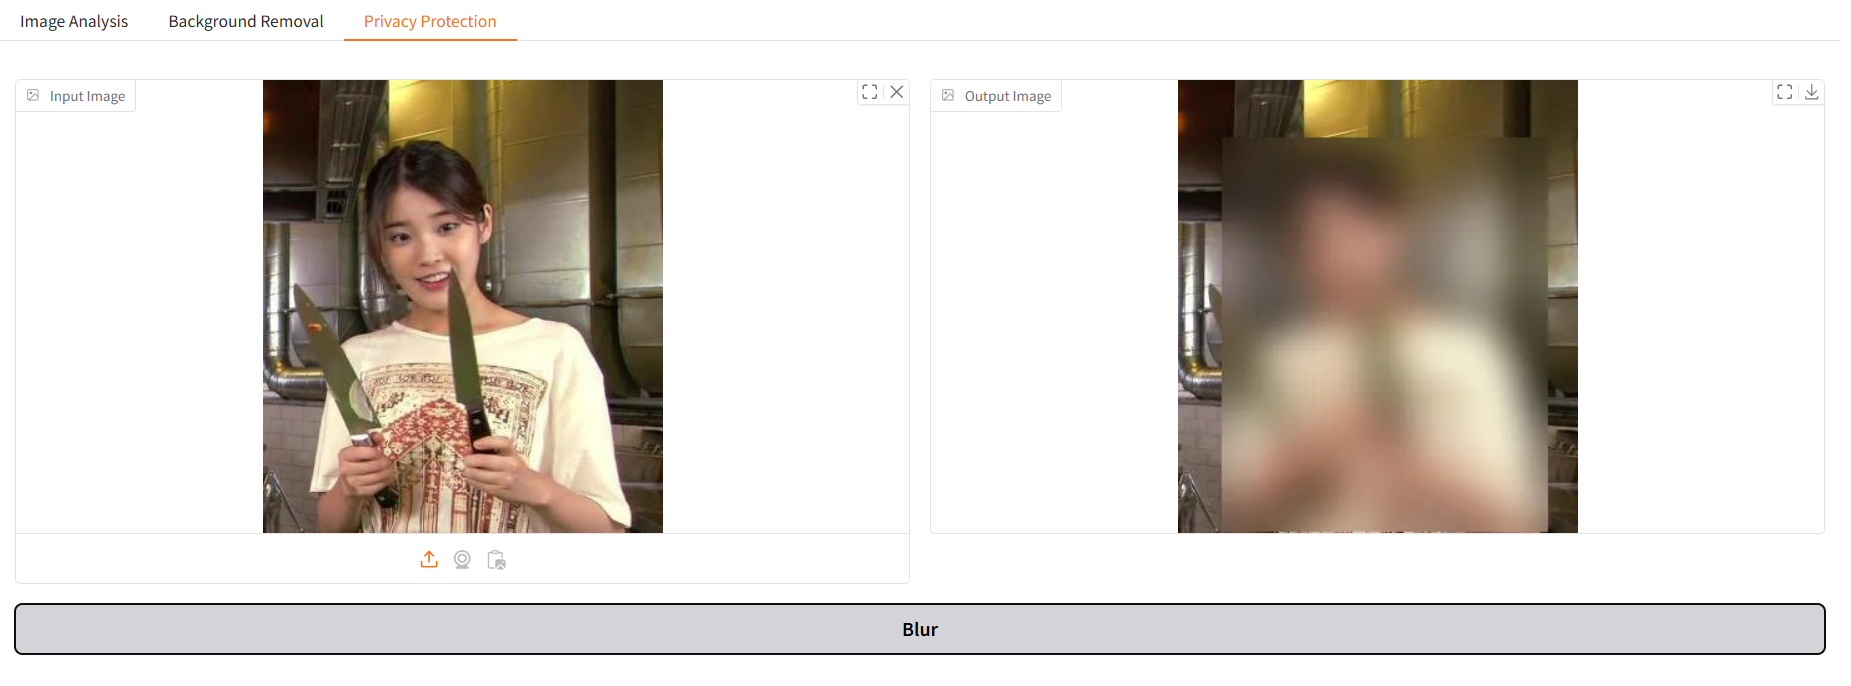
프라이버시 필터링
얼굴만 블러처리하고 싶었지만,, 그거슨 나의 능력 밖의 일으로, 오늘은 사람 전체를 블러링하고, 다음주에 있을 OpenCV 강의를 기다리기로 했다. (배운 내용은 아니고 그냥 내가 해보고 싶어서 써본 코드)
def blur_faces(image_file):image_file: 사람을 흐리게 처리할 이미지 파일.
이미지 읽기
with open(image_file, "rb") as f:
image_data = f.read()- 이미지 바이너리 데이터로 읽어오기. 이것 꽤나 반복되는 것 같은데 함수처리할 수도 있으려나?
사람 감지 요청 보내기
result = client._analyze_from_image_data(image_data=image_data, visual_features=[VisualFeatures.PEOPLE])- 사실 위에 이미지 분석 파트에서 할 수도 있는데 그라디오에서 탭을 나누려고 일부러 함수를 나눴다.
VisualFeatures.PEOPLE: 이미지에서 사람을 감지하는 기능.
원본 이미지 열기
image = Image.open(image_file)- Pillow 라이브러리를 이용해 원본 이미지를 연다. 사람이 감지되면 이 이미지에 블러 효과를 적용할 예정.
- 여기서는 바운딩박스를 그릴 필요가 없으므로 draw는 따로 적지 않았는데, 바운딩 박스를 그리면서 블러링 하고 싶으면 위의 이미지 분석 함수 쪽 참고하면 될듯?
블러 적용
if result.people:
    for person in result.people.list:
        box = person.bounding_box
bbox = [int(box.x), int(box.y), int(box.x + box.width), int(box.y + box.height)]result.people:
- Azure API가 반환한 사람의 위치 정보. 위치는 바운딩 박스(bounding box) 형태로 제공된다. (그리지만 않았을 뿐)- 바운딩 박스 좌표를 읽어온 다음에 정수(int)로 변환하여 흐림 효과를 적용할 영역을 정의.
region = image.crop(bbox)
blurred_region = region.filter(ImageFilter.GaussianBlur(15))
image.paste(blurred_region, bbox) image.crop(bbox): 사람 영역만 잘라내기ImageFilter.GaussianBlur(15):- Gaussian Blur 필터를 사용해 사람 영역을 흐릿하게 만든다.
- 숫자 15는 블러 강도로 값이 클수록 흐림 효과가 강해진다.
image.paste(blurred_region, bbox): 블러 처리된 사람 영역을 원본 이미지에 다시 붙여넣는다.
결과 반환
return image블러처리된 이미지 반환.
그라디오
여기가 오랜만에 블로그를 쓴 목적이므로 좀 더 자세하게 설명해보려고 노력할 예정.
gr.Blocks()
with gr.Blocks() as demo:gr.Blocks: Gradio에서 여러 요소(버튼, 이미지 업로드 등등등)를 체계적으로 배치하는데 사용된다.- 오늘의 코드에서는 탭(Tab) 을 사용해 작업 유형(이미지 분석, 배경 제거, 프라이버시 보호)을 구분한다.
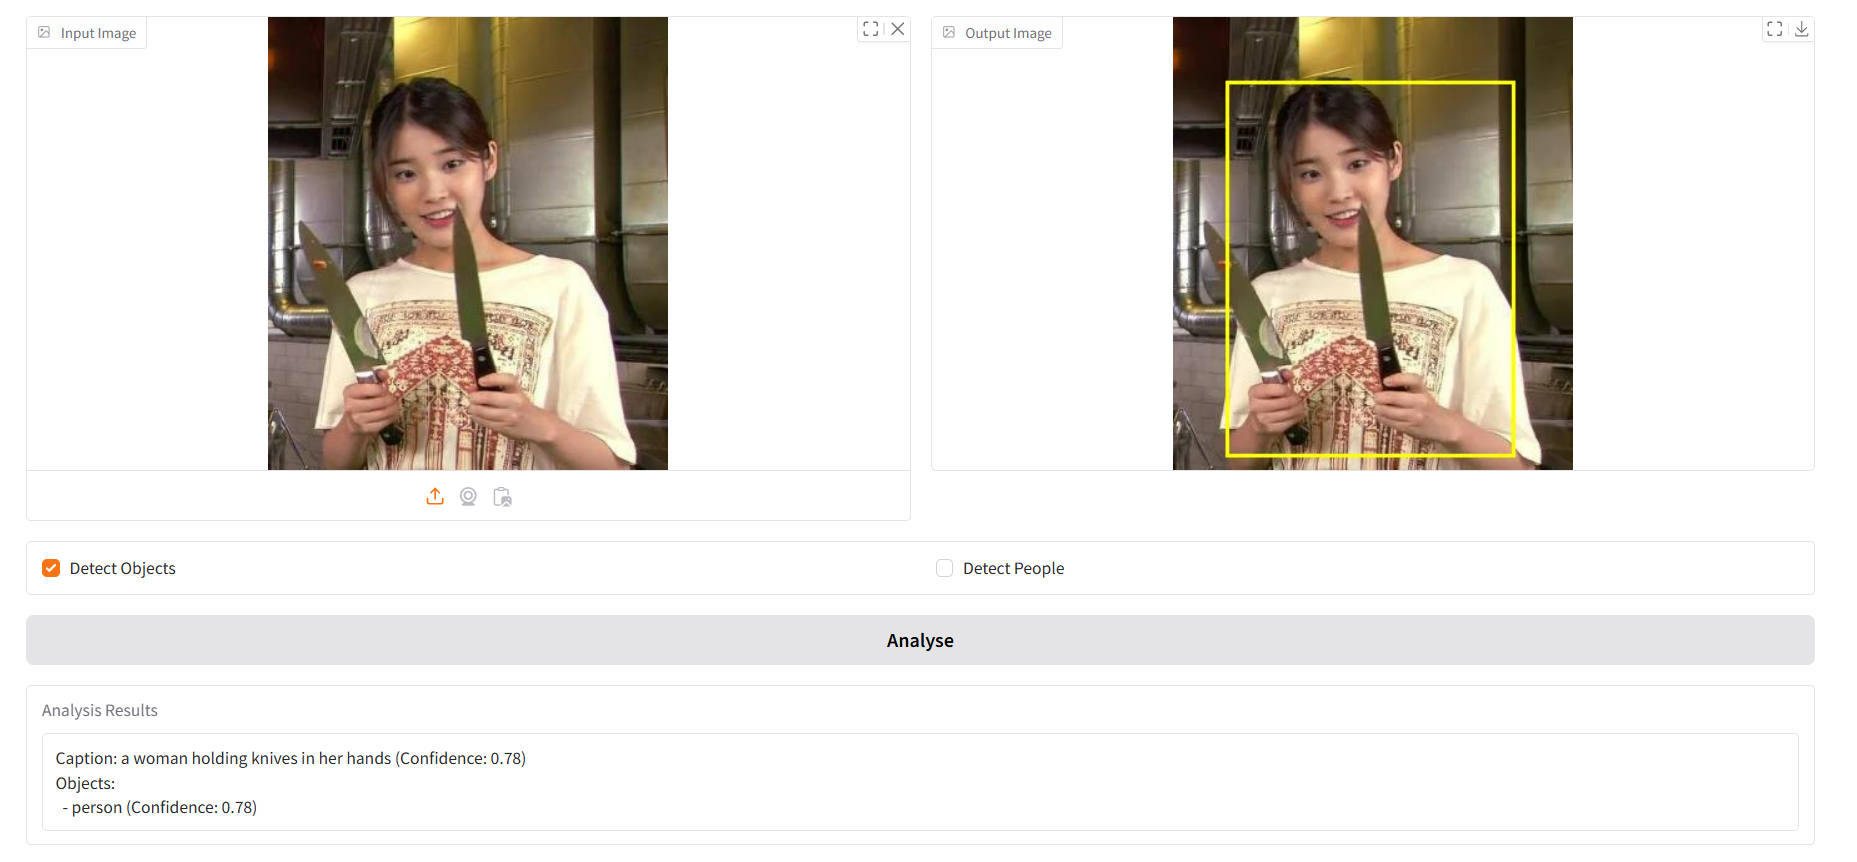
첫번째 탭: Image Analysis
with gr.Tab("Image Analysis"):- 첫 번째 탭은 위에서 구현한 이미지 분석 기능. 사용자가 이미지를 업로드 하고 객체 또는 사람 감지를 선택한 후 분석 결과를 확인할 수 있다.
이미지 입력 및 출력
input_image = gr.Image(label="Input Image", type="filepath")
output_image = gr.Image(label="Output Image")gr.Image:
-label: 요소에 표시될 이름.type="filepath": 업로드된 이미지의 파일 경로를 함수에 전달.
- 사용자는 입력 이미지를 업로드하고 결과 이미지를 확인한다.
체크박스
detect_objects = gr.Checkbox(label="Detect Objects")
detect_people = gr.Checkbox(label="Detect People")gr.Checkbox: 특정 옵션을 켜거나 끌 수 있는 체크박스.- 사용자는 객체 감지와 사람 감지 기능을 선택적으로 활성화할 수 있다.
버튼
analyse_button = gr.Button("Analyse")gr.Button: 사용자가 작업을 실행할 수 있는 버튼.- 버튼을 클릭하면, 입력된 이미지와 옵션을 기반으로 분석 작업이 수행된다.
함수와 연결
analyse_button.click(
    analyse_image,
    inputs=[input_image, detect_objects, detect_people],
    outputs=[output_image, gr.Textbox(label="Analysis Results")]
)click메서드: 위에서 정의한analyse_button클릭시 호출할 함수를 지정.
-inputs:analyse_image함수에 전달될 입력 요소(이미지와 체크박스 값)outputs: 함수가 반환한 분석 결과를 표시할 출력 요소
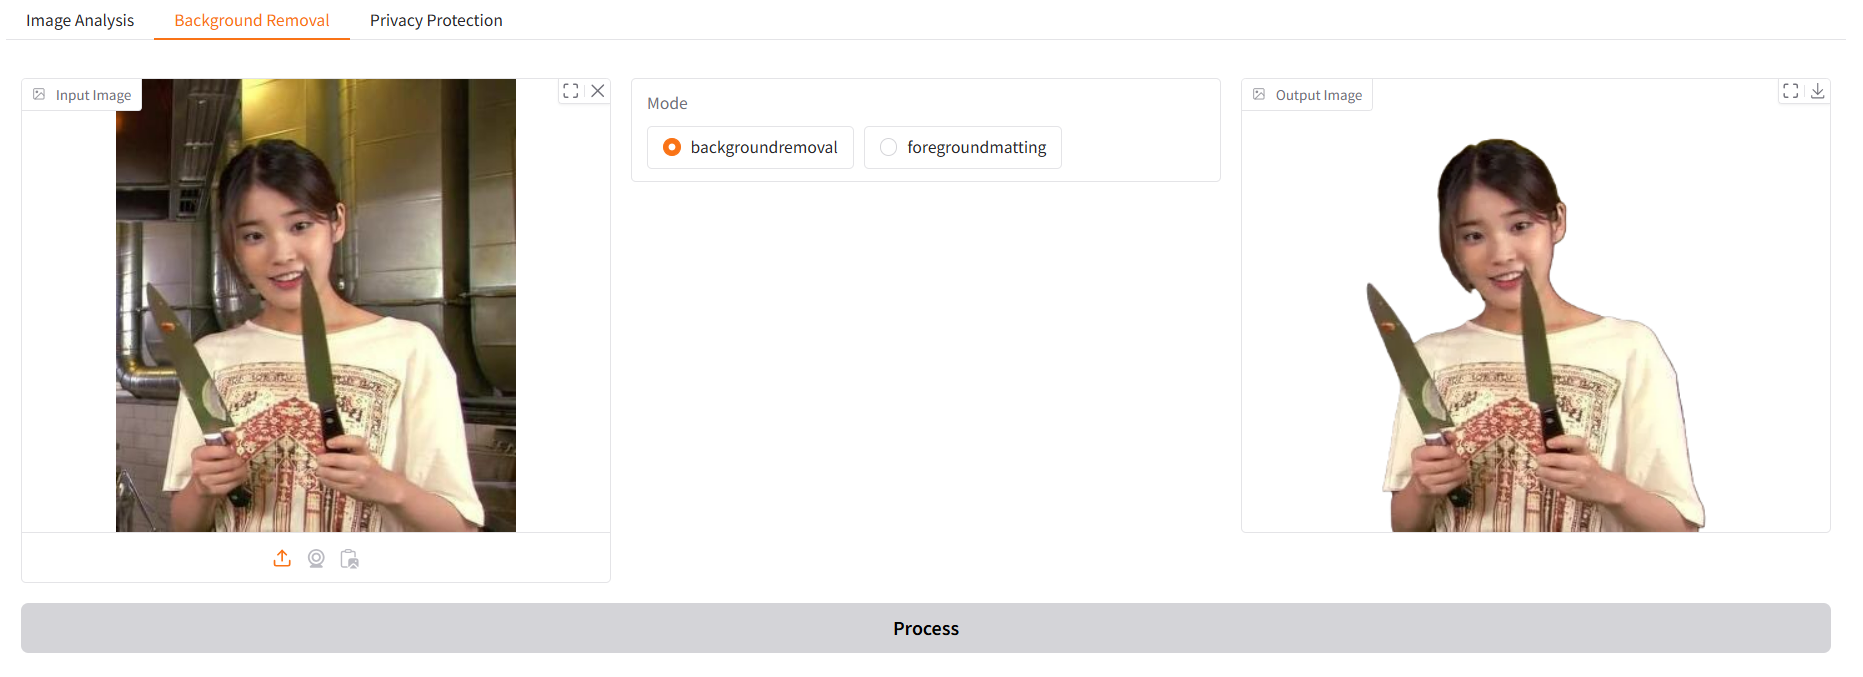
두번째 탭: Background Removal
with gr.Tab("Background Removal"):- 두번째 탭은 배경 제거 기능. 사용자가 업로드한 이미지에서 배경을 제거하거나 전경을 분리한다.
이미지 입력 및 출력
input_image_bg = gr.Image(label="Input Image", type="filepath")
output_image_bg = gr.Image(label="Output Image")
첫번째 탭과 동일. 변수명만 다르게 설정.
라디오 버튼
mode = gr.Radio(
    choices=["backgroundremoval", "foregroundmatting"],
    label="Mode",
    value="backgroundremoval"
)gr.Radio: 오늘 배운 기능이라구.
-choices: 사용 가능한 옵션 제공backgroundremoval: 배경 제거foregroundmatting: 전경 분리value: 기본 값.
- 사용자가 원하는 배경 제거 방식을 선택한다.
버튼
bg_button = gr.Button("Process")첫번째 탭과 동일
함수와 연결하기
bg_button.click(remove_background, inputs=[input_image_bg, mode], outputs=output_image_bg)remove_background함수에 업로드된 이미지와 모드 선택 값을 전달하고 결과 이미지를 출력.
세번째 탭: Privacy Protection
with gr.Tab("Privacy Protection"):- 세번째 탭은 프라이버시 보호 기능으로 이미지에서 사람을 감지하고 흐리게 처리한다.
이미지 입력 및 출력
input_image_blur = gr.Image(label="Input Image", type="filepath")
output_image_blur = gr.Image(label="Output Image")
이제는 뭐 자연스럽쥬.
버튼
blur_button = gr.Button("Blur")함수와 연결하기
blur_button.click(blur_faces, inputs=input_image_blur, outputs=output_image_blur)앱 실행: demo.launch()
demo.launch(share=True)launch: Gradio 앱 실행.
-share=True: 외부에서 접근 가능한 공유 링크 생성.
그래서 오늘의 결론은?
1. 오늘 코드의 기본 구조
gr.Blocks()로 전체 인터페이스 구성- 3개의 탭으로 구분.
1. Image Analysis: 객체/사람 감지 및 이미지 캡션 생성.- Background Removal: 배경 제거 및 객체 분리.
- Privacy Protection: 얼굴 감지 및 블러 처리.
2. 주요 인터페이스 요소
gr.Image: 이미지 업로드/출력gr.Checkbox: 옵션 선택 (예: 객체 감지, 사람 감지)gr.Radio: 모드 선택 (예: 배경 제거 방식)gr.Button: 작업 실행 버튼- 각 버튼은
click메서드로 함수와 연결
3. 각 탭에서 실행시킨 핵심 함수
analyse_image
- 이미지 분석 >> 객체 및 사람 감지, 이미지에 표시
- 결과 텍스트(캡션 및 Confidence)와 함께 반환
remove_background
- 배경 제거 >> 배경 제거 또는 객체 분리
blur_faces
- 사람 흐림 >> 사람 감지 후 블러 처리
4. 실행 방법
demo.launch(share=True)
- 웹 애플리케이션 실행
- share=True로 외부에서 접근 가능한 링크 생성. 셀 실행 시 이 public 링크는 72시간 동안 유효하다고 뜬다. 이 옵션을 주지 않으면 로컬에서 실행 가능한 링크가 생성됨.
코드 모아보기
import gradio as gr
from PIL import Image, ImageDraw, ImageFilter
import requests
import io
from dotenv import load_dotenv
from azure.ai.vision.imageanalysis import ImageAnalysisClient
from azure.ai.vision.imageanalysis.models import VisualFeatures
from azure.core.credentials import AzureKeyCredential
import os

load_dotenv()
endpoint = os.getenv("AI_SERVICE_ENDPOINT")
key = os.getenv("AI_SERVICE_KEY")

client = ImageAnalysisClient(endpoint=endpoint, credential=AzureKeyCredential(key))

def analyse_image(image_file, detect_objects, detect_people):
    with open(image_file, "rb") as f:
        image_data = f.read()

    features = [VisualFeatures.CAPTION]
    if detect_objects:
        features.append(VisualFeatures.OBJECTS)
    if detect_people:
        features.append(VisualFeatures.PEOPLE)

    result = client._analyze_from_image_data(image_data=image_data, visual_features=features)
    image = Image.open(image_file)
    draw = ImageDraw.Draw(image)

    output_text = []

    # Caption
    if result.caption:
        output_text.append(f"Caption: {result.caption.text} (Confidence: {result.caption.confidence:.2f})")

    # Objects
    if detect_objects and result.objects:
        output_text.append("Objects:")
        for obj in result.objects.list:
            output_text.append(f"  - {obj.tags[0].name} (Confidence: {obj.tags[0].confidence:.2f})")
            box = obj.bounding_box
            draw.rectangle(
                [(box.x, box.y), (box.x + box.width, box.y + box.height)], outline="yellow", width=3
            )

    # People
    if detect_people and result.people:
        output_text.append("People:")
        for person in result.people.list:
            output_text.append(f"  - Confidence: {person.confidence:.2f}")
            box = person.bounding_box
            draw.rectangle(
                [(box.x, box.y), (box.x + box.width, box.y + box.height)], outline="magenta", width=3
            )

    return image, "\n".join(output_text)

def remove_background(image_file, mode):
    url = f"{endpoint}/computervision/imageanalysis:segment"
    headers = {"Ocp-Apim-Subscription-Key": key, "Content-Type": "application/octet-stream"}
    params = {"api-version": "2023-02-01-preview", "mode": mode}

    with open(image_file, "rb") as f:
        image_data = f.read()
    response = requests.post(url, headers=headers, params=params, data=image_data)
    if response.status_code == 200:
        return Image.open(io.BytesIO(response.content))
    else:
        return None

def blur_faces(image_file):
    with open(image_file, "rb") as f:
        image_data = f.read()
    result = client._analyze_from_image_data(image_data=image_data, visual_features=[VisualFeatures.PEOPLE])
    image = Image.open(image_file)

    if result.people:
        for person in result.people.list:
            box = person.bounding_box
            bbox = [int(box.x), int(box.y), int(box.x + box.width), int(box.y + box.height)]
            region = image.crop(bbox)
            blurred_region = region.filter(ImageFilter.GaussianBlur(15))
            image.paste(blurred_region, bbox)
    return image

with gr.Blocks() as demo:
    with gr.Tab("Image Analysis"):
        with gr.Row():
            input_image = gr.Image(label="Input Image", type="filepath")
            output_image = gr.Image(label="Output Image")
        with gr.Row():
            detect_objects = gr.Checkbox(label="Detect Objects")
            detect_people = gr.Checkbox(label="Detect People")
        analyse_button = gr.Button("Analyse")
        analyse_button.click(
            analyse_image,
            inputs=[input_image, detect_objects, detect_people],
            outputs=[output_image, gr.Textbox(label="Analysis Results")]
        )

    with gr.Tab("Background Removal"):
        with gr.Row():
            input_image_bg = gr.Image(label="Input Image", type="filepath")
            mode = gr.Radio(
                choices=["backgroundremoval", "foregroundmatting"],
                label="Mode",
                value="backgroundremoval"
            )
            output_image_bg = gr.Image(label="Output Image")
        bg_button = gr.Button("Process")
        bg_button.click(remove_background, inputs=[input_image_bg, mode], outputs=output_image_bg)

    with gr.Tab("Privacy Protection"):
        with gr.Row():
            input_image_blur = gr.Image(label="Input Image", type="filepath")
            output_image_blur = gr.Image(label="Output Image")
        blur_button = gr.Button("Blur")
        blur_button.click(blur_faces, inputs=input_image_blur, outputs=output_image_blur)

demo.launch(share=True)
실행 화면
모두모두 파이팅 :D