
React DnD를 사용하면서 움직임 제어에 고통을 느꼈다..
react-beautiful-dnd 로 피신해보자
⚙️ Setting
npm i react-beautiful-dnd
구조는 정말 쉽다
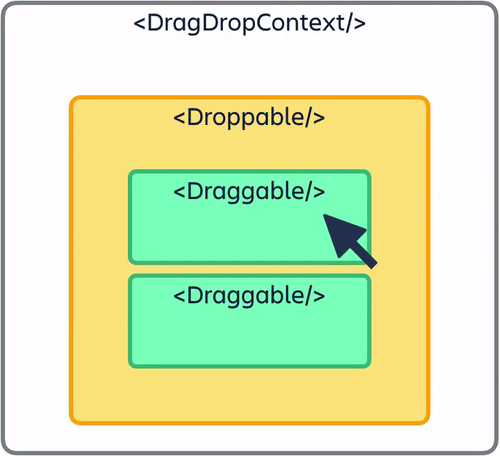
DragDropContext를 감싸주고
Droppable영역을 설정하여
Draggable 가능한 영역을 map으로 돌려주면 끝이다..
파일 구조는
Tab.js
ㄴ DragTab.js 로 잡았다.
📑 최종
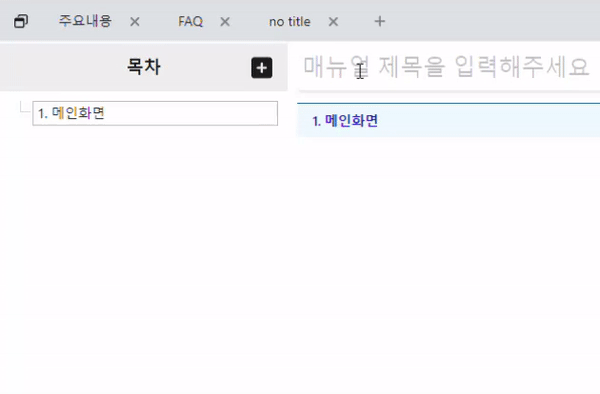
out focus 되면 값이 수정되지 않고 취소 되는 것 과 같은 기능을 구현하였다.
esc를 누르는 것에는 아예 다른 기능에 적용 하였기 때문에 해당 기능에서는 사용하지 않았다.
📀 적용
시작하기에 앞서 필요한 모든 것들을 import 해준다
📂 Tab.js
✔️ Tab.js
ㄴ DragTab.js
//한 페이지에 다 넣을 수 있다.
import { DragDropContext, Droppable, Draggable } from 'react-beautiful-dnd';

//다른 페이지에서도 사용 할 수있게 컴포넌트로 만들었다.
export const RayTab = ({ value, onChange, tabAdd, tabRemove }) => {

//drag & drop 할 값을 넘겨받을 state
const [_tabsInfo, setTabsInfo] = useState();
//DragTab.js 에서 스타일을 바꿀 요소를 선택할 state
const [selectIndex, setSelectIndex] = useState('all');

useEffect(() => {
    if (value) {
      setTabsInfo(value);
    }
}, [value]);

//drag가 완료 될때 array의 값을 새롭게 설정하는 함수
const onDragEnd = (result) => {
    console.debug(result);
    if (!result.destination) {
      return;
    }

  //...(spread operator) 과 비슷한 얕은 복사를 실행하는 Array.from을 사용하였다.
  //이는 공식홈페이지에 있는 기능을 그대로 떄려 박았음..
    const reorderedTabs = Array.from(_tabsInfo);
    const [movedTab] = reorderedTabs.splice(result.source.index, 1);
    reorderedTabs.splice(result.destination.index, 0, movedTab);
    setTabsInfo(reorderedTabs);
  };

    const onClickTest = (index) => {
    setSelectIndex(index);
  };


//수직으로 구성하기 위해서 direction을 horizontal로 선언해준다.
return(
<DragDropContext onDragEnd={onDragEnd}>
  //drag 와 drop을 가능하게하는 영역을 선언한다.
  <Droppable droppableId="_tabsInfo" direction="horizontal">
    //provided는 provided.innerRef를 참조하여 동작을 실행하는 매개변수
    //그 외에도 여러가지 값들을 참조하기에 반드시 들어가야한다.
     {(provided) => (
            <div ref={provided.innerRef}
     				 {...provided.droppableProps}
					 className="horizontal-tabs-container">
              {_tabsInfo &&
                _tabsInfo.map((tab, index) => (
                  <Draggable key={tab.TAB_KEY} draggableId={tab.TAB_KEY} index={index}>
                    {(provided) => (
                      <div ref={provided.innerRef}
                    		   {...provided.draggableProps}
							   {...provided.dragHandleProps}>

                        //실제로 drag가 실행될 요소
                        // DragTab및 Draggable 에서 onClick이 먹히지 않아서 새로운 div를 만들어 click을 받아 Css를 재정의 할 index를 내려주었다.
                        <div className="clickDragTab" onClick={() => onClickTest(index)}>
                        <DragTab
                          onChange={onChange}
                          selectTabKey={tab.TAB_KEY}
                          tab={tab}
                          index={index}
                          tabRemove={tabRemove}
                        />
                      </div>
                    )}
                  </Draggable>
                ))}
              {provided.placeholder}
            </div>
          )}


 </Droppable>
</DragDropContext>
)
📂 DragTab.js
해당 기능은 기존에 dnd에 넣었던 것들과 동일하다 단순히 useDrag useDrop을 완전히 뺐다.
🔔 active
Tab.js로 물려받은 props인 selectIndex를 통해서 스타일컴포넌트인 StyledRayDragTab에 active를 추가하였다.
<StyledRayDragTab active={selectIndex === index}>해당 값은 styled-componented에 prop로 받을 수 있기 때문에 css변경이 용이하다. 선택된 요소의 CSS를 변경해주어 현재 위치를 확인 할 수 있는 UI를 넣었다.
export const StyledRayDragTab = styled.div`
  /* &:hover {
    border-top: 2px solid black;
  } */
  ${(props) =>
    props.active &&
    css`
      .hoverTopBorder {
        background-color: black;
      }
    `}
📑 완성

그으렇 다면 코드를 보자
Tab.js
ㄴ ✔️ DragTab.js
import { useState, useRef, useEffect } from 'react';
import { Input } from 'antd';
import { StyledRayDragTab } from './styled';

export const DragTab = ({ tab, index, tabRemove, onChange, selectTabKey, selectIndex }) => {
  const [editedLabel, setEditedLabel] = useState(tab.LABEL);
  const [changeIndex, setChangeIndex] = useState();

  console.debug(selectIndex);

  const ref = useRef(null);
  //더블클릭시 이름 변경 실행
  const handleTabClick = (index) => {
    setChangeIndex(index);
  };
  //아웃 포커싱될 때 이름변경 해제
  const onBlur = () => {
    setChangeIndex();
    setEditedLabel(tab.LABEL);
  };
  //엔터 클릭시 이름변경 해제
  const handleOnKeyDown = (e) => {
    if (e.key === 'Enter') {
      setChangeIndex();
      tab.LABEL = editedLabel;
    }
  };

  return index === changeIndex ? (
    <StyledRayDragTab>
      <Input
        value={editedLabel}
        style={{ width: `${editedLabel.length * 10}px`, minWidth: '100px' }}
        onChange={(e) => setEditedLabel(e.target.value)}
        onBlur={onBlur}
        onKeyDown={handleOnKeyDown}
      />
    </StyledRayDragTab>
  ) : (
    <StyledRayDragTab active={selectIndex === index}>
      <div className="dragTabZone" ref={ref} onClick={() => onChange(tab.TAB_KEY)}>
        <div className="hoverTopBorder"></div>
        <div style={{ display: 'flex', marginBottom: '8px', marginTop: '8px' }}>
          <div className="labelName" onDoubleClick={() => handleTabClick(index)}>
            {tab.LABEL}
          </div>
          <div className="removeButton" onClick={tabRemove}>
            <i class="fa-solid fa-xmark"></i>
          </div>
        </div>
      </div>
    </StyledRayDragTab>
  );
};
📐 CSS
css도 아예 새로 만들었기 때문에 같이 적용하였다.
📂 Tab-styled.js
Tab.js
✔️Tab-styled.js
ㄴ DragTab.js
ㄴ DragTab-styled.js
import styled from 'styled-components';

export const StyledRayTab = styled.div`
  width: 100%;
  height: 42px;
  display: flex;

  .hoverTopBorder {
    height: 2px;
    &:hover {
      height: 0px;
      border: 1px solid black;
    }
  }
  .tabItemPlus {
    min-width: 50px;
    margin-left: 1px;
    display: flex;
    justify-content: center;
    align-items: center;
    color: gray;
    cursor: pointer;
    &:hover {
      color: black;
    }
  }

  .horizontal-tabs-container {
    display: flex;
  }
`;
📂 DragTab-styled.js
Tab.js
Tab-styled.js
ㄴ DragTab.js
ㄴ ✔️DragTab-styled.js
import styled, { css } from 'styled-components';

export const StyledRayDragTab = styled.div`
  min-width: 100px;
  height: 100%;
  display: flex;
  justify-content: center;
  align-items: center;
  cursor: pointer;
  /* &:hover {
    border-top: 2px solid black;
  } */
  ${(props) =>
    props.active &&
    css`
      .hoverTopBorder {
        background-color: black;
      }
    `}
  .labelName {
    margin: 0 8px 0 17px;
  }
  .hoverTopBorder {
    height: 2px;
    &:hover {
      height: 0px;
      border: 1px solid black;
    }
  }

  .removeButton {
    margin: 0 17px 0 10px;
    border: none;
    background-color: none;
    font-size: 15px;
    font-weight: bolder;
    color: gray;
    cursor: pointer;
    &:hover {
      color: black;
    }
  }

  .dragTabZone {
    width: 100%;
    height: 100%;
    display: flex;
    flex-direction: column;
    justify-content: space-between;
    align-items: center;

    .hoverTopBorder {
      height: 2px;
      width: 100%;
    }
    &:hover {
      .hoverTopBorder {
        background-color: black;
      }
    }
  }
`;
🚨 Error
아래와 같이 droppable entry with id 에러가 발생 할 수 있다.
Invariant failed: Cannot find droppable entry with id [...]
at handleError (http://localhost:3100/static/js/bundle.js:70851:58)
at http://localhost:3100/static/js/bundle.js:70870:7
🔔 solution
📂 index.js
index.js에서 <React.StrictMode>를 제거해주면 된다
const root = ReactDOM.createRoot(document.getElementById("root"));
root.render(
  //<React.StrictMode>
    <App />
  // </React.StrictMode>
);