ant.Design 에서 사용한 tab 기능에 Drag and Drop 기능을 넣어주려고 한다.
⚙️ Setting
사용 전 install 해준다
npm install react-dnd react-dnd-html5-backend
react-dnd와 react-dnd-html5-backend 가 있는데 react-dnd-html5-backend 에서 사용할 수 있는 HTML5Backend와 react-dnd에서 사용할 수 있는 DndProvider를 import 하여 전체를 감싸주면서 시작한다.
<DndProvider backend={HTML5Backend}>
       <AntTabs />
</DndProvider>
기본적인 컴포넌트 구조는
Panel.js
ㄴTabPanel.js(antDesign)
ㄴDragPanel.js
TabPanel 에서는 배열값인 _tabsInfo를 Panel에서 state로 받아와서 .map 하여 값을 하나하나 읽는데, 이 때 return 값 중 label을 DragPanel.js 통해서 그려준다.
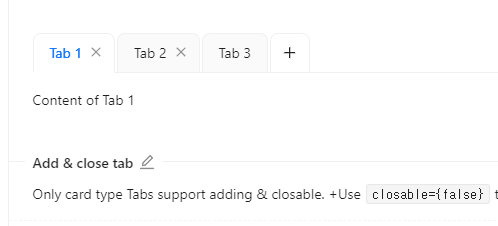
사실 단순히 map을 돌린 후 return div를 쓰는 일반적인 방법을 택해도 됐었지만 좀 더 디자인 적인 요소를 가미하기 위해 ant.Design에서 tabs 기능을 추가하여 items 값으로 출력을 잡았다 onEdit을 통해 자동으로 Add와 Remove기능을 커스텀 할 수 있어 편했다. 해당 기능은 컴포넌트 밖인 부모 페이지에서 설정을 하였기에 props로 내려주었다.
📂 TabPanel.js
Panel.js
ㄴ ✔️ TabPanel.js(antDesign)
ㄴDragPanel.js
const TabPanel = ({ tabInfos, onChange, tabAdd, tabRemove }) => {
  const [_tabsInfo, setTabsInfo] = useState();

  //부모의 props로 받아온 tabInfos를 useEffect를 통해서 state값에 넣어준다.
  useEffect(() => {
    if (tabInfos) {
      setTabsInfo([...tabInfos]);
    }
  }, [tabInfos]);

  //선택한 기능을 onEdit를 통해 전달받는다
  //antDesign -tabs의 순기능
  const onEdit = (targetKey, action) => {
    if (action === 'add') {
      tabAdd(targetKey, action);
    } else {
      tabRemove(targetKey, action);
    }
  };

  //자식페이지인 DragPanel.js에서 전달받은 이동하기전 위치인 index(dragIndex)와
  //이동해야할 index(hoverIndex)를 props로 전달받는다.
  const onMoveContent = (dragIndex, hoverIndex) => {
    console.debug('move', dragIndex, hoverIndex);
    setTabsInfo((prev) =>
      update(prev, {
        $splice: [
          [dragIndex, 1],
          [hoverIndex, 0, prev[dragIndex]],
        ],
      })
    );
  };


return (
  <DndProvider backend={HTML5Backend}>
     <AntTabs
          items={
            _tabsInfo &&
            _tabsInfo.map((tab, index) => {
              return {
                label: <DragPanel
                		tab={tab}
              			index={index}
              			onMoveContent={onMoveContent} />,
                key: tab.TAB_KEY,
              };
            })
          }
          onChange={onChange}
          onEdit={onEdit}
        />
      </DndProvider>
  )
📂 Panel.js
✔️ Panel.js
ㄴTabPanel.js(antDesign)
ㄴDragPanel.js
const Edit = () => {
  const [tabKey, setTabKey] = useState('tab1');
  //init은 edit밖에 설정한 기본 값이다
  //init 자체는 배열로 내부 배열의 순서는 tabInfos라고 명한 배열과(객체의 모음)
  //tocList라고 명한 객체(객체의 모음)으로 이루어져있다.
  //그렇기에 immutability-helper 를 이용한 .splice()
  const [content, setContent] = useState(init);
  const [selectIndex, setSelectIndex] = useState('all');

  //선택한 tab의 key를 가져와 본문에 뿌려준다.
  const onTabChange = (key) => {
    setSelectIndex(key);
    setTabKey(key);
  };


//각각의 add와 remove는 action과 targetKey를 props로 전달받는다.
  const tabAdd = (targetKey, action) => {
    const randomKey = uuid();
    const { tabInfos } = content;
    const addInitInfo = {
      TAB_KEY: randomKey,
      LABEL: 'no title',
      POS: tabInfos.length + 1,
    };

  //배열에 값을 추가한다.
  setContent((prev) =>
      update(prev, {
        tabInfos: { $push: [addInitInfo] },
        tocList: { $merge: { [randomKey]: [] } },
      })
    );
  };

  const tabRemove = (targetKey, action) => {
    //targetKey 는 TAB_KEY 값이 전달된다.
   	//선택한 키와 배열의 index를 찾아 해당 index의 TAB_KEY를 비교하여 일치하는 값의 요소를 삭제한다.
    const delTabInfos = content.tabInfos.findIndex((f) => f.TAB_KEY === targetKey);
    //tocList객체 삭제
    delete content.tocList[targetKey];
	//tabInfos 배열을 삭제한다.
    setContent((prev) =>
      update(prev, {
        tabInfos: { $splice: [[delTabInfos, 1]] },
      })
    );
  };

  return (
    <StyledManual>
        <div className="tab-panel">
        <TabPanel
          tabInfos={content.tabInfos}
          onChange={onTabChange}
          tabAdd={tabAdd}
          tabRemove={tabRemove}
          selectIndex={selectIndex}
        />
      </div>
      <div className="content-panel">
        <ContentPanel
		  tocList={content.tocList[tabKey]}
          onChangeTree={onChangeTree}
		  onCreateIndex={onCreateIndex}
		/>
      </div>
    </StyledManual>
  );
}
📀 적용
📂 DragPanel.js
Panel.js
ㄴTabPanel.js(antDesign)
ㄴ✔️ DragPanel.js
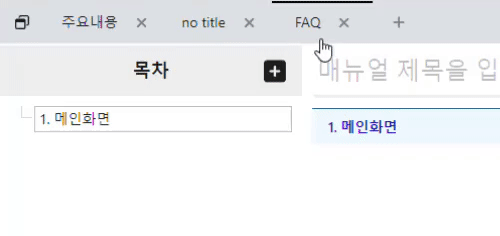
TabPanel.js에서 return값으로 출력되는 DragPanel는 React DnD가 실행되는 페이지다.
기본적으로 useDrag와 useDrop을 이용하여 이동할 값의 순서를 변경하게 되는데 직접 값을 바꾸는 컴포넌트는 위에 TabPanel.js에서 선언한 onMoveContent 에서 이루어진다.
배열의 이름을 변경하기 위한 기능을 추가하였기에 state인 changeIndex 를 이용하여 해당 선택되어진 배열의 요소만 return 값을 달리하도록 설정하였다. 제목을 수정할 값을 입력받는 Input 의 크기 또한 value 값의 길이에 따라 조정되게 설정하였으며 focus Out 기능인 onBlur를 통해서 포커싱이 아웃 될 때의 기능과 enter 값을 받아 값을 수정할 수 있는 함수를 onKeyDown 에 추가하였다.
import { useState, useRef } from 'react';
import { useDrag, useDrop } from 'react-dnd';
import { Input } from 'antd';

const DragPanel = ({ tab, index, onMoveContent }) => {
  const [editedLabel, setEditedLabel] = useState(tab.LABEL);
  const [changeIndex, setChangeIndex] = useState();
  const ref = useRef(null);

  //더블클릭시 이름 변경 실행
  const handleTabClick = (index) => {
    setChangeIndex(index);
  };
  //아웃 포커싱될 때 이름변경 해제
  const onBlur = () => {
    setChangeIndex();
    setEditedLabel(tab.LABEL);
  };
  //엔터 클릭시 이름변경 해제
  const handleOnKeyDown = (e) => {
    if (e.key === 'Enter') {
      setChangeIndex();
      tab.LABEL = editedLabel;
    }
  };

  const [{ isDragging }, drag, previewRef] = useDrag(() => {
    return {
      type: 'content-item',
      item: { activeType: 'content-item', index },
      // end: (item, monitor) => {
      //   const didDrop = monitor.didDrop();
      //   const dragIndex = item.index;
      //   const hoverIndex = index;
      //   console.debug('drag', dragIndex, hoverIndex);
      //   if (!didDrop) {
      //     moveContent(dragIndex, hoverIndex);
      //   }
      //   item.index = hoverIndex;
      // },
      collect: (monitor) => {
        return { isDragging: monitor.isDragging() };
      },
    };
  });

  const [{ handlerId }, drop] = useDrop({
    accept: 'content-item',
    collect(monitor) {
      return {
        handlerId: monitor.getHandlerId(),
      };
    },
    hover: (item, monitor) => {
      if (!ref.current) {
        return;
      }
      const dragIndex = item.index;
      const hoverIndex = index;
      if (dragIndex === hoverIndex) {
        return;
      }

      const hoverBoundingRect = ref.current?.getBoundingClientRect();
      const hoverMiddleX = (hoverBoundingRect.right - hoverBoundingRect.left) / 2;
      const clientOffset = monitor.getClientOffset();

      // console.debug('drop monitor', monitor);
      console.debug('drop cliend Offset', clientOffset);
      console.debug('drop getBoundingClientRect right', hoverBoundingRect.right);

      if (!clientOffset) {
        return null;
      }
      const hoverClientX = clientOffset.x - hoverBoundingRect.left;
      if (dragIndex < hoverIndex && hoverClientX < hoverMiddleX) {
        return;
      }
      if (dragIndex > hoverIndex && hoverClientX > hoverMiddleX) {
        return;
      }

      console.debug('drop', dragIndex, hoverIndex);
      const didDrop = monitor.didDrop();
      if (!didDrop) {
        onMoveContent(dragIndex, hoverIndex);
      }

      item.index = hoverIndex;
    },
  });

  const opacity = isDragging ? 0.3 : 1;
  drag(drop(ref));

  return index === changeIndex ? (
    <Input
      value={editedLabel}
      style={{ width: `${editedLabel.length * 10}px`, minWidth: '100px' }}
      onChange={(e) => setEditedLabel(e.target.value)}
      onBlur={onBlur}
      onKeyDown={handleOnKeyDown}
    />
  ) : (
    <div ref={previewRef} style={{ opacity: isDragging ? '0.3' : '1' }}>
      <div style={{ opacity }} data-handler-id={handlerId} ref={ref} onDoubleClick={() => handleTabClick(index)}>
        {tab.LABEL}
      </div>
    </div>
  );
};

export default DragPanel;
📑 const useDrag()
{ isDragging } : 드래깅이 될 때 해당 값은 true로 바뀌게된다
drag : 실행되어지는 요소에 ref값으로 들어갈 수 있다.
previewReg :
- type : 해당 값은 drop의 accept값과 맞추어야한다
- item : end에서 인자로 받아질 item 값을 설정한다.
- end : drag가 완료 될 때 실행되어지는 값이다.
- monitor : DND는 항상 상태를 체크하고 확인하고 갱신해야한다. 해당 값에는 여러 state 값을 이용하여 item이 어떤 상태인지 체크한다.
- monitor 안에 담겨있는 state를 이용해 canDrop 상태이면 highlighted를, isOver 상태이면 hovered를 반환하도록 설정 가능 - collect : monitor값을 검색하여 활용 할 수 있다.
  const [{ isDragging }, drag, previewRef] = useDrag(() => {
    return {
      type: 'content-item',
      item: { activeType: 'content-item', index },
      // end: (item, monitor) => {
      //   const didDrop = monitor.didDrop();
      //   const dragIndex = item.index;
      //   const hoverIndex = index;
      //   console.debug('drag', dragIndex, hoverIndex);
      //   if (!didDrop) {
      //     moveContent(dragIndex, hoverIndex);
      //   }
      //   item.index = hoverIndex;
      // },
      collect: (monitor) => {
        return { isDragging: monitor.isDragging() };
      },
    };
  });
📑 const useDrop()
- accept : 해당 값은 drag의 type 맞추어야한다.
- hover : 해당 기능을 통해 hover되는 값과 기존 값(item)을 이용하여 값을 이동할 수 있다.
dnd는 위치가 바뀔 요소들의 크기가 다를 때 무한으로 hover가 발생할 수 있다.
출처 : https://channel.io/ko/blog/react-dnd-tips-tricks

그렇기에 getBoundingClientRect()와 monitor의 getClientOffset()를 통해
현재 해당 요소의 값과 monitor 위치를 비교하여 해당 요소의 절반이상을 지났을 때
hover가 실행될 수 있도록 설정하였다.
const [{ handlerId }, drop] = useDrop({
    accept: 'content-item',
    collect(monitor) {
      return {
        handlerId: monitor.getHandlerId(),
      };
    },
    hover: (item, monitor) => {
      if (!ref.current) {
        return;
      }
      const dragIndex = item.index;
      const hoverIndex = index;
      //현재 위치(index)와 바꿀 위치가 같다면 return
      if (dragIndex === hoverIndex) {
        return;
      }

      //무한 hover를 방지하기 위한 요소의 위치와 monitor의 위치를 비교한 값.
      const hoverBoundingRect = ref.current?.getBoundingClientRect();
      const hoverMiddleX = (hoverBoundingRect.right - hoverBoundingRect.left) / 2;
      const clientOffset = monitor.getClientOffset();
      const hoverClientX = clientOffset.x - hoverBoundingRect.left;

      if (!clientOffset) {
        return null;
      }

      if (dragIndex < hoverIndex && hoverClientX < hoverMiddleX) {
        return;
      }
      if (dragIndex > hoverIndex && hoverClientX > hoverMiddleX) {
        return;
      }

      const didDrop = monitor.didDrop();
      if (!didDrop) {
        onMoveContent(dragIndex, hoverIndex);
      }

      item.index = hoverIndex;
    },
  });
🪲 마치며
어렵다 ㅡㅡ 다양한 기능들을 사용할 수 있으며 monitor를 통해 세세한 설정이 가능하지만 진입 장벽이 꽤 있음.... vertical이 아닌 horizontal 로 만들었더니 계속 width 값을 제대로 잡지 못하여 발생되는 오류가 있었다... 프로젝트에서는 beautiful-dnd 로 새로 만들어 최종 적용할 예정...