- 2024.01.25 -
이틀동안 어김없이 삽질을 해온 나, 자랑스럽다...
ROS1에서는 아두이노, STM 등의 MCU와 통신하기 위해서 ROSSerial을 사용한다.
하지만, ROS2에서는 MICRO-ROS로 전환되었다.
MICRO-ROS로 전환되면서 다양한 이점이 생겼다.
기존의 ROSSeiral을 통해서는 시리얼통신만 가능했었지만,
MICRO-ROS로 넘어오게 되면서 CAN, ethernet, Wi-Fi로도 통신이 가능하게 되었다고 한다.
[MICRO-ROS 정보 출처]
*물론 ROS2 환경에서 ROSSerial로도 통신이 가능하다!
하지만, 나온지 얼마 되지 않았기 때문에 MICRO-ROS가 지원되는 보드가 그렇게 많지 않다는 것이 단점이다.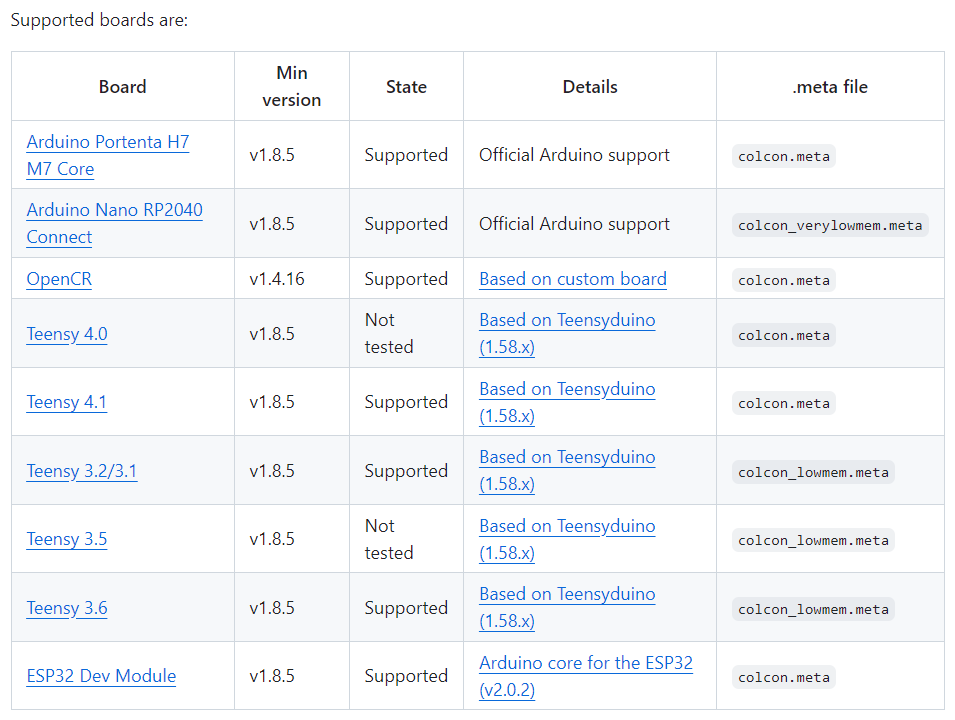
 MICRO-ros(gitHub) 라이브러리에 대한 정보를 확인해보면 Arduino는 ortenta, Nano, Due, Zero만 지원되는 것을 확인할 수 있다.
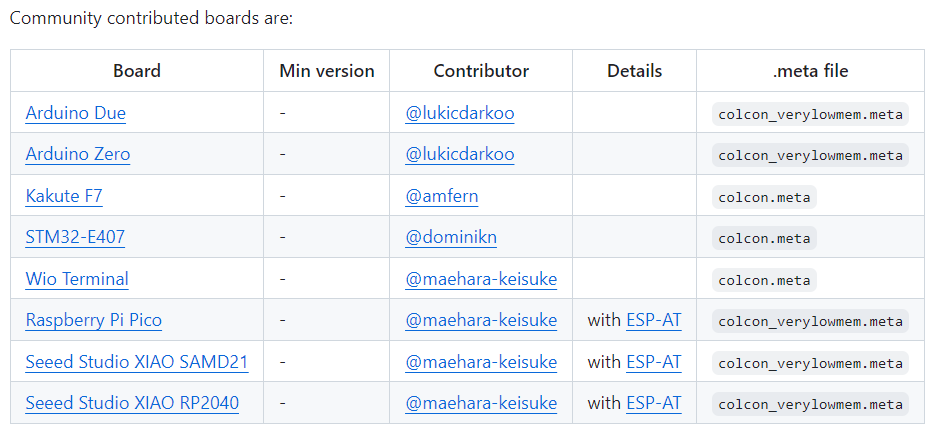
Arduino Due와 Zero도 호환이 되도록 해주신 훌륭한 개발자님들이 여러가지 다른 보드로 MICRO-ROS가 가능해지도록 해주시지 않을까 생각한다... 항상 감사합니다...
나는 Arduino uno R4 minima 보드와 Linux환경의 ROS2 통신을 원했지만,
Arduino uno R4 minima로는 MICRO-ROS가 불가능 -> 통신도 어렵다는 것을 확인했다.
- 2024.01.31 -
1. Arduino-IDE 아이콘
Arduino-IDE를 Ubuntu환경에 설치를 완료했지만
아이콘이 생성되지 않아 IDE실행할 때마다 터미널에 명령어를 쳐야하는 번거로움이 생겼다.
그래서 나는 다음 게시물을 참고하여 아두이노 바로가기 아이콘을 생성하였다.
아두이노 IDE 바로가기 아이콘 참고
2. micro-ROS Package 설치
다음과 같은 과정을 거쳐 micro-ROS 패키지를 설치패보았다.
과정은 다음 게시글을 참고하였다. micro-ROS 패키지 설치 참고
2-1. 본인의 workspace 활용하여 패키지 설치
cd ~/ros2_ws/src
git clone -b $ROS_DISTRO https://github.com/micro-ROS/micro_ros_setup.git

sudo apt update && rosdep update
rosdep install --from-paths src --ignore-src -y

sudo apt-get install python3-pip
2-2. micro-ROS tools과 source 빌드
cd ..
colcon build --packages-select micro_ros_setup
source install/local_setup.bash
2-3. micro-ROS agent package 설치
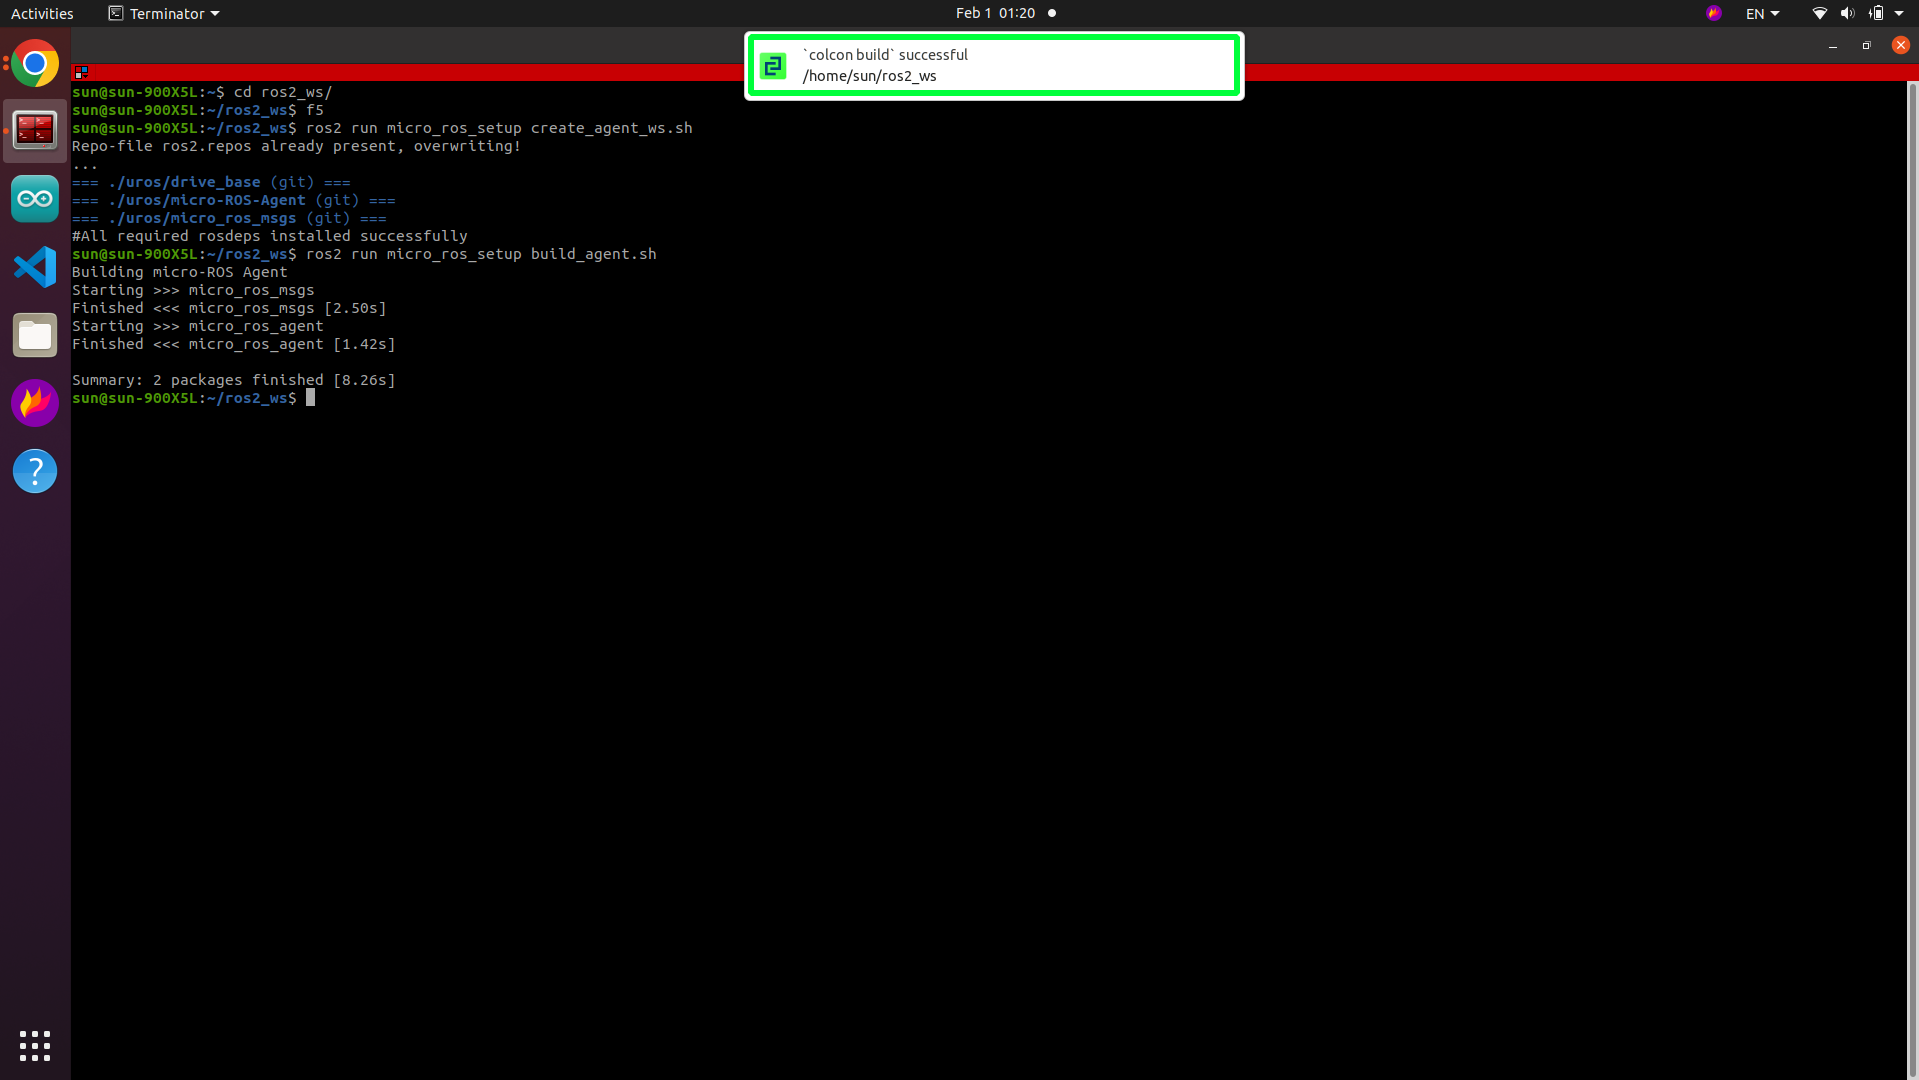
ros2 run micro_ros_setup create_agent_ws.sh

ros2 run micro_ros_setup build_agent.sh
source install/local_setup.bash- agent 패키지가 제대로 설치 됐을 경우

2-4. 설치 완료 후 test
ros2 run micro_ros_agent micro_ros_agent serial --dev /dev/ttyACM0- 설치가 완료된 경우 (아두이노가 연결되지 않은 경우)

- 설치가 완료된 경우 (아두이노가 연결되어 있는 경우)

- 2024.02.01 -
2-5. arduino-IDE tool library download
나는 ros-foxy 2.0.5 버전으로 다운받았다.
다운 받은후, IDE에서
Sketch → Include library → Add .ZIP Library
를 통해 다운로드한 라이브러리를 추가해준다.
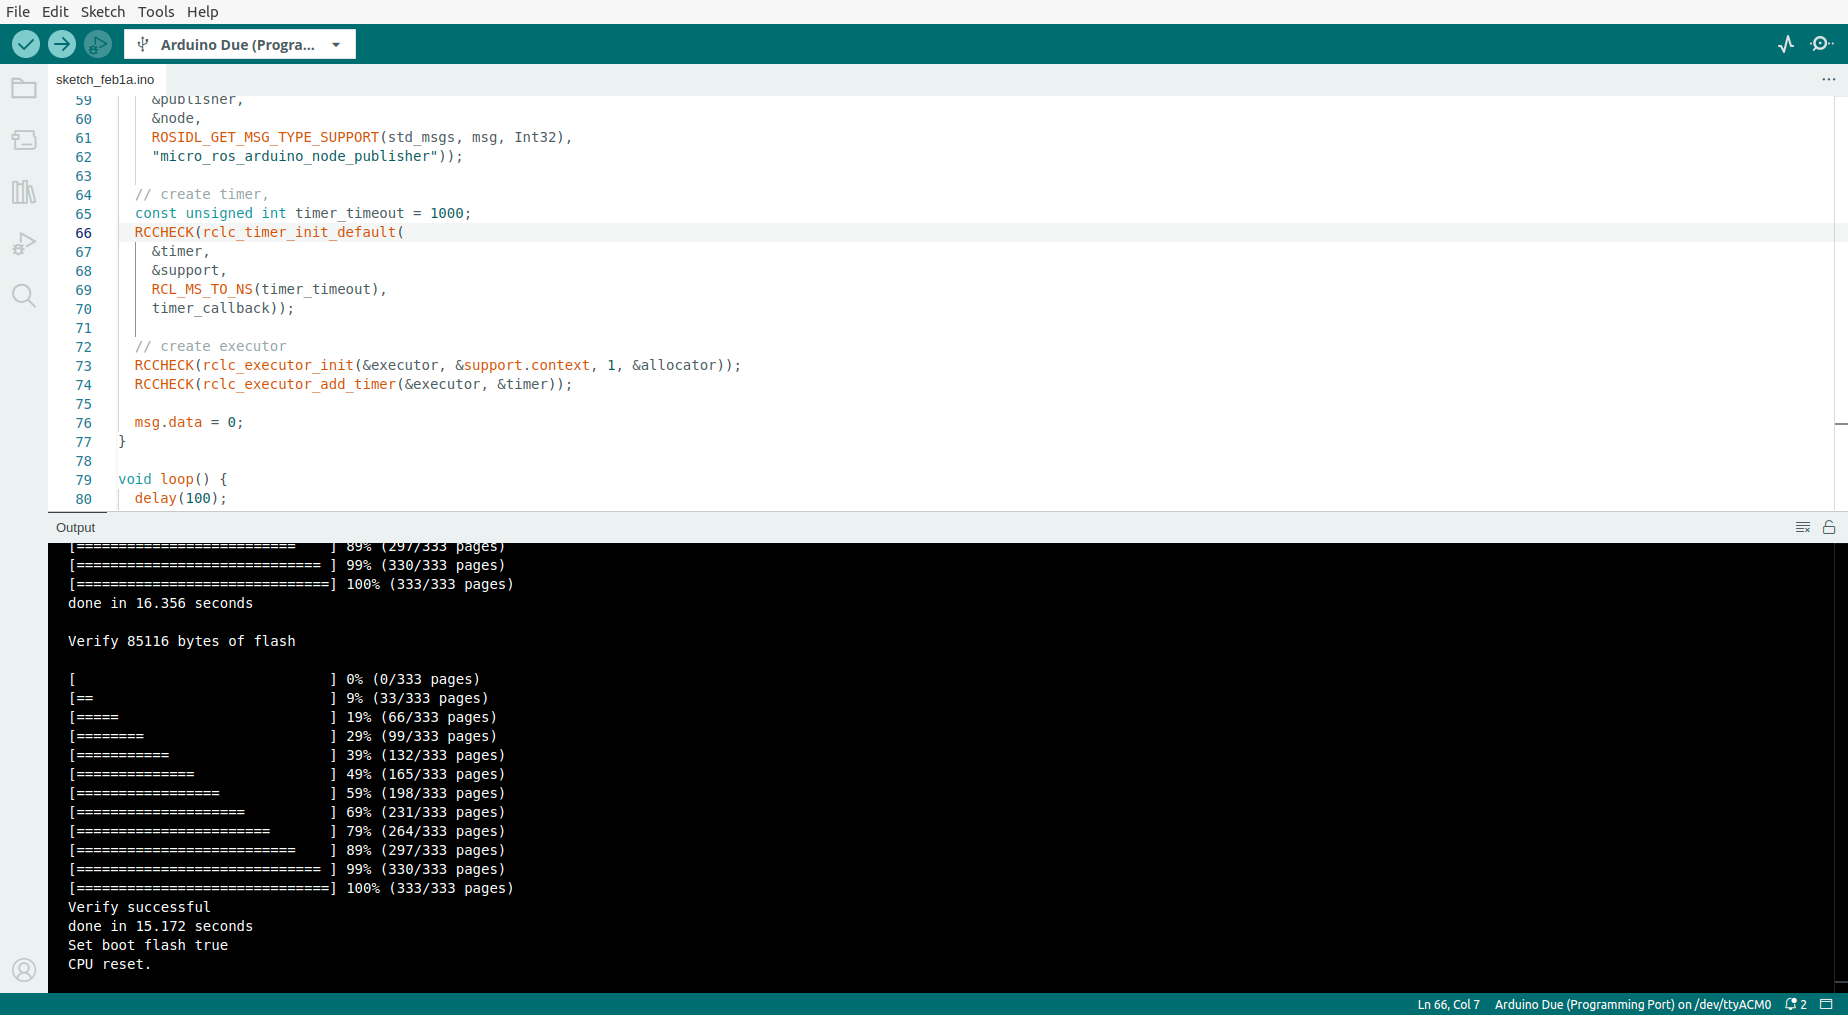
2-6. micro-ROS publisher 예제 upload
#include <micro_ros_arduino.h>

#include <stdio.h>
#include <rcl/rcl.h>
#include <rcl/error_handling.h>
#include <rclc/rclc.h>
#include <rclc/executor.h>

#include <std_msgs/msg/int32.h>

rcl_publisher_t publisher;
std_msgs__msg__Int32 msg;
rclc_executor_t executor;
rclc_support_t support;
rcl_allocator_t allocator;
rcl_node_t node;
rcl_timer_t timer;

#define LED_PIN 13

#define RCCHECK(fn) { rcl_ret_t temp_rc = fn; if((temp_rc != RCL_RET_OK)){error_loop();}}
#define RCSOFTCHECK(fn) { rcl_ret_t temp_rc = fn; if((temp_rc != RCL_RET_OK)){}}


void error_loop(){
  while(1){
    digitalWrite(LED_PIN, !digitalRead(LED_PIN));
    delay(100);
  }
}

void timer_callback(rcl_timer_t * timer, int64_t last_call_time)
{
  RCLC_UNUSED(last_call_time);
  if (timer != NULL) {
    RCSOFTCHECK(rcl_publish(&publisher, &msg, NULL));
    msg.data++;
  }
}

void setup() {
  set_microros_transports();

  pinMode(LED_PIN, OUTPUT);
  digitalWrite(LED_PIN, HIGH);

  delay(2000);

  allocator = rcl_get_default_allocator();

  //create init_options
  RCCHECK(rclc_support_init(&support, 0, NULL, &allocator));

  // create node
  RCCHECK(rclc_node_init_default(&node, "micro_ros_arduino_node", "", &support));

  // create publisher
  RCCHECK(rclc_publisher_init_default(
    &publisher,
    &node,
    ROSIDL_GET_MSG_TYPE_SUPPORT(std_msgs, msg, Int32),
    "micro_ros_arduino_node_publisher"));

  // create timer,
  const unsigned int timer_timeout = 1000;
  RCCHECK(rclc_timer_init_default(
    &timer,
    &support,
    RCL_MS_TO_NS(timer_timeout),
    timer_callback));

  // create executor
  RCCHECK(rclc_executor_init(&executor, &support.context, 1, &allocator));
  RCCHECK(rclc_executor_add_timer(&executor, &timer));

  msg.data = 0;
}

void loop() {
  delay(100);
  RCSOFTCHECK(rclc_executor_spin_some(&executor, RCL_MS_TO_NS(100)));
}
해당 예제를 upload하였을 때 어김없이 오류가 발생하였다.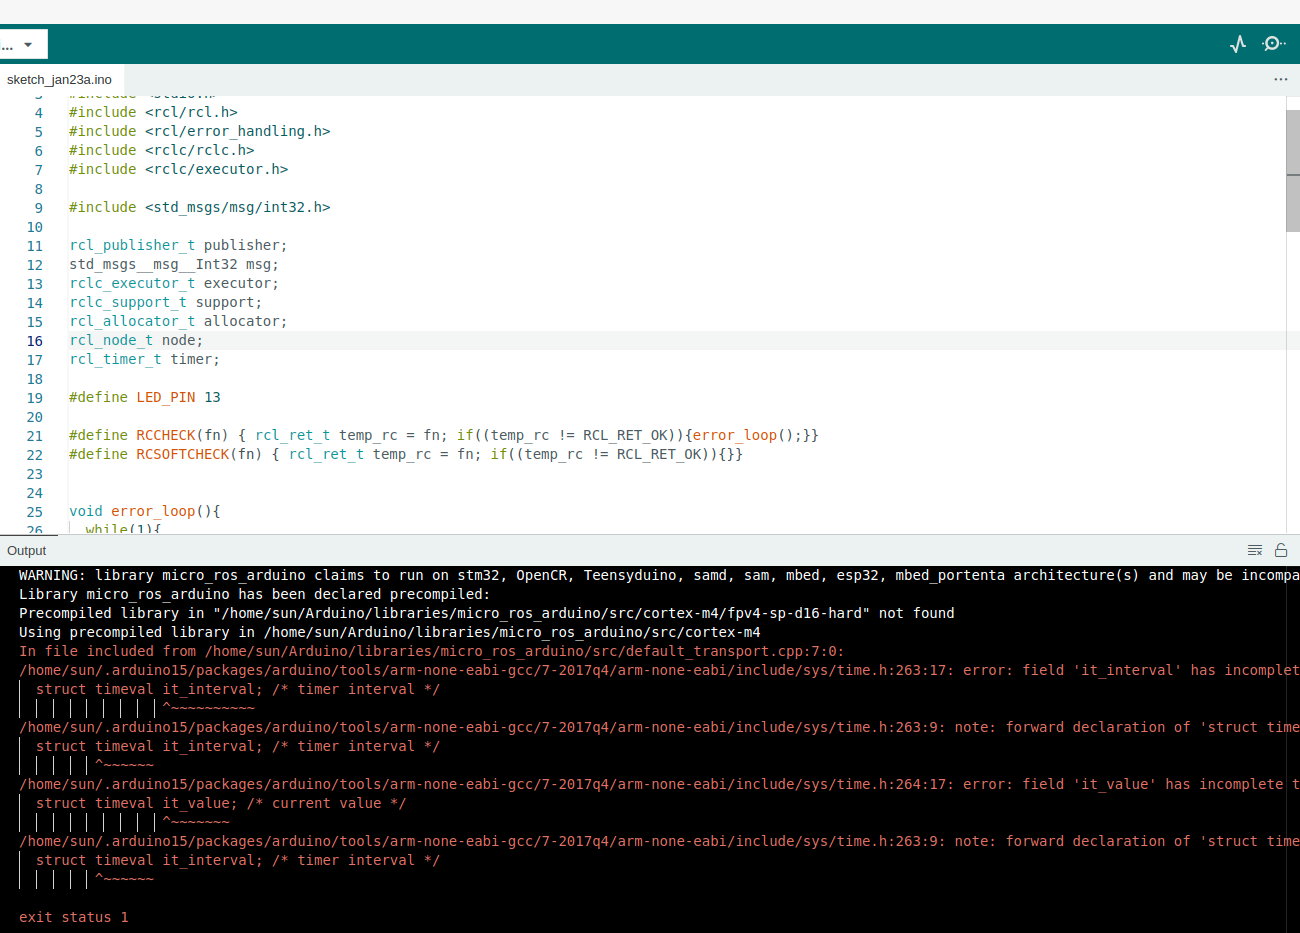
하지만, 이 오류는 arduino의 platform.txt를 맞춰주지 않아서 의존성 문제로 생기는 오류이다.
{PATH_TO_arduino}/hardware/sam/1.6.12의 위치에 있는 platform.txt파일을 수정해준다.
[ platform.txt 출처 ]
# Arduino SAM Core and platform.
# ------------------------------
#
# For more info:
# https://github.com/arduino/Arduino/wiki/Arduino-IDE-1.5-3rd-party-Hardware-specification

name=Arduino ARM (32-bits) Boards
version=1.6.12

# SAM3 compile variables
# ----------------------

compiler.warning_flags=-w
compiler.warning_flags.none=-w
compiler.warning_flags.default=
compiler.warning_flags.more=-Wall
compiler.warning_flags.all=-Wall -Wextra

compiler.path={runtime.tools.arm-none-eabi-gcc-4.8.3-2014q1.path}/bin/
compiler.c.cmd=arm-none-eabi-gcc
compiler.c.flags=-c -g -Os {compiler.warning_flags} -std=gnu11 -ffunction-sections -fdata-sections -nostdlib --param max-inline-insns-single=500 -Dprintf=iprintf -MMD
compiler.c.elf.cmd=arm-none-eabi-gcc
compiler.c.elf.flags=-Os -Wl,--gc-sections
compiler.S.cmd=arm-none-eabi-gcc
compiler.S.flags=-c -g -x assembler-with-cpp -MMD
compiler.cpp.cmd=arm-none-eabi-g++
compiler.cpp.flags=-c -g -Os {compiler.warning_flags} -std=gnu++11 -ffunction-sections -fdata-sections -nostdlib -fno-threadsafe-statics --param max-inline-insns-single=500 -fno-rtti -fno-exceptions -MMD
compiler.ar.cmd=arm-none-eabi-ar
compiler.ar.flags=rcs
compiler.objcopy.cmd=arm-none-eabi-objcopy
compiler.objcopy.eep.flags=-O ihex -j .eeprom --set-section-flags=.eeprom=alloc,load --no-change-warnings --change-section-lma .eeprom=0
compiler.elf2hex.flags=-O binary
compiler.elf2hex.cmd=arm-none-eabi-objcopy
compiler.ldflags=
compiler.size.cmd=arm-none-eabi-size
compiler.define=-DARDUINO=
compiler.combine.flags=-u _sbrk -u link -u _close -u _fstat -u _isatty -u _lseek -u _read -u _write -u _exit -u kill -u _getpid

# This can be overridden in boards.txt
build.extra_flags=

# These can be overridden in platform.local.txt
compiler.c.extra_flags=
compiler.c.elf.extra_flags=
compiler.cpp.extra_flags=
compiler.S.extra_flags=
compiler.ar.extra_flags=
compiler.elf2hex.extra_flags=
compiler.libraries.ldflags=


compiler.libsam.c.flags="-I{build.system.path}/libsam" "-I{build.system.path}/CMSIS/CMSIS/Include/" "-I{build.system.path}/CMSIS/Device/ATMEL/"

# USB Flags
# ---------
build.usb_flags=-DUSB_VID={build.vid} -DUSB_PID={build.pid} -DUSBCON '-DUSB_MANUFACTURER={build.usb_manufacturer}' '-DUSB_PRODUCT={build.usb_product}'

# Default usb manufacturer will be replaced at compile time using
# numeric vendor ID if available or by board's specific value.
build.usb_manufacturer="Unknown"


# SAM3 compile patterns
# ---------------------

## Compile c files
recipe.c.o.pattern="{compiler.path}{compiler.c.cmd}" {compiler.c.flags} -mcpu={build.mcu} -mthumb -DF_CPU={build.f_cpu} -DARDUINO={runtime.ide.version} -DARDUINO_{build.board} -DARDUINO_ARCH_{build.arch} {compiler.c.extra_flags} {build.extra_flags} {compiler.libsam.c.flags} {includes} "{source_file}" -o "{object_file}"

## Compile c++ files
recipe.cpp.o.pattern="{compiler.path}{compiler.cpp.cmd}" {compiler.cpp.flags} -mcpu={build.mcu} -mthumb -DF_CPU={build.f_cpu} -DARDUINO={runtime.ide.version} -DARDUINO_{build.board} -DARDUINO_ARCH_{build.arch} {compiler.cpp.extra_flags} {build.extra_flags} {compiler.libsam.c.flags} {includes} "{source_file}" -o "{object_file}"

## Compile S files
recipe.S.o.pattern="{compiler.path}{compiler.S.cmd}" {compiler.S.flags} -mcpu={build.mcu} -mthumb -DF_CPU={build.f_cpu} -DARDUINO={runtime.ide.version} -DARDUINO_{build.board} -DARDUINO_ARCH_{build.arch} {compiler.S.extra_flags} {build.extra_flags} {compiler.libsam.c.flags} {includes} "{source_file}" -o "{object_file}"

## Create archives
# archive_file_path is needed for backwards compatibility with IDE 1.6.5 or older, IDE 1.6.6 or newer overrides this value
archive_file_path={build.path}/{archive_file}
recipe.ar.pattern="{compiler.path}{compiler.ar.cmd}" {compiler.ar.flags} {compiler.ar.extra_flags} "{archive_file_path}" "{object_file}"

## Combine gc-sections, archives, and objects
recipe.c.combine.pattern="{compiler.path}{compiler.c.elf.cmd}" -mcpu={build.mcu} -mthumb {compiler.c.elf.flags} "-T{build.variant.path}/{build.ldscript}" "-Wl,-Map,{build.path}/{build.project_name}.map" {compiler.c.elf.extra_flags} -o "{build.path}/{build.project_name}.elf" "-L{build.path}" -Wl,--cref -Wl,--check-sections -Wl,--gc-sections -Wl,--entry=Reset_Handler -Wl,--unresolved-symbols=report-all -Wl,--warn-common -Wl,--warn-section-align -Wl,--start-group {compiler.combine.flags} {object_files} {compiler.libraries.ldflags} "{build.variant.path}/{build.variant_system_lib}" "{build.path}/{archive_file}" -Wl,--end-group -lm -lgcc

## Create output (.bin file)
recipe.objcopy.bin.pattern="{compiler.path}{compiler.elf2hex.cmd}" {compiler.elf2hex.flags} {compiler.elf2hex.extra_flags} "{build.path}/{build.project_name}.elf" "{build.path}/{build.project_name}.bin"

## Save hex
recipe.output.tmp_file={build.project_name}.bin
recipe.output.save_file={build.project_name}.{build.variant}.bin

## Compute size
recipe.size.pattern="{compiler.path}{compiler.size.cmd}" -A "{build.path}/{build.project_name}.elf"
recipe.size.regex=\.text\s+([0-9]+).*


# SAM3 Uploader tools
# -------------------

# BOSSA
tools.bossac.path={runtime.tools.bossac.path}
tools.bossac.cmd=bossac
tools.bossac.cmd.windows=bossac.exe

tools.bossac.upload.params.verbose=-i -d
tools.bossac.upload.params.quiet=
tools.bossac.upload.params.verify=-v
tools.bossac.upload.pattern="{path}/{cmd}" {upload.verbose} --port={serial.port.file} -U {upload.native_usb} -e -w {upload.verify} -b "{build.path}/{build.project_name}.bin" -R

tools.bossac_remote.upload.pattern=/usr/bin/run-bossac {upload.verbose} --port=ttyATH0 -U {upload.native_usb} -e -w -v -b /tmp/sketch.bin -R
파일을 수정하고 upload를 진행하면 오류 발생없이 정상적으로 compile을 완료하게 된다.
[ 참고할 사항 ]
만약 platform.txt를 수정했는데도 upload시 같은 오류가 발생한다면,
1. arduino-ide가 열린 상태에서 수정을 했거나,
2. {PATH_TO_arduino}/hardware 폴더에 sam 이외의 다른 폴더가 있는 경우라고 추측해 볼 수 있다.
나같은 경우는 두 개 다 해당되지 않기도 하고, 검증은 하지 않았지만 위의 두가지 상황이었을 때 compile이 되지 않았다.
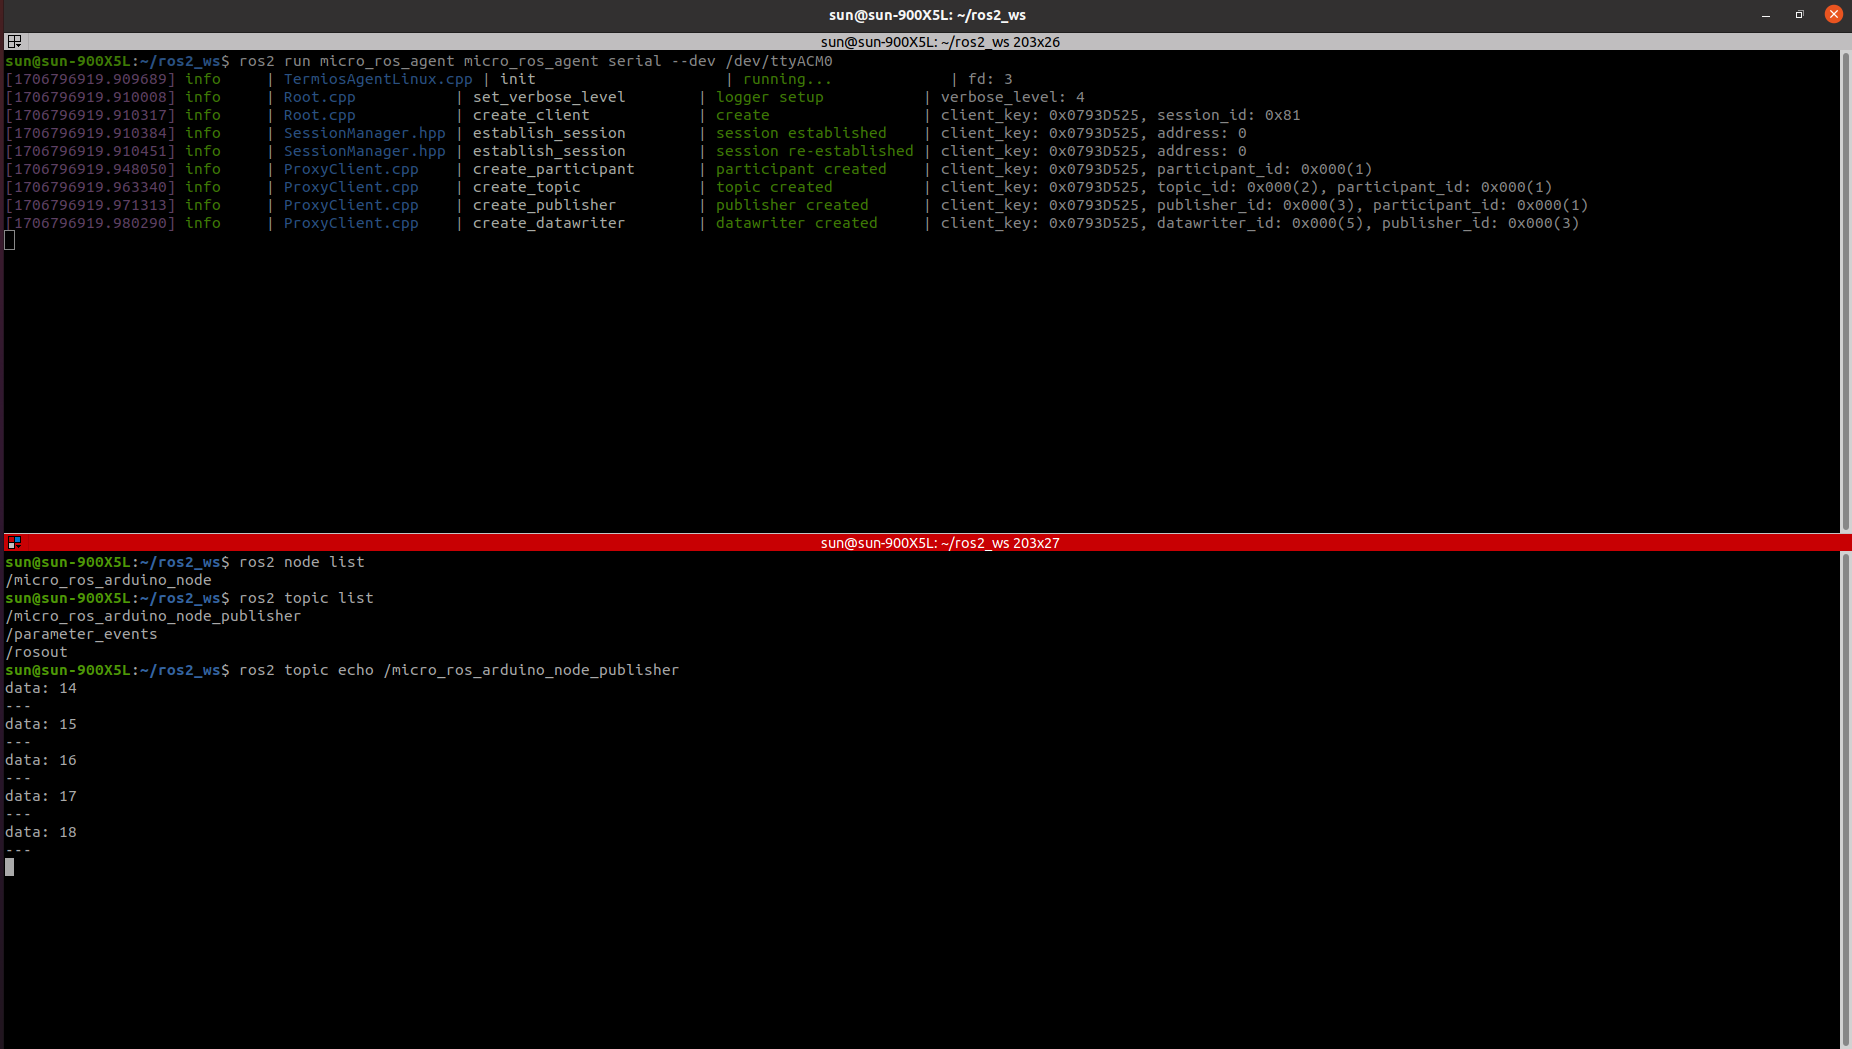
2-7. ros에서 arduino가 publish한 topic 받아오기
upload를 해준 다음,
바로 터미널을 열고
ros2 run micro_ros_agent micro_ros_agent serial --dev /dev/ttyACM0
명령을 내려준다.
publish가 된다면 다음과 같은 결과가 나올 것이다.
다음 사진은 ros2 topic echo를 통해 아두이노의 topic을 받아오는 장면이다.
[ 참고할 사항 ]
Arduino DUE는 usb포트의 종류가 두 가지인데,
하나는 Programming USB PORT, 다른 하나는 Native USB PORT 이다.
나는 Native USB PORT로 연결하였을 때, 업로드는 성공하였지만 ros로부터 topic이 받아지지 않았다.
하지만, Programming USB PORT와 연결했을 때는 topic을 아주 잘 받아왔다.
