learnopengl.com, 막님의 learn OpenGL 쉬운 번역, ThinMatrix, michaelh800님의
thinmatrix-game-engine(c++)를 공부하며 작성한 글입니다.
thinmatix 유튜브를 먼저 보고, c++로 어떻게 작성할까 고민하면서 코드를 작성하였다. 지금 시점은 opengl이나 c++이나 빠르게 늘고 있는 시점인 것 같다. 어차피 조금 지나면 힘든 구간이 오므로 자만하지 말고 진행이 잘 되든, 되지 않든 꾸준하게 하는 것을 가장 큰 목표로 삼으며 공부해나갈 것이다.
thinmatrix의 유튜브는 15분~20분 남짓 하는 영상들을 매일매일 지하철에서 내내 돌려보고 있다. 처음 보면 이해가 안 돼도 이틀 차에 2번 보고, 사흘 차에 3번 누적해서 보고 하다보니 코드를 보면 이해가 되는 때가 온다. 이럴 때 기분이 정말 좋다.
변환 행렬
변환 행렬 복습을 해보자
앞선 글에서 변환 행렬(Transformation Matrix)에 대해 배웠다.
변환 행렬이란 쉽게 말하면 물체의 위치, 각도, 크기를 한 번에 변환하기 위한 행렬이다.
변환 행렬은 미리 scaling, rotation, translation을 계산해두고 (이것을 combining matrices라 한다.) 우리의 오브젝트에 곱하여 한번에 변환을 수행할 수 있다고 하였다. 이것이 변환 행렬의 최대 장점이었고, 이를 위해서 반드시 숙지해야 할 주의 사항이 있었다.
행렬은 교환 법칙이 성립하지 않기 때문에 scaling -> rotation -> translation 순으로 행렬의 곱을 진행하여야 하며,
행렬의 곱은 오른쪽에서 왼쪽으로 진행되므로 으로 계산한다고 하였다.
GLM
이제 변환 행렬을 실제 OpenGL에 적용하여 보자.
그전에, opengl에는 기본적으로 matrix와 vector에 대해서 내장되어있는 기능은 없기 때문에 수학과 관련된 라이브러리를 사용하는 것이 좋다.
만약 당신이 C++을 이용하여 OpenGL를 쓰고 있다면, GLM(openGL Mathematics)이라는 라이브러리를 사용할 수 있다.
GLM 다운로드 링크를 통해 GLM 라이브러리를 다운로드할 수 있으며, header only 라이브러리기 때문에 헤더만 포함해주면 된다.
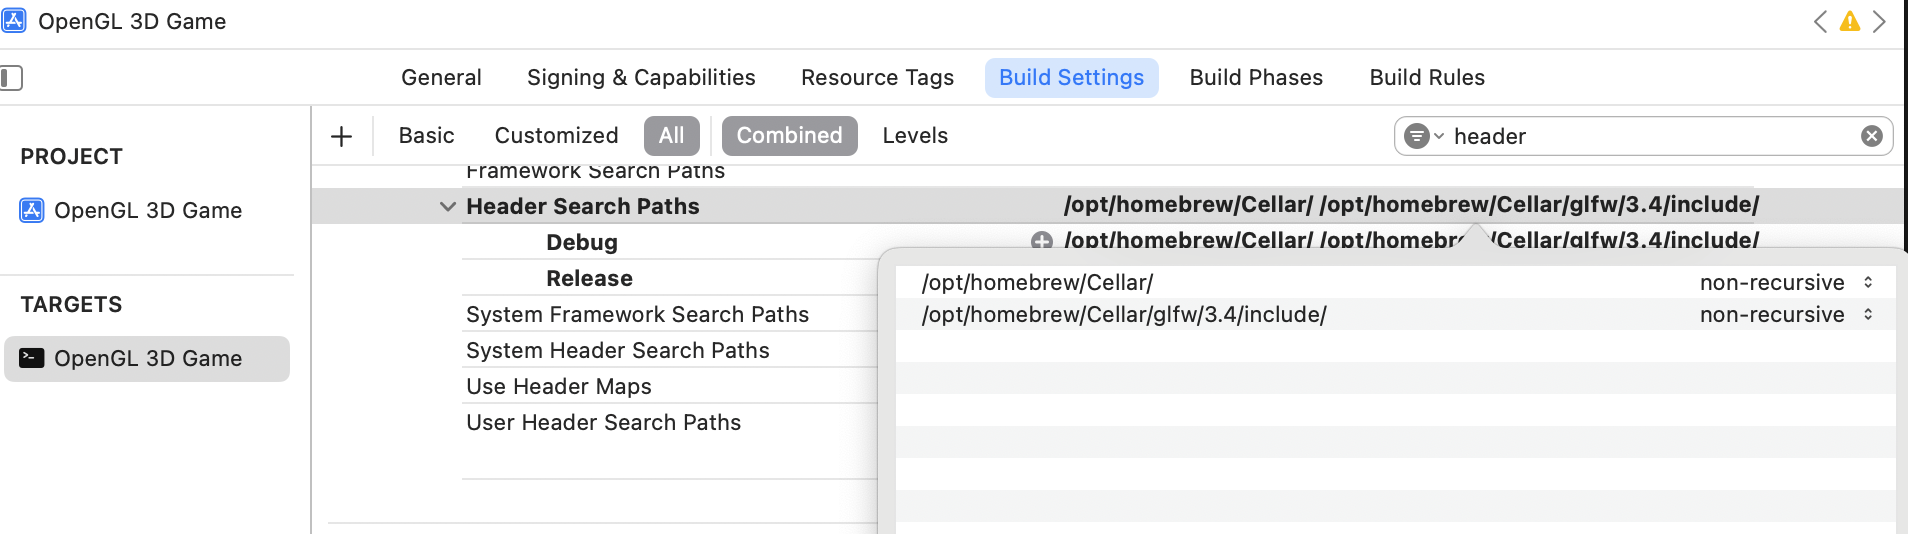
위 사진처럼 Header Search Path를 잘 찾아서 경로를 입력해주면 #include로 스크립트에서 GLM 라이브러리를 쓸 수 있다.
나는 /opt/homebrew/Cellar/에 GLM이 있기 때문에 저렇게 작성하였다.
(맥 사용자라면 Finder > *의 MacBook > Macintosh HD > cmd+shift+. > opt > homebrew > Cellar로 glm이 다운로드 된 경로를 찾으면 수월하게 찾을 수 있을 것이다.)
아무튼 이렇게 변환 행렬에 필요한 vector, matrix, translate 등을 사용할 수 있게 하는 GLM을 추가한다.
Entity
텍스처링까지 openGL 실습을 진행하였을 때, 단일한 오브젝트에 텍스처링을 적용해보았다. 하지만 위의 오브젝트를 여러번 렌더링, 그러니까 같은 오브젝트를 화면에 여러 개 띄우고 싶다면 우리를 위 글에서 했던 과정을 힘들게 반복해야 할까??!! 아니다.
Entity 개념을 도입하여 그 과정을 피하고, 특정 텍스처 모델을 여러번 렌더링할 수 있다. 아래 스크립트를 보며 이해를 해보자.
실습
Entity.cpp
#include <glm/glm.hpp>
#include "TexturedModel.hpp"
#include "Entity.h"

Entity::Entity(TexturedModel const* model,
               glm::vec3 const& position,
               glm::vec3 const& rotation,
               glm::vec3 const& scale,
               int textureIndex
            )
                : model_(model)
                , position_(position)
                , rotation_(rotation)
                , scale_(scale)
                , textureIndex_(textureIndex)
{}

void Entity::move(glm::vec3 const& translation){
    position_ += translation;
}

void Entity::rotate(glm::vec3 const& rotation){
    rotation_ += rotation;
}

void Entity::scale(glm::vec3 const& scale){
    scale_ += scale;
}


TexturedModel const* Entity::getModel() const{
    return model_;
}
glm::vec3 const& Entity::getPosition() const{
    return position_;
}
glm::vec3 const& Entity::getRotation() const{
    return rotation_;
}
glm::vec3 const& Entity::getScale() const{
    return scale_;
}

void Entity::setModel(TexturedModel const* model){
    model_ = model;
}
void Entity::setPosition(glm::vec3 const& position){
    position_ = position;
}
void Entity::setRotation(glm::vec3 const& rotation){
    rotation_ = rotation;
}
void Entity::setScale(glm::vec3 const& scale){
    scale_ = scale;
}
Entity는 같은 Model 데이터를 공유하면서 각각 다른 transform 정보를 가지는 객체이다.
원래 메인 루프에서 renderer.render(texturedModel);로 텍스처 모델을 렌더링하였는데 엔티티 클래스가 있다면, 같은 텍스처 모델이라도 위치, 각도, 크기가 다른 오브젝트를 편하게 렌더링할 수 있게 되는 것이다.
변환 행렬을 사용한다면, 위치, 회전, 크기 변환 정보를 가진 이 행렬을 셰이더에게 알려줘야 하기 때문에 render() 함수의 인자에 entity 뿐 아니라 shader도 들어가게 된다.
Renderer.cpp
#include "Renderer.h"

void Renderer::prepare() {
    // 배경색 설정
    glClearColor(0.2f, 0.3f, 0.3f, 1.0f);
    // 색상 버퍼를 지움
    glClear(GL_COLOR_BUFFER_BIT);
}

void Renderer::render(const Entity& entity, StaticShader& shader) {
    TexturedModel const* texturedModel = entity.getModel();
    RawModel model = texturedModel->getRawModel();
    // 모델의 VAO를 활성화
    glBindVertexArray(model.getVaoID());

    glm::mat4 transformationMatrix = Maths::createTransformationMatrix(entity.getPosition(), entity.getRotation(), entity.getScale());

    shader.loadTransformMatrix(transformationMatrix);


    // 삼각형 그리기 명령
    glDrawElements(GL_TRIANGLES, model.getVertexCount(), GL_UNSIGNED_INT, 0);

    glBindVertexArray(0);
}
-
glm::mat4 transformationMatrix = Maths::createTransformationMatrix(entity.getPosition(), entity.getRotation(), entity.getScale());entity의 위치, 회전, 크기 정보를 담은 변환행렬을 생성한다. 변환행렬 생성 함수를 담은 Maths 스크립트는 아래에 작성해두었다.
-
shader.loadTransformMatrix(transformationMatrix);셰이더에 변환행렬을 load한다.
#include "Maths.hpp"
#define GLM_FORCE_RADIANS
#include <glm/gtc/matrix_transform.hpp>
#include <glm/gtc/type_ptr.hpp>

glm::mat4 Maths::createTransformationMatrix(const glm::vec3 &translation, const glm::vec3 &rotation, const glm::vec3 &scale){

    glm::mat4 matrix = glm::mat4(1.0f);

    matrix = glm::translate(matrix, translation);
    matrix = glm::rotate(matrix, rotation.x, glm::vec3(1.0f,0.0f,0.0f));
    matrix = glm::rotate(matrix, rotation.y, glm::vec3(0.0f,1.0f,0.0f));
    matrix = glm::rotate(matrix, rotation.z, glm::vec3(0.0f,0.0f,1.0f));
    matrix = glm::scale(matrix, scale);

    return matrix;
}

glm::mat4 Maths::createTransformationMatrix(const glm::vec2 &translation, const glm::vec2 &scale){

    glm::mat4 matrix = glm::mat4(1.0f);

    matrix = glm::translate(matrix, glm::vec3(translation, 0.0f));
    matrix = glm::scale(matrix, glm::vec3(scale, 1.0f));

    return matrix;
}
2D, 3D Entity의 정보를 담을 변환행렬을 생성하는 함수를 담은 스크립트이다.
이때, translate -> rotate -> scale 순으로 행렬을 곱해놓았기 때문에 셰이더에서 이 행렬에 벡터 를 곱하면 형태가 되어 scaling -> rotation -> translation 계산이 올바른 순서대로 진행된다.
Shaders
StaticShader.cpp
#include "StaticShader.hpp"

StaticShader::StaticShader()
: ShaderProgram("res/shaders/VertexShader.vert", "res/shaders/FragmentShader.frag")
{
    initialize();
}


void StaticShader::bindAttributes(){
    bindAttribute(0, "positions");
    bindAttribute(1, "colors");
    bindAttribute(2, "textureCoords");
}

void StaticShader::getAllUniformLocations(){
    location_texture = getUniformLocation("ourTexture1");
    transformationMatrixLocation_ = getUniformLocation("transformationMatrix");
}

void StaticShader::loadTransformMatrix(glm::mat4 const& matrix){
    loadMatrix(transformationMatrixLocation_, matrix);
}
-
void StaticShader::loadTransformMatrix(glm::mat4 const& matrix)vertex shader에서 vertex 좌표를 변환하기 위해 행렬을 load해주는 함수이다.
VertexShader.vert
#version 330 core

layout (location = 0) in vec3 aPos;
layout (location = 1) in vec3 aColor;
layout (location = 2) in vec2 aTexCoords;

out vec3 ourColor;
out vec2 TexCoord;

uniform mat4 transformationMatrix;

void main() {
    gl_Position = transformationMatrix * vec4(aPos, 1.0);
    ourColor = aColor;
    TexCoord = aTexCoords;
}
-
gl_Position = transformationMatrix * vec4(aPos, 1.0);위에서 load한 변환행렬을 오브젝트의 기본 위치에 곱함으로써 변환을 행한다.
vec3는 4x4 행렬에 곱할 수 없으므로 vec4로 변환해야 하는데, w값에 1.0이 들어가는 이유는 이전 글에서 배웠다!
w = 1.0이면 좌표가 되어 translation의 영향을 받고, w = 0이면 벡터가 되어 translation의 영향을 받지 않는다고 한 것을 기억하는가? 우리는 translation을 원하므로 w값에 1.0을 입력한 것이다.
MainGameLoop.cpp
...

int main() {
    // 디스플레이 생성 (창 띄우기)
    DisplayManager::createDisplay();

    // 필요한 엔진 컴포넌트 생성
    Loader loader;
    Renderer renderer;

    // 데이터를 VAO에 로드하여 RawModel 생성
    RawModel model = loader.loadToVAO(vertices, indices, colors, textureCoords);

    // 텍스처
    GLuint textureID = loader.loadTexture("res/textures/고릴라.jpg");

    ModelTexture texture = ModelTexture(textureID);
    TexturedModel texturedModel = TexturedModel(model, texture);
    Entity entity(&texturedModel, glm::vec3(-1.0f, 0.0f, 0.0f), glm::vec3(0.0f, 0.0f, 0.0f), glm::vec3(1.0f, 1.0f, 1.0f), 1);

    // 셰이더
    StaticShader shader;

    while (!DisplayManager::isCloseRequested()) {
        renderer.prepare();

        shader.start();

        glActiveTexture(GL_TEXTURE0);
        glBindTexture(GL_TEXTURE_2D, textureID);

        renderer.render(entity, shader);
        shader.stop();

        DisplayManager::updateDisplay();
    }

    DisplayManager::closeDisplay();

    return 0;
}-
Entity entity(&texturedModel, glm::vec3(-1.0f, 0.0f, 0.0f), glm::vec3(0.0f, 0.0f, 0.0f), glm::vec3(1.0f, 1.0f, 1.0f), 1);entity 객체를 생성하며, 위에서 생성한 textureModel, 원하는 위치, 회전, 크기, 텍스처 인덱스(여기서는 entity와 텍스처가 1개이므로 안쓰임)를 입력한다.
-
renderer.render(entity, shader);생성한 entity와 shader를 입력받아 렌더링을 한다.
결과
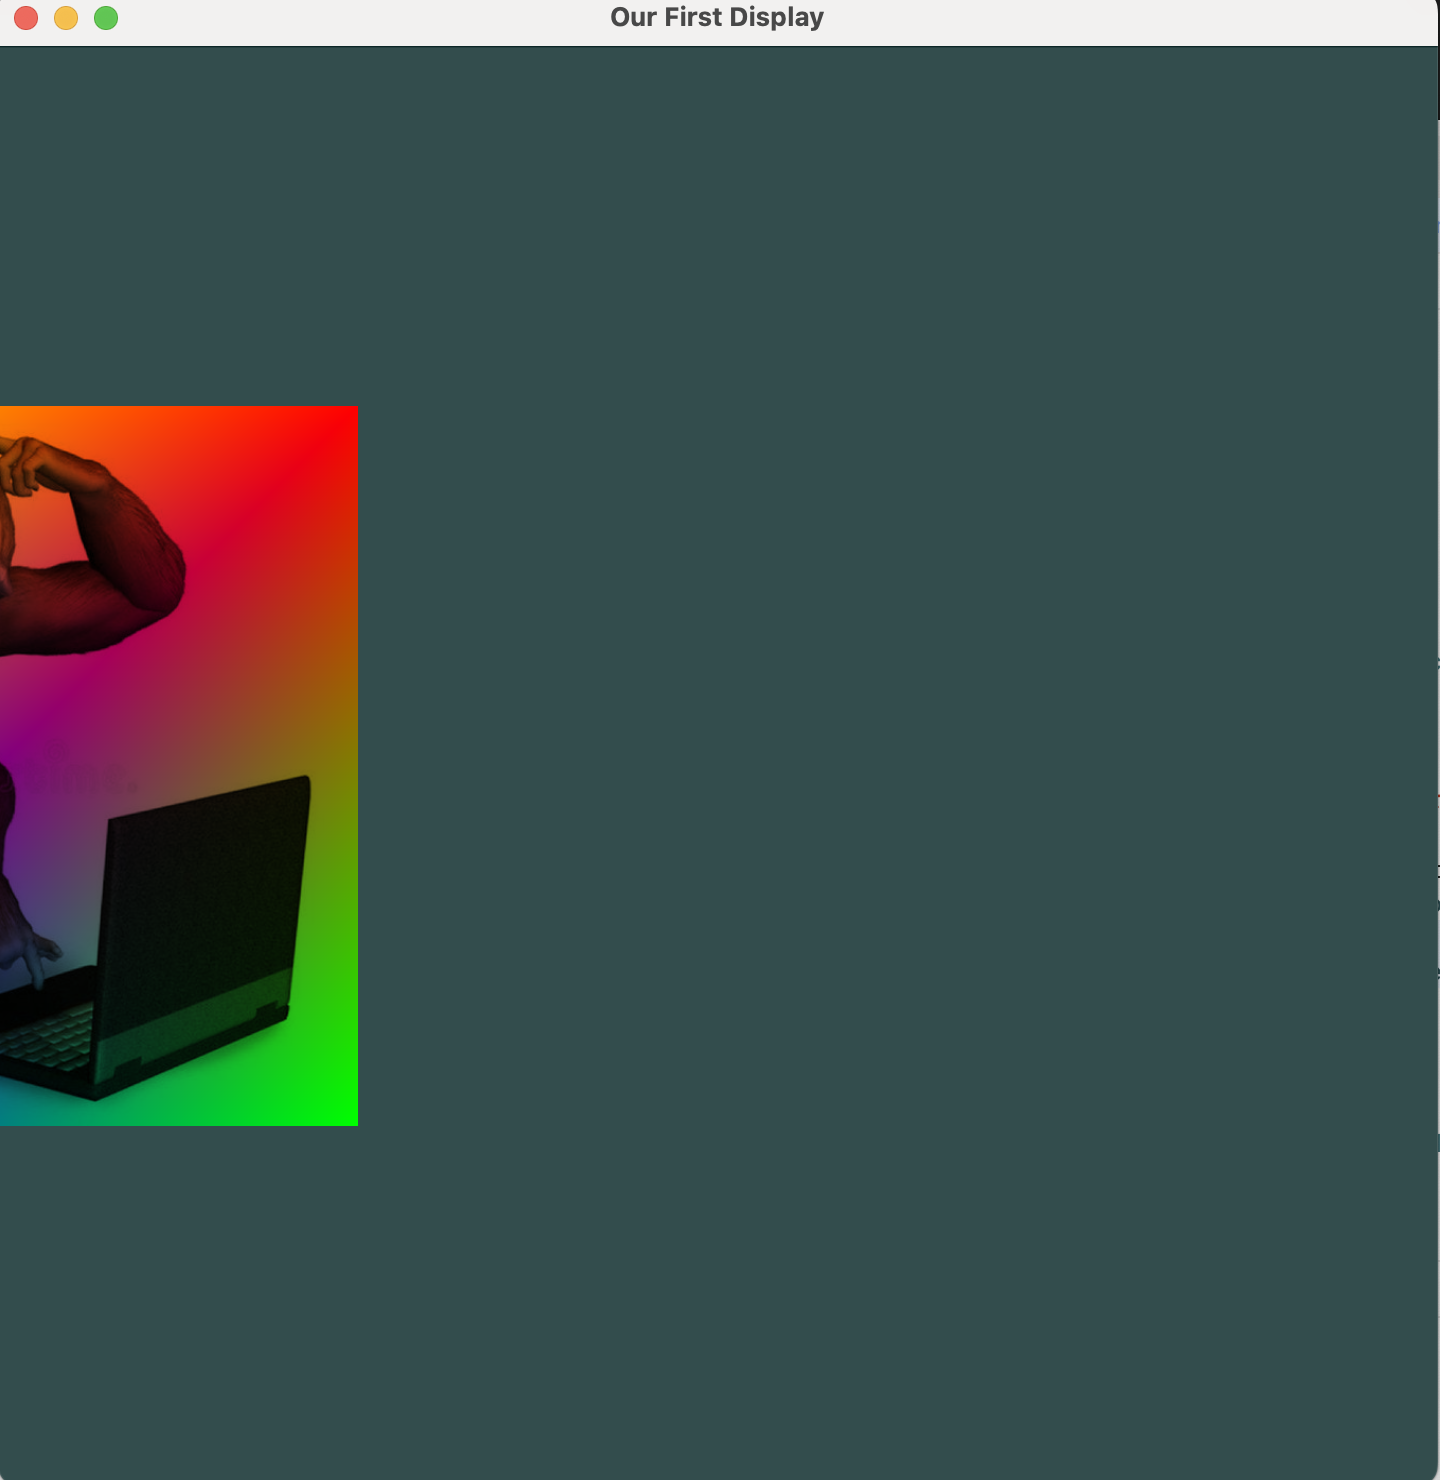
이전 실습 글에서 렌더링한 오브젝트와 같지만, entity에서 위치를 glm::vec3(-1.0f, 0.0f, 0.0f)로 입력한 만큼 왼쪽으로 이동한 것을 볼 수 있다!