Composition API
- Vue3에서 추가된 함수 기반 API
- 기존 Vue 프로젝트는 프로젝트 규모가 커지면 컴포넌트 계층 구조가 복잡해 추적 및 관리가 어려웠던 단점을 커버하기 위한 기술
- Vue3공식문서에서 권장
- 옵션을 선언하는 대신 import한 함수를 사용하여 Vue Component를 작성할 수 있음
* Composition API는 data, methods, computed로 로직을 구성하지 않고(ref, computed, defineEmits, defineExpose 등의 기능을 사용해 대체 가능) export defaul{}를 제공하지 않는다
1. 장점
1) 반응형 API
- ref(), reactive()를 사용하여 반응형 상태를 직접 생성 가능
- reactive, ref값 템플릿 표기법은 {{ }}
- setup { } 에서 값 반환시 속성명 변경 가능
- 변경 감시(watch)도 Vue2버전과 동일한 옵션으로 Composition API로 사용가능
(1). reactive()
- 객체를 반응형으로 만들기 위해 사용
(객체의 모든 속성이 반응형이 되어 객체 내부의 변경사항이 Vue의 반응 시스템에 자동 추적) - 객체만 받고 인자로 받은 객체와 완전히 동일한 프록시 객체 반환
- reactive를 통해 생성된 객체는 객체가 중첩된 상태에서도 반응형 데이터를 쉽게 조작 처리 가능
- 원본 객체 자체에서 변경을 감지하는 옵저버를 추가하여 그대로 반환한 값
(2) ref()
- 기본타입(String, 숫자, boolean 등)을 반응형으로 만들기 위해 사용
( 기타 다른 값도 다 받을 수 있다 ) - value속성을 통해 접근 가능, 값 변경도 value속성에 접근하여 조작
- ref객체는 원본 값을 value라는 속성에 담아두고 변경을 감시하는 객체
(ref 객체를 통해 값을 얻거나 설정시 자동의로 의존성 추적과 업데이트가 이루어진다) - isRef : 어떤 유형인지 값을 확인
- toRefs : reactive값을 ref값으로 변환
(3) 차이
- ref 는 기본타입을 위한 것, .value로 값을 조작
- reactive는 객체에 사용, 객체 내부 속성을 직접 조작
- 템플릿 내에서 ref로 생성된 반응형 객체 사용시는 .value없이 직접 참조 가능, reactive로 생성된 객체도 템플릿에서 직접 속성에 접근 가능
ex)
<template>
	<div>
    	<h1>{{first.name}}</h1>
        <h1>{{second}}</h1>
    <div>
</template>

<script>
import {reactive, ref } from @vue/composition-api

const useValues = () => {
	const reactiveValue = reactive({ name: 'tom' })
    const refValue = ref(10)

    return {reactiveValue, refValue }
}
2) 생명주기
onMounted(), onUnmounted(), onUpdated()를 사용하여 Component생명 주기에 프로그래밍 방식으로 연결 가능
import { onMounted, onUpdated, onUnmounted } from '@vue/composition-api'

export default {
	setup () {
    	onMounted(() => {
        	//mounted
        })
        onUpdated(() => {
        	//updated
        })
        onUnmounted(() => {
        	//destroyed
        })
    }
}
3) 의존성 주입
provide(), inject()를 사용하여 반응형API를 사용하는동안 Vue 의존성 주입 시스템 활용 가능
4). 예시
- 공식문서
<script setup>
import { ref, onMounted } from 'vue'

// 반응형 상태
const count = ref(0)

// 상태를 변경하고 업데이트를 트리거하는 함수
function increment() {
  count.value++
}

// 생명주기 훅
onMounted(() => {
  console.log(`숫자를 세기 위한 초기값은 ${count.value} 입니다.`)
})
</script>

<template>
  <button @click="increment">숫자 세기: {{ count }}</button>
</template>- ref, reactive 코드 차이 예시
https://kyounghwan01.github.io/blog/Vue/vue3/composition-api/#google_vignette
<template>
<div class="home">
<p>{{ person1.name }} {{ person1.value }}</p>
<button @click="handleClick">click</button>
</div>
</template>
<script>
import { ref, reactive } from "vue";
export default {
name: "HOME",
setup() {
// 데이터를 ref, reactive로 감싸면 반응형으로 바뀝니다.
const person1 = ref({ name: "nkh", age: 29 });
const person2 = reactive({ name: "nki", age: 26 });
const handleClick = () => {
// ref로 감싼 값을 변경할 때는 value로 한번 들어가주고 값을 바꿉니다.
person1.value.age = 30;
// reactive는 바로 값을 바꿉니다.
person2.age = 30;
};
// ref값은 return을 거치게되면 person1.value.age는 person1.age로 바뀝니다. (template에서는 person1.age로 사용합니다)
return { person1, handleClick };
}
};
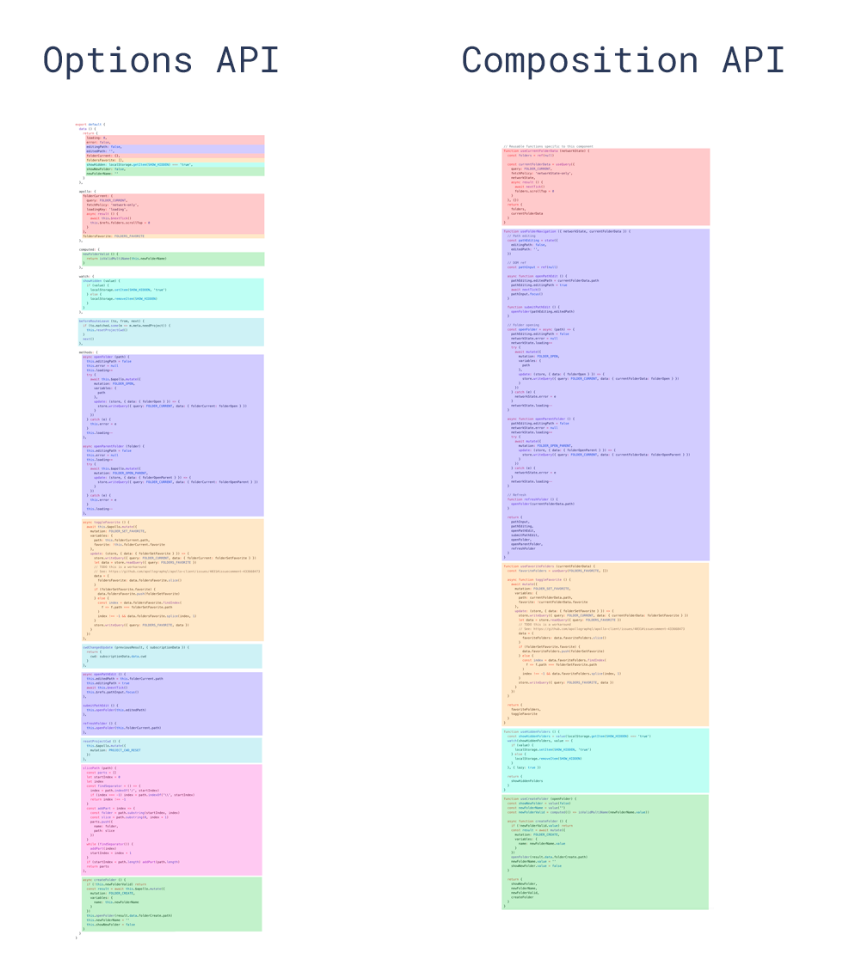
</script>2. 기존의 Option API와 Composition API 비교
- 동일한 논리적 문제를 기준으로 같은 색상을 사용
- 기존의 Option API는 동일한 논리적 문제를 여러 부분에 분할되어 있으나 Composition API는 모아서 관리 가능
* OptionAPI는 Component에서 setup() 옵션을 통해 Composition API를 사용할 수 있다.
* OptionAPI는 복잡성이 낮은 시나리오에선 여전히 좋은 선택일 수 있다
- Vue3에서는 Class API를 더 이상 사용하지 않는 것이 좋다
- 참고 Vue3 공식문서
- https://geundung.dev/102#6.%20Composition%20API%20%EC%82%B4%ED%8E%B4%EB%B3%B4%EA%B8%B0%20-%20%EC%83%9D%EB%AA%85%20%EC%A3%BC%EA%B8%B0%20%ED%9B%85%20(Life%20Cycle%20Hooks)-1
- https://kyounghwan01.github.io/blog/Vue/vue3/composition-api/#google_vignette
3. setup
- Vue3에 추가된 기능(Vue3이상 버전만 사용가능)
- Single-File Components 내에 Composition API를 사용하기 위해 필요한 문법
- this키워드 사용불가(ref, toRef를 사용해 value속성으로 접근가능)
<template>
  <div>
    <button @click="increment">Increment</button>
    <p>Count: 8</p>
  </div>
</template>

<script setup> // script setup 적용
import { ref } from 'vue';

const count = ref(0);

const increment = () => {
  count.value++;
};
</script>
4. props
- component간 데이터를 전달하는 기본적인 방법
- 부모 Component에서 자식 Component로 데이터 전달하는데 사용
- CompositionAPI에서 setup 함수 사용시 첫번째 인자로 props를 받을 수 있다
(자식 Component는 부모 Component로 부터 전달받은 props를 직접 사용 가능) - props객체는 Vue반응 시스템에 의해 자동으로 반응형으로 만들어 짐
(부모 Component에서 props값 변경시 자식 Component에서 이를 즉시 반영)
ex)
1) 부모 Component(Home)
<template>
  <dlv class="home">
    <!-- child 컴포넌트에게 props 내림 -->
    <PostList :posts="posts" />
  </div>
</template>
<script>
  // 사용할 컴포넌트 import
  import PostList from '../components/PostList.vue'
  import { ref } from 'vue';

  export default {
    name: 'Home',
    // 사용할 컴포넌트를 넣어줍니다.
    components: { PostList },

    setup() {
      const posts = ref([
        { title: '1번 타이틀', body: '1번 제목', id: 1 },
        { title: '2번 타이틀', body: '2번 제목', id: 2 },
      ]);

      return { posts }
    }
  }
</script>
2) 자식 Component(Posts)
<template>
  <div>
    {{ post.title }}
    {{ post.body }}
  </div>
</template>
<script>
export default {
  // 사용할 props를 배열내에 정의합니다.
  props: ["posts"],
  setup(props) {
    console.log(props.posts); // 받은 prop 사용가능
  }
};
</script
! pinia 사용시 props에 대해
- Pinia를 사용하는 경우 props를 사용하여 Component간 데이터 전달하는 방식이 다르다
- Pinia는 Component간 직접적인 데이터 전달(props)보다는, 중앙 집중화된 상태 관리를 필요로 하는(전역 상태를 효과적으로 관리) 복잡한 애플리케이션에 적합한 방식
* 차이점
1) 데이터 전달 범위
- props : 부모 -> 자식 으로의 단방향 데이터 전달에 이용
(계층 내 간단한 데이터 전달이 필요할 때, 주로 사용) - pinia : 애플리케이션 전역에서 관리하여 어떤 Component에서든 스토어 상태를 접근, 변경 가능
(사용자 인증 상태, 애플리케이션 설정, 여러 컴포넌트 간 공유되어야 하는 데이터 등을 관리하는데 적합)
2) 반응성 관리
- Pinia 스토어 상태 변경시 이를 사용하는 컴포넌트의 UI도 자동 업데이트
- props는 주로 부모 -> 자식 컴포넌트 관계내 데이터 흐름을 위한 것
* props 사용 이유
Pinia가 애플리케이션 전역 상태를 관리하여 Component간 데이터 전달을 단순화하거나 props전달의 필요성을 줄일 수 있다.
그러나 모든 데이터를 Pinia 스토어에 저장하면 편리할 수 있지만 애플리케이션 성능에 부담을 줄 수 있다.
(특히, 간단한 부모 -> 자식 컴포넌트 간 데이터 전달은 props 사용이 더 경량화되고 효율적이다)