
지난 포스팅에선 Node project를 nexus에 upload 하는 작업을 진행하였습니다.
이번 포스팅에선 지난번에 배포된 Node Project를 다운 받아 도커라이징 하는 작업을 진행하고자 합니다.
사전 준비사항
1) nexus repository 작업
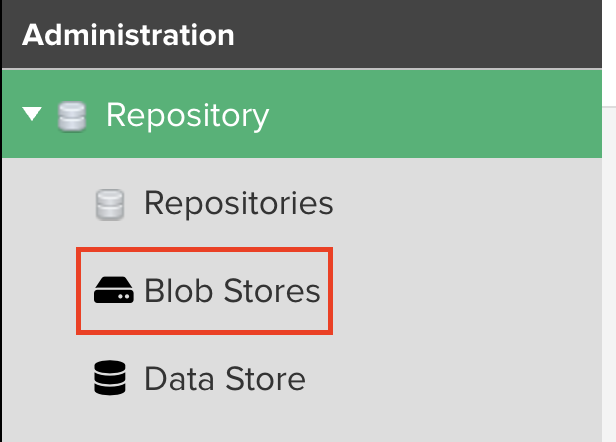
(1) Blob Stores 추가
Docker image를 upload하기 위해선 우선 Blob Stores를 추가해야 한다.
- Setting → blob Stores 클릭
- Create Blob Store 클릭
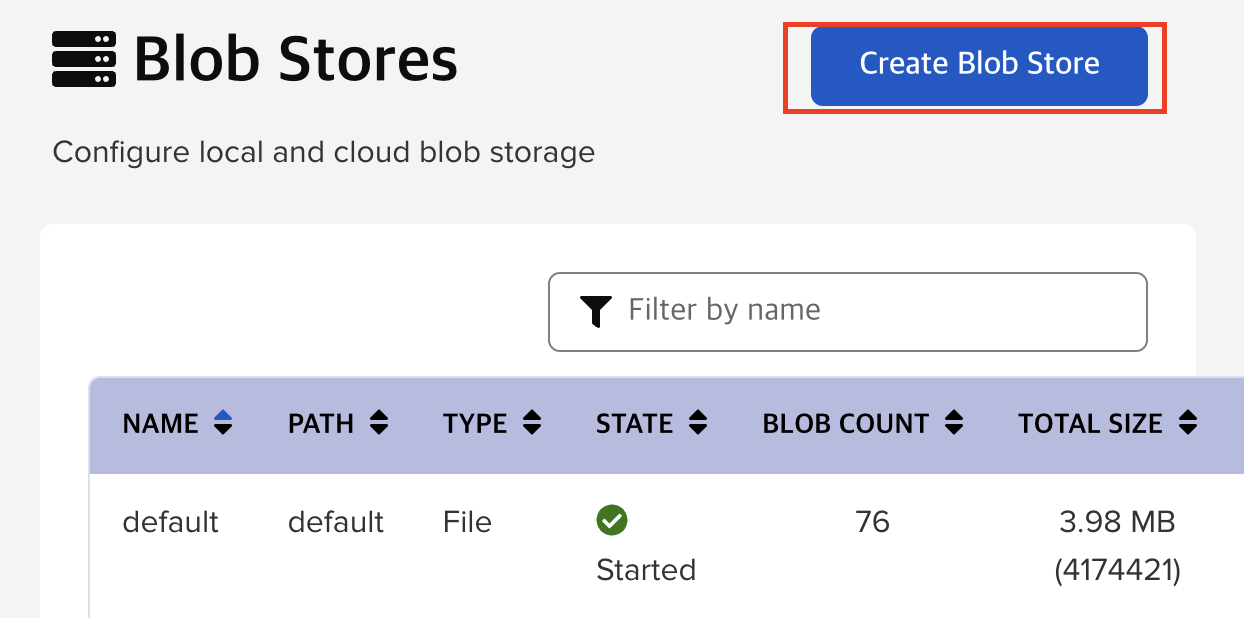
- 아래 정보대로 입력후에 Save 클릭
-
type : File
-
name : docker-hosted
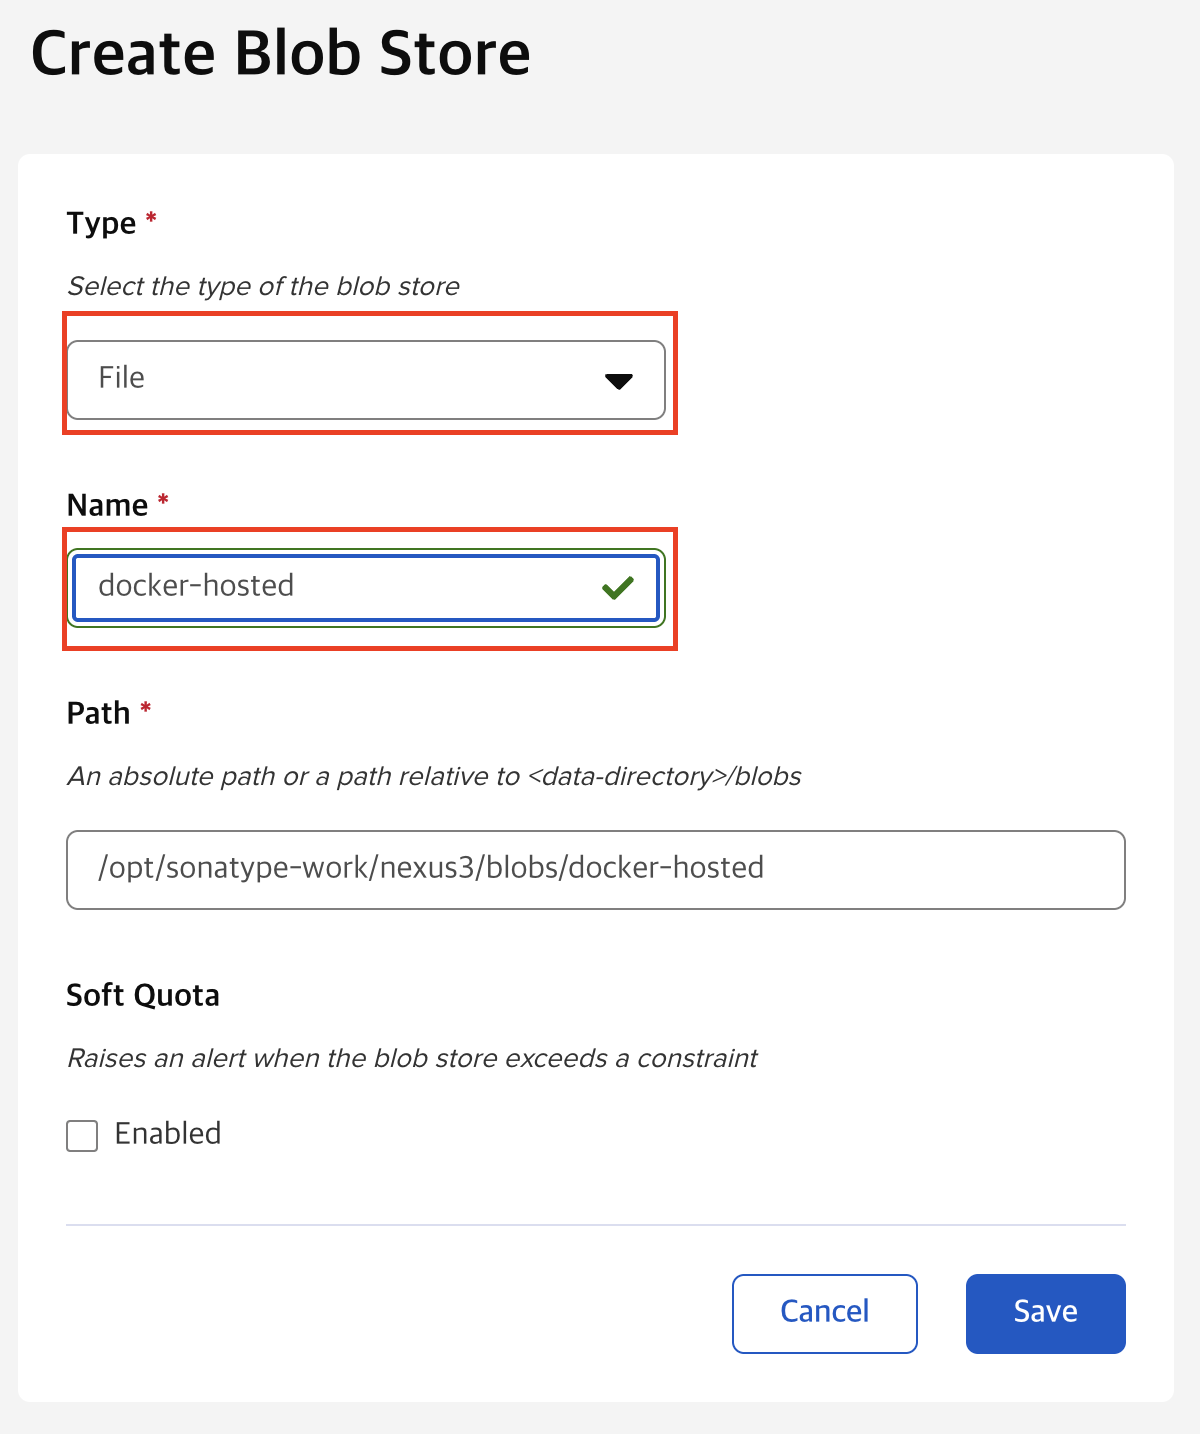
-
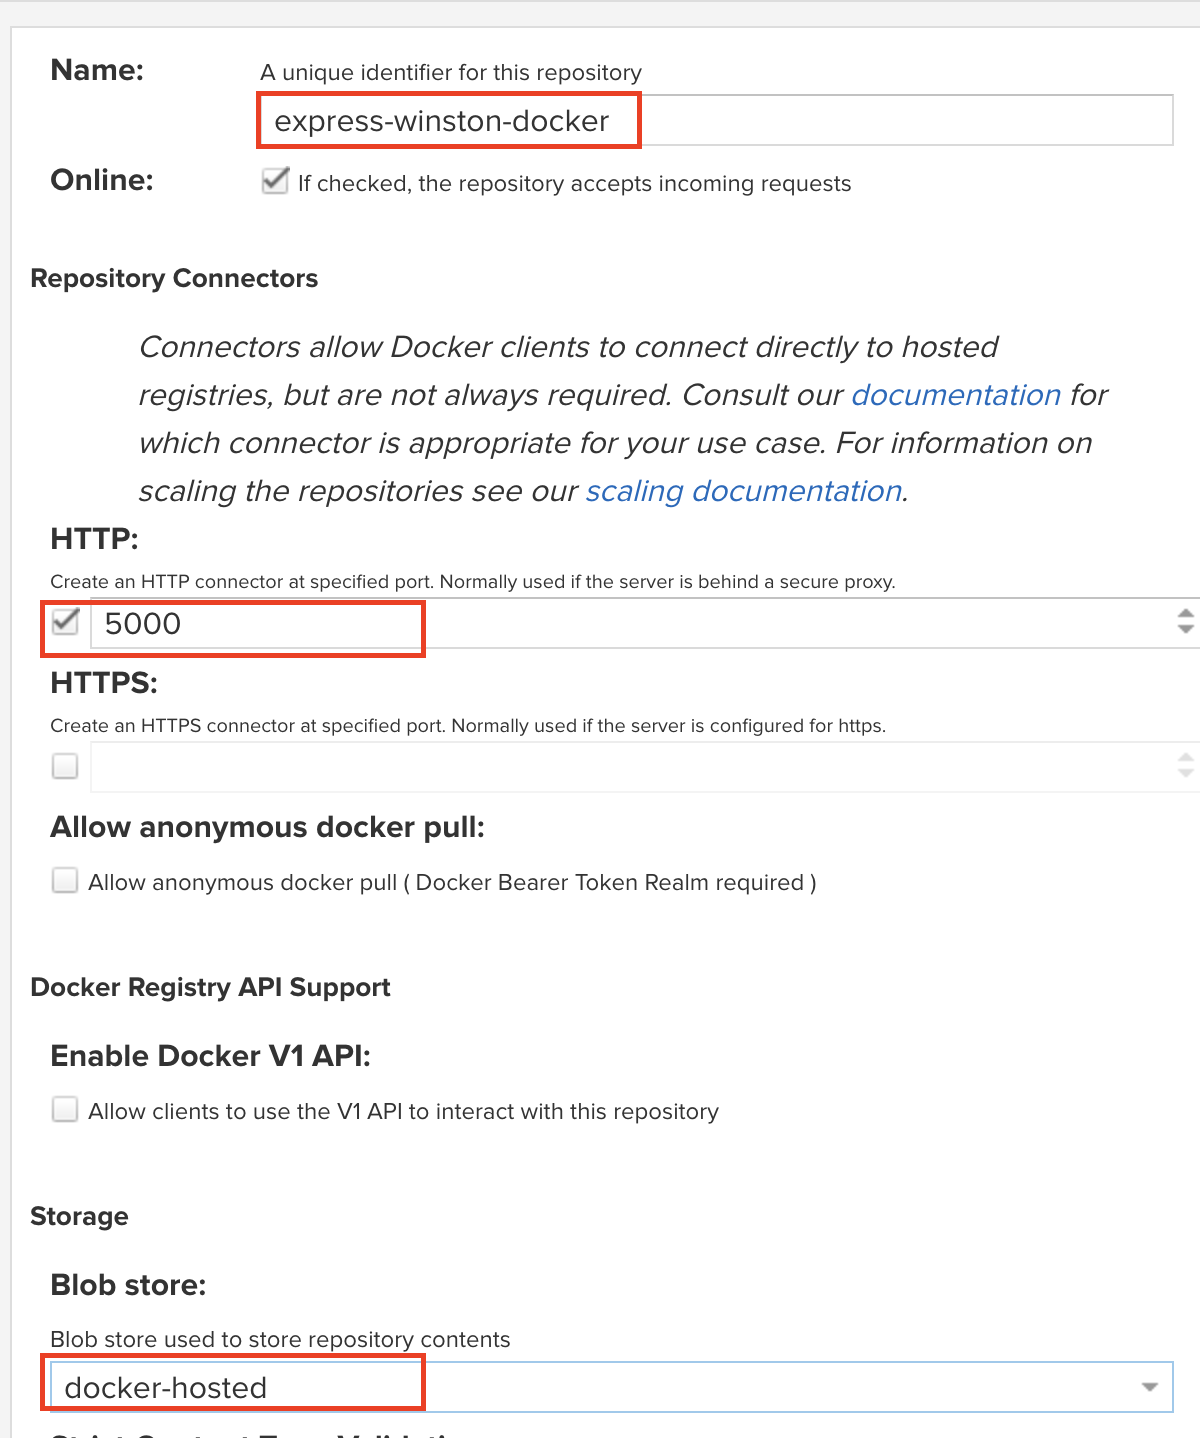
(2) Docker Repository 생성
- Setting → Repositories 클릭
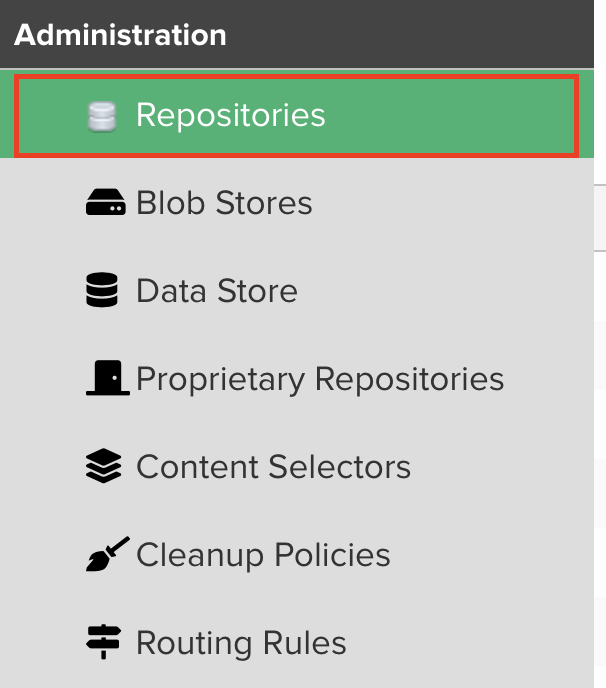
- Create repository 클릭

- docker (hosted) 클릭

- 아래 정보대로 입력 및 선택 후 save 클릭
-
name : express-winston-docker
-
http : check
- port : 5000
-
Blob store : docker-hosted 선택
-
Deployment policy : Allow redeploy (Docker 각 버전 반영시 마다 최신 버전도 같이 반영)

-
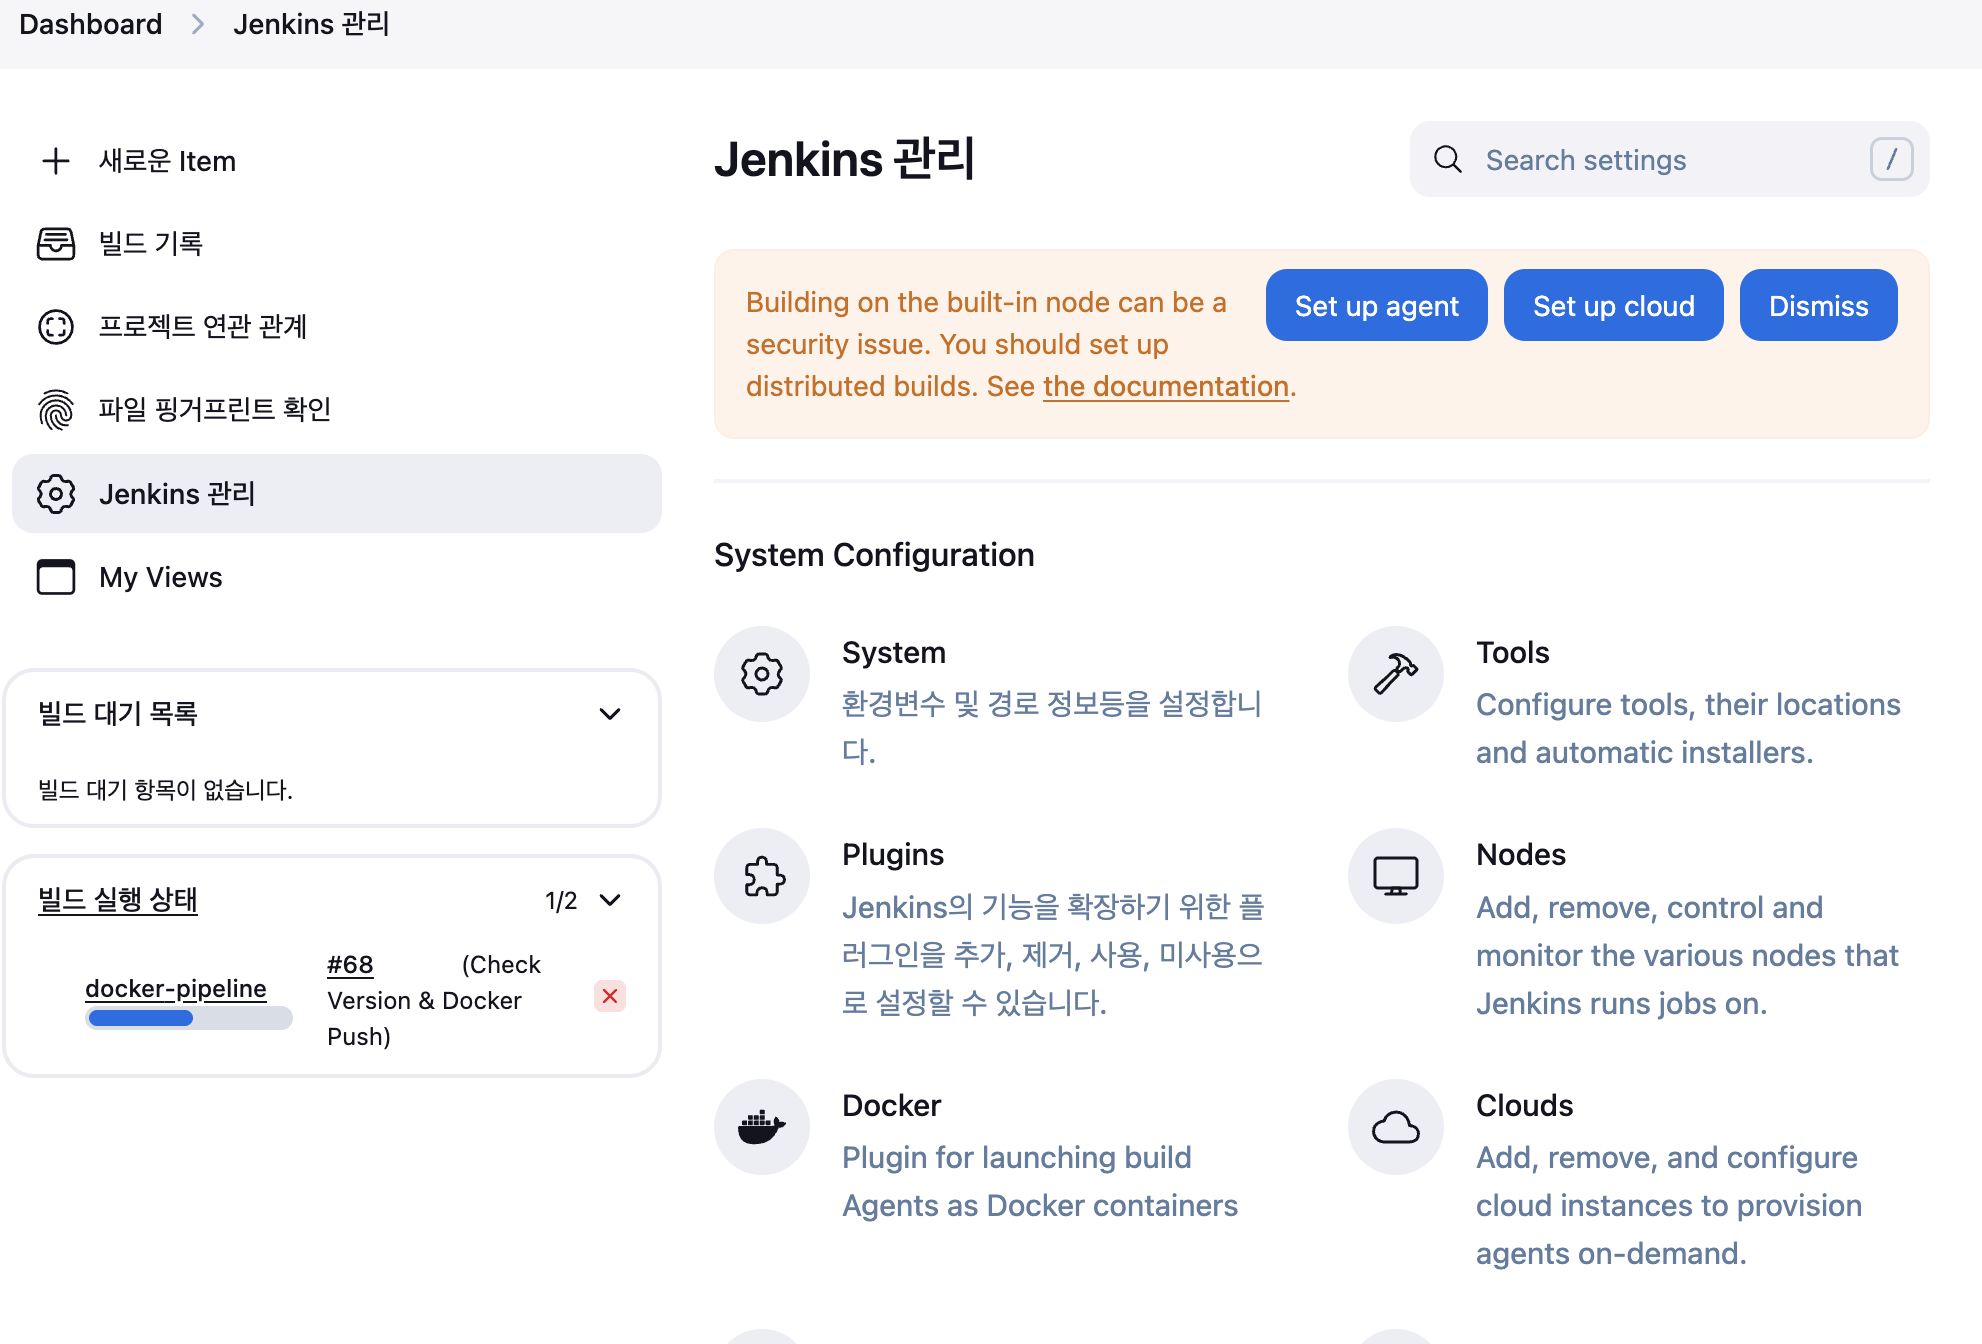
2) jenkins 서버에 docker 설치
Docker Hub에 업로드를 진행하는 경우에는 해당 과정이 필요 없으나
Private Nexus Repository에 node project를 업로드 한 경우에는 Jenkins 서버내에 docker 설치가 필요합니다.
해당 포스팅 글은 Ubuntu 24.04 버전에서 설치를 진행하고자 합니다.
-
패키지 목록 업데이트 및 필수 패키지 설치
sudo apt-get update
sudo apt-get install ca-certificates curl
-
Docker의 공식 GPG Key 추가
sudo install -m 0755 -d /etc/apt/keyrings
sudo curl -fsSL https://download.docker.com/linux/ubuntu/gpg -o /etc/apt/keyrings/docker.asc
sudo chmod a+r /etc/apt/keyrings/docker.asc
-
Docker 저장소 추가
echo \
  "deb [arch=$(dpkg --print-architecture) signed-by=/etc/apt/keyrings/docker.asc] https://download.docker.com/linux/ubuntu \
  $(. /etc/os-release && echo "${UBUNTU_CODENAME:-$VERSION_CODENAME}") stable" | \
  sudo tee /etc/apt/sources.list.d/docker.list > /dev/null
-
Docker 엔진 및 관련 패키지 설치
sudo apt-get update
sudo apt-get install docker-ce docker-ce-cli containerd.io docker-buildx-plugin docker-compose-plugin
-
현재 사용자를 Docker 그룹에 추가 : Jenkins 를 실행하는 계정을 그룹에 추가한다.
sudo usermod -aG docker $USER

# 예시
sudo usermod -aG docker jenkins
(선택) insecure registry 설정
기본적으로 Docker repository에 관한 protocol은 https입니다.
만약 Neux Repository를 http로 통신 하기 위해선 아래 과정을 진행해야합니다.
root 계정 설정
- 설정
# jenkins
sudo vi ~/docker/daemon.json

# root
sudo vi /etc/docker/daemon.json
- 내용
# docker_repository_port : nexus에서 docker repository 생성시 http/https에 설정했던 포트를 입력해야함
{
  "insecure-registries": ["${docker_repository_url}:${docker_repository_port}"]
}

# 예시
{
  "insecure-registries": ["http://52.231.190.95:5000"]
}
- 확인
docker info | grep -A5 'Insecure Registries'
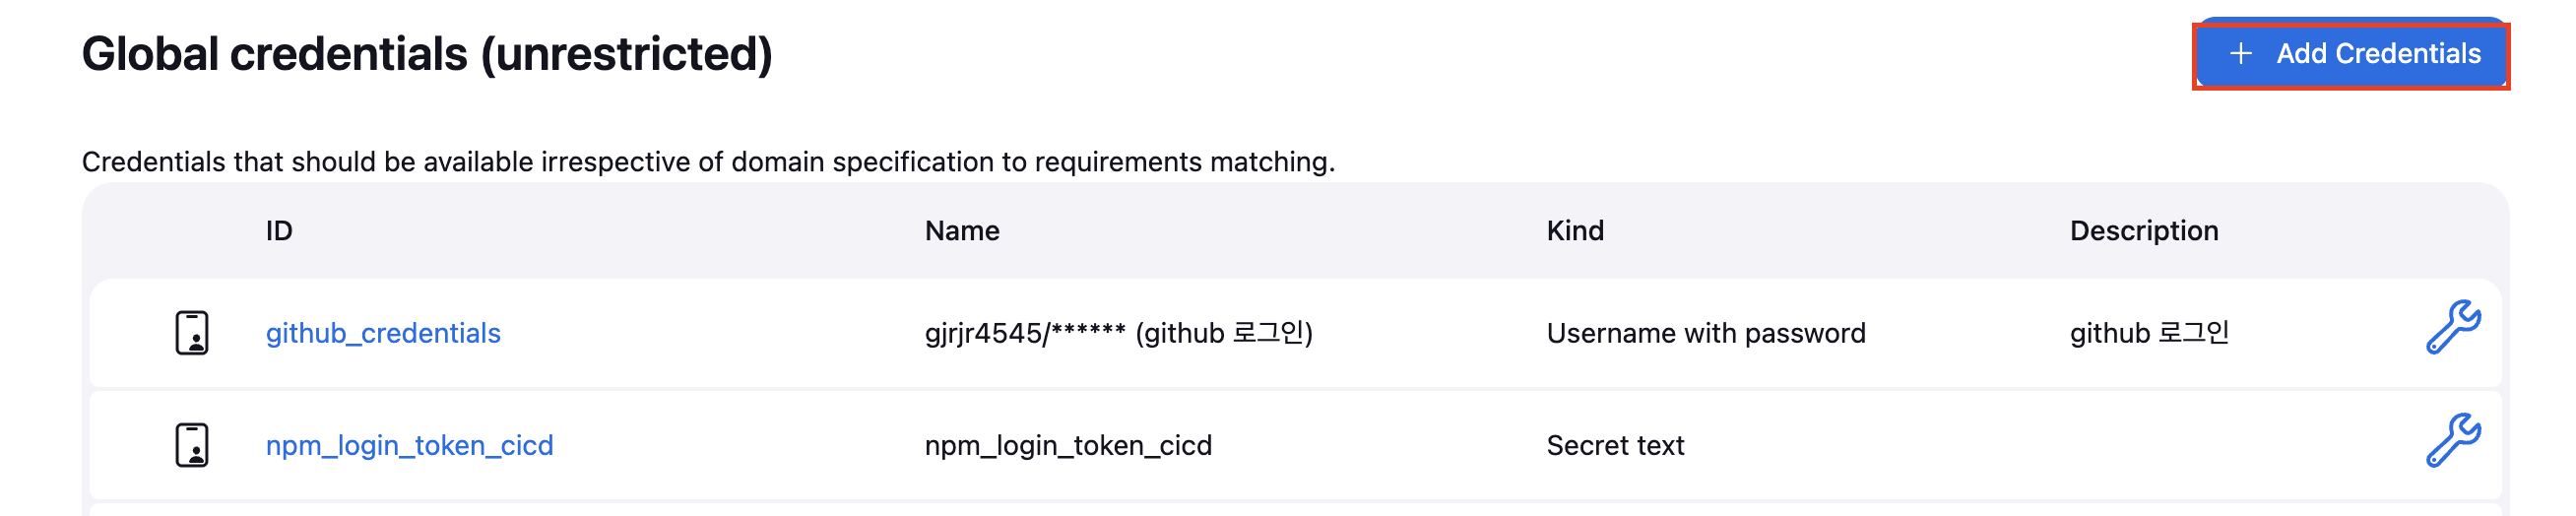
3) jenkins credentials 등록
neuxs Login에 필요한 계정 정보에 대해 등록이 필요하다
- Jenkins 관리 → Credentials 클릭
- (global) 클릭

- Add Credentials 추가
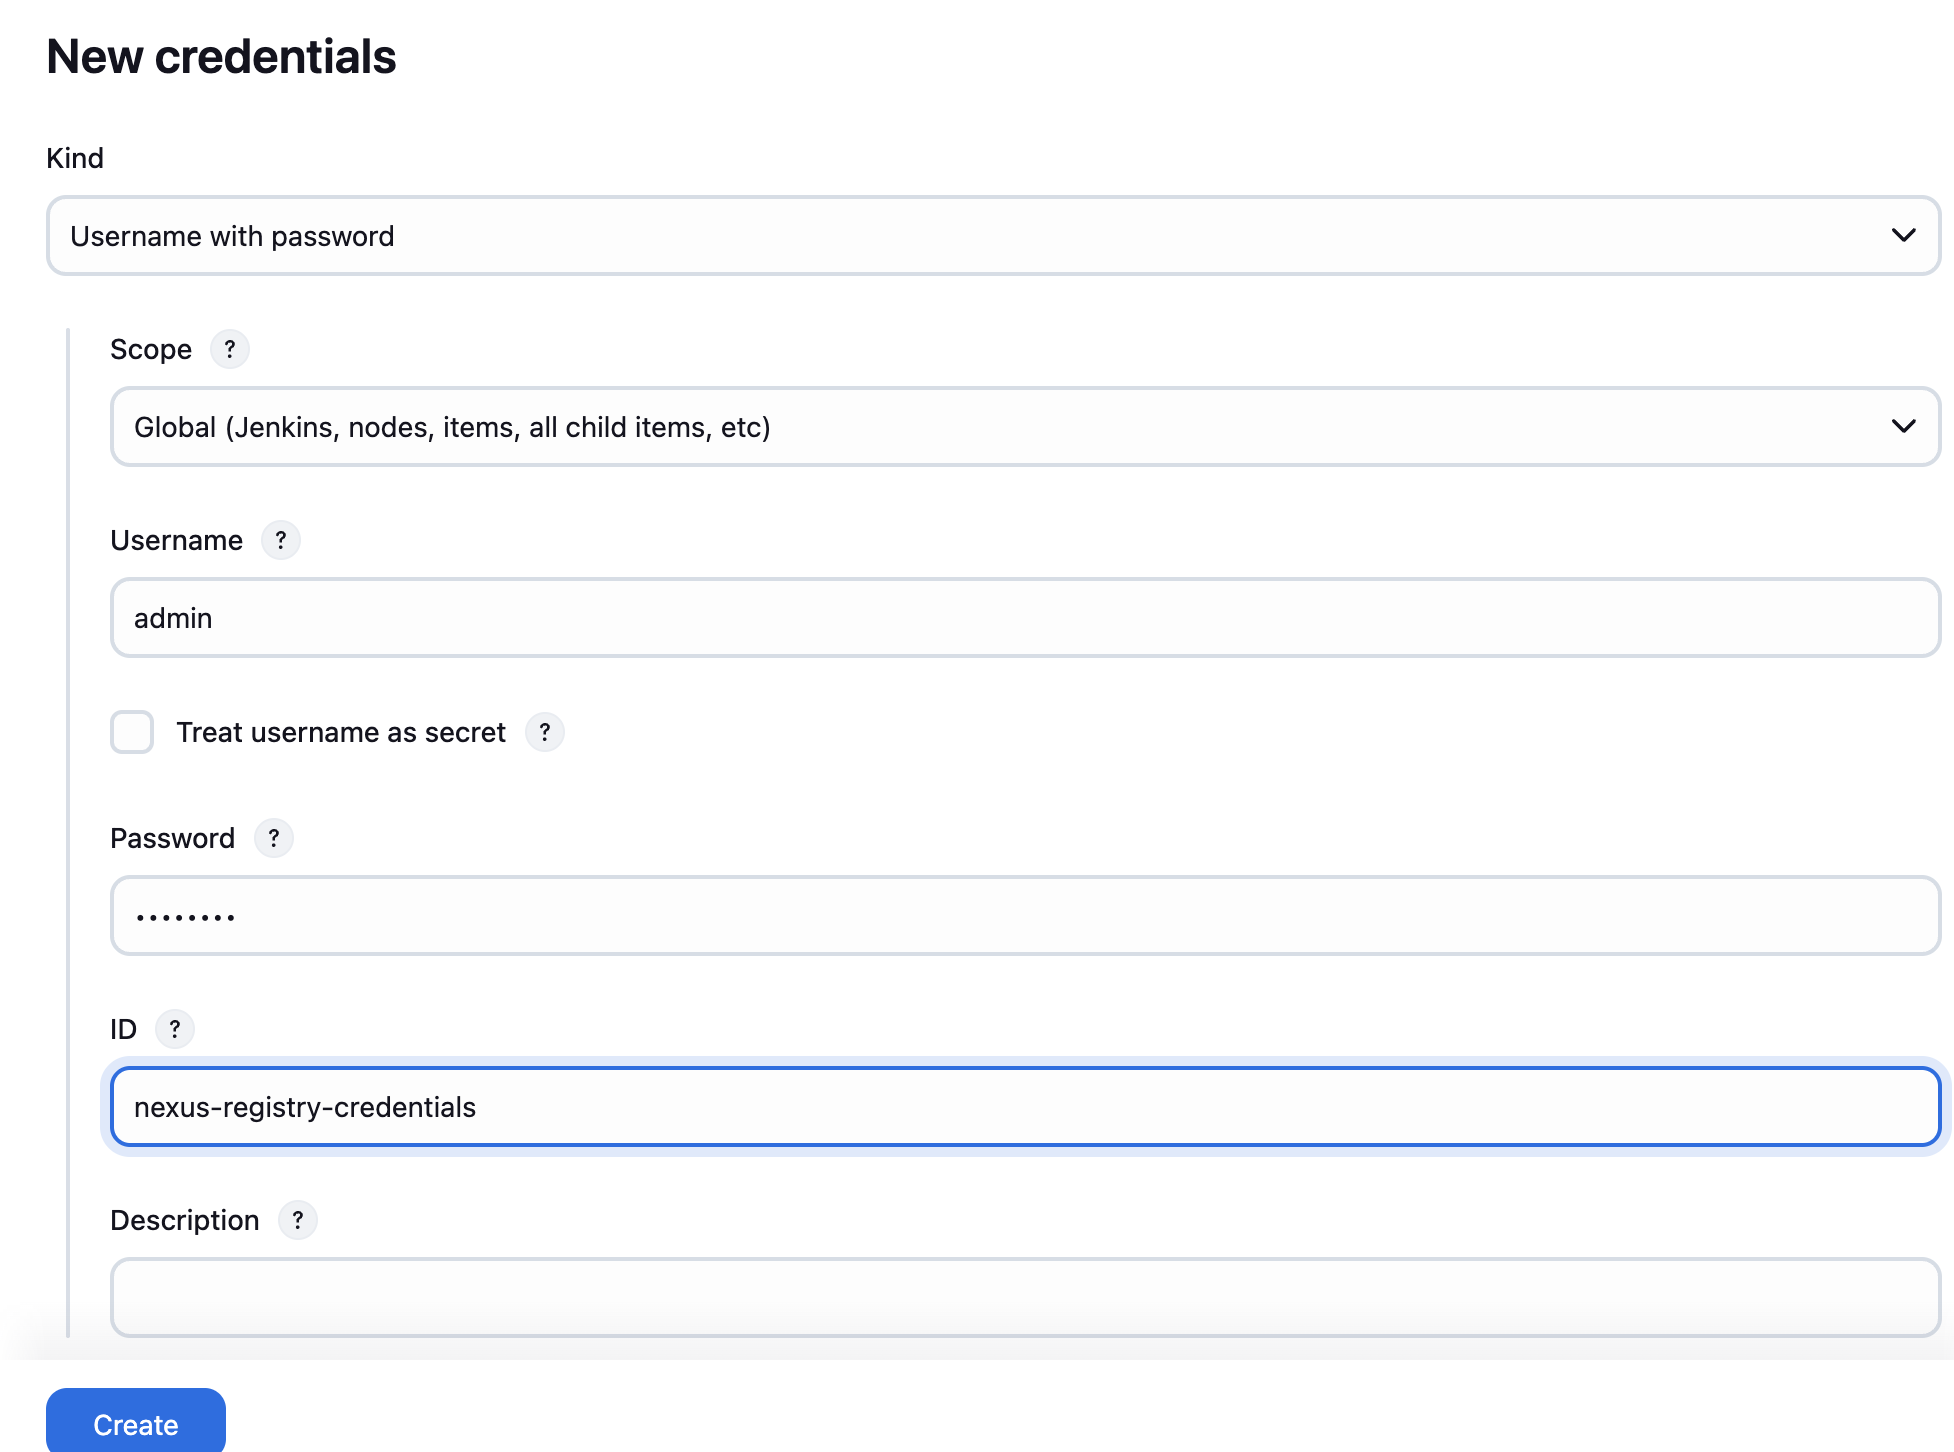
- 아래 정보대로 입력후 create 클릭
-
kind : username and password
-
Scope : Global
-
username : Nexus Repository ID
-
password : Neuxs Repository Password
-
ID : nexus-registry-credentials
-
파이프라인 생성
1) 파이프라인 개요
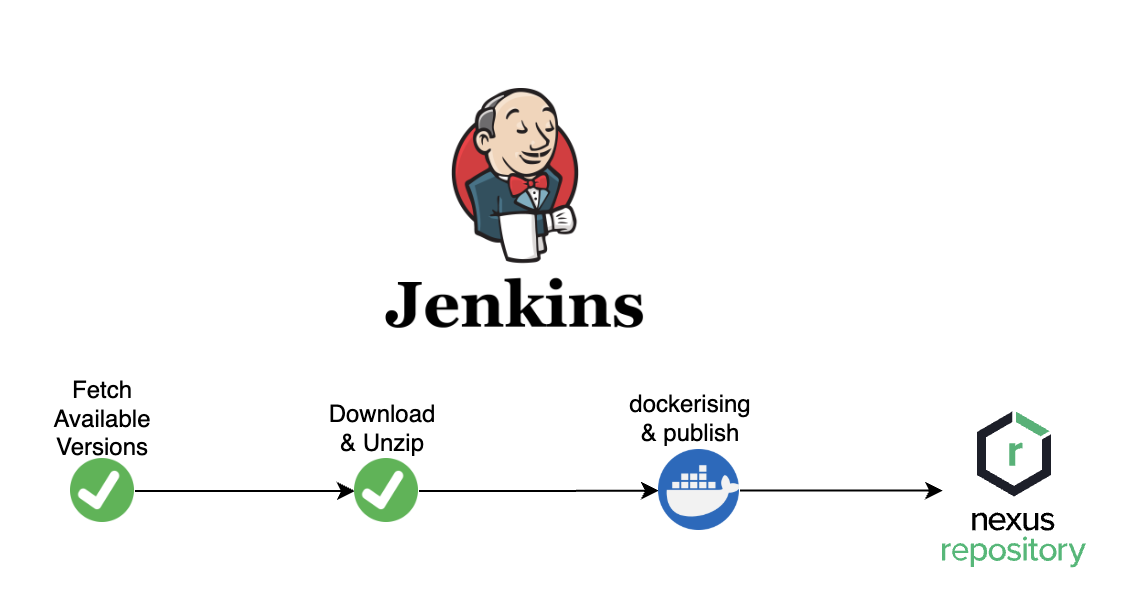
-
Fetch Available Versions
- Nexus 에 업로드 되어 있는 express-winston에 대해 다운로드 가능한 파일의 Version을 조회한다.
- 조회 한 버전을 기반으로 어떤 버전에 대해 build를 진행할지를 결정한다.
-
Download & Unzip
- 선택 된 버전을 기준으로 express-winston에 대해 다운로드 및 압축 해제를 진행한다.
-
Dockerising & Push
- express-winston 안에 존재하는 Dockerfile를 기준으로 컨테이너 이미지 생성
- 생성된 컨테이너 이미지를 Neuxs Repository에 push를 진행한다.
Pipeline Script code
pipeline {
agent any
environment {
DOCKER_IMAGE = 'express-winston'
DOCKER_REGISTRY = 'http://${neuxs_repository_url}:${docker_repository_port}'
NPM_REGISTRY = '${neuxs_repository_url}:${npm_repository_port}'
}
stages {
stage('Fetch Available Versions') {
steps {
withCredentials([usernamePassword(
credentialsId: 'nexus-registry-credentials',
usernameVariable: 'NEXUS_ID',
passwordVariable: 'NEXUS_PASSWORD'
)]) {
script {
def result = sh(
script: """
curl -s -u ${NEXUS_ID}:${NEXUS_PASSWORD} "http://${NPM_REGISTRY}/service/rest/v1/search?repository=express-winston&name=express-winston" \\
| jq -r '.items[].version' | sort -r
""",
returnStdout: true
).trim()
def versions = result.split("\n")
echo "📦 사용 가능한 버전 목록:"
versions.each { echo "- ${it}" }
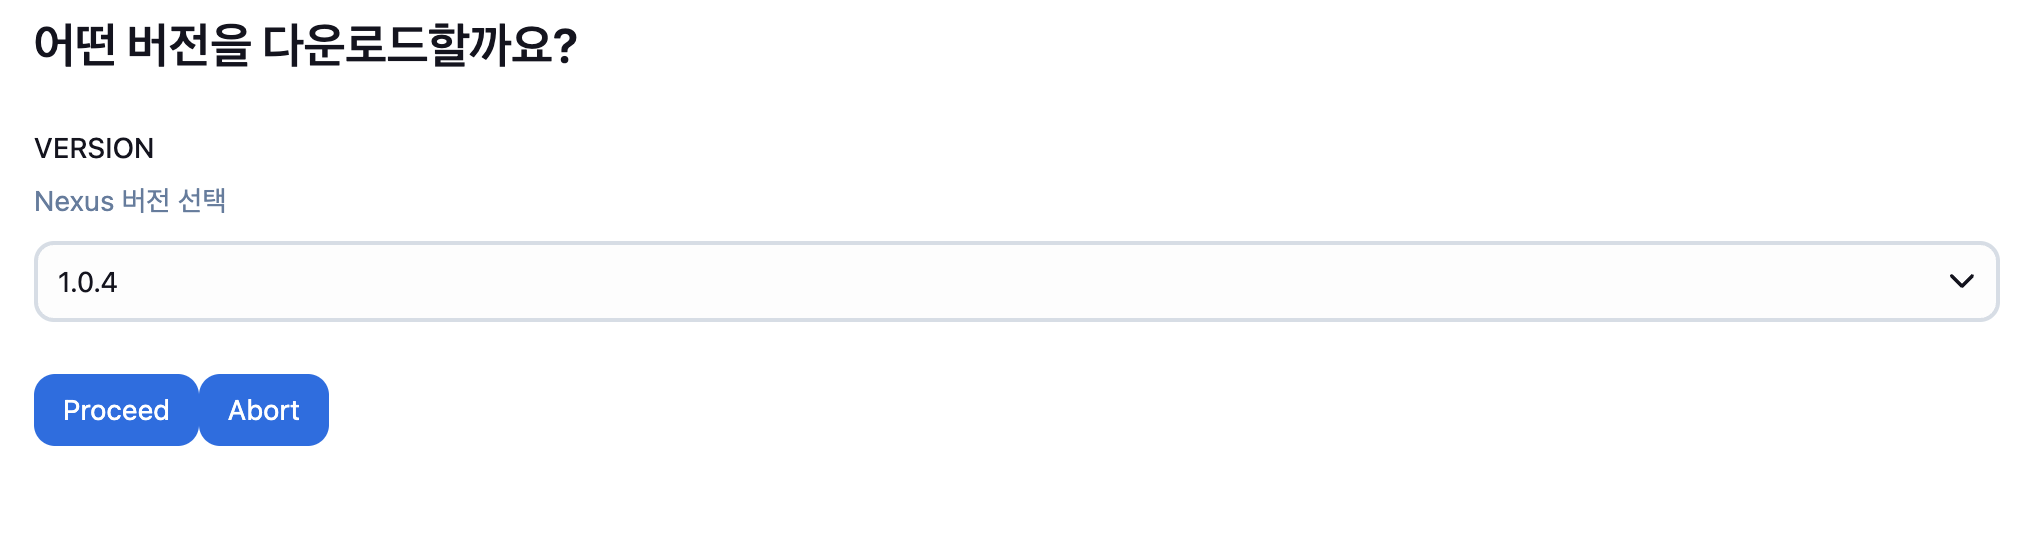
def selected = input(
message: "어떤 버전을 다운로드할까요?",
parameters: [
choice(name: 'VERSION', choices: versions.join('\n'), description: 'Nexus 버전 선택')
]
)
env.SELECTED_VERSION = selected
echo "✅ 선택된 버전: ${selected}"
}
}
}
}
stage('Download & Unzip') {
steps {
withCredentials([usernamePassword(
credentialsId: 'nexus-registry-credentials',
usernameVariable: 'NEXUS_ID',
passwordVariable: 'NEXUS_PASSWORD'
)]) {
script {
sh """
rm -rf package
rm -rf *.tgz
wget --user=${NEXUS_ID} --password='${NEXUS_PASSWORD}' http://${NPM_REGISTRY}/repository/express-winston/express-winston/-/express-winston-${env.SELECTED_VERSION}.tgz
tar -xvzf express-winston-${env.SELECTED_VERSION}.tgz
"""
}
}
}
}
stage('Check Version & Docker Push') {
steps {
script {
def pkgVersion = sh(
script: "jq -r '.version' package/package.json",
returnStdout: true
).trim()
echo "📦 package.json 버전: ${pkgVersion}"
docker.withRegistry(DOCKER_REGISTRY, 'nexus-registry-credentials') {
def image = docker.build("${DOCKER_IMAGE}:${pkgVersion}", "package")
image.push()
image.push('latest')
}
}
}
}
}
}
pipeline Script 세부 설명
(1) environment
-
DOCKER_IMAGE : Nexus Repository에 업로드 될 컨테이너 이미지 명
-
DOCKER_REGISTRY / NPM_REGISTRY : Docker, NPM Repository URL
- 여기서 NPM, DOCKER repository 모두 Neuxs이긴 하나 사용하는 포트가 다르기 때문에 분기처리를 진행
- Docker login 시에는 http 프로토콜을 이용해야 하므로 다음과 같이 설정함
-
code
     environment {
        DOCKER_IMAGE = 'express-winston'
        DOCKER_REGISTRY = 'http://${neuxs_repository_url}:${docker_repository_port}'
        NPM_REGISTRY = '${neuxs_repository_url}:${npm_repository_port}'
     }

 # 예시
     environment {
        DOCKER_IMAGE = 'express-winston'
        DOCKER_REGISTRY = 'http://52.231.190.95:5000'
        NPM_REGISTRY = '52.231.190.95:8081'
    }
(2) Fetch Available Versions
-
withCredentials : Jenkins에 등록해놓은
nexus-registry-credentials를 사용withCredentials([usernamePassword( credentialsId: 'nexus-registry-credentials', usernameVariable: 'NEXUS_ID', passwordVariable: 'NEXUS_PASSWORD' )])
- script
- code
def result = sh( script: """ curl -s -u ${NEXUS_ID}:${NEXUS_PASSWORD} "http://${NPM_REGISTRY}/service/rest/v1/search?repository=express-winston&name=express-winston" \\ | jq -r '.items[].version' | sort -r """, returnStdout: true ).trim() def versions = result.split("\n") echo "📦 사용 가능한 버전 목록:" versions.each { echo "- ${it}" } def selected = input( message: "어떤 버전을 다운로드할까요?", parameters: [ choice(name: 'VERSION', choices: versions.join('\n'), description: 'Nexus 버전 선택') ] ) env.SELECTED_VERSION = selected echo "✅ 선택된 버전: ${selected}"
- code
-
설명
- Neux Repository에 upload 된 정보는 curl 명령어를 이용하여 조회가 가능하다.
curl -s -u ${NEXUS_ID}:${NEXUS_PASSWORD} "http://${NEXUS_REPOISTORY_URL}:${NPM_REPOSITORY_PORT}/service/rest/v1/search?repository=${REPOSITORY_NAME}}&name=${PROJECT_NAME}" \\n| jq -r '.items[].version' | sort - curl -s -u ${NEXUS_ID}:${NEXUS_PASSWORD} "http://52.231.190.95:8081/service/rest/v1/search?repository=express-winston&name=express-winston" \\n| jq -r '.items[].version' | sort -r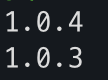
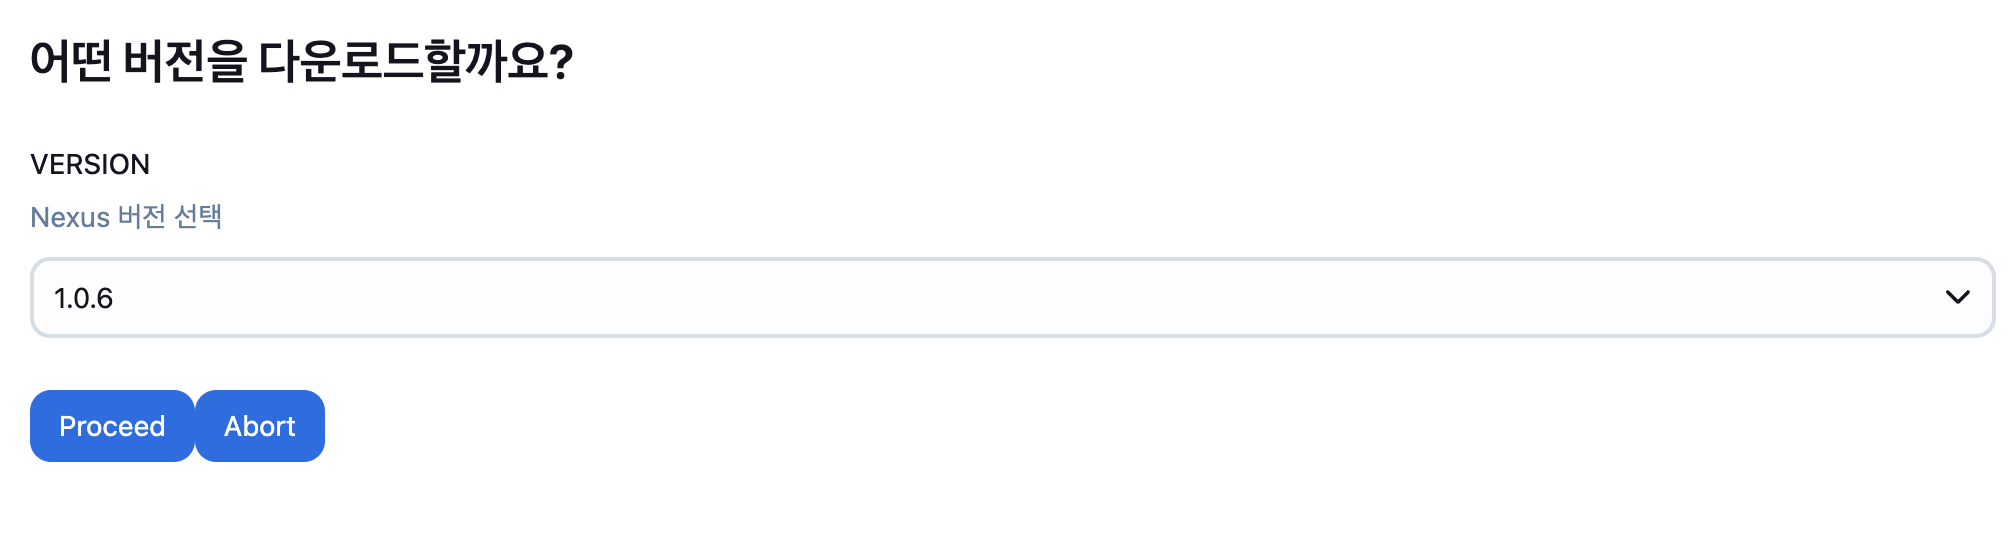
- 조회 해온 version에 Jenkins에서 제공하는
Input Request기능을 이용하여 버전을 선택할수 있다. - 해당 이미지는 Jenkins Pipeline를 실행 후에
Console Output에서 로그를 확인하였을때 다음과 같은 화면이 보여진다.
- Neux Repository에 upload 된 정보는 curl 명령어를 이용하여 조회가 가능하다.
(3) Download & Unzip
선택된 Version을 기준으로 다운로드 및 압축 해제하는 작업이 필요합니다.
이때 wget 명령어를 이용할 예정이고, private Repository 이므로 ID, Password가 필요합니다.
Fetch Available Versions 와 마찬가지로 등록 하였던 nexus-registry-credentials 을 이용합니다.
withCredentials([usernamePassword(
                        credentialsId: 'nexus-registry-credentials',
                        usernameVariable: 'NEXUS_ID',
                        passwordVariable: 'NEXUS_PASSWORD'
)]) {
script {
sh """
rm -rf package
rm -rf *.tgz
wget --user=${NEXUS_ID} --password='${NEXUS_PASSWORD}' http://${NPM_REGISTRY}/repository/express-winston/express-winston/-/express-winston-${env.SELECTED_VERSION}.tgz
tar -xvzf express-winston-${env.SELECTED_VERSION}.tgz
"""
}
}(4) Dockerrising & push
해당 작업은 컨테이너 이미지를 생성하고, 생성한 이미지를 기준으로 Nexus Repository에 upload를 진행합니다.
        stage('Check Version & Docker Push') {
            steps {
                script {
                    def pkgVersion = sh(
                            script: "jq -r '.version' package/package.json",
                            returnStdout: true
                    ).trim()

                    echo "📦 package.json 버전: ${pkgVersion}"

                    docker.withRegistry(DOCKER_REGISTRY, 'nexus-registry-credentials') {
                        def image = docker.build("${DOCKER_IMAGE}:${pkgVersion}", "package")
                        image.push()
                        image.push('latest')
                    }
                }
            }
}-
version 조회
package.json에는 여러가지 정보가 존재합니다.
이 중에서 version 정보를 조회를 하여 Dokcer version에 이용합니다.
{"name":"express-winston","version":"1.0.4","scripts":{"start":"node ./index.js"},"bin":{},"publishConfig":{}}
-
Docker image 생성 및 push
version 조회가 완료되었다면 이미지를 생성합니다.
이때 조회한 version, latest 두개의 버전으로 이미지를 생성한 다음 push 진행합니다.
docker.withRegistry(DOCKER_REGISTRY, 'nexus-registry-credentials') {
	def image = docker.build("${DOCKER_IMAGE}:${pkgVersion}", "package")
	image.push()
	image.push('latest')
}
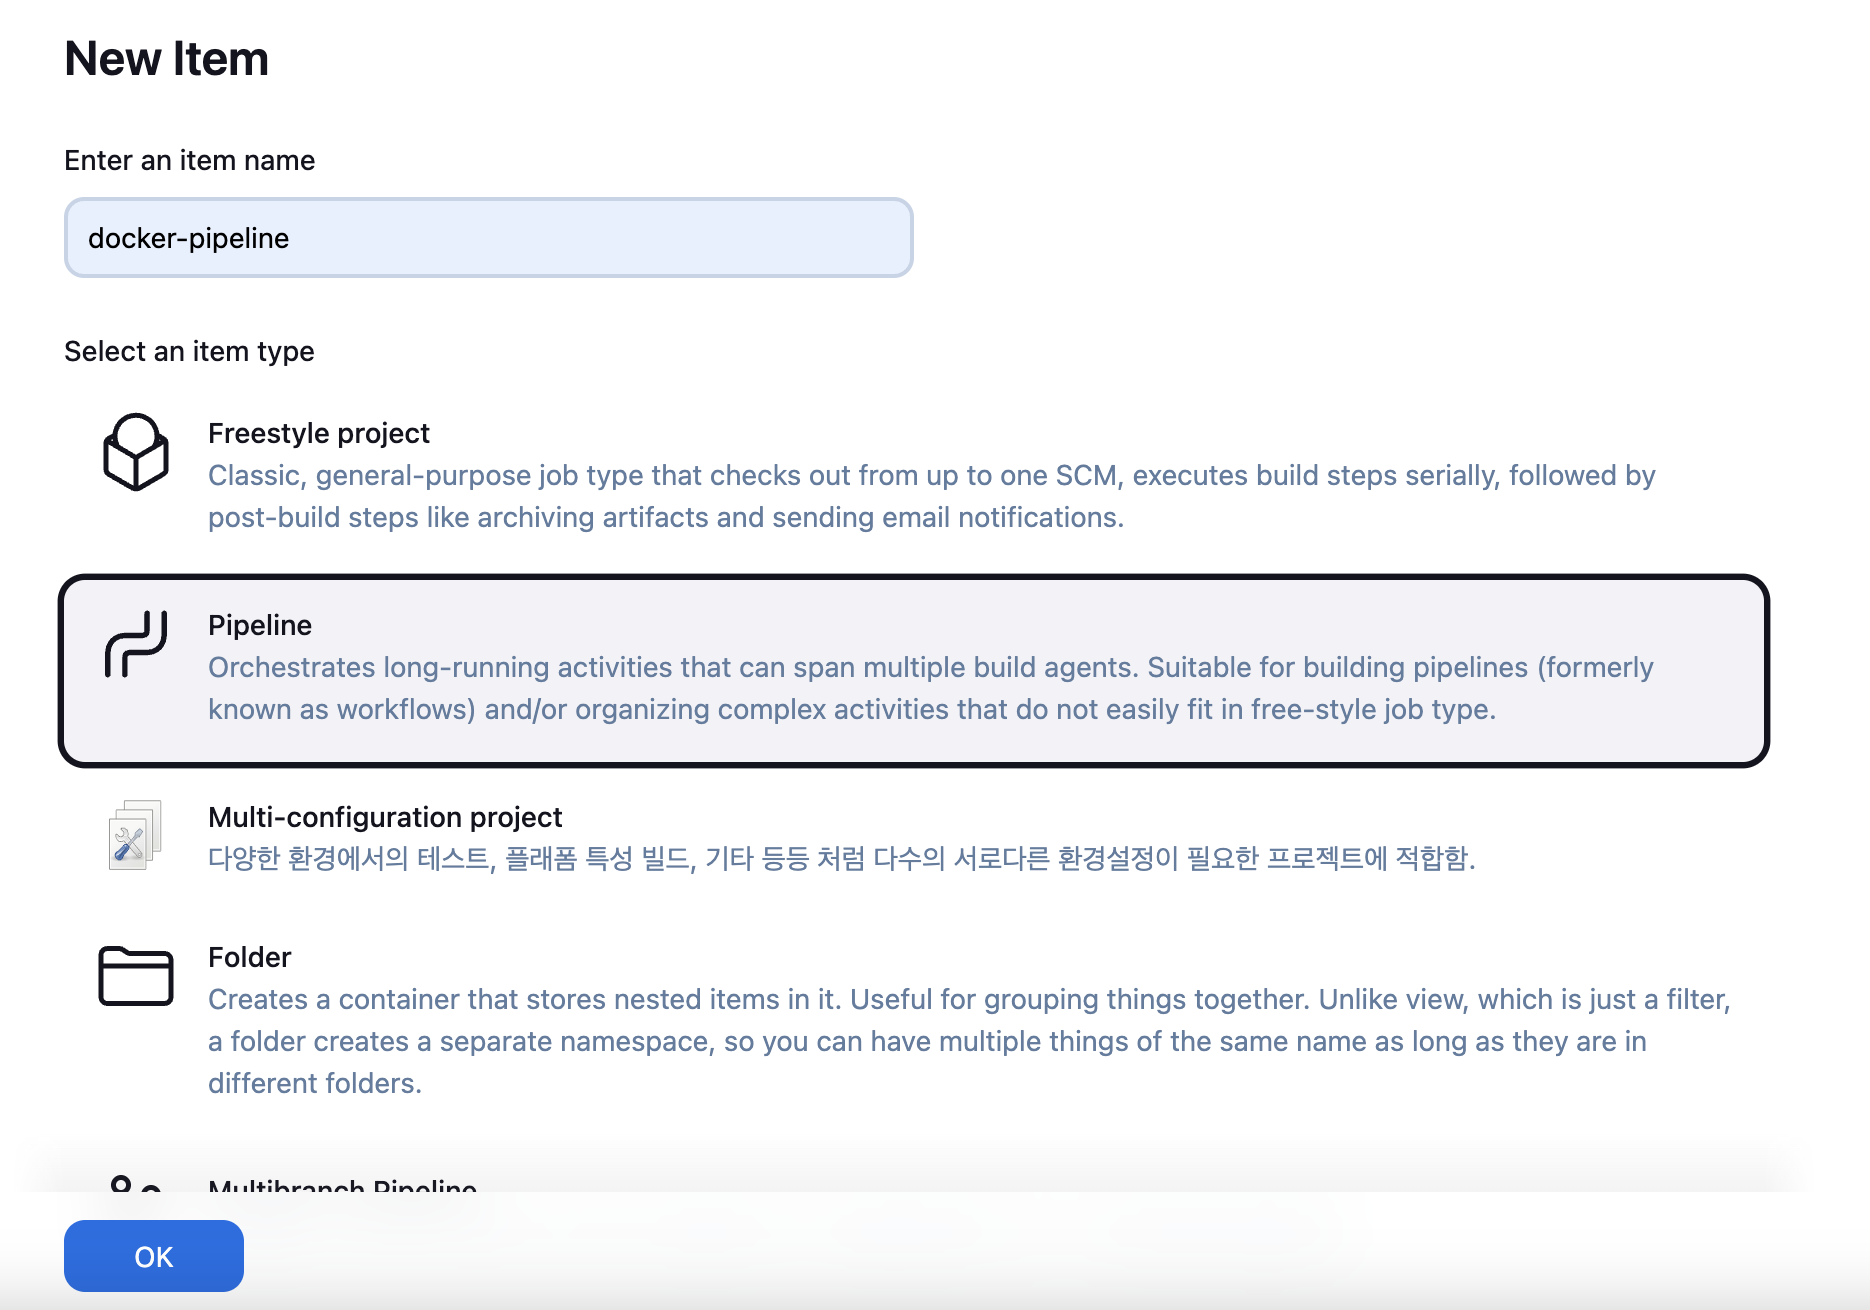
파이프라인 생성
- new item 클릭
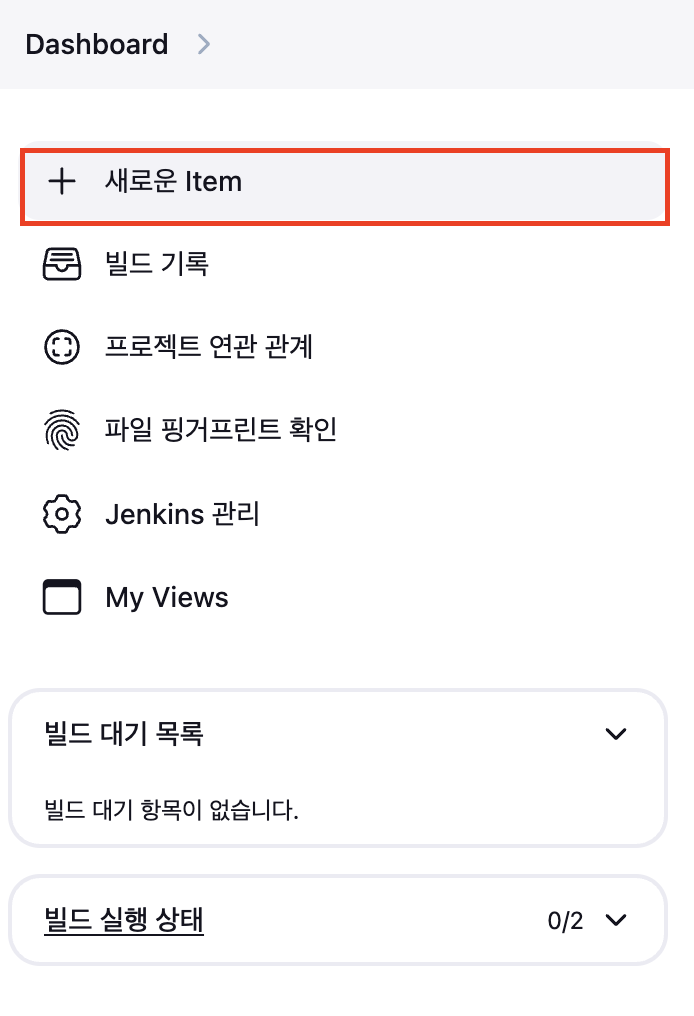
- name 입력, pipeline 선택후 OK 클릭
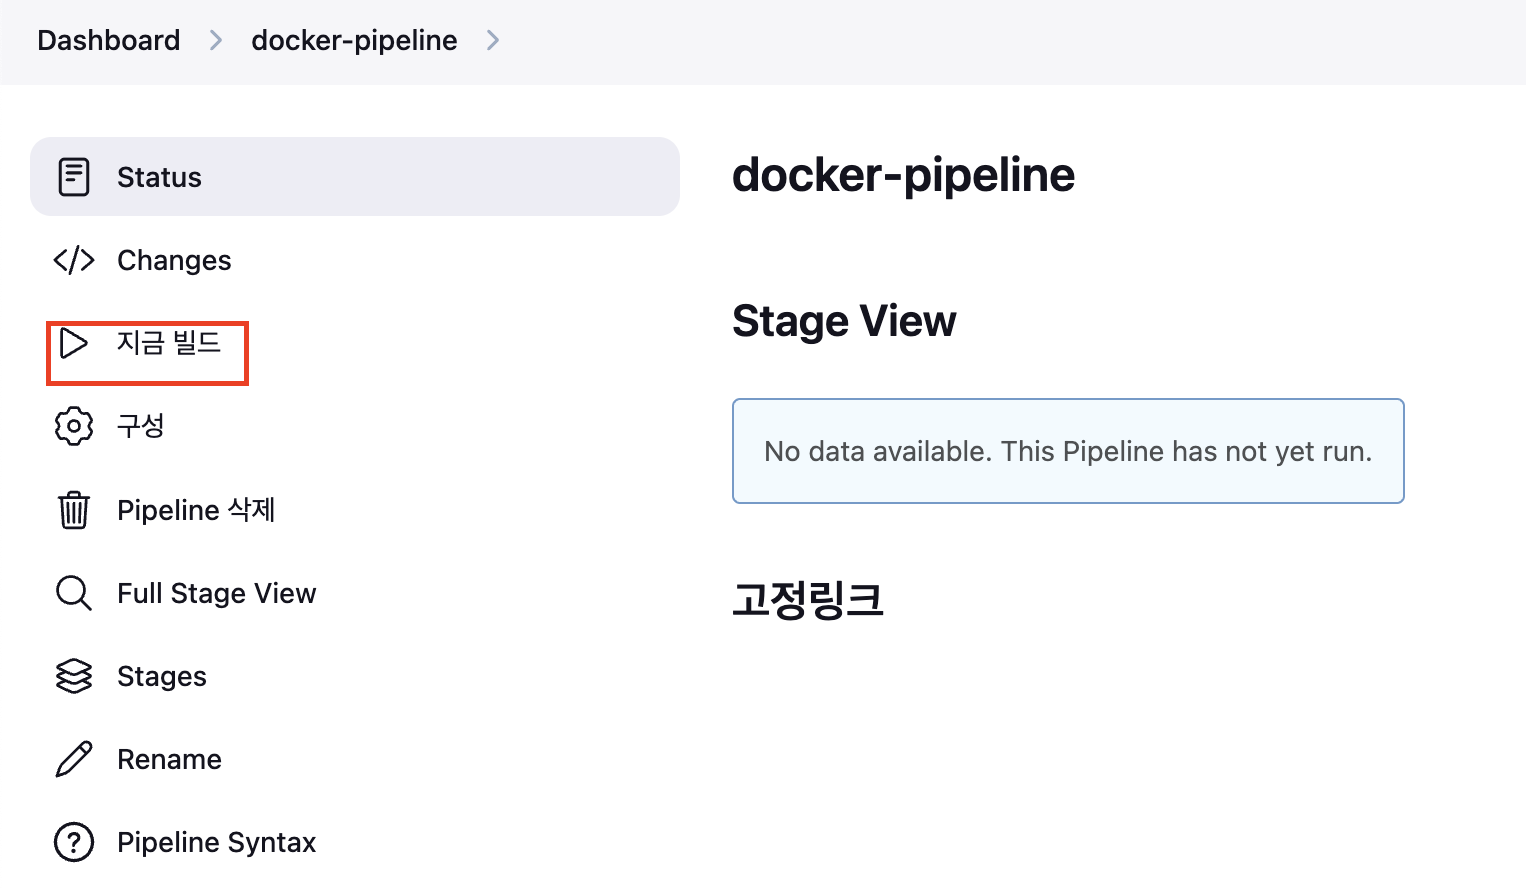
파이프라인 실행
파이프라인 작업이 완료되었다면 실행을 해봅시다.
- 지금 빌드를 클릭 합니다.
- 빌드를 클릭하였다면 아래와 같은 화면이 나오는데 클릭을 진행합니다.

- 왼쪽 매뉴템에 Console Output를 클릭합니다.

- log 하단에 보면 Input requested를 클릭합니다,.

- 빌드하려는 버전을 선택한 후 Proceed를 클릭합니다.
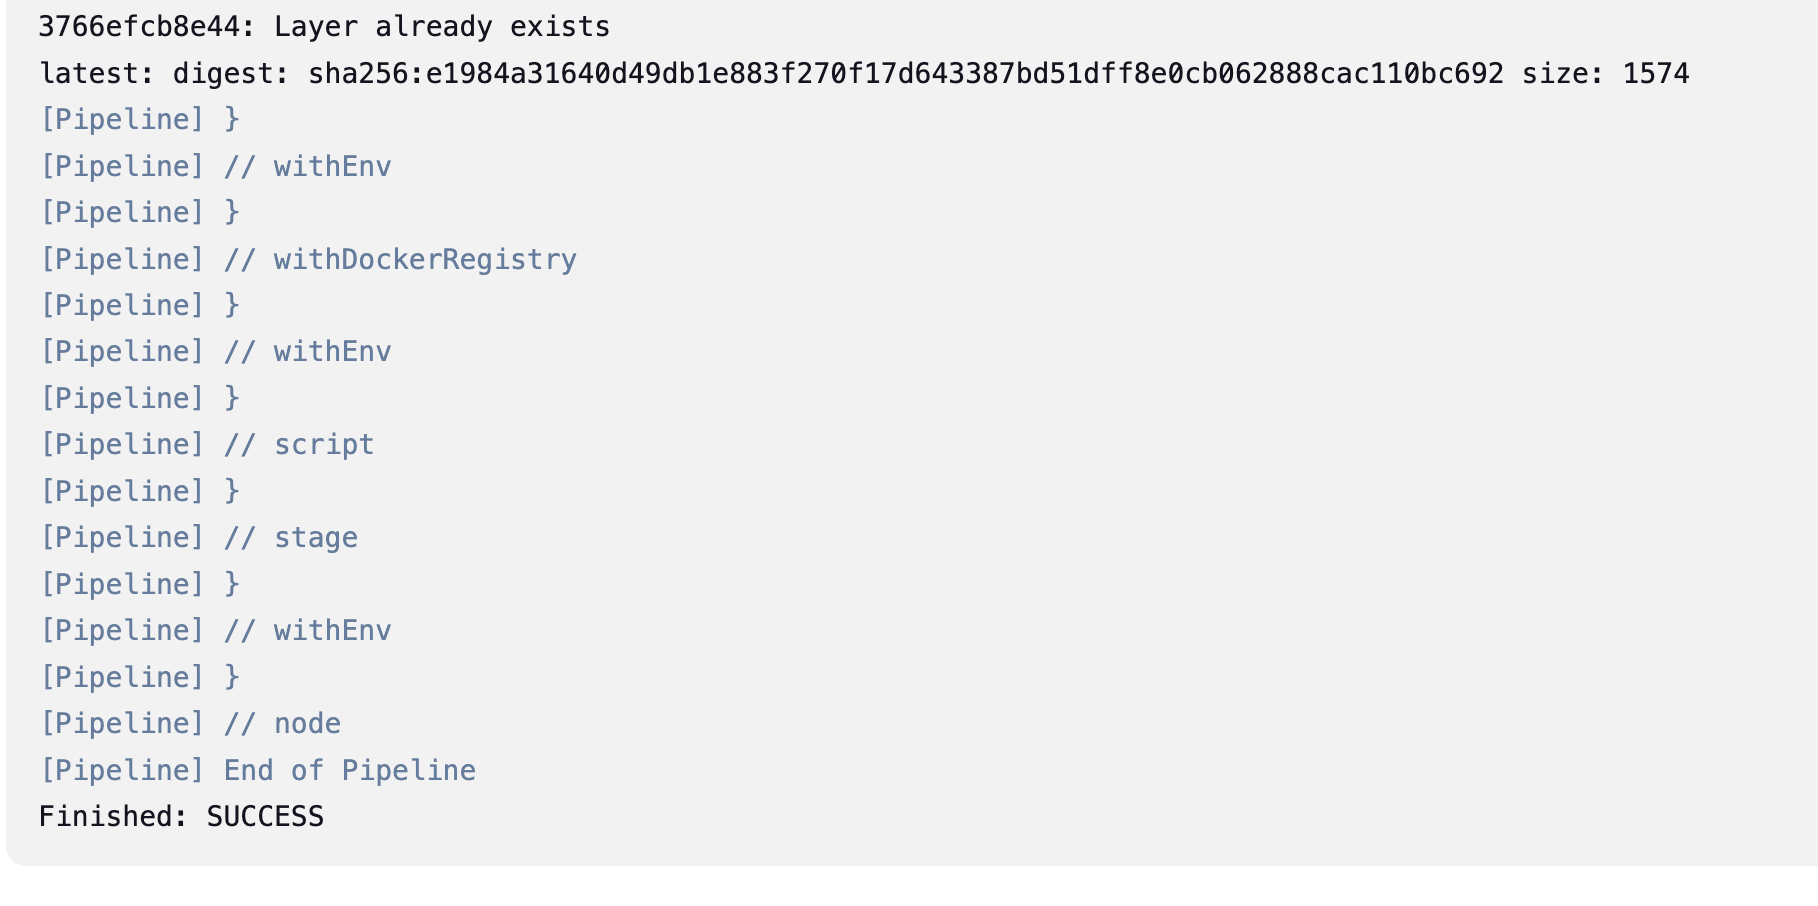
- 빌드가 완료되면 다음과 같이 SUCESS가 발생합니다.
Neuxs Repository 확인
빌드가 성공하였다면 이제 Nexus Repository에 제대로 업로드 되었는지 확인합니다.
Nexus Repository에 접근하면 다음과 같이 manifests, tags가 업로드가 된것을 확인 할수 있스빈다.
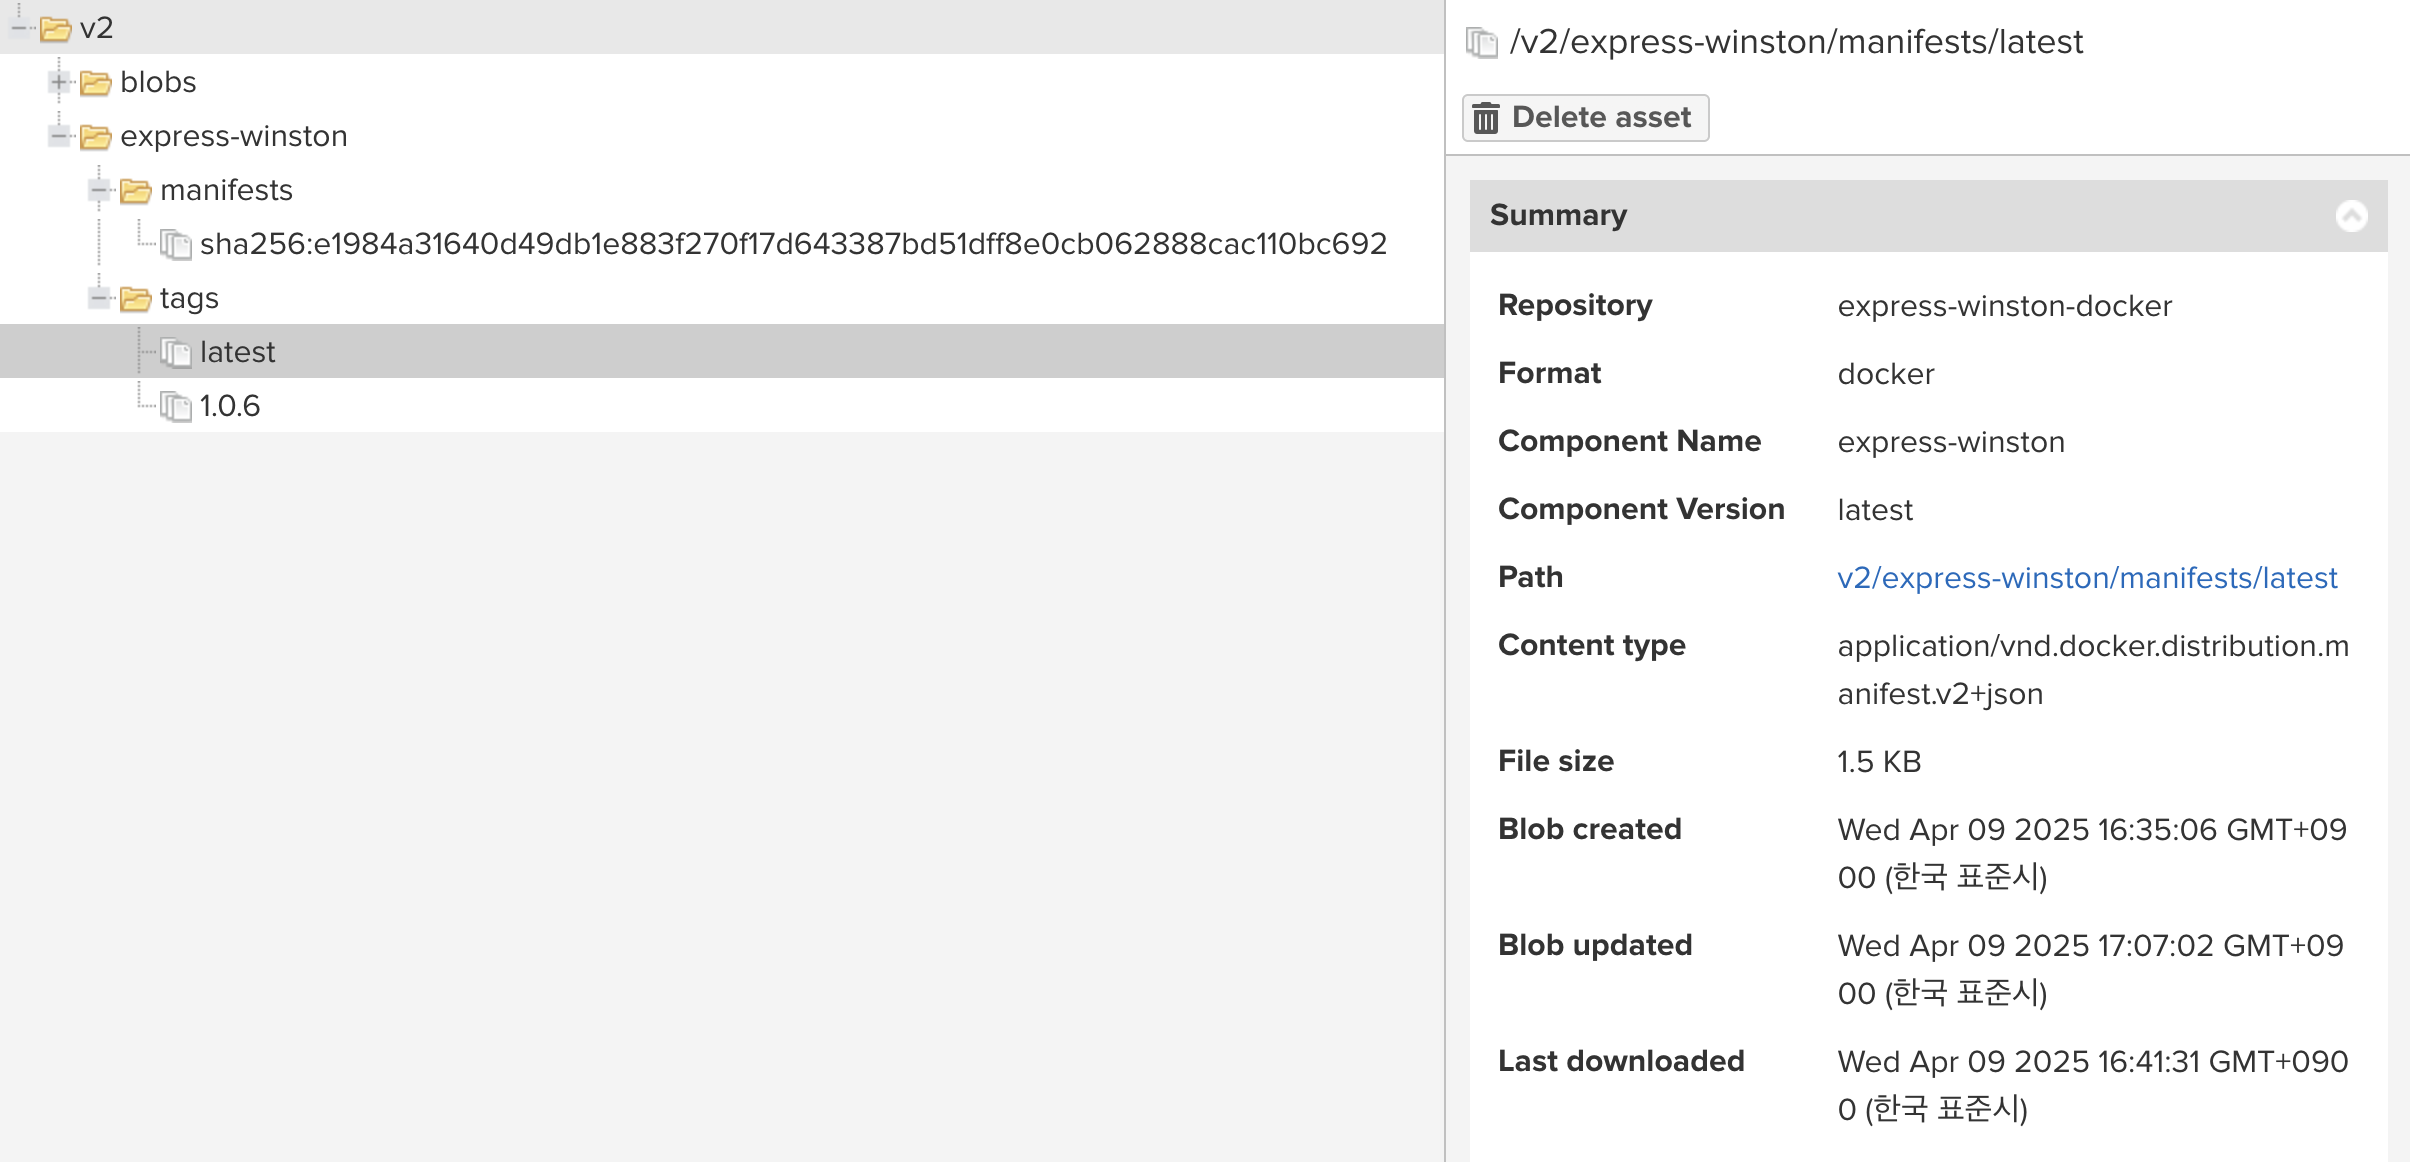
image pull 및 container 실행
upload가 된것을 확인하였다면 마지막으로 pull를 받아서 container 실행을 진행합니다.
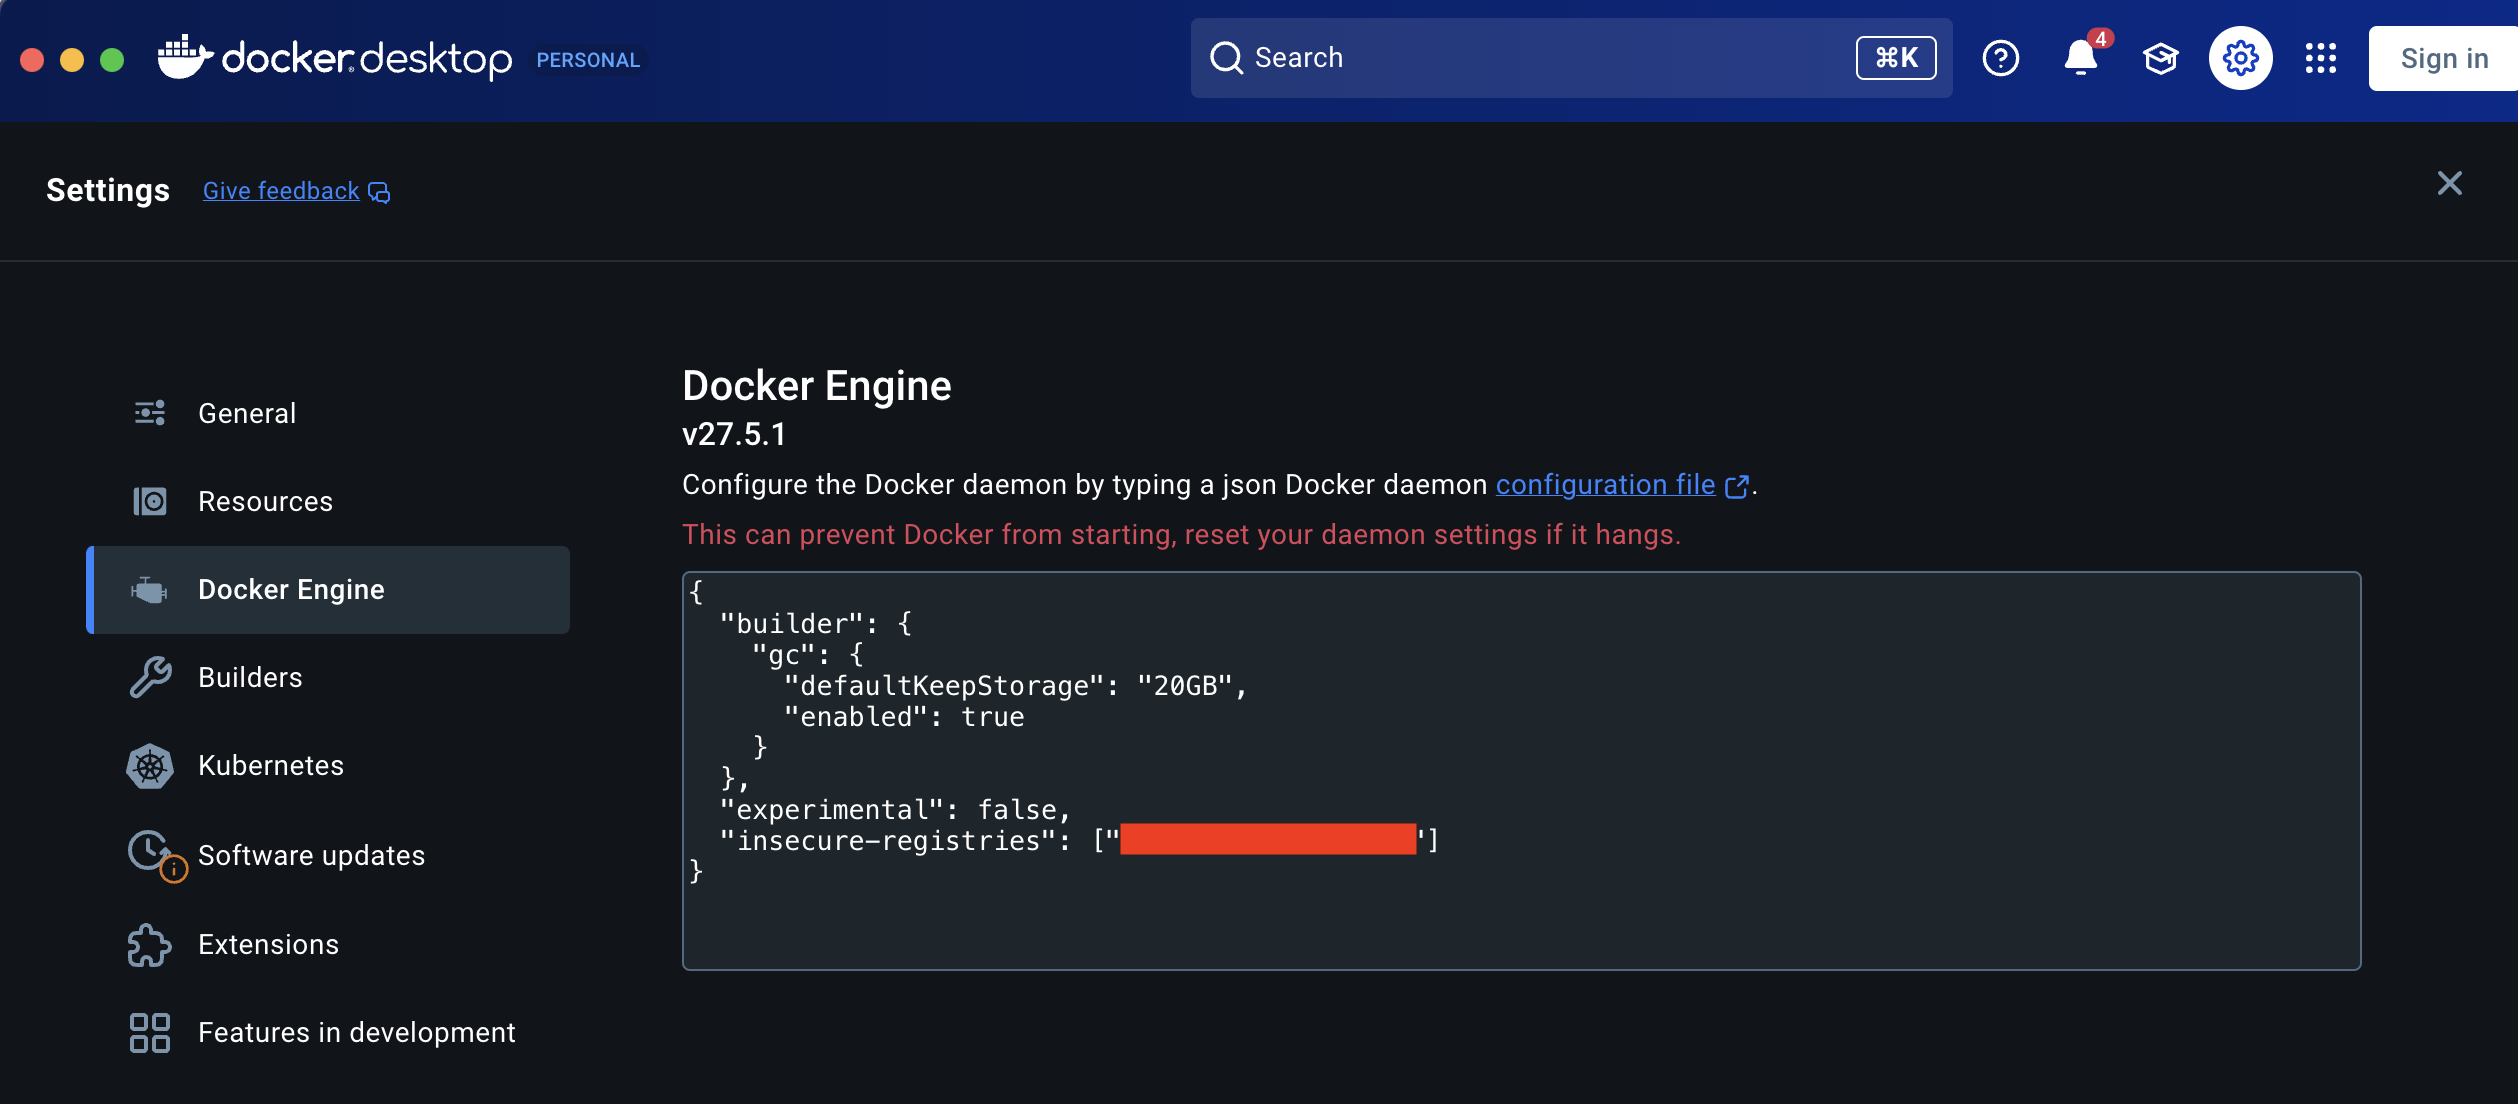
Docker insecure-registries 등록
만약 Neuxs Repository가 http를 이용할 경우 mac에 설치 되어 있는 docker에도 insecure-registries 설정이 필요합니다.
- Setting icon 클릭 → Docker Engine 클릭
- "insecure-registries": ["${docker_repository_url}: ${docker_repository_port}"] 입력후 저장 클릭
Docker Login
해당 작업이 끝났다면 Nexus Repository에 로그인을 진행합니다.
docker login ${docker_repository_url}:${docker_repository_port} -u ${ID} -p ${password}해당 명령어를 이용하여 로그인을 진행하면 다음과 같은 메세지가 나옵니다.

Docker image pull
이제 이미지를 pull 받습니다.
이때 Nexus Repository를 보시면 다음과 같이 구성이 되어 있습니다.
- express-winston : docker image name
- tags : version

해당 정보를 참고하여 다음 명령어를 진행합니다.
docker pull ${docker_repository_url}:${docker_repository_port}/${docker_name}:${version}

# 예시
docker pull 127.0.0.1:5000/express-winston:latest
이미지가 제대로 받아왔는지 확인을 합니다.
docker image
이제 해당 이미지를 기반으로 container를 실행합니다.
docker run -dit --name=${name} ${docker_repository_url}:${docker_repository_port}/${docker_image_name} -p 4000:4000 /bin/sh
docker run -dit --name=express-winston -p 4000:4000 127.0.0.1:5000/express-winston  /bin/sh
해당 명령어를 선택후에 접속하게 되면 다음과 같이 express가 나오는 것을 확인할수 있다.

마지막으로
이번 포스팅에선 지난번에 배포된 Node Project를 다운 받아 도커라이징 하는 작업을 진행하였습니다.
다음 포스팅에선 express-winston에 origin/master에 tag가 발생하였을때 github action를 이용하여 다음 절차를 진행하고자 합니다.

