
실전 모델 만들기
data : Fashion_MNIST
- Functional API로 모델 만들기
- pixel값 1 ~ 255를 0 ~ 1사이값 Float 32로 만들기
- One Hot Encoding Label에 적용하기
- 학습과 검증 데이터로 나누기.
- compile, 학습/예측/평가
1. Funtional API 적용
from tensorflow.keras.layers import Layer, Input, Dense, Flatten
from tensorflow.keras.models import Model
import tensorflow as tf

INPUT_SIZE = 28

def create_model():
    input_tensor = Input(shape=(INPUT_SIZE, INPUT_SIZE))
    x = Flatten()(input_tensor)
    x = Dense(100, activation='relu')(x)
    x = Dense(30, activation='relu')(x)
    output = Dense(10, activation='softmax')(x)

    model = Model(inputs=input_tensor, outputs=output)
    return model
2. Preprocessing
1) pixel값 범위 조정
import numpy as np
from tensorflow.keras.utils import to_categorical
from sklearn.model_selection import train_test_split

# 0 ~ 1사이값의 float32로 변경하는 함수
def get_preprocessed_data(images, labels):

    # 학습과 테스트 이미지 array를 0~1 사이값으로 scale 및 float32 형 변형.
    images = np.array(images/255.0, dtype=np.float32)
    labels = np.array(labels, dtype=np.float32)

    return images, labels
2) One-Hot-Encoding
# 0 ~ 1사이값 float32로 변경하는 함수 호출 한 뒤 OHE 적용
def get_preprocessed_ohe(images, labels):
    images, labels = get_preprocessed_data(images, labels)
    # OHE 적용
    oh_labels = to_categorical(labels)
    return images, oh_labels
3) 검증 데이터 분리
# 학습/검증/테스트 데이터 세트에 전처리 및 OHE 적용한 뒤 반환
def get_train_valid_test_set(train_images, train_labels, test_images, test_labels, valid_size=0.15, random_state=2021):
    # 학습 및 테스트 데이터 세트를  0 ~ 1사이값 float32로 변경 및 OHE 적용.
    train_images, train_oh_labels = get_preprocessed_ohe(train_images, train_labels)
    test_images, test_oh_labels = get_preprocessed_ohe(test_images, test_labels)

    # 학습 데이터를 검증 데이터 세트로 다시 분리
    tr_images, val_images, tr_oh_labels, val_oh_labels = train_test_split(train_images, train_oh_labels, test_size=valid_size, random_state=random_state)

    return (tr_images, tr_oh_labels), (val_images, val_oh_labels), (test_images, test_oh_labels )
4) 데이터셋 생성
from tensorflow.keras.datasets import fashion_mnist
# Fashion MNIST 데이터 재 로딩 및 전처리 적용하여 학습/검증/데이터 세트 생성.

(train_images, train_labels), (test_images, test_labels) = fashion_mnist.load_data()
print(train_images.shape, train_labels.shape, test_images.shape, test_labels.shape)
(tr_images, tr_oh_labels), (val_images, val_oh_labels), (test_images, test_oh_labels) = \
    get_train_valid_test_set(train_images, train_labels, test_images, test_labels, valid_size=0.15, random_state=2021)
print(tr_images.shape, tr_oh_labels.shape, val_images.shape, val_oh_labels.shape, test_images.shape, test_labels.shape)
>> (60000, 28, 28) (60000,) (10000, 28, 28) (10000,)
>> (51000, 28, 28) (51000, 10) (9000, 28, 28) (9000, 10) (10000, 28, 28) (10000,)3. 모델 세팅
from tensorflow.keras.optimizers import Adam

# Model 생성 및 optimizer, loss, metric 적용
model = create_model()
model.summary()

model.compile(optimizer=Adam(0.001), loss='categorical_crossentropy', metrics=['accuracy'])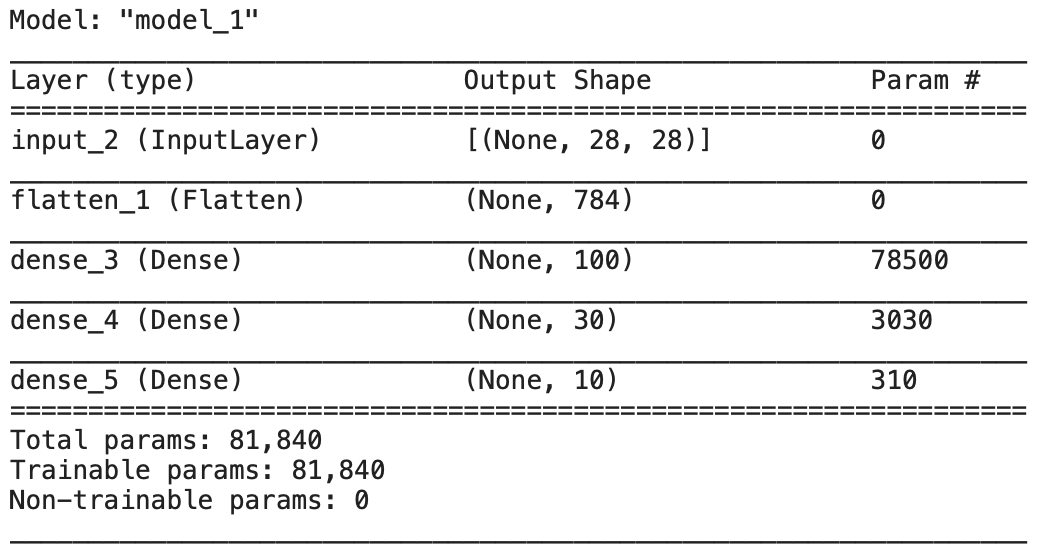
4. 학습 및 시각화
# 학습
history = model.fit(x=tr_images, y=tr_oh_labels, batch_size=128, epochs=20, validation_data=(val_images,val_oh_labels))
# 시각화
import matplotlib.pyplot as plt
%matplotlib inline
def show_history(history):
plt.plot(history.history['accuracy'], label='train')
plt.plot(history.history['val_accuracy'], label='valid')
plt.title("accuracy")
plt.legend()
plt.show()
plt.plot(history.history['loss'], label='loss')
plt.plot(history.history['val_loss'], label='val_loss')
plt.title("Loss")
plt.legend()
plt.show()
show_history(history)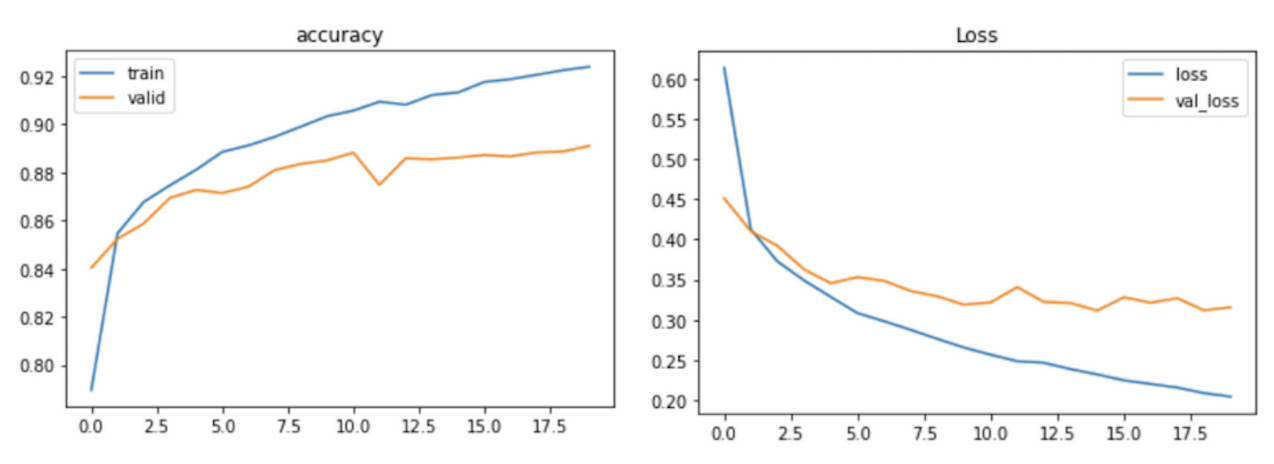
5. Test 검증
# 테스트 데이터 세트로 모델 성능 검증
model.evaluate(test_images, test_oh_labels, batch_size=256, verbose=1)
40/40 [==============================] - 0s 2ms/step - loss: 0.3618 - accuracy: 0.8782
[0.36183494329452515, 0.8781999945640564]

✏️세상의 모든 기록 ✏️