Chapter 7
Nested Parallel
1. Nested Parallel
개요
- OpenMP 3.0부터 지원
- 병렬화 효율성 및 편의성의 증대
function
omp_set_nested(): nested parallel 사용 여부 설정 가능- 인수 1: 사용 / 인수 0: 사용 안함
omp_get_nested(): nested parallel 지원 여부 결과 return
주의
- OpenMP 5.2에서 deprecate 됨
- HPC 환경에서는 사용하지 않는 것을 권장 (ex. 계산과학)
2. Example
C code
#include <stdio.h>
#include <omp.h>

int main()
{
	int tid;
    omp_set_nested(1); // nested parallel 사용
    omp_set_num_threads(2);
#pargma omp parallel private(tid)
{
	tid=omp_get_thread_num();
    printf("thread id=%d\n", tid);
    if (tid==1){
    	#pragma omp parallel private(tid)
        {
        	tid = omp_get_thread_num();
            printf("\t thread id=%d\n", tid);
        }
    }
}
}
Result
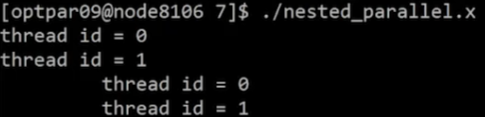
- 외부 병렬문에서
thread id=0,thread id=1출력 - 내부 병렬문에서
\t thread id=0,\t thread id=1출력
해석
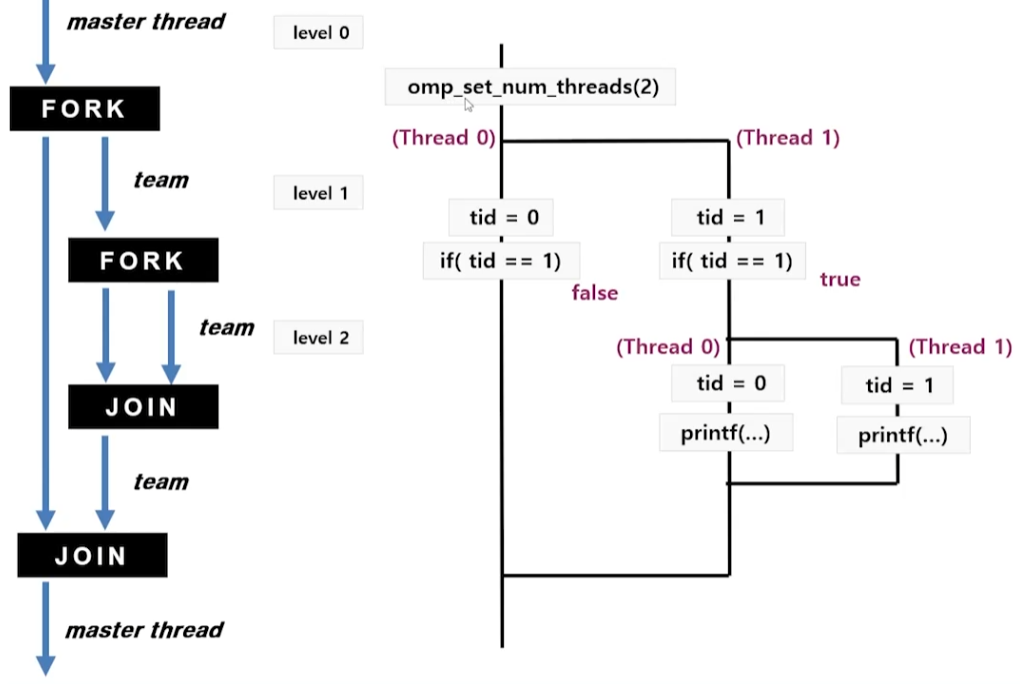
- 처음
omp_set_num_threads(2)에서 Thread 0, Thread 1 생성 if (tid==1)에 의해 Thread 1에서 Thread 0, Thread 1이 다시 생성- Master Thread == level 0이며, fork를 할 때 마다 level이 1씩 증가
3. Additional Functions
| function | 설명 |
|---|---|
| omp_set_nested(nested) | Nested Parallelism 활성화/비활성화 |
| omp_get_nested() | Nested 설정 여부 return |
| omp_get_level() | 현재 스레드의 level값 return |
| omp_get_ancestor_thread_num(level) | 현재 스레드의 parent thread return |
| omp_get_team_size(level) | 스레드 팀의 크기 return |
Nested Parallel 데이터 유효범위
1. Example 1
C code
#include <stdio.h>
#include <omp.h>

int main()
{
	int x,y,z;
    omp_set_nested(1);
    omp_set_num_threads(4);
#pragma omp parallel private(y)
{
	// x: shared, y: private, z: shared
	#pragma omp parallel num_threads(2) private(x)
    {
    	// x: private, y: shared, z: shared
    }
}
}
해석
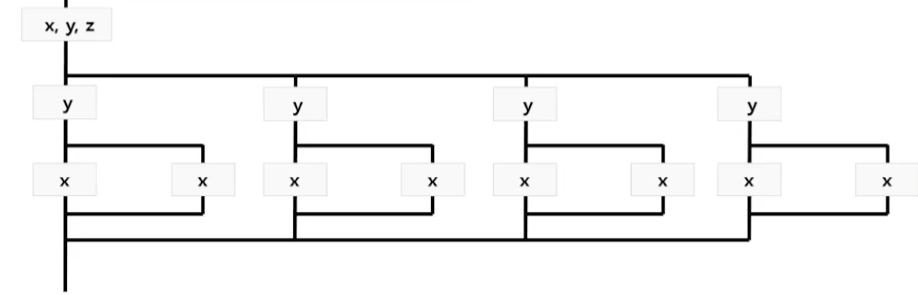
- Master Thread에서 셋다 shared var로 시작
- 첫번째 병렬문에서 y가 private으로 선언되며 4개의 스레드에서 각각 y 변수가 생성
- Nested 병렬문에서 x가 private으로 선언되며 8개의 하위 스레드에서 각각 x 변수가 생성
2. Example 2
C code
#include <stdio.h>
#include <omp.h>
int main()
{
int x=1, y=10, z=20, tid;
omp_set_nested(1);
omp_set_num_threads(4);
#pragma omp parallel private(y, tid)
{
tid=omp_get_thread_num();
x++; y=12; z=22;
#pragma omp parallel num_threads(2) private(x, tid)
{
tid=omp_get_thread_num();
x=10; y++; z++;
printf("\t tid=%d x=%d y=%d z=%d\n",tid, x, y, z);
}
printf("tid=%d x=%d y=%d z=%d\n",tid, x, y, z);
}
printf("\n")
printf("x=%d y=%d z=%d\n"x, y, z);
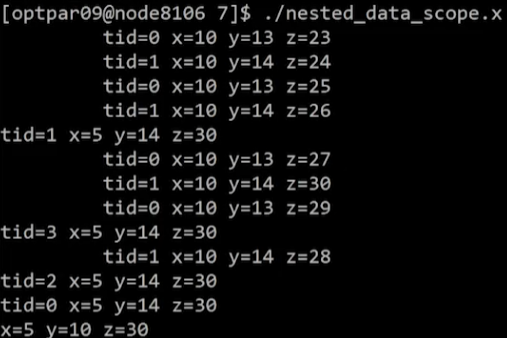
}Result
3. Example 2 - 해석
x: level 1에서는 shared, level 2에서는 private
- level 1에서
x++연산이 각 스레드 4개에서 이루어지며 x는 5가 됨 - level 2에서
x=10에 의해 초기화가 되긴 하지만, nested parallel 영역이 끝나며 소멸 - 결과적으로 level 1의 연산 결과인
x=5만 남음
y: level 1에서는 private, level 2에서는 shared
- level 1에서 각 스레드에 y 변수 메모리가 할당되며, 12로 초기화됨
- level 2에서 상위 스레드(4개)의 y=12를 하위 스레드 0,1에서 각각
y++연산 수행 -> 13, 14 반복 출력 - level 1 병렬 영역이 끝나며 모든 연산 결과가 소멸, 초기 값인
y=10만 남음
z: 모든 영역에서 shared
- level 1의
z=22할당, level 2의z++연산이 shared var z에 모두 누적됨 - 22에 1을 8번 더한 30이 z에 저장됨

올해는 진짜 갓생 산다