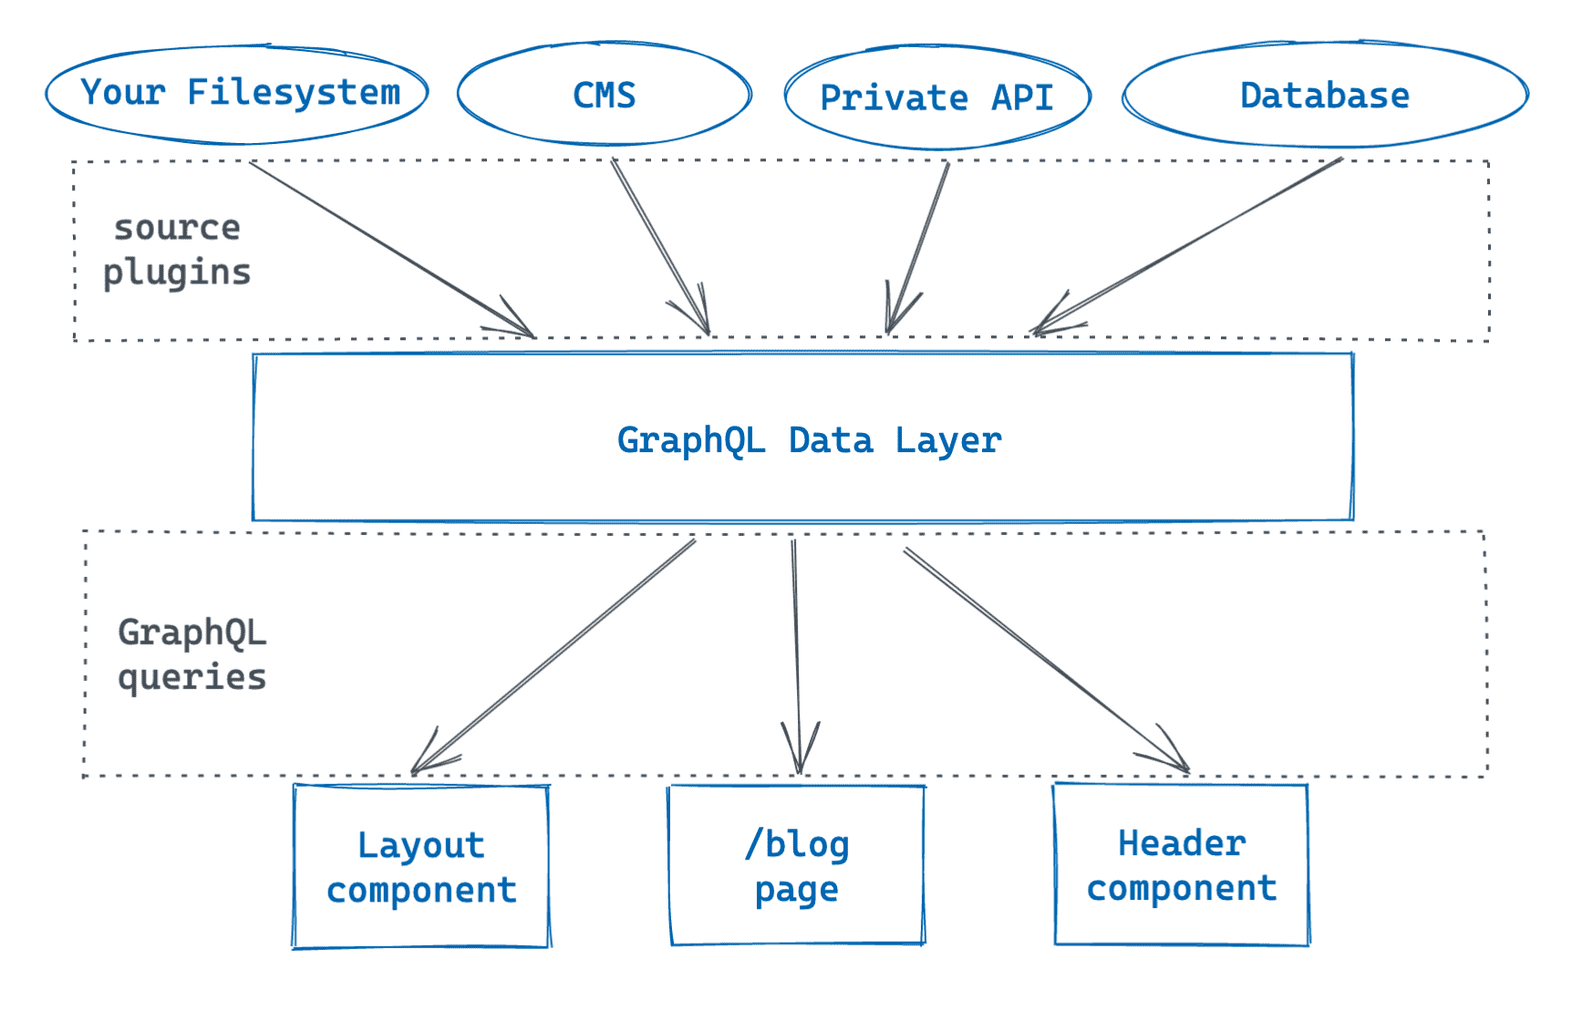
저번에는 React-Gatsby에서 프론트엔드 구성 방법에 대해 공부를 했다. 이번에는 프론트에 나타나는 Text, Image와 같은 Data를 어떻게 처리하는지를 중심으로 공부를 할 예정이다. 우리는 일반적으로 데이터를 Markdown files이나 Content Management System(CMS)를 데이터를 저장하고 가져온다. 근데 이미지나 글 등 다양한 요소를 Shopify나 WordPress에서 계속 가져와야되는 것인가? 그러면 데이터 통신이 효과적이지 않을 것이다. 이에 대항해 Gatsby는 GraphQL 기반 "Data Layer"를 사용할 수 있게 했다.

Part 4: Query for Data with GraphQL
화면을 구성하는 우리의 데이터 원천은 하나일 수도 있고 여러 개일 수도 있다. 그러한 원천은 우리 컴퓨터 파일시스템의 폴더일 수도 있고 WordPress나 DB와 같은 CMS일 수 있다. 여기서 손쉽게 데이터를 가져올 수 있게 하는게 gatsby-source-라는 Library로 구성된 gatsby-source-filesystem/gatsby-source-contentful과 같은 것이다.
- GraphiQL을 통한 Data Layer 탐색 및 GraphQL Query 작성
- useStaticQuery을 사용해 building-block에서 데이터 가져오기
- gatsby-source-filesystem을 사용해 내 컴퓨터에서 데이터 가져오기
여기서 우리는 "useStaticQuery"나 "gatsby-source-filesystem"을 사용할 예정이다.
Queries in building-block componenets "Layout"
먼저, gatsby-config.js를 살펴보자.
module.exports = {
  siteMetadata: {
    title: "My First Gatsby Site",
  },
  plugins: [
    // ...
  ],
};
여기서 siteMetadata 같은 경우 우리가 처음에 gatsby new를 실행하면서 자동으로 GraphQL형식으로 title 데이터가 가져오게 된 것이다. 이것을 GraphQL과 JSON으로 나타나면 아래와 같다.
GraphQL

query MyQuery {
  site {
    siteMetadata {
      title
    }
  }
}
JSON
{
"data": {
"site": {
"siteMetadata": {
"title": "My First Gatsby Site"
}
}
},
"extensions": {}
}useStaticQuery 사용법
useStaticQuery는 기본적으로 하나의 매개변수를 GraphQL 쿼리문의 String화된 요소로 받아서 사용할 수 있다.
1. Import useStaticQuery
import { useStaticQuery, graphql } from 'gatsby'2. graphql 쿼리문 작성 및 삽입
const data = useStaticQuery(graphql`
  // 여기에 나만의 쿼리를 삽입한다.
`)
3. graphql로 부른 데이터를 .(dot operator)을 사용해 접근
import * as React from 'react'
import { useStaticQuery, graphql } from 'gatsby'

const Header = () => {
  const data = useStaticQuery(graphql`
    query {
      site {
        siteMetadata {
          title
        }
      }
    }
  `)

  return (
    <header>
      <h1>{ data.site.siteMetadata.title }</h1>
    </header>
  )
}

export default Header
*여기서 주의할 점은 useStaticQuery를 한 파일에 하나씩만 호출할 수 있다는 점이다. 따라서, graphql 쿼리를 잘 작성하는게 중요하다.
Queries in page components "filenames"
기본 정적인 사이트 페이지들은 앞서 언급한 것처럼 filename으로 접근하게 된다. 앞서 페이지를 구성할 때 Index.js와 About.js이라는 이름으로 url이 설정된 것처럼 정적으로 접근할 때가 있다. MDX와 gatsby-source-filesystem으로 접근 가능한데 먼저, 후자부터 살펴보도록 하겠다.
Use GraphiQL to build the query (feat, Plugins)
Gatsby는 GraphQL을 원활하게 쓰기 위해 gatsby-source-filesystem을 이용한다.
npm install gatsby-source-filesystem1. gatsby-config.js 수정
module.exports = {
  siteMetadata: {
    title: "My First Gatsby Site",
  },
  plugins: [
    "gatsby-plugin-image",
    "gatsby-plugin-sharp",
    {
      resolve: "gatsby-source-filesystem",
      options: {
        name: `blog`,
        path: `${__dirname}/blog`,
      }
    },
  ],
};
만약에 파일이 blog라는 폴더에 있으면 name과 path에 blog를 적는다. 그리고 __ dirname 은 기본적으로 Nodemon에서 제공해주는 절대경로이다. name은 sourceInstanceName이라고 각 파일에 폴더라고 영역으로 폴더이름으로 설정하면 된다. 만약 다양한 파일과 각각의 폴더가 존재할 경우 GraphQL 쿼리를 작성할 때 특정 폴더에 접근할 수 있게 하면된다.
2. 개발 서버 재실행 후 Data Layer가 파일들을 인식하고 가져올 수 있게함
3. 한번에 다양한 파일들을 가져올 경우 "allFile" 사용
query MyQuery {
  allFile {
    nodes {
      name
    }
  }
}
4. GraphiQL에서 쿼리를 돌려 데이터 통신이 잘되는지 확인하기
{
  "data": {
    "allFile": {
      "nodes": [
        {
          "name": "my-first-post"
        },
        {
          "name": "another-post"
        },
        {
          "name": "yet-another-post"
        }
      ]
    }
  },
  "extensions": {}
}
Part 5: Transform Data to Use MDX
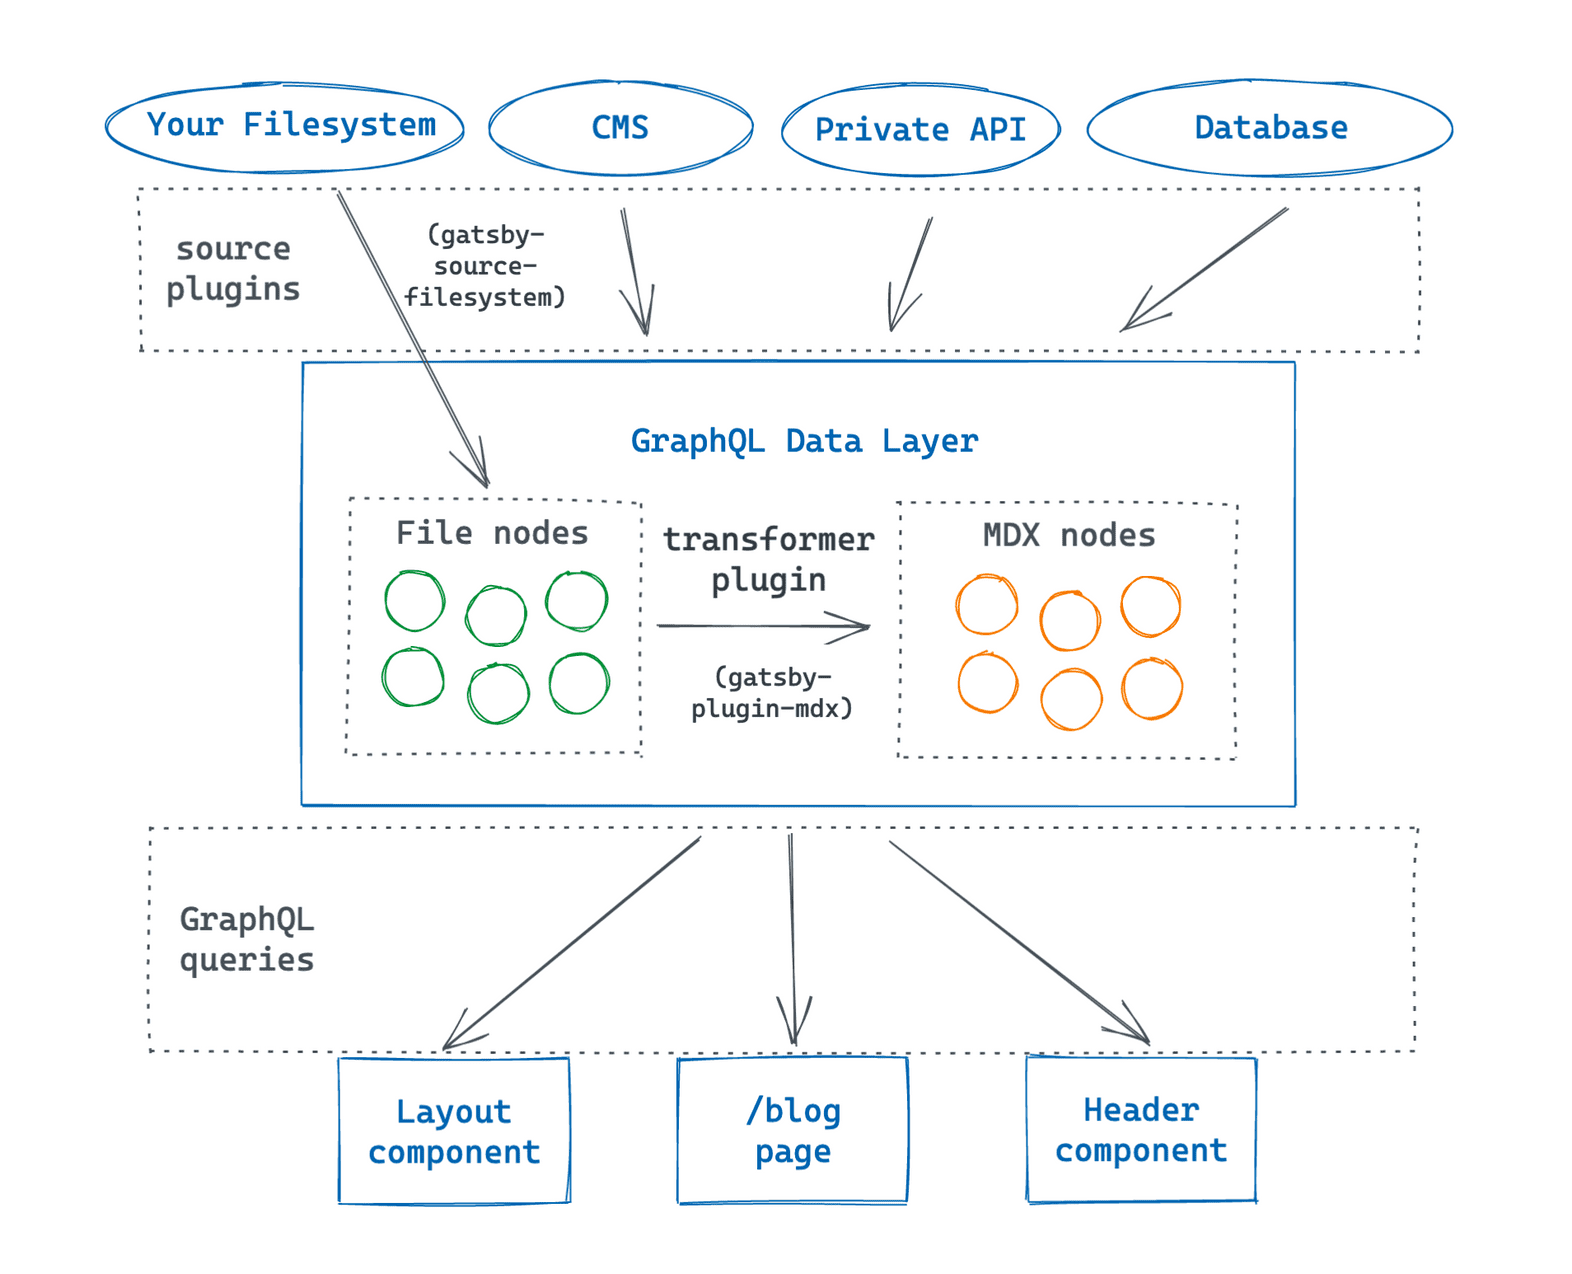
이전에는 gatsby-source-filesystem을 사용해 파일에 접근하고 사이트의 데이터를 구성했다. 그러나 filesystem이 처리할 수 없는 데이터 형태가 존재하고 있다. 그러한 데이터의 형태를 변환해 처리해줄 수 있는 plugin을 transformer plugin이라고 한다. Github에서는 Markdown과 JSX로 구성된 MDX 파일을 올릴 때가 있다. 그래서 이번에는 transformer plugin 대표격인 gatsby-plugin-mdx를 알아보자.

우선 더 자세히 Gatsby의 Data Layer에 대해 알아보자면 Data Layer에서 정보들은 nodes라는 이름으로 저장이 된다. 가장 작은 단위인 node가 gatsby-source-filesystem을 통해 파일로 불러와지면 transformer plugin인 gatsby-plugin-mdx로 인해 MDX node로 변환이 된다. 이번에는 이것을 중점적으로 알아볼 예정이다.
Add some MDX content
Markdown에서 우리는 frontmatter을 사용해 이 파일에 대한 metadata를 기록할 수 있다. 아래의 예시를 보면, 이름/발행일/저자에 대한 정보를 넣을 수 있다.
MDX
---
name: "Fun Facts about Red Pandas"
datePublished: "2021-07-12"
author: "#1 Red Panda Fan"
---
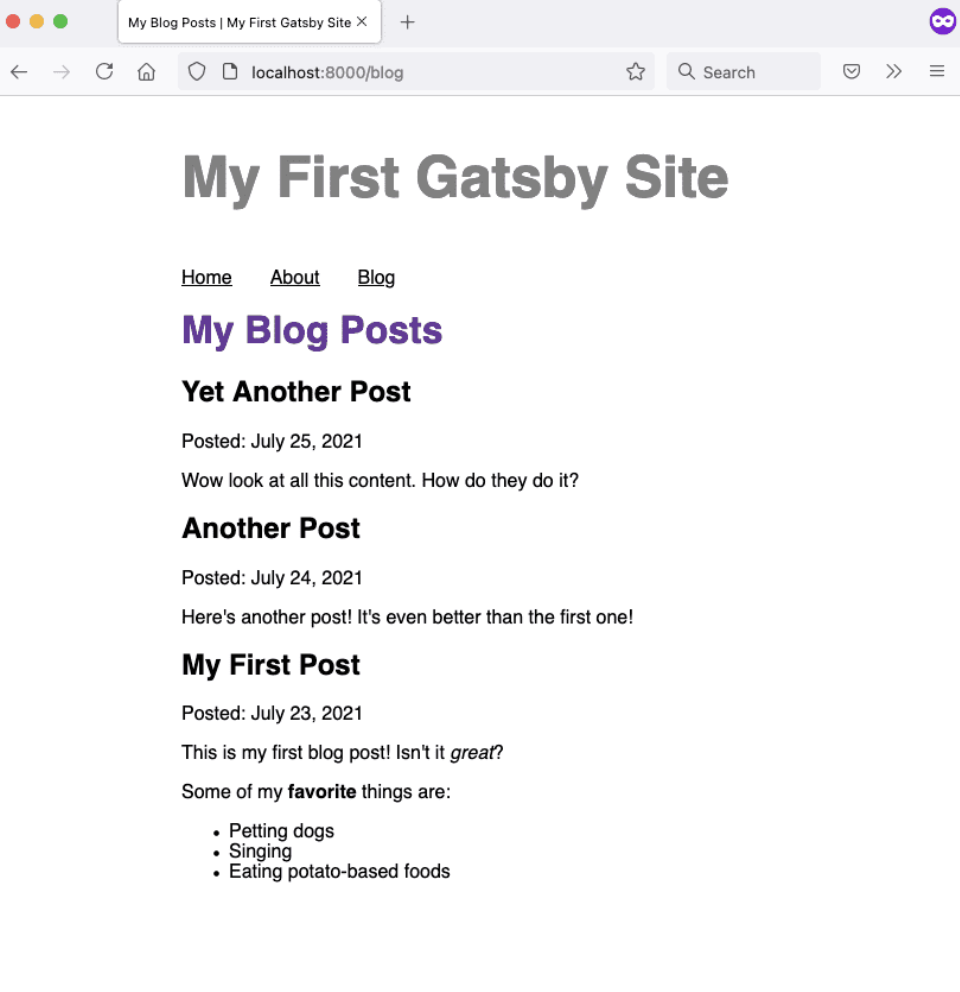
우리가 구성할 블로그에 아래와 같이 3개의 파일이 있다고 가정하자.
---
title: "My First Post"
date: "2021-07-23"
---

This is my first blog post! Isn't it *great*?

Some of my **favorite** things are:

* Petting dogs
* Singing
* Eating potato-based foods
---
title: "Another Post"
date: "2021-07-24"
---
Here's another post! It's even better than the first one!---
title: "Yet Another Post"
date: "2021-07-25"
---
Wow look at all this content. How do they do it?Render each post's contents on the Blog page
gatsby-plugin-mdx는 2개의 field와 1개의 component로 구성되어 있다.
- allMdx/mdx fields : GraphQL 쿼리용
- MDXRenderer component : MDX 컨텐츠를 처리하고 보여주기 위한 용도
Install and configure the MDX transformer plugin
gatsby-plugin-mdx 패키지는 아래와 같은 의존성들이 필요하다.
- @mdx-js/mdx : MDX 실행용
- @mdx-js/react : 처리된 MDX를 React component로 매칭시켜주는 용도
1. gatsby-plugin-mdx 설치
npm install gatsby-plugin-mdx @mdx-js/mdx @mdx-js/react2. gatsby-config.js 수정
module.exports = {
  siteMetadata: {
    title: "My Super Cool Blog",
  },
  plugins: [
    "gatsby-plugin-gatsby-cloud",
    "gatsby-plugin-image",
    "gatsby-plugin-sharp",
    {
      resolve: `gatsby-source-filesystem`,
      options: {
        name: `blog`,
        path: `${__dirname}/blog/`,
      },
    },
    "gatsby-plugin-mdx",
  ],
};
*Markdown 파일에 여러가지 임팩트를 주기위한 마크가 필요하다면 gatsby-remark-images/gatsby-remark-prismjs/gatsby-remark-autolink-headers를 추가하면 된다.
allMdx 사용법
1. 가져올 요소 선정 및 쿼리문 작성
MDX
---
date: "2021-07-23"
---
GraphQL
query MyQuery {
allMdx {
nodes {
frontmatter {
date(formatString: "MMMM D, YYYY")
}
}
}
}2. "id" field 추가 및 최신 글 순으로 쿼리문 작성
query MyQuery {
  allMdx(sort: {fields: frontmatter___date, order: DESC}) {
    nodes {
      frontmatter {
        date(formatString: "MMMM D, YYYY")
        title
      }
      id
    }
  }
}
3. 쿼리문 실행 및 확인
사실 id 필드는 gatsby 고유 string으로 모든 node에 자동으로 추가된다. 그래서 실행을 시켜보면 아래와 같이 id 요소가 기록되어 있음을 알 수 있다.
JSON
{
  "data": {
    "allMdx": {
      "nodes": [
        {
          "frontmatter": {
            "date": "July 25, 2021",
            "title": "Yet Another Post"
          },
          "id": "c4b5ae6d-f3ad-5ea4-ab54-b08a72badea1"
        },
        {
          "frontmatter": {
            "date": "July 24, 2021",
            "title": "Another Post"
          },
          "id": "560896e4-0148-59b8-9a2b-bf79bee68fba"
        },
        {
          "frontmatter": {
            "date": "July 23, 2021",
            "title": "My First Post"
          },
          "id": "11b3a825-30c5-551d-a713-dd748e7d554a"
        }
      ]
    }
  },
  "extensions": {}
}
만약에 쿼리문 밑에 body를 추가하면 body field는 파일에서 컴파일된 MDX content를 포함하고 있어 사람들이 직접 읽기보다 MDXRenderer로 처리할 수 있다.
"body": "var _excluded = [\"components\"];\n\nfunction _extends() { _extends = Object.assign || function (target) { for (var i = 1; i < arguments.length; i++) { var source = arguments[i]; for (var key in source) { if (Object.prototype.hasOwnProperty.call(source, key)) { target[key] = source[key]; } } } return target; }; return _extends.apply(this, arguments); }\n\nfunction _objectWithoutProperties(source, excluded) { if (source == null) return {}; var target = _objectWithoutPropertiesLoose(source, excluded); var key, i; if (Object.getOwnPropertySymbols) { var sourceSymbolKeys = Object.getOwnPropertySymbols(source); for (i = 0; i < sourceSymbolKeys.length; i++) { key = sourceSymbolKeys[i]; if (excluded.indexOf(key) >= 0) continue; if (!Object.prototype.propertyIsEnumerable.call(source, key)) continue; target[key] = source[key]; } } return target; }\n\nfunction _objectWithoutPropertiesLoose(source, excluded) { if (source == null) return {}; var target = {}; var sourceKeys = Object.keys(source); var key, i; for (i = 0; i < sourceKeys.length; i++) { key = sourceKeys[i]; if (excluded.indexOf(key) >= 0) continue; target[key] = source[key]; } return target; }\n\n/* @jsxRuntime classic */\n\n/* @jsx mdx */\nvar _frontmatter = {\n \"title\": \"Yet Another Post\",\n \"date\": \"2021-07-25\"\n};\nvar layoutProps = {\n _frontmatter: _frontmatter\n};\nvar MDXLayout = \"wrapper\";\nreturn function MDXContent(_ref) {\n var components = _ref.components,\n props = _objectWithoutProperties(_ref, _excluded);\n\n return mdx(MDXLayout, _extends({}, layoutProps, props, {\n components: components,\n mdxType: \"MDXLayout\"\n }), mdx(\"p\", null, \"Wow look at all this content. How do they do it?\"));\n}\n;\nMDXContent.isMDXComponent = true;"Use the MDXRenderer component
MDXRenderer 가져와서 React Component에 집어넣으면 된다.
import { MDXRenderer } from 'gatsby-plugin-mdx'

// Use this in the JSX for your component
<MDXRenderer>
  { node.body }
</MDXRenderer>
import * as React from 'react'
import { graphql } from 'gatsby'
import { MDXRenderer } from 'gatsby-plugin-mdx'
import Layout from '../components/layout'
const BlogPage = ({ data }) => {
return (
<Layout pageTitle="My Blog Posts">
{
data.allMdx.nodes.map((node) => (
<article key={node.id}>
<h2>{node.frontmatter.title}</h2>
<p>Posted: {node.frontmatter.date}</p>
<MDXRenderer>
{node.body}
</MDXRenderer>
</article>
))
}
</Layout>
)
}
export const query = graphql`
query {
allMdx(sort: {fields: frontmatter___date, order: DESC}) {
nodes {
frontmatter {
title
date(formatString: "MMMM DD, YYYY")
}
id
body
}
}
}
`
export default BlogPage
지금까지 파일 형식의 변환 및 처리를 살펴봤다. 다음에는 반복적인 Pages를 생성하는 것에 대해 알아보도록 하겠다.
