📒 <Assignment> morsecode
첫 강의부터 과제라 잠이 확 깰 수 있어서 좋았다.
최대한 코드를 파이써닉하게 작성해보고 싶어서 시간이 생각보다 많이 걸렸다.
for문을 지양하고 map, regex, comprehension 등을 활용해서 풀어보았다.
📝 is_help_command
def is_help_command(user_input):
    """
    Input:
        - user_input : 문자열값으로 사용자가 입력하는 문자
    Output:
        - 입력한 값이 대소문자 구분없이 "H" 또는 "HELP"일 경우 True,
          그렇지 않을 경우 False를 반환함
    Examples:
        >>> import morsecode as mc
        >>> mc.is_help_command("H")
        True
        >>> mc.is_help_command("Help")
        True
        >>> mc.is_help_command("Half")
        False
        >>> mc.is_help_command("HeLp")
        True
        >>> mc.is_help_command("HELLO")
        False
        >>> mc.is_help_command("E")
        False
    """
    result = user_input.lower() in ['h', 'help']

    return result
저번 과제의 is_yes or is_no 와 동일한 로직이다.📝 is_validated_english_sentence
def is_validated_english_sentence(user_input):
    """
    Input:
        - user_input : 문자열값으로 사용자가 입력하는 문자
    Output:
        - 입력한 값이 아래에 해당될 경우 False, 그렇지 않으면 True
          1) 숫자가 포함되어 있거나,
          2) _@#$%^&*()-+=[]{}"';:\|`~ 와 같은 특수문자가 포함되어 있거나
          3) 문장부호(.,!?)를 제외하면 입력값이 없거나 빈칸만 입력했을 경우
    Examples:
        >>> import morsecode as mc
        >>> mc.is_validated_english_sentence("Hello 123")
        False
        >>> mc.is_validated_english_sentence("Hi!")
        True
        >>> mc.is_validated_english_sentence(".!.")
        False
        >>> mc.is_validated_english_sentence("!.!")
        False
        >>> mc.is_validated_english_sentence("kkkkk... ^^;")
        False
        >>> mc.is_validated_english_sentence("This is Gachon University.")
        True
    """
    result = re.fullmatch('[ .,!?]*', user_input)
    if result != None:
        return False
    result = re.fullmatch('[ .,!?a-zA-Z]+', user_input)
    if result == None:
        return False

    return True
정규표현식의 fullmatch를 사용해서 풀었다.
처음 써보는 문법이였는데, 문자열이 해당 정규식에 전부 매칭되는지 확인할 수 있다.
매칭이 되면 매칭 결과를 반환해주고, 되지 않는다면 None을 반환한다.
처음엔 3번 조건의 4개의 문장 부호로만 이루어진 경우인지 체크했다.
'*'를 사용했기 때문에 빈 문자열도 찾는다.
(처음에 공백을 넣지 않아 많은 시간을 날렸다. 다음부터 주의하자)
매칭이 성공한다면 False를 반환한다.
그 후로는 1,2번 조건을 함께 비교했다.
매칭이 되지 않는다면, False를 반환한다.📝 is_validated_morse_code
def is_validated_morse_code(user_input):
    """
    Input:
        - user_input : 문자열값으로 사용자가 입력하는 문자
    Output:
        - 입력한 값이 아래에 해당될 경우 False, 그렇지 않으면 True
          1) "-","."," "외 다른 글자가 포함되어 있는 경우
          2) get_morse_code_dict 함수에 정의된 Morse Code 부호외 다른 코드가 입력된 경우 ex)......
    Examples:
        >>> import morsecode as mc
        >>> mc.is_validated_morse_code("..")
        True
        >>> mc.is_validated_morse_code("..-")
        True
        >>> mc.is_validated_morse_code("..-..")
        False
        >>> mc.is_validated_morse_code(". . . .")
        True
        >>> mc.is_validated_morse_code("-- -- -- --")
        True
        >>> mc.is_validated_morse_code("!.1 abc --")
        False
    """
    morse_code = get_morse_code_dict()
    result = list(map(lambda x : x in morse_code.values(), user_input.split()))

    return all(result)
우선 morse_code에 제공된 dictionary를 받아왔다.
그리고 user_input을 공백으로 나누었다.
이 후 map과 lambda 함수를 활용하여 값들이 morse_code의 value에 들어있는지 확인해주었다.
모든 값들이 들어있으면 True를 반환하면 되기 때문에, all을 사용해주었다.📝 get_cleaned_english_sentence
def get_cleaned_english_sentence(raw_english_sentence):
    """
    Input:
        - raw_english_sentence : 문자열값으로 Morse Code로 변환 가능한 영어 문장
    Output:
        - 입력된 영어문장에수 4개의 문장부호를 ".,!?" 삭제하고, 양쪽끝 여백을 제거한 문자열 값 반환
    Examples:
        >>> import morsecode as mc
        >>> mc.get_cleaned_english_sentence("This is Gachon!!")
        'This is Gachon'
        >>> mc.get_cleaned_english_sentence("Is this Gachon?")
        'Is this Gachon'
        >>> mc.get_cleaned_english_sentence("How are you?")
        'How are you'
        >>> mc.get_cleaned_english_sentence("Fine, Thank you. and you?")
        'Fine Thank you and you'
    """
    result = raw_english_sentence.strip()
    result = re.sub('[.,!?]', '', result)
    result = re.sub(' +', ' ', result)

    return result
처음으로 좌우의 공백을 제거해준다.
그리고 정규표현식을 사용하여 문장 부호들을 삭제해준다.
마지막으로 2개 이상의 공백들을 공백 하나로 바꿔준다.📝 decoding_character
def decoding_character(morse_character):
    """
    Input:
        - morse_character : 문자열값으로 get_morse_code_dict 함수로 알파벳으로 치환이 가능한 값의 입력이 보장됨
    Output:
        - Morse Code를 알파벳으로 치환함 값
    Examples:
        >>> import morsecode as mc
        >>> mc.decoding_character("-")
        'T'
        >>> mc.decoding_character(".")
        'E'
        >>> mc.decoding_character(".-")
        'A'
        >>> mc.decoding_character("...")
        'S'
        >>> mc.decoding_character("....")
        'H'
        >>> mc.decoding_character("-.-")
        'K'
    """
    inv_morse_code_dict = { v : k for k, v in get_morse_code_dict().items() }
    inv_morse_code_dict["DS"] = " "
    result = inv_morse_code_dict[morse_character]

    return result
제공된 morse_code_dict의 key, value값을 바꾸어서 inv 상태로 만들어주었다.
그리고, 공백 2개를 표현해놓은 DS를 공백으로 바꿔주었다.(하단 decoding_sentence 참고)
이 후, inv_morse_code_dict에서 key값으로 value를 반환해주면 된다.📝 encoding_character
def encoding_character(english_character):
    """
    Input:
        - english_character : 문자열값으로 알파벳 한 글자의 입력이 보장됨
    Output:
        - get_morse_code_dict 함수의 반환 값으로 인해 변환된 모스부호 문자열값
    Examples:
        >>> import morsecode as mc
        >>> mc.encoding_character("G")
        '--.'
        >>> mc.encoding_character("A")
        '.-'
        >>> mc.encoding_character("C")
        '-.-.'
        >>> mc.encoding_character("H")
        '....'
        >>> mc.encoding_character("O")
        '---'
        >>> mc.encoding_character("N")
        '-.'
    """
    morse_code_dict = get_morse_code_dict()
    morse_code_dict[" "] = ""
    result = morse_code_dict[english_character.upper()]

    return result
제공된 morse_code_dict를 저장했다.
그리고, ' '를 ''으로 바꿔주었다.(하단 encoding_sentence 참고)
이 후, morse_code_dict에서 key값으로 value를 반환해주면 된다.📝 decoding_sentence
def decoding_sentence(morse_sentence):
    """
    Input:
        - morse_sentence : 문자열 값으로 모스 부호를 표현하는 문자열
    Output:
        - 모스부호를 알파벳으로 변환한 문자열
    Examples:
        >>> import morsecode as mc
        >>> mc.decoding_sentence("... --- ...")
        'SOS'
        >>> mc.decoding_sentence("--. .- -.-. .... --- -.")
        'GACHON'
        >>> mc.decoding_sentence("..  .-.. --- ...- .  -.-- --- ..-")
        'I LOVE YOU'
        >>> mc.decoding_sentence("-.-- --- ..-  .- .-. .  ..-. ")
        'YOU ARE F'
    """
    conv_morse_sentence = re.sub('  ', ' DS ', morse_sentence)
    result = list(map(decoding_character, conv_morse_sentence.split()))

    return ''.join(result)
모스 부호가 들어오는데 split으로 구분을 해주기 위해서, 공백 2개는 따로 분류해야한다.
그래서 DS(Double Space)로 바꿔줘서 전처리 작업을 해주었다.
이 후에는 만들어 놓은 decoding_character 함수를 활용해서 각 문자열들을 알파벳 값으로 바꿔 주었다.
이것이 list 형태로 저장되는데, ''.join 구문을 이용해서 문자열로 반환해주었다.📝 encoding_sentence
def encoding_sentence(english_sentence):
    """
    Input:
        - english_sentence : 문자열 값으로 모스 부호로 변환이 가능한 영어문장
    Output:
        - 입력된 영어문장 문자열 값을 모스부호로 변환된 알파벳으로 변환한 문자열
          단 양쪽 끝에 빈칸은 삭제한다.
    Examples:
        >>> import morsecode as mc
        >>> mc.encoding_sentence("HI! Fine, Thank you.")
        '.... ..  ..-. .. -. .  - .... .- -. -.-  -.-- --- ..-'
        >>> mc.encoding_sentence("Hello! This is CS fifty Class.")
        '.... . .-.. .-.. ---  - .... .. ...  .. ...  -.-. ...  ..-. .. ..-. - -.--  -.-. .-.. .- ... ...'
        >>> mc.encoding_sentence("We Are Gachon")
        '.-- .  .- .-. .  --. .- -.-. .... --- -.'
        >>> mc.encoding_sentence("Hi! Hi!")
        '.... ..  .... ..'
    """
    cleaned_sentence = get_cleaned_english_sentence(english_sentence)
    result = list(map(encoding_character, cleaned_sentence))

    return ' '.join(result)
들어온 english_sentence를 get_cleaned_english_sentence를 사용하여 전처리를 했다.
만들어진 cleaned_sentece를 map을 사용하여 하나씩 encoding_character 해주었다.
완성된 list에 ' '.join을 하여 문자열로 반환해주었다.
상단에서, 공백은 빈 문자열로 바뀌게 설정을 해놓았다.
따라서, '' 왼쪽 오른쪽에 join으로 공백이 하나씩 들어와서
기존 공백 하나는 공백 두개로 대체될 수 있다.📝 main
def main():
    print("Morse Code Program!!")
    # ===Modify codes below=============
    while True:
        user_input = input("Input your message(H - Help, 0 - Exit): ")
        if user_input == '0':
            break
        if is_help_command(user_input):
            print(get_help_message())
            continue
        if is_validated_english_sentence(user_input):
            print(encoding_sentence(user_input))
        elif is_validated_morse_code(user_input):
            print(decoding_sentence(user_input))
        else:
            print("Wrong Input")
while문에서 입력을 계속 받는다.
사용자가 0을 입력을 하면, 프로그램을 종료한다.
사용자가 H or Help를 입력하면 help message를 출력한다.
그리고 encoding or decoding이 가능한 문자열이라면 해당 작업을 해준다.
그렇지 않은 경우에는 Wrong Input을 출력한다.📒 Python Object Oriented Programming
첫날에 배웠듯이, 파이썬은 객체지향 프로그래밍이다.
OOP는 프로그래밍 언어를 배우는 데 있어서 매우 중요한 개념이다.
고난이도 프로그래밍을 위한 길로 생각하고 항상 생각하며 코딩하는 습관을 가지자.
마지막의 decorate는 공부가 많이 필요할 것 같다.
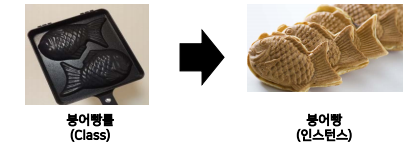
📝 객체지향 프로그래밍 개요
- 객체 : 실생활에서 일종의 물건으로, 속성(Attribute)와 행동(Action)을 가진다.
- OOP에서는 이러한 객체 개념을 프로그램으로 표현한다.
👉속성은 변수(variable), 행동은 함수(method)로 표현된다. - 설계도에 해당하는 클래스(class)와 실제 구현체인 인스턴스(instance)로 나눈다.
📝 Objects in Python
✏️ class와 Identifier
class SoccerPlayer(object): # class 기본 선언함수의 정의와 거의 동일하다.
class 예약어 + class 이름 + (상속받는 객체명) : 변수와 Class명 함수명은 짓는 방식이 존재한다.
- snake_case : 띄어쓰기 부분에 '_'를 추가한다. 주로 함수 or 변수명에 사용한다.
- CamelCase : 띄어쓰기 부분에 대문자를 사용한다. 주로 파이썬 Class명에 사용한다.
✏️ Attribute 추가하기
Attribute 추가는 __init__, self와 함께 사용한다.
여기서 init는 객체 초기화 예약 함수이다.
class SoccerPlayer(object):
    def __init__(self, name, position, back_number):
        self.name = name
        self.position = position
        self.back_number = back_number

    def __str__(self): # print문 사용 가능
        return f"Hello, {self.position} {self.name}."

SHM = SoccerPlayer('son', 'FW', 7) # instance 생성
print(SHM)
# Hello, FW son. 출력
⭐️ '__'의 의미
- __는 특수한 예약 함수나 변수, 그리고 함수명 변경(맨글링)으로 사용한다.
- __main__, __add__, __str__ , __eq__ 등 다양하다.
- Magic Method 참고
✏️ class variable과 instance variable
클래스 변수는 모든 인스턴스가 공유하는 변수이다.
class Person:
        cnt = 0 # 클래스 변수
        def __init__(self, name):
                self.name = name # 인스턴스 변수
                Person.cnt += 1
        def __del__(self):
                Person.cnt -= 1

>>> a = Person('kim')
>>> print(a.cnt, a.name)
1 kim
>>> b = Person('lee')
>>> print(b.cnt, b.name)
2 lee
>>> print(a.cnt, a.name)
2 kim
✏️ method 구현하기
method 추가는 기존 함수와 같으나, 반드시 self를 추가해야 class 함수로 인정된다.
class SoccerPlayer(object):
    def change_back_number(self, new_number):
        self.back_number = new_number
⭐️ self는 생성된 인스턴스 자신을 의미한다.
📝 OOP Characteristics
✏️ 상속(Inheritance)
부모클래스로부터 속성과 method를 물려받은 자식 클래스를 생성하는 것
class Person(object):
    def __init__(self, name, age):
        self.name = name
        self.age = age

class Korean(Person):
    def __init__(self, name, age, location): # 부모객체를 사용할 수 있다.
        super().__init__(name, age)
        self.location = location

first_korean = Korean("Gyuho", 26, "Suwon")
print(first_korean.name)
# Gyuho 출력
✏️ 다형성(Polymorphism)
- 같은 이름 메소드의 내부 로직을 다르게 작성할 수 있다.
- Dynamic Typing 특성으로 인해 파이썬에서는 같은 부모클래스의 상속에서 주로 발생한다.
class Animal:
    def __init__(self, name):
        self.name = name

    def talk(self): # 다형성 예시 함수
        raise NotImplementedError("Subclass must implement abstract method")

class Cat(Animal):
    def talk(self):
        return 'Meow!'

class Dog(Animal):
    def talk(self):
        return 'Woof!!'
✏️ 가시성(Visibility)
객체의 정보를 볼 수 있는 레벨을 조절하는 것. 변수에 '__'을 앞에 붙여서 사용한다.
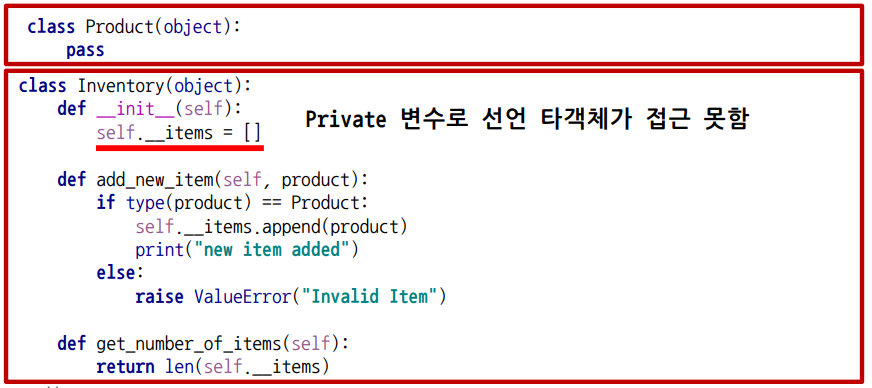
@property를 앞에 붙여 return 하면 함수명을 변수처럼 쓸 수 있다.
⭐️ Encapsulation
- 캡슐화 또는 정보 은닉(Information Hiding)
- Class를 설계할 때, 클래스 간 간섭/정보 공유를 최소화한다.
- 캡슐을 던지듯, 인터페이스만 알아서 써야 한다.
📝 decorate
✏️ first-class objects
- 일등함수 또는 일급 객체라고 불린다.
- 변수나 데이터 구조에 할당이 가능한 객체이다.
- parameter로 전달이 가능하거나, 리턴 값으로 사용한다.
파이썬의 함수는 일급 함수이다.
def square(x):
    return x * x

def formula(method, argument_list): # 이런 식으로도 사용 가능하다.
    return [method(value) for value in argument_list]

>>> f = square # 이것을 의미
>>> f(5)
25
✏️ inner function
함수 내에 또 다른 함수가 존재하는 것이다.
def print_msg(msg):
    def printer():
        print(msg)
    printer()
✏️ decorator
⭐️ closures : inner function을 return 값으로 반환
def print_msg(msg):
    def printer():
        print(msg)
    return printer
⭐️ decorator function : 복잡한 클로져 함수를 간단하게 만들어준다.
def star(func):
    def inner(*args, **kwargs):
        print('*' * 30)
        func(*args, **kwargs)
        print('*' * 30)
    return inner

@star # 이 함수가 start의 func에 들어간다.
def printer(msg):
    print(msg)

printer('hello')
📒 Module and Project
다양한 파이썬 패키지들을 사용해본 경험이 있지만
이렇게 이론적인 부분을 배운 것은 처음이였다.
무엇이든지 기본이 가장 중요한 것 같다.
배운 내용을 잘 학습해 완성도 있는 프로젝트를 만들자.
📝 모듈
✏️ 모듈이란?
프로그램에서는 작은 프로그램 조각들을 의미한다.
모듈들을 모아서 하나의 큰 프로그램을 개발한다.
프로그램을 모듈화 시키면 다른 프로그램이 사용하기 쉽다.
✏️ 파이썬에서의 모듈
파이썬에서의 모듈은 py 파일을 의미한다.
같은 폴더에 Mdodule에 해당하는 .py 파일과 사용하는 .py을 저장한다.
이 후 import 문을 사용해서 module을 호출할 수 있다.
# fah_converter.py (모듈화)
def convert_c_to_f(celcius_value):
    return celcius_value * 9.0 / 5 + 32
# module_ex.py
>>> import fah_converter # 불러오기. 해당 py의 모든 코드가 메모리에 로딩된다.
>>>
>>> print(fah_converter.convert_c_to_f(5))
41✏️ namespace
- 모듈을 호출할 대 범위를 정하는 방법이다.
- 모듈 안에는 함수와 클래스 등이 존재 가능하다.
- 필요한 내용만 골라서 호출 할 수 있다.
- from과 import를 사용해서 쓸 수 있다.
- Alias를 설정하여 모듈명을 별칭으로 사용할 수도 있다.
from queue import priorityqueue # namespace 예시
import numpy as np # Alias 예시
✏️ Built-in Module
import random # 난수
print(random.randint(0, 100)) # 0~100 사이의 정수 난수 생성
print(random.random()) # 일반적인 난수 생성
import time # 시간
print(time.localtime()) # 현재 시간 출력import urllib.request # 웹
response = urllib.request.urlopen('http://thetemlab.io')
print(response.read())구글링으로 다양한 모듈들을 알아보자.📝 패키지
✏️ 패키지란?
- 하나의 대형 프로젝트를 만드는 코드의 묶음
- 다양한 모듈들의 합, 폴더로 연결된다.
- __init__, __main__ 등 키워드 파일명이 사용된다.
- 다양한 오픈소스들이 모두 패키지로 관리된다.
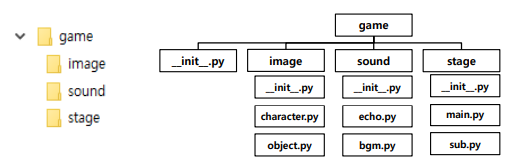
✏️ __init__.py
- 폴더별로 구성되야 하는 파일이다.
- 현재 폴더가 패키지임을 알리는 초기화 스크립트이다.
- 하위 폴더와 py 파일(모듈)을 모두 포함한다.
- import와 __all__ keyword를 사용한다.
# sound/__init__.py
__all__ = ['echo', 'bgm']

from . import echo
from . import bgm
'.'는 현재 directory 기준, '..'은 부모 directory 기준을 의미한다.
📝 Virtual Environment
✏️ 파이썬 가상 환경
- 프로젝트 진행 시 필요한 패키지만 설치하는 환경
- 기본 인터프리터에 프로젝트 종류별로 패키지를 설치한다.
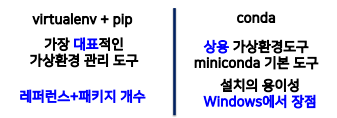
- 다양한 패키지 관리 도구를 사용한다.
- 대표적인 도구 virtualenv, conda가 있다.
✏️ conda
(base) λ conda create -n my_project python=3.8 # 설치
(base) λ conda activate my_project # 호출
(my_project) λ conda install numpy # 모듈 설치
(my_project) λ conda deactivate # 해제