03. HATEOAS와 Self-Descriptive Message 적용
스프링 HATEOAS 소개
Spring HATEOAS 란 HATEOAS 를 만족하는 REST representation을 제공하는 API를 만들 때 편리하게 사용할 수 있는 툴을 제공해 주는 라이브러리이다.
1장에서 배웠던 HATEOAS 를 예제를 통해 다시 복습해 보자!
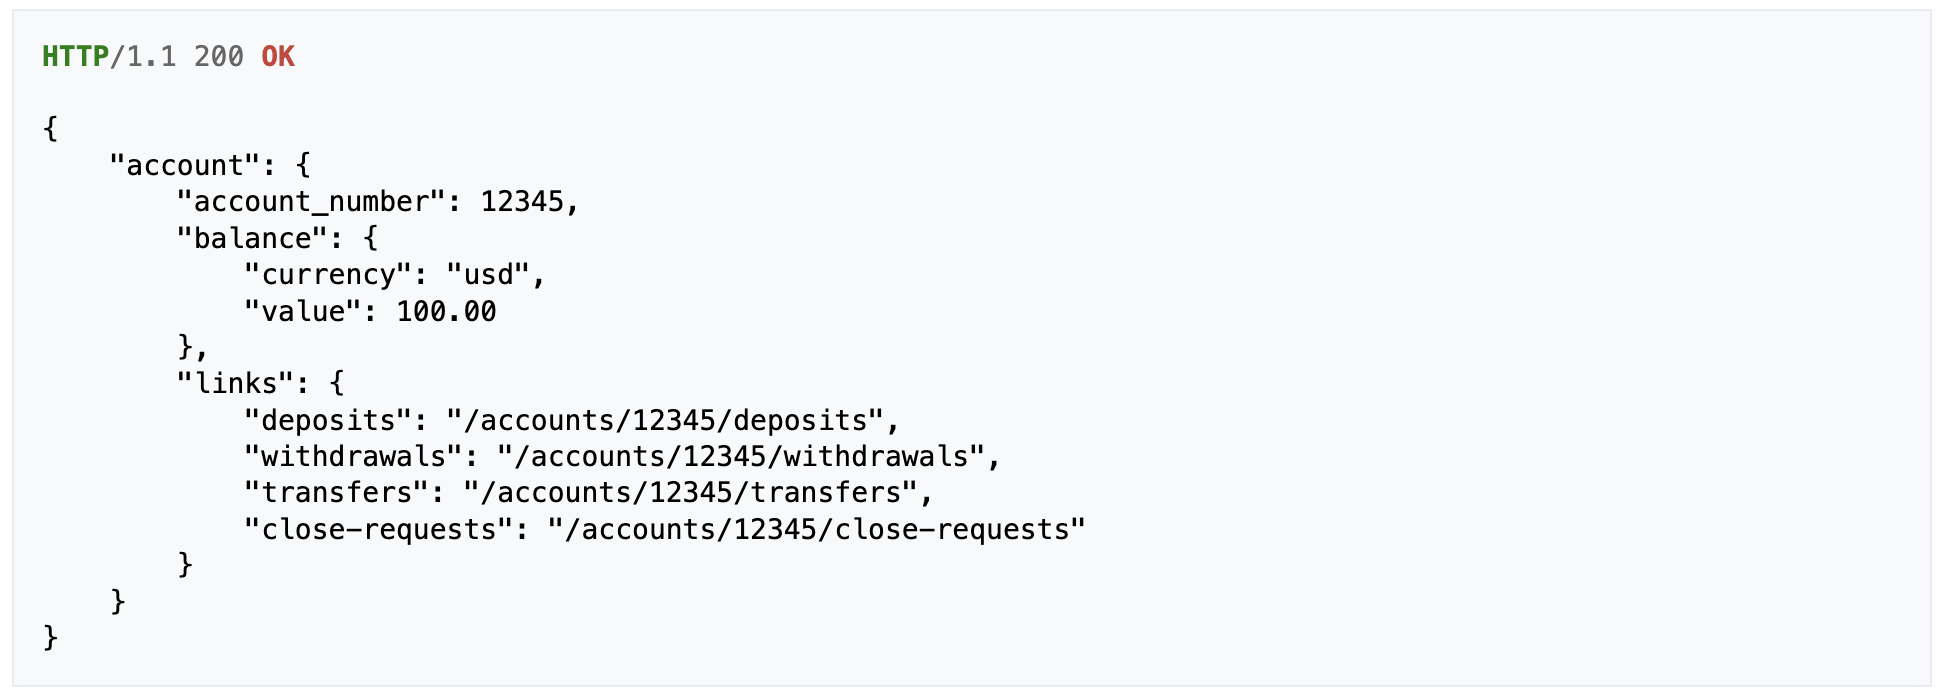
위의 응답 본문의 링크 정보에서 deposits, withdrawals, transfers, close-requests 는 애플리케이션과 클라이언트 간에 어떠한 상호작용을 할 수 있는지 릴레이션을 나타낸다.
이때 value 값이 마이너스로 바뀌게 된다면 아래 응답처럼 deposit 릴레이션만 가능해야 한다.
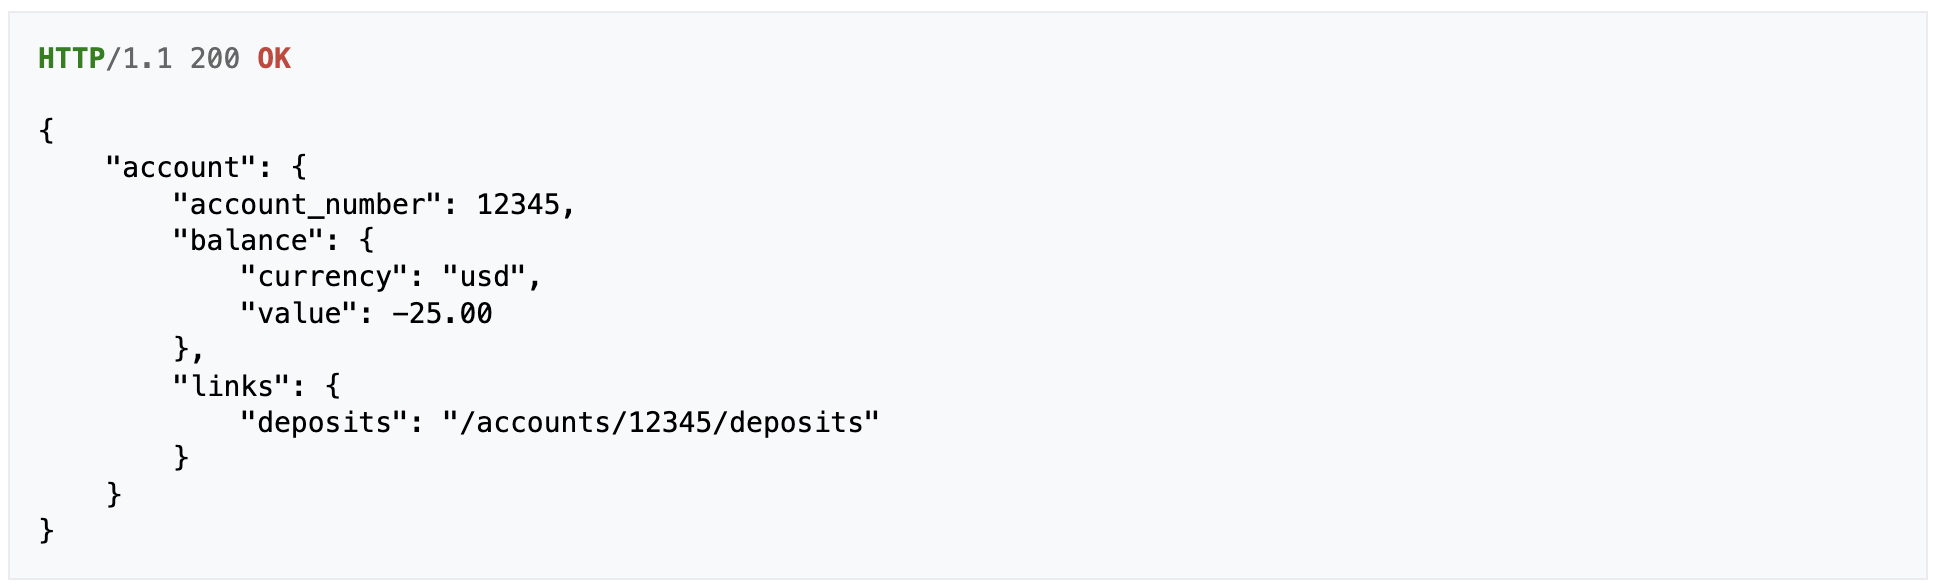
즉, HATEOAS 는 애플리케이션 상태의 변화에 따라 링크의 정보가 바뀌어야 한다.
Spring HATEOAS 가 제공하는 가장 중요한 두 가지 기능은 다음과 같다.
- 링크 만드는 기능
• 문자열 가지고 만들기
• 컨트롤러와 메소드로 만들기 - 리소스 만드는 기능
• 리소스 = 데이터 + 링크
이때 리소스는 또 다른 리소스를 담을 수 있다.
앞서 1장과 2장에서 구현한 Event 생성 API 에서는 링크에 어떤 정보가 들어가야 할까?
크게 HREF 와 REL 정보가 들어가야 하는데, 자세히 살펴보면 다음과 같다.
- HREF :
URI나URL설정 - REL : 현재 리소스와의 관계
•self: 자기 자신에 대한 URL
•profile: 응답 본문에 대한 문서로 링크
•update-event: 이벤트 수정 링크
•query-events: 이벤트 조회 링크
스프링 HATEOAS 적용
이제 본격적으로 그동안 작성한 Event 생성 API를 REST API 로 만들기 위해 응답이 잘 생성된 경우에 링크 정보를 받을 수 있도록 구현해 보자.
먼저 EventControllerTests.java 클래스에 링크 정보를 받았는지 확인하는 테스트 코드가 필요하다.
// EventControllerTests.java

@RunWith(SpringRunner.class)
@SpringBootTest
@AutoConfigureMockMvc
public class EventControllerTests {

    @Autowired
    MockMvc mockMvc;

    @Autowired
    ObjectMapper objectMapper;

    @Test
    @TestDescription("정상적으로 이벤트를 생성하는 테스트")
    public void createEvent() throws Exception {
        EventDto event = EventDto.builder()
                .name("Spring")
                .description("REST API Development with Spring")
                .beginEnrollmentDateTime(LocalDateTime.of(2023, 11, 11, 11, 11))
                .closeEnrollmentDateTime(LocalDateTime.of(2023, 11, 12, 11, 11))
                .beginEventDateTime(LocalDateTime.of(2023, 11, 22, 11, 11))
                .endEventDateTime(LocalDateTime.of(2023, 11, 23, 11, 11))
                .basePrice(100)
                .maxPrice(200)
                .limitOfEnrollment(100)
                .location("이화여자대학교 신공학관")
                .build();

        mockMvc.perform(post("/api/events/") // HTTP POST 요청 보내면
                        .contentType(MediaType.APPLICATION_JSON) // 요청의 본문에 JSON을 담아서 보내고 있음
                        .accept(MediaTypes.HAL_JSON) // 원하는 응답
                        .content(objectMapper.writeValueAsString(event))) // 위에서 작성한 event를 JSON으로 바꾸고 요청 본문에 넣기
                .andDo(print()) // 실제 응답 확인
                .andExpect(status().isCreated()) // isCreated(201) 응답
                .andExpect(jsonPath("id").exists()) // id가 있는지 확인
                .andExpect(header().exists(HttpHeaders.LOCATION)) // Location 헤더가 있는지 확인
                .andExpect(header().string(HttpHeaders.CONTENT_TYPE,  MediaTypes.HAL_JSON_VALUE))
                .andExpect(jsonPath("free").value(false))
                .andExpect(jsonPath("offline").value(true))
                .andExpect(jsonPath("eventStatus").value(Matchers.not(EventStatus.DRAFT)))
                .andExpect(jsonPath("_links.query-events").exists())
                .andExpect(jsonPath("_links.update-event").exists())
        ;
    }
그리고 EventResource.java 클래스를 생성해야 한다.
이때 두 가지 방법을 사용할 수 있다.
RepresentationModel상속 받고 생성자와 getter 생성하기EntityModel상속 받고 생성자 생성하기
(🚨 Spring HATEOAS 버전이 업데이트 되면서 강의 내용과 코드가 꽤 달라졌다!)
본 블로그에서는 2번 방법으로 구현하고자 한다.
import org.springframework.hateoas.EntityModel;
import org.springframework.hateoas.Link;

import static org.springframework.hateoas.server.mvc.WebMvcLinkBuilder.linkTo;

public class EventResource extends EntityModel<Event> {

    public EventResource(Event event, Iterable<Link> links) {
        super(event, links);
        add(linkTo(EventController.class).slash(event.getId()).withSelfRel());
    }
}
self 링크는 리소스마다 매번 필요하기 때문에 EventResource 에 추가했다.
이벤트 리소스를 추가한 후, 테스트 코드를 실행시키면 응답에 HATEOAS 관련 링크가 있는지 확인할 수 있다.
스프링 REST Docs 소개
Spring REST Docs 는 Spring MVC 테스트 를 실행할 때 사용한 요청과 응답(헤더 정보)을 사용해서 REST API 문서의 조각 snippets 을 생성해내는데 유용한 기능을 제공하는 라이브러리이다.
REST Docs 코딩을 위해서는 andDo() 메소드와 document() 메소드를 이용하여 현재 이 테스트를 실행한 결과 snippet을 어떤 디렉토리에 만들지 설정할 수 있다.
그리고 snippets 안에 정리할 수 있는 내용은 다음과 같다.
links(): hypermedia, 링크 정보requestParameters()+parameterWithName()pathParameters()+parametersWithName(): URI에 들어오는 패턴들 (ex./api/events/{id})requestParts()+partWithname(): 파일 다운로드 할 때 사용requestPartBody(),requestPartFields(): 파일 다운로드 할 때 사용requestHeaders()+headerWithName()requestFields()+fieldWithPathresponseHeaders()+headerWithName()responseFields()+fieldWithPath()
이외에 다른 기능들은 Spring REST Docs 공식 문서에서 확인할 수 있다! 🤗
스프링 REST Docs 적용
이제 본격적으로 우리의 프로젝트에 Spring REST Docs를 적용해 보자.
의존성은 프로젝트를 생성할 때 이미 추가했으므로, EventControllerTests 위에 @AutoConfigureRestDocs 어노테이션을 추가하면 REST Docs를 자동 설정할 수 있다.
테스트 코드에서 .andDo(document("create-event")) 와 같이 사용하면, ./target/generated-snippets/create-event/ 디렉토리 아래에 문서가 생성된다.
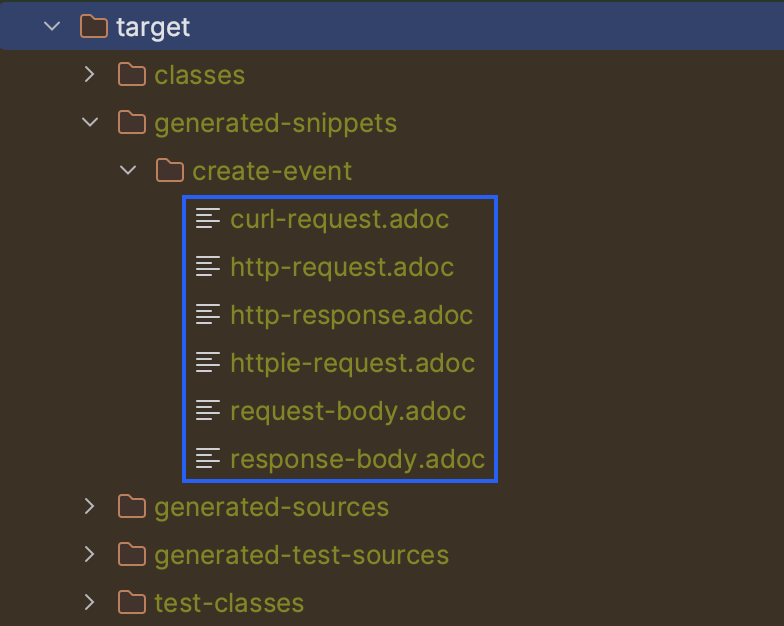
생성된 문서에서 http-response.adoc 를 한 번 열어보면 다음과 같다.
{"id":1,"name":"Spring","description":"REST API Development with Spring","beginEnrollmentDateTime":"2023-11-11T11:11:00","closeEnrollmentDateTime":"2023-11-12T11:11:00","beginEventDateTime":"2023-11-22T11:11:00","endEventDateTime":"2023-11-23T11:11:00","location":"이화여자대학교 신공학관","basePrice":100,"maxPrice":200,"limitOfEnrollment":100,"offline":true,"free":false,"eventStatus":"DRAFT","_links":{"query-events":{"href":"http://localhost:8080/api/events"},"self":{"href":"http://localhost:8080/api/events/1"},"update-event":{"href":"http://localhost:8080/api/events/1"}}}
응답 본문이 포맷팅이 되어 있지 않아 보기가 힘들다.
RestDocMockMvs 커스터마이징 을 하면 더 보기 좋게 포맷팅 할 수 있다.
test에 common 패키지 생성 후, RestDocsConfiguration.java 파일에서 커스터마이징을 하면된다.
// RestDocsConfiguration.java

import org.springframework.boot.test.autoconfigure.restdocs.RestDocsMockMvcConfigurationCustomizer;
import org.springframework.boot.test.context.TestConfiguration;
import org.springframework.context.annotation.Bean;

import static org.springframework.restdocs.operation.preprocess.Preprocessors.prettyPrint;

@TestConfiguration // test에서만 사용하는 configuration
public class RestDocsConfiguration {
    @Bean
    public RestDocsMockMvcConfigurationCustomizer restDocsMockMvcConfigurationCustomizer () {
        return configurer -> {
            configurer.operationPreprocessors()
                    .withRequestDefaults(prettyPrint()) // 요청 본문 예쁘게 출력
                    .withResponseDefaults(prettyPrint()); // 응답 본문 예쁘게 출력
        };
    }
}
이를 적용하기 위해 EventControllerTests 에 @Import(RestDocsConfiguration.class) 어노테이션을 추가하고 테스트를 실행하면, 아래와 같이 예쁘게 포맷팅 된 응답 본문을 확인할 수 있다.
{
  "id" : 1,
  "name" : "Spring",
  "description" : "REST API Development with Spring",
  "beginEnrollmentDateTime" : "2023-11-11T11:11:00",
  "closeEnrollmentDateTime" : "2023-11-12T11:11:00",
  "beginEventDateTime" : "2023-11-22T11:11:00",
  "endEventDateTime" : "2023-11-23T11:11:00",
  "location" : "이화여자대학교 신공학관",
  "basePrice" : 100,
  "maxPrice" : 200,
  "limitOfEnrollment" : 100,
  "offline" : true,
  "free" : false,
  "eventStatus" : "DRAFT",
  "_links" : {
    "query-events" : {
      "href" : "http://localhost:8080/api/events"
    },
    "self" : {
      "href" : "http://localhost:8080/api/events/1"
    },
    "update-event" : {
      "href" : "http://localhost:8080/api/events/1"
    }
  }
}
이렇게 해서 API 문서 만들기 테스트에서 요청 본문 문서화와 응답 본문 문서화가 완료되었다!
스프링 REST Docs 각종 문서 조각 생성하기
이번에는 API 문서 만들기 테스트로 다음 다섯 가지 문서 조각을 생성해볼 것이다.
- 링크 문서화
• self
• query-events
• update-event - 요청 헤더 문서화
- 요청 필드 문서화
- 응답 헤더 문서화
- 응답 필드 문서화
각각의 snippet들을 andDo의 document() 메소드 안에 추가하면 테스트를 실행할 때마다 문서 조각이 생성된다.
1️⃣ 링크 문서화
// EventControllerTests.java
// createEvent() 테스트에 추가

// ... 생략 ...
.andDo(document("create-event",
        // 링크 문서화
        links(
            linkWithRel("self").description("link to self"),
			linkWithRel("query-events").description("link to query events"),
  			linkWithRel("update-event").description("link to update an existing event")
		)
));
테스트를 실행하면 links.adoc 문서가 생성된다.
링크에 대한 정보는 linkWithRel() 메소드를 이용하여 추가할 수 있다.
2️⃣ 요청 헤더 문서화
// EventControllerTests.java
// createEvent() 테스트에 추가

// ... 생략 ...
.andDo(document("create-event",
        // 링크 문서화
        // ... 생략 ...

        // 요청 헤더 문서화
        requestHeaders(
			headerWithName(HttpHeaders.ACCEPT).description("accept header"),
			headerWithName(HttpHeaders.CONTENT_TYPE).description("content type header")
		)
));
테스트를 실행하면 request-headers.adoc 문서가 생성된다.
헤더에 대한 정보는 headerWithName() 메소드를 이용하여 추가할 수 있다.
3️⃣ 요청 필드 문서화
// EventControllerTests.java
// createEvent() 테스트에 추가

// ... 생략 ...
.andDo(document("create-event",
        // 링크 문서화
        // ... 생략 ...

        // 요청 헤더 문서화
        // ... 생략 ...

        // 요청 필드 문서화
        requestFields(
			fieldWithPath("name").description("Name of new event"),
			fieldWithPath("description").description("Description of new event"),
			fieldWithPath("beginEnrollmentDateTime").description("DateTime of begin of new event"),
			fieldWithPath("closeEnrollmentDateTime").description("DateTime of close of new event"),
			fieldWithPath("beginEventDateTime").description("DateTime of begin of new event"),
			fieldWithPath("endEventDateTime").description("DateTime of end of new event"),
			fieldWithPath("location").description("Location of new event"),
			fieldWithPath("basePrice").description("basePrice of new event"),
			fieldWithPath("maxPrice").description("maxPrice of new event"),
			fieldWithPath("limitOfEnrollment").description("limit of enrollment")
		)
));
테스트를 실행하면 request-fields.adoc 문서가 생성된다.
필드에 대한 정보는 fieldWithPath() 메소드를 이용하여 추가할 수 있다.
이때 필드의 이름에 오타가 없도록 조심해야 한다!
4️⃣ 응답 헤더 문서화
// EventControllerTests.java
// createEvent() 테스트에 추가

// ... 생략 ...
.andDo(document("create-event",
        // 링크 문서화
        // ... 생략 ...

        // 요청 헤더 문서화
        // ... 생략 ...

        // 요청 필드 문서화
		// ... 생략 ...

        // 응답 헤더 문서화
        responseHeaders(
        	headerWithName(HttpHeaders.LOCATION).description("Location header"),
			headerWithName(HttpHeaders.CONTENT_TYPE).description("Content type")
		)
));
테스트를 실행하면 response-headers.adoc 문서가 생성된다.
헤더에 대한 정보는 headerWithName() 메소드를 이용하여 추가할 수 있다.
5️⃣ 응답 필드 문서화
우리는 이미 링크 문서화에 대한 테스트를 1️⃣ 에서 했지만, 응답 필드에서 links에 해당하는 부분만 검증하지 않으면 에러가 발생한다.
이는 두 가지 방법으로 해결할 수 있다.
- Relaxed 접두어 사용
// EventControllerTests.java
// createEvent() 테스트에 추가

// ... 생략 ...
.andDo(document("create-event",
        // 링크 문서화
        // ... 생략 ...

        // 요청 헤더 문서화
        // ... 생략 ...

        // 요청 필드 문서화
		// ... 생략 ...

        // 응답 헤더 문서화
        // ... 생략 ...

        // 응답 필드 문서화
        relaxedResponseFields(
			fieldWithPath("id").description("Identifier of new event"),
			fieldWithPath("name").description("Name of new event"),
			fieldWithPath("description").description("Description of new event"),
			fieldWithPath("beginEnrollmentDateTime").description("DateTime of begin of new event"),
			fieldWithPath("closeEnrollmentDateTime").description("DateTime of close of new event"),
			fieldWithPath("beginEventDateTime").description("DateTime of begin of new event"),
			fieldWithPath("endEventDateTime").description("DateTime of end of new event"),
			fieldWithPath("location").description("Location of new event"),
			fieldWithPath("basePrice").description("basePrice of new event"),
			fieldWithPath("maxPrice").description("maxPrice of new event"),
			fieldWithPath("limitOfEnrollment").description("limit of enrollment"),
			fieldWithPath("free").description("It tells if this event is free or not"),
			fieldWithPath("offline").description("It tells if this event is offline event or not"),
			fieldWithPath("eventStatus").description("event status")
		)
));
이 방법을 사용하면 문서의 일부분만 테스트할 수 있는 장점이 있지만, 정확한 문서를 생성하지 못한다는 단점이 있다.
- link 정보를 다 기술하기
// EventControllerTests.java
// createEvent() 테스트에 추가

// ... 생략 ...
.andDo(document("create-event",
        // 링크 문서화
        // ... 생략 ...

        // 요청 헤더 문서화
        // ... 생략 ...

        // 요청 필드 문서화
		// ... 생략 ...

        // 응답 헤더 문서화
        // ... 생략 ...

        // 응답 필드 문서화
        responseFields(
			fieldWithPath("id").description("Identifier of new event"),
			fieldWithPath("name").description("Name of new event"),
			fieldWithPath("description").description("Description of new event"),
			fieldWithPath("beginEnrollmentDateTime").description("DateTime of begin of new event"),
			fieldWithPath("closeEnrollmentDateTime").description("DateTime of close of new event"),
			fieldWithPath("beginEventDateTime").description("DateTime of begin of new event"),
			fieldWithPath("endEventDateTime").description("DateTime of end of new event"),
			fieldWithPath("location").description("Location of new event"),
			fieldWithPath("basePrice").description("basePrice of new event"),
			fieldWithPath("maxPrice").description("maxPrice of new event"),
			fieldWithPath("limitOfEnrollment").description("limit of enrollment"),
			fieldWithPath("free").description("It tells if this event is free or not"),
			fieldWithPath("offline").description("It tells if this event is offline event or not"),
			fieldWithPath("eventStatus").description("event status"),

			// 링크 정보 기술
			fieldWithPath("_links.self.href").description("link to self"),
			fieldWithPath("_links.query-events.href").description("link to query event lists"),
			fieldWithPath("_links.update-event.href").description("link to update existing event")
		)
));
테스트를 실행하면 response-fields.adoc 문서가 생성된다.
스프링 REST Docs 문서 빌드
이번에는 지금까지 생성한 문서 조각들을 가지고 완성된 API 문서를 빌드해 보자.
먼저, pom.xml 에 메이븐 빌드 플러그인을 추가해야 한다.
			<plugin>
				<groupId>org.asciidoctor</groupId>
				<artifactId>asciidoctor-maven-plugin</artifactId>
				<version>1.5.3</version>
				<executions>
					<execution>
						<id>generate-docs</id>
						<phase>prepare-package</phase>
						<goals>
							<goal>process-asciidoc</goal>
						</goals>
						<configuration>
							<backend>html</backend>
							<doctype>book</doctype>
						</configuration>
					</execution>
				</executions>
				<dependencies>
					<dependency>
						<groupId>org.springframework.restdocs</groupId>
						<artifactId>spring-restdocs-asciidoctor</artifactId>
						<version>2.0.2.RELEASE</version>
					</dependency>
				</dependencies>
			</plugin>
			<plugin>
				<artifactId>maven-resources-plugin</artifactId>
				<version>2.7</version>
				<executions>
					<execution>
						<id>copy-resources</id>
						<phase>prepare-package</phase>
						<goals>
							<goal>copy-resources</goal>
						</goals>
						<configuration>
							<outputDirectory>
								${project.build.outputDirectory}/static/docs
							</outputDirectory>
							<resources>
								<resource>
									<directory>
										${project.build.directory}/generated-docs
									</directory>
								</resource>
							</resources>
						</configuration>
					</execution>
				</executions>
			</plugin>
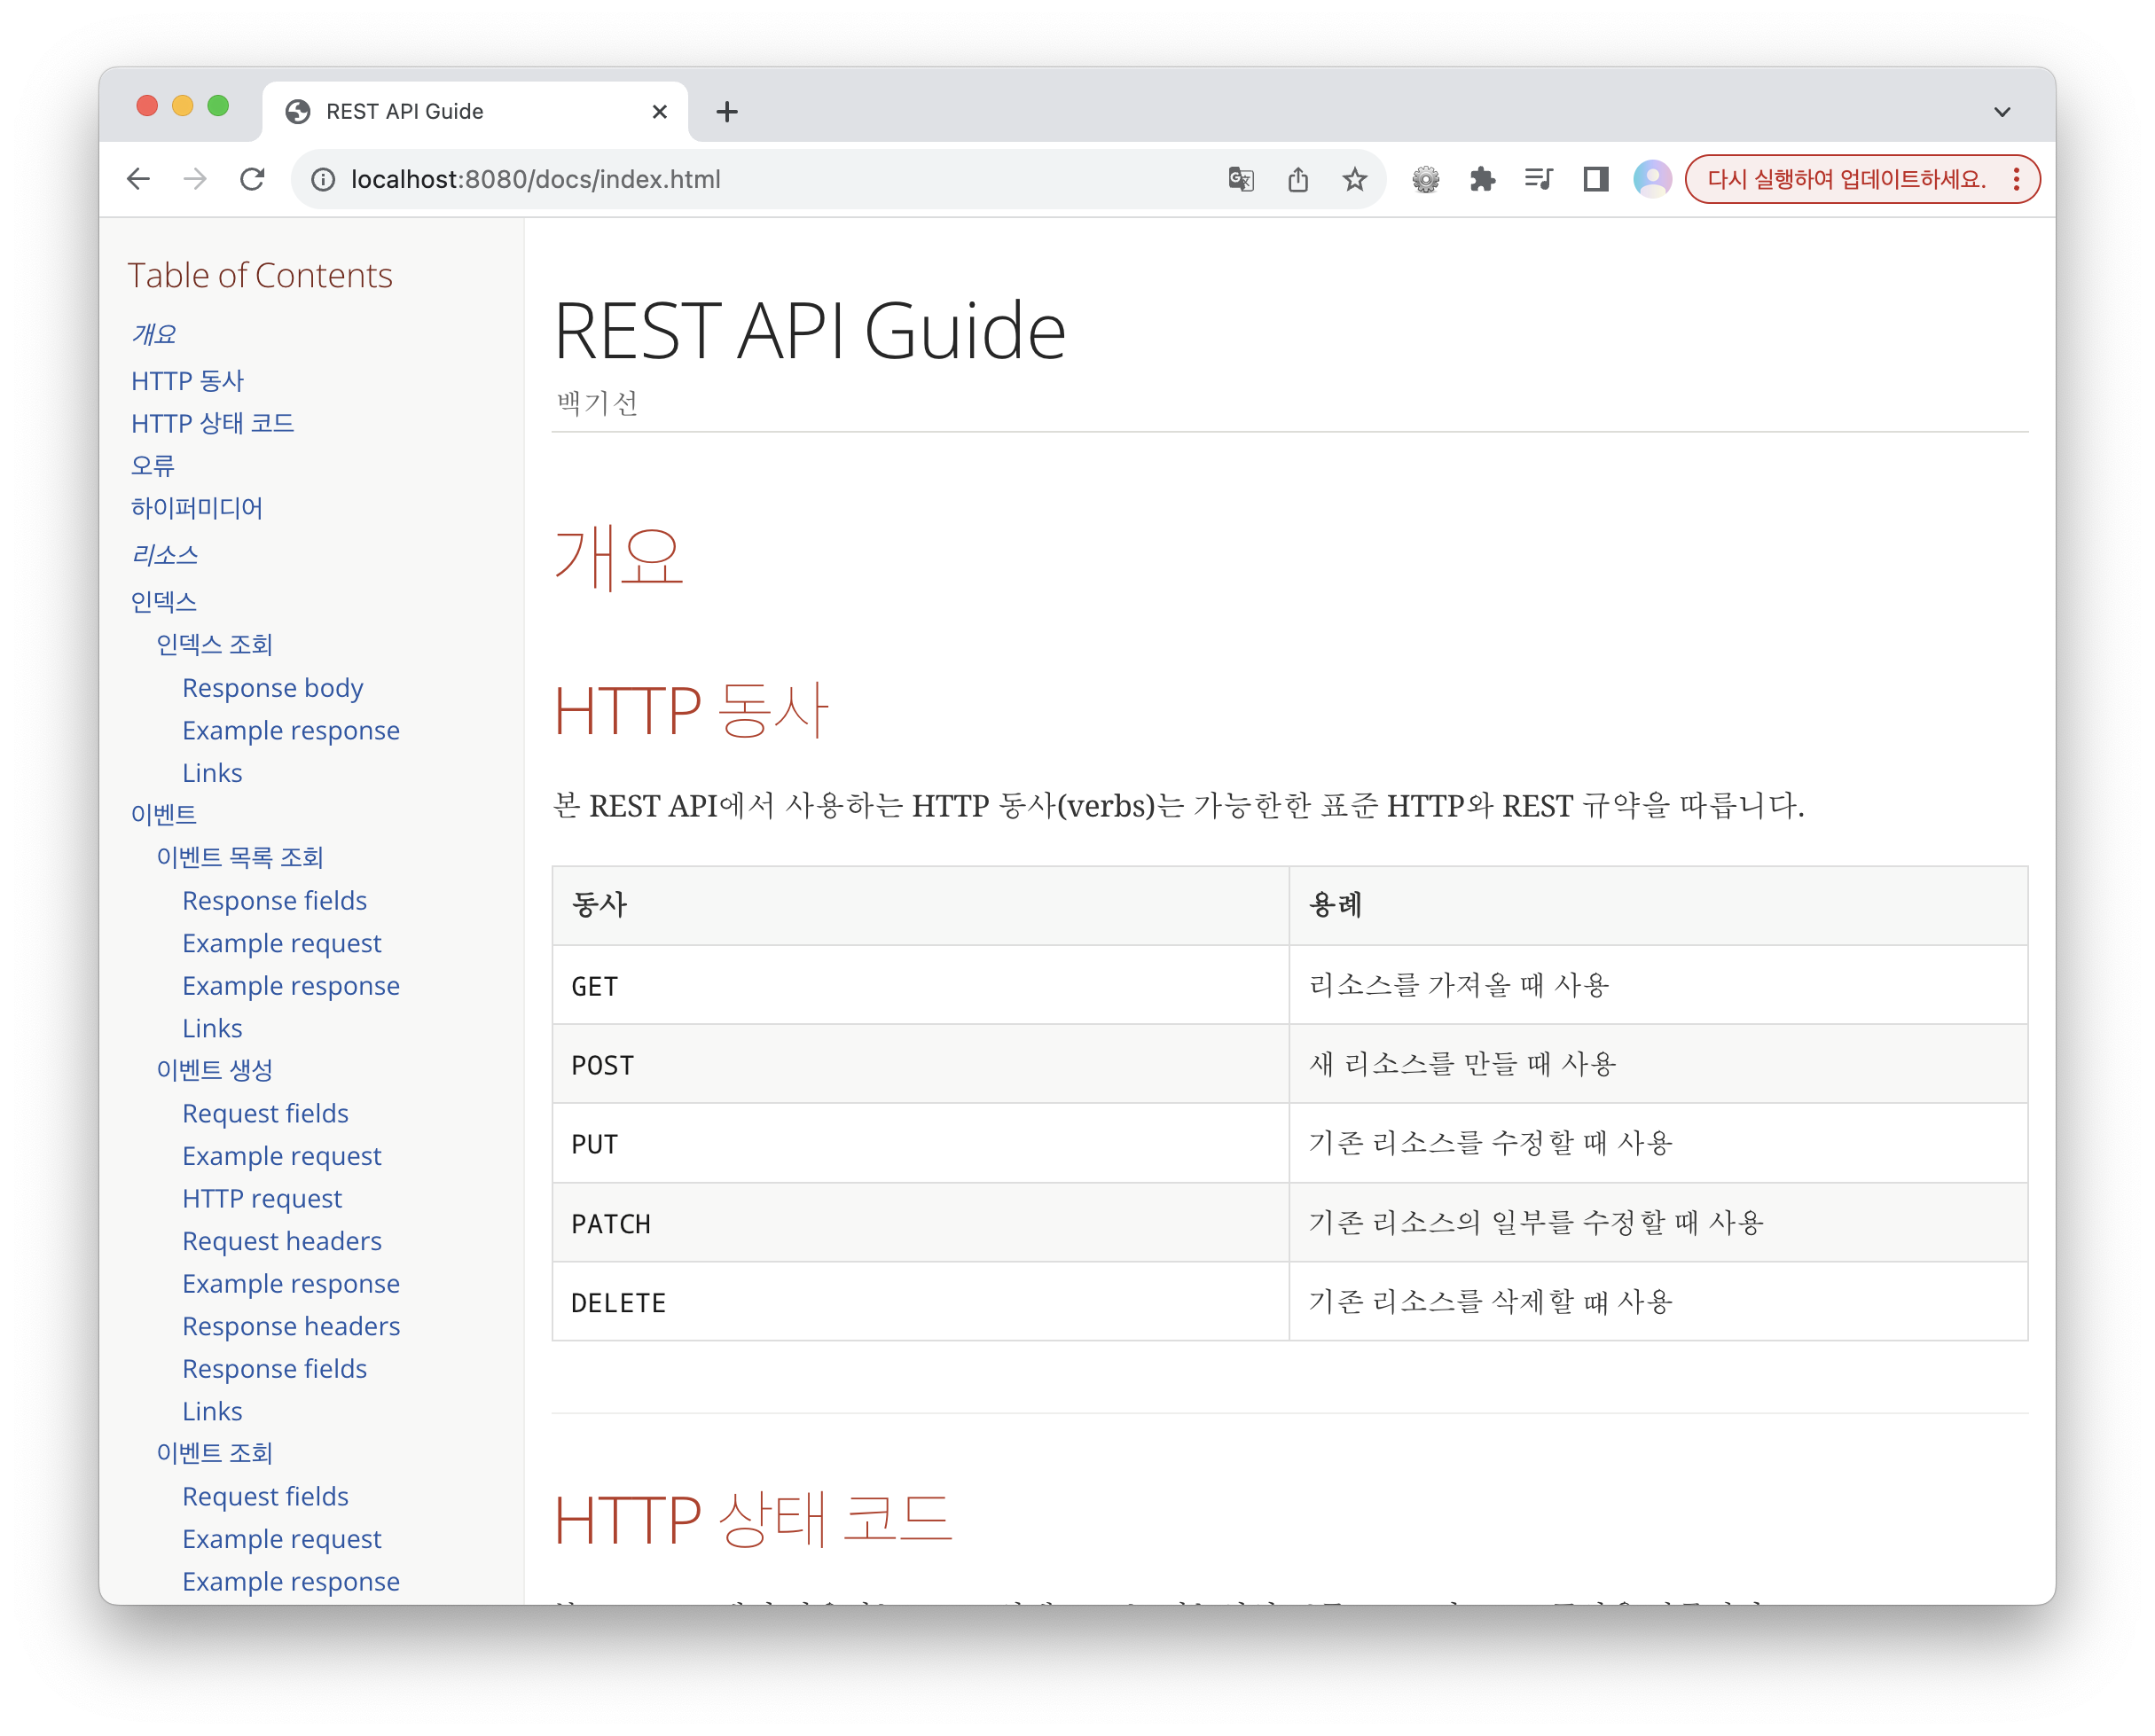
src/main/asciidoc/index.adoc 에 템플릿 파일을 추가한 후, 터미널에 mvn package 를 입력하면 HTML 문서가 생성된다.
이는 pom.xml에 추가한 두 가지 기능이 수행되었기 때문이다.
process-asciidoc:mvn package를 실행할 때,src/main/asciidoc/에 있는 모든.adoc문서를 HTML로 만들어 준다.copy-resources:/generated-docs/에 생성된index.html을/static/doc/디렉토리로 copy 해 준다.
http://localhost:8080/docs/index.html 접속하면 문서 확인할 수 있다.
이제 이 문서에 대한 링크를 응답 안에 넣어주면 REST API를 달성하기 위한 조건 중, self-descriptive message 를 달성하게 된다.
EventController 에 profile 링크를 추가해 보자.
// EventController.java

@Controller
@RequestMapping(value = "/api/events", produces = MediaTypes.HAL_JSON_VALUE)
public class EventController {
    // ... 생략 ...

    @PostMapping
    public ResponseEntity createEvent(@RequestBody @Valid EventDto eventDto, Errors errors) {
        // ... 생략 ...

        EntityModel eventResource = EntityModel.of(newEvent);
        eventResource.add(linkTo(EventController.class).withRel("query-events"));
        eventResource.add(selfLinkBuilder.withSelfRel());
        eventResource.add(selfLinkBuilder.withRel("update-event"));
        eventResource.add(Link.of("/docs/index.html#resources-events-create").withRel("profile")); // profile 링크 추가

        return ResponseEntity.created(createdUri).body(eventResource);
    }
}
🚨 강의에서는 new Link() 를 사용했지만, 현 시점에서는 Spring HATEOAS 버전이 업데이트 되어 Link.of() 를 사용해야 한다!
테스트용 DB와 설정 분리하기
애플리케이션에서 사용하는 DB와 테스트에서 사용하는 DB를 구분하기 위해 PostgreSQL 적용이 필요하다.
즉, 테스트를 할 때는 계속 H2 Database 를 사용하고, 애플리케이션 서버를 실행할 때는 PostgreSQL 을 사용하도록 변경해 보자.
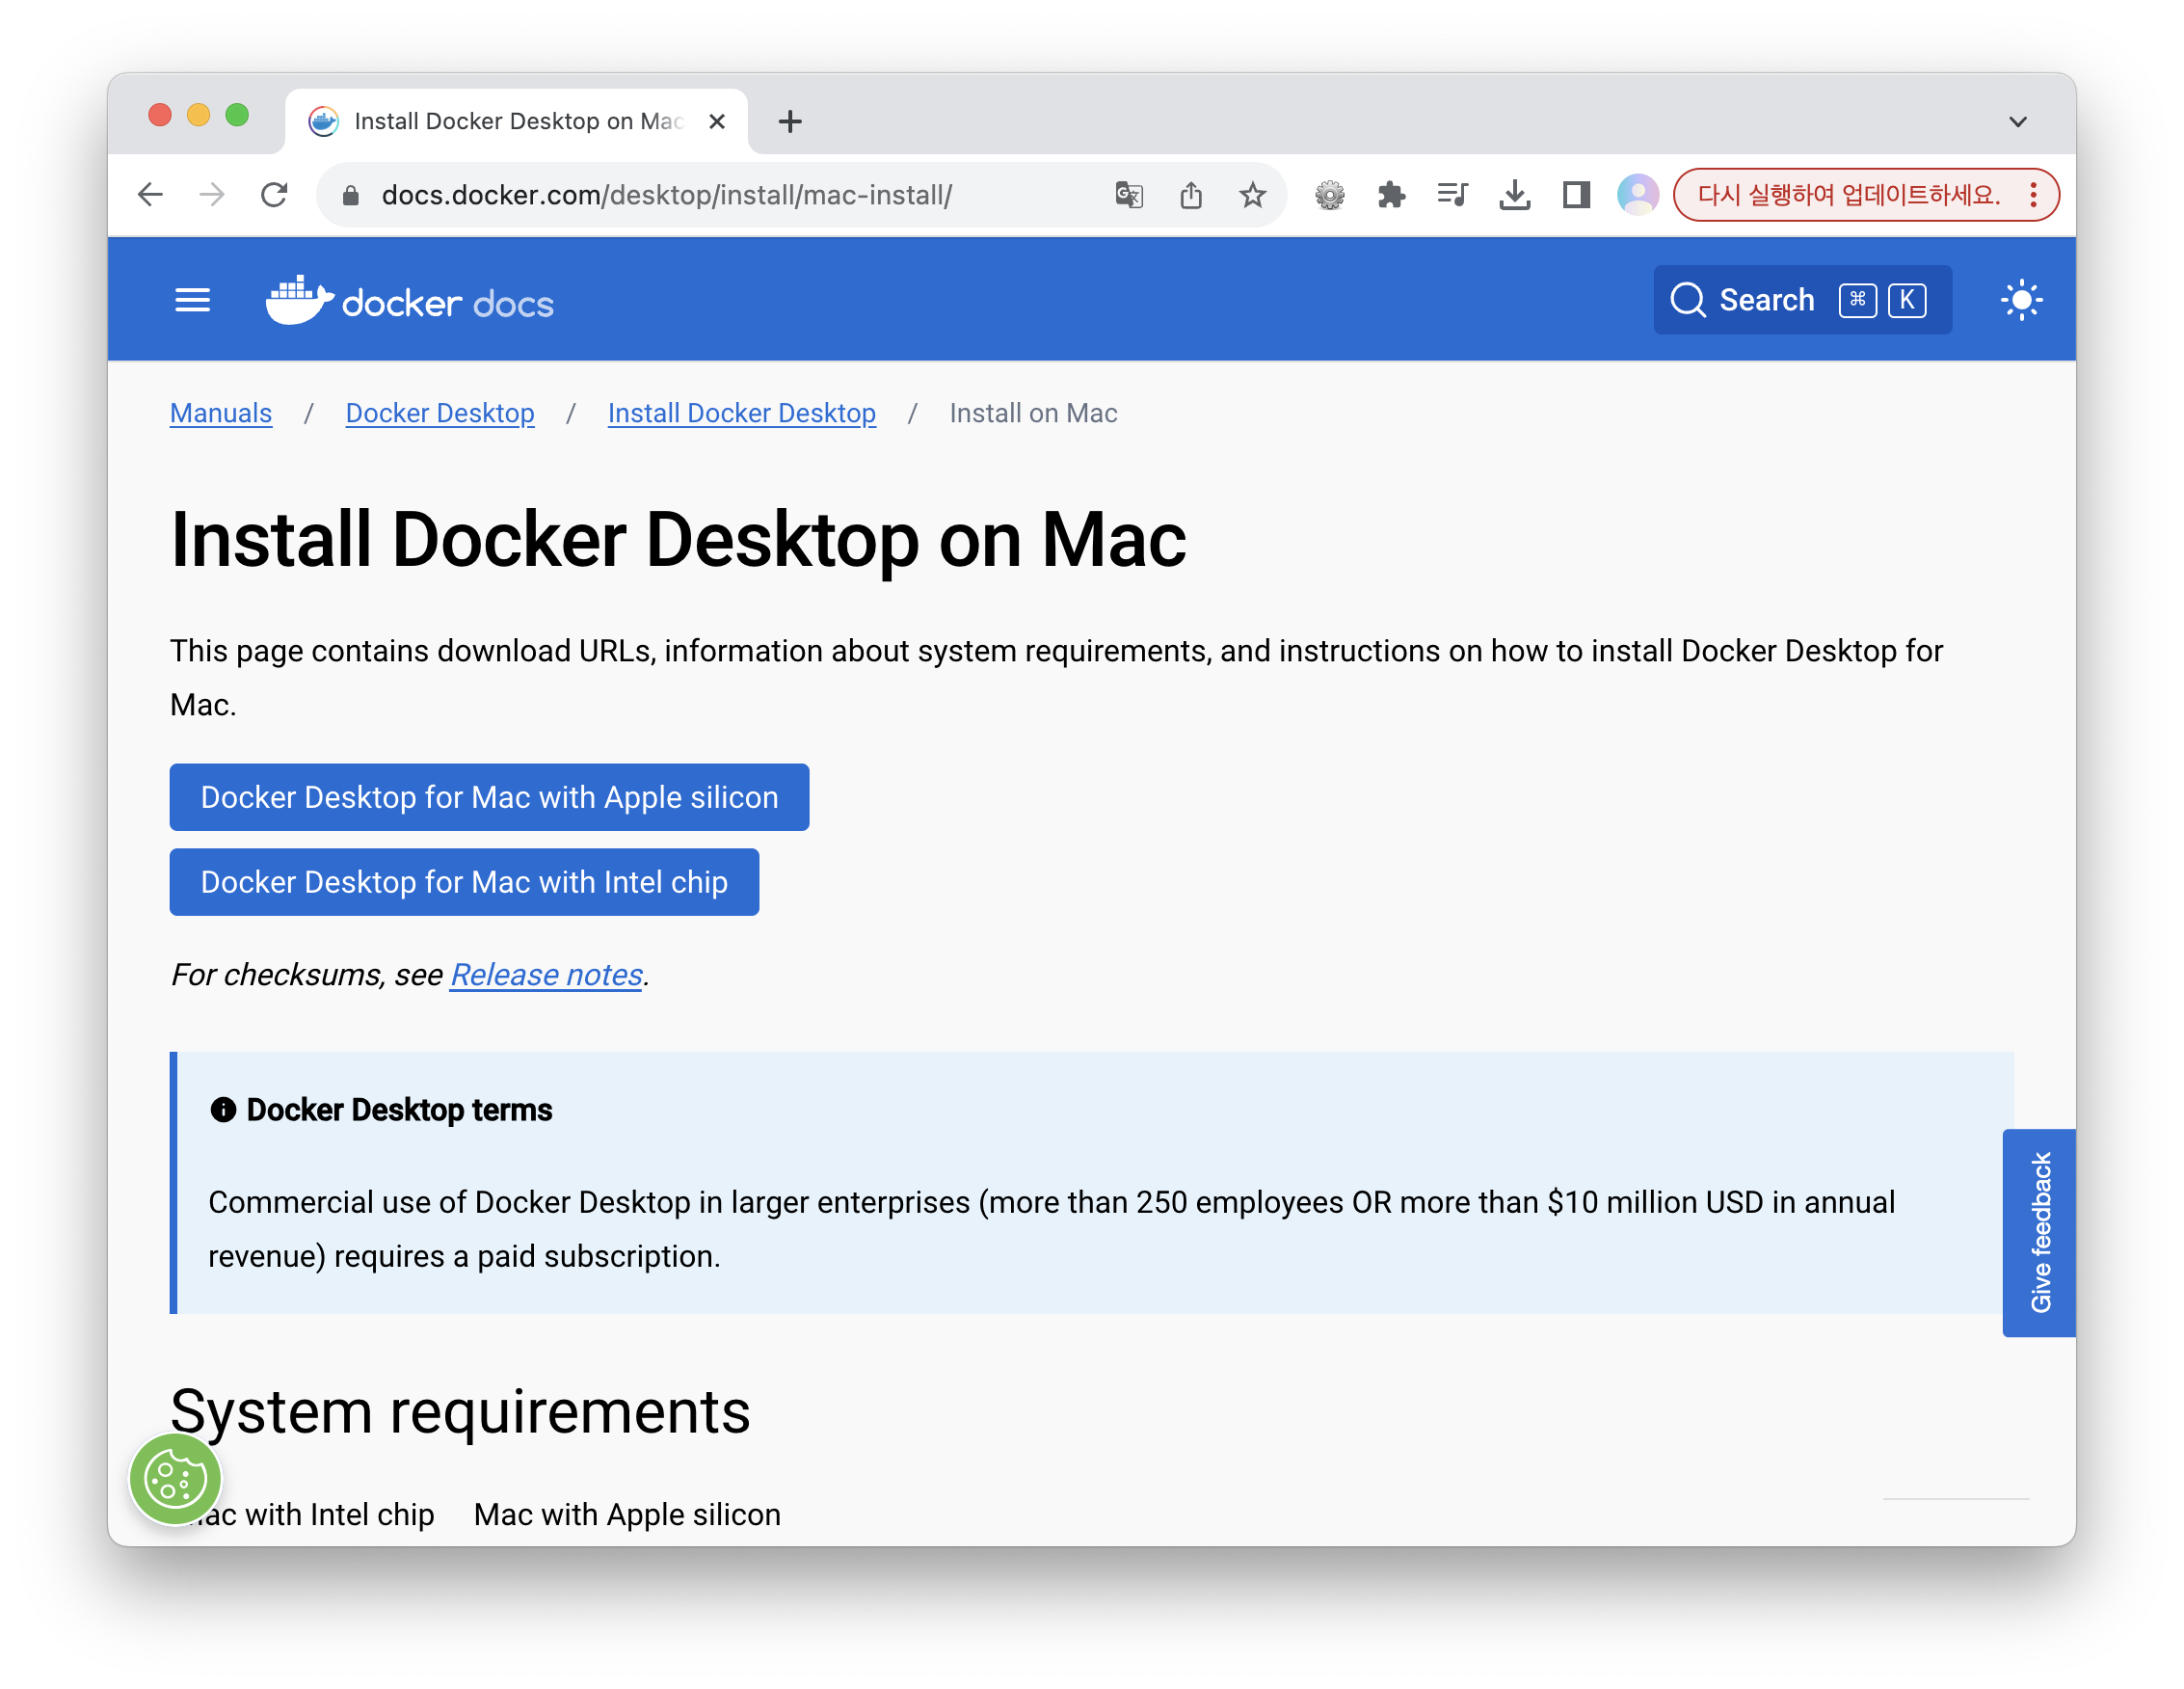
실습을 위해서는 docker가 필요하기 때문에, 공식 문서를 참고하여 docker를 설치해주었다.
도커로 PostgreSQL 컨테이너를 실행하기 위한 명령어이다.
$ docker run --name rest -p 5432:5432 -e POSTGRES_PASSWORD=pass -d postgresrest 를 컨테이너 이름으로 하여, -p 옵션으로 port 매핑, -e 옵션으로 환경변수 설정, -d로 데몬 모드로 설정했다.
그리고 $ docker ps 명령어를 입력하면 컨테이너 목록에서 rest 컨테이너를 확인할 수 있다.
다음은 도커 컨테이너에 들어가보기 위한 명령어이다.
$ docker exec -i -t rest bash # target 컨테이너를 rest 로 지정
$ su - postgres # postgres로 user 변경
$ psql -d postgres -U postgres
$ \l # 데이터베이스 목록 확인
$ \dt # 테이블 확인
이제 test에서 H2 Database를 사용하기 위해 pom.xml에서 h2database를 test scope으로 변경해야 한다.
<dependency>
	<groupId>com.h2database</groupId>
	<artifactId>h2</artifactId>
	<scope>test</scope>
</dependency>
그리고 데이터소스와 하이버네이트 설정을 위해 applicaion.properties 에 다음 내용을 추가한다.
spring.datasource.username=postgres
spring.datasource.password=pass
spring.datasource.url=jdbc:postgresql://localhost:5432/postgres
spring.datasource.driver-class-name=org.postgresql.Driver

spring.jpa.hibernate.ddl-auto=create-drop
spring.jpa.properties.hibernate.jdbc.lob.non_contextual_creation=true
spring.jpa.properties.hibernate.format_sql=true

logging.level.org.hibernate.SQL=DEBUG
logging.level.org.hibernate.type.descriptor.sql.BasicBinder=TRACE
하이버네이트 설정을 통해 이벤트에 대한 테이블을 만들어 줄 수 있고, 우리가 쿼리가 볼 수 있도록 할 수 있다.
하지만 테스트에서 H2 Database를 사용하기 위해서는 테스트에 대한 application.properties가 필요한데, test 안에 resources 디렉토리를 생성하여 설정 파일을 추가하게 되면 애플리케이션 설정과 테스트 설정이 중복된다.
따라서 이를 해결하려면 테스트 설정 파일의 이름을 application-test.properties 로 변경하고 내용을 다음과 같이 변경하여 오버라이딩 하고 싶은 것만 남긴다.
spring.datasource.username=sa
spring.datasource.password=
spring.datasource.url=jdbc:h2:mem:testdb
spring.datasource.driver-class-name=org.h2.Driver
spring.datasource.hikari.jdbc-url=jdbc:h2:mem:testdb
spring.jpa.properties.hibernate.dialect=org.hibernate.dialect.H2Dialect
테스트에서 이 설정을 사용할 수 있도록 EventControllerTests 에 @ActiveProfiles("test") 어노테이션을 추가하면 애플리케이션 설정과 테스트 설정 중복을 피할 수 있게 된다.
API 인덱스 만들기
이벤트를 조회, 생성, 수정 ••• 하기 위해서는 API의 진입점이 필요하다.
따라서 이번 실습에서는 인덱스 핸들러를 구현하고자 한다.
이벤트 핸들러는 다음 두 가지 기능이 있다.
- 다른 리소스에 대한 링크 제공
- 문서화
먼저 test에 index 패키지를 만들고, IndexControllerTest.java 클래스를 생성한다.
// IndexControllerTest.java

@RunWith(SpringRunner.class)
@SpringBootTest
@AutoConfigureMockMvc
@AutoConfigureRestDocs
@Import(RestDocsConfiguration.class)
@ActiveProfiles("test")
public class IndexControllerTest {
    @Autowired
    MockMvc mockMvc;

    @Test
    public void index() throws Exception {
        this.mockMvc.perform(get("/api/"))
                .andExpect(status().isOk())
                .andExpect(jsonPath("_links.events").exists());
    }
}
그리고 IndexController 클래스를 생성하여 이벤트에 대한 링크를 추가한다.
// IndexController.java

@RestController
public class IndexController {
    @GetMapping("/api")
    public RepresentationModel index() {
        var index = new RepresentationModel();
        index.add(linkTo(EventController.class).withRel("events"));

        return index;
    }

}
인덱스 링크는 입력 값이 잘못되어 에러가 발생한 경우에 인덱스로 가는 링크를 제공할 때 사용할 수 있다.
따라서 에러가 발생한 경우 에러를 리소스로 변환하여 전달할 수 있도록 EventController 를 수정해야 한다.
// EventController.java

@Controller
@RequestMapping(value = "/api/events", produces = MediaTypes.HAL_JSON_VALUE)
public class EventController {
	// ... 생략 ...

    @PostMapping
    public ResponseEntity createEvent(@RequestBody @Valid EventDto eventDto, Errors errors) {
        if (errors.hasErrors()) { // 바인딩에서 에러 발생하면
            return badRequest(errors);
        }

        eventValidator.validate(eventDto, errors);
        if (errors.hasErrors()) {
            return badRequest(errors);
        }

        Event event = modelMapper.map(eventDto, Event.class); // Deserialization : eventDto에 있는 것을 이벤트 클래스의 인스턴스로 만들기
        event.update(); // free 여부 변경
        Event newEvent = this.eventRepository.save(event);
        WebMvcLinkBuilder selfLinkBuilder = linkTo(EventController.class).slash(newEvent.getId());
        URI createdUri = selfLinkBuilder.toUri();

        EntityModel eventResource = EntityModel.of(newEvent); // 이벤트를 이벤트 리소스로 변환 → 링크를 추가할 수 있음
        eventResource.add(linkTo(EventController.class).withRel("query-events"));
        eventResource.add(selfLinkBuilder.withSelfRel()); // self 링크 추가
        eventResource.add(selfLinkBuilder.withRel("update-event"));
        eventResource.add(Link.of("/docs/index.html#resources-events-create").withRel("profile"));

        return ResponseEntity.created(createdUri).body(eventResource); // createdUri를 헤더로 가지는 201 응답


    }

    private ResponseEntity badRequest(Errors errors) {
        return ResponseEntity.badRequest().body(ErrorResource.of(errors)); // 에러를 리소스로 변환
    }
}
에러를 리소스로 변환할 때 index 에 대한 링크를 추가해 주기 위해서 ErrorResource 도 수정해야 한다.
package GDSC.ewha.springrestapi.common;

import GDSC.ewha.springrestapi.index.IndexController;
import org.springframework.hateoas.EntityModel;
import org.springframework.validation.Errors;

import static org.springframework.hateoas.server.mvc.WebMvcLinkBuilder.linkTo;
import static org.springframework.hateoas.server.mvc.WebMvcLinkBuilder.methodOn;

public class ErrorResource extends EntityModel<Errors> {
    public static EntityModel<Errors> of(Errors errors) {
        EntityModel<Errors> errorsModel = EntityModel.of(errors);
        errorsModel.add(linkTo(methodOn(IndexController.class).index()).withRel("index"));
        return errorsModel; // 에러를 리소스로 변환할 때 index에 대한 링크 추가
    }
}
이제 에러가 발생한 경우에 상태를 전이할 수 있는 index 링크가 추가되었으므로 이에 대한 테스트 코드 수정이 필요하다.
@RunWith(SpringRunner.class)
@SpringBootTest
@AutoConfigureMockMvc
@AutoConfigureRestDocs
@Import(RestDocsConfiguration.class)
@ActiveProfiles("test")
public class EventControllerTests {
	// ... 생략 ...

	@Test
    @TestDescription("입력 값이 잘못된 경우에 에러가 발생하는 테스트")
    public void createEvent_Bad_Request_Wrong_Input() throws Exception{
        EventDto eventDto = EventDto.builder()
                .name("Spring")
                .description("REST API Development with Spring")
                .beginEnrollmentDateTime(LocalDateTime.of(2023, 11, 14, 11, 11))
                .closeEnrollmentDateTime(LocalDateTime.of(2023, 11, 12, 11, 11))
                .beginEventDateTime(LocalDateTime.of(2023, 11, 24, 11, 11))
                .endEventDateTime(LocalDateTime.of(2023, 11, 23, 11, 11))
                .basePrice(10000)
                .maxPrice(200)
                .limitOfEnrollment(100)
                .location("이화여자대학교 신공학관")
                .build();

        this.mockMvc.perform(post("/api/events")
                        .contentType(MediaType.APPLICATION_JSON)
                        .content(this.objectMapper.writeValueAsString(eventDto))
                )
                .andDo(print())
                .andExpect(status().isBadRequest())
                // 응답에 있기를 바라는 내용
                .andExpect(jsonPath("errors[0].objectName").exists()) // 에러 배열에서 객체 이름
                .andExpect(jsonPath("errors[0].defaultMessage").exists()) // 기본 메시지
                .andExpect(jsonPath("errors[0].code").exists()) // 에러 코드
                .andExpect(jsonPath("_links.index").exists())
        ;
    }
}
테스트를 수행하면 에러가 발생한 경우 _links.index가 정상적으로 응답에 담겨오는 것을 확인할 수 있다.
🚨 강의에서는 content[0] 을 사용했지만, 현 시점에서는 Spring 버전이 업데이트 되어 error[0]을 사용해야 한다!
(ErrorsSerializer.java 에 gen.writeFieldName("errors"); 추가 필요)
IntelliJ 명령어 정리 (macOS)
💡
[cmd + shift + T]: test로 이동
💡[ctrl + shift + R]: 테스트 메소드 실행
→ 마우스를 메소드 밖에 두면 전체 테스트를 실행할 수 있음
인프런 백기선님의 스프링 기반 REST API 개발을 기반으로 작성했습니다.