ref. https://ko.reactjs.org/tutorial/tutorial.html
위 자습서의 틱택토 게임 개발을 클래스 컴포넌트가 아닌 함수형 컴포넌트와 Hook을 이용해 진행합니다. 필자는 리액트를 처음 사용해보므로 코드가 더럽거나 올바르지 않을 수 있습니다.
이 글을 작성하는 이유는 제 개인적인 리액트 학습을 위한 것입니다.
사실상 위 링크의 튜토리얼에 있던 틱택토 게임 만들기는 끝이 났다. 이제부터는 Redux를 React에 적용하는 과정을 다룰 것이다. Redux 또한 React와 마찬가지로 처음 사용해본다. 여기저기서 본 샘플 코드를 보고 맨땅에 헤딩 식으로 작성하는 것이기 때문에 엉망일 수도 있음을 미리 알린다.🤔 리덕스는 도큐먼트가 잘 쓰여져 있으므로 참고하는 것이 좋을 것이다. 그마저도 귀찮다면, 이 시리즈에 리덕스를 간략히 정리한 것이 있으니 앞으로 넘어가 보고 오기를 권장한다.
준비하기
- Redux 기초 이해하기
- 이전 프로젝트 복사하기
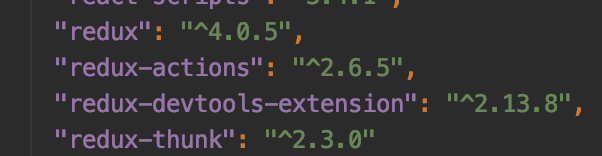
redux-actionsdependency가 설정되어 있지 않다면 IDE의 커맨드라인에yarn add redux-actions를 입력하여 종속성 추가하기
package.json에 redux 관련 종속성이 잘 추가되어 있는지 확인하자
스토어 생성하기
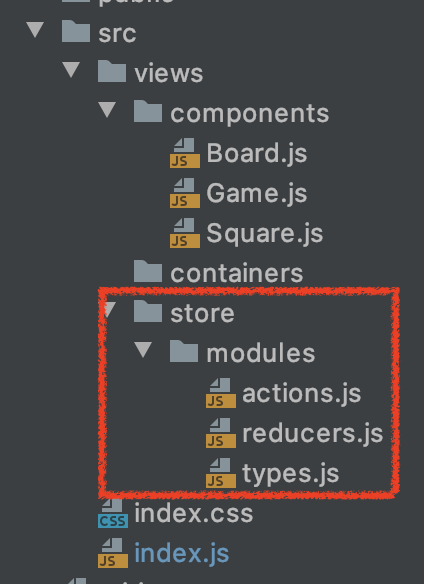 스토어 패키지를 컴포넌트 패키지와 동일한 댑스에 생성하고 하위에 모듈 패키지를 생성하였다.
- types.js : 액션 타입
- actions.js : 액션 생성 함수
- reducers.js : 리듀서
types.js
쉽게 생각하면 Enum 같은 존재이다. 문자열로 이루어져 있으며 액션 생성 함수가 type이라는 필수 파라미터로 가지게 된다. 이는 리듀서가 상태를 변경할 때 사용할 정보의 일종이므로 상태가 변경되는 모든 행위에 대해 고유한 타입을 생성해야한다.
이전에 작성한 Game.js의 메소드를 참고하여 틱택토 게임에서 상태가 변경되는 작업을 정의해보았다.
- 스퀘어를 클릭한다. → 히스토리가 쌓인다. 다음 플레이어가 정해진다. 클릭 횟수가 증가한다.
- 히스토리를 클릭한다. → 히스토리가 삭제된다(n까지만 남긴다). 클릭 횟수를 되돌린다.
- 승자가 결정된다.
- 무승부로 게임이 종료된다.
그리고 이에 맞춰서 액션 타입을 다음처럼 정의하였다.
export default {
    SQUARE_CLICK : 'SQUARE/SQUARE_CLICK',
    GO_TO_HISTORY : 'SQUARE/GO_TO_HISTORY',
    WINNER_DETERMINED : 'SQUARE/WINNER_DETERMINED',
    DRAW_ENDS : 'SQUARE/DRAW_ENDS'
}
action.js
import { createAction } from 'redux-actions';
import type from './types';

export const squareClick = createAction(
    type.SQUARE_CLICK, squares => squares
);

export const goToHistory = createAction(
    type.GO_TO_HISTORY, move => move
);

export const winnerDetermined = createAction(
    type.WINNER_DETERMINED
);

export const drawEnds = createAction(
    type.DRAW_ENDS
)
❗️NOTE
export default { .. }로 표현되어 단 하나의 오브젝트를 export 하는 js 파일을 가져올 때는import name from '..'꼴을 사용하도록 한다.
export되는 대상이 많은 경우에만 import에{}를 사용한다.이걸로 삽질 어지간히 했다.😔
reducers.js
import {handleActions} from 'redux-actions'
import type from './types';

const initializeSquares = () => {
    const MAXIMUM_ROW = 3, MAXIMUM_COLUMN = 3;
    const init = Array(MAXIMUM_ROW).fill(null);
    for (var i = 0; i < MAXIMUM_ROW; ++i) {
        var columns = Array(MAXIMUM_COLUMN).fill(null);
        for (var j = 0; j < MAXIMUM_COLUMN; ++j) {
            columns[j] = {index: i * MAXIMUM_COLUMN + j, value: null};
        }
        init[i] = columns;
    }
    return [{squares: init}];
}

const initialState = {
    history : initializeSquares(),
    xIsNext : true,
    clickCount : 0,
    status : 'Next Player : X'
}

export default handleActions({
    [type.SQUARE_CLICK]: (state, action) => ({
        ...state,
        history: state.history.concat({squares : action.payload}),
        status: 'Next Player : '+(state.xIsNext ? 'O' : 'X'),
        xIsNext: !state.xIsNext,
        clickCount: state.clickCount+1,
    }),
    [type.GO_TO_HISTORY]: (state, action) => ({
        ...state,
        history: state.history.slice(0, action.payload + 1),
        clickCount: action.payload
    }),
    [type.WINNER_DETERMINED]: (state, action) => ({
        ...state,
        status: 'Winner is '+(state.xIsNext ? 'O' : 'X')
    }),
    [type.DRAW_ENDS]: (state, action) => ({
        ...state,
        status : 'GAME-OVER'
    })
  },
  initialState
);
이전 코드의 상태 중 winner를 제거하고, status로만 출력문을 관리하도록 변경하였다. reducer의 payload는 action의 createAction 함수의 두번째 Argument로 들어온 값이다. 이는 항상 payload라는 이름의 파라미터로 저장되기때문에 action.payload로 접근하도록 하자.
index.js
import React from 'react';
import ReactDOM from 'react-dom';

import { createStore } from 'redux';
import rootReducer from './views/store/modules/reducers';

import { Provider } from 'react-redux';

import Game from './views/components/Game';
import './index.css';

const store = createStore(rootReducer);
console.log(store.getState());

ReactDOM.render(
    <Provider store={store}>
        <Game />
    </Provider>,
    document.getElementById('root')
);
프로젝트를 시작하면 처음으로 읽히는 파일이다. 특별한 것은 없고 createStore 메소드를 이용하여 store 객체를 생성한 뒤 Provider 컴포넌트의 상태값으로 전달해준다. 한마디로 스토어를 등록해주는 과정이라고 생각하면된다.
컴포넌트 변경하기
우선, Board 컴포넌트를 생성하기 전에 store와 연결하는 작업을 수행하는 BoardContainer를 생성할 것이다. views 패키지 하위에 containers패키지를 생성한뒤 BoardContainer.js를 생성한다.
이전에 Game 컴포넌트에서 수행했던 작업 또한 BoardContainer 컨테이너에 위임될 것이다. 따라서 index.js의 render()함수 내 컴포넌트를 BoardContainer로 변경한다. 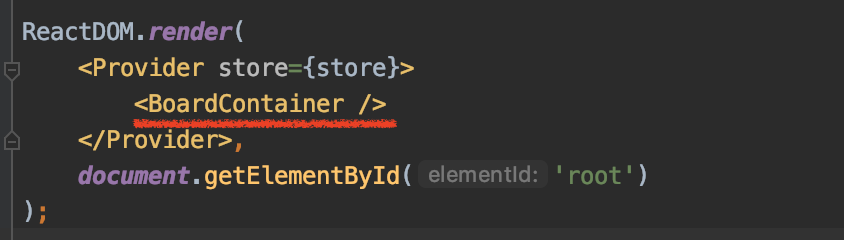
BoardContainer.js
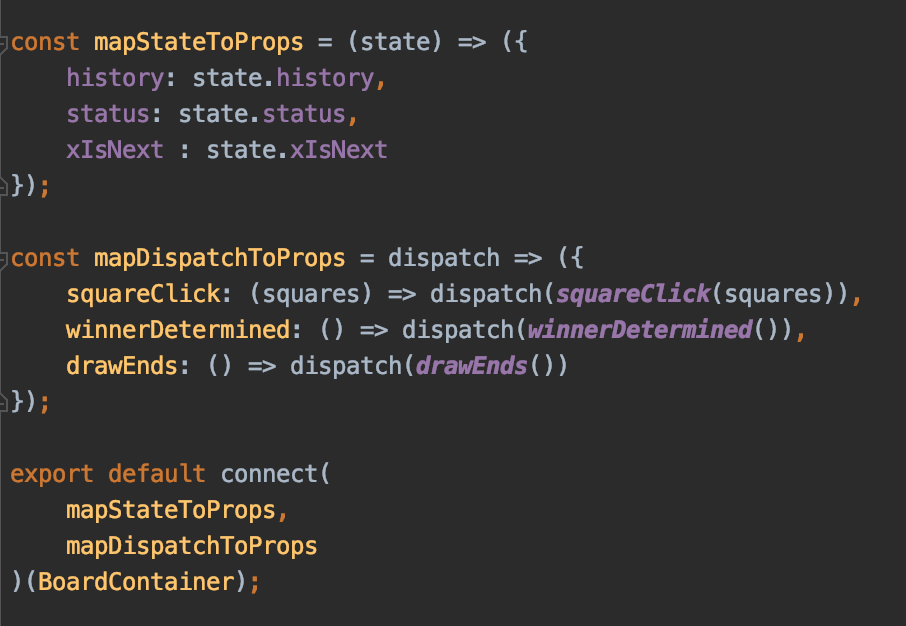 store와 컴포넌트를 연결해주는 것이 컨테이너의 핵심이다. 그리고 위의 코드가 바로 그 작업을 수행해주는 것이다.
mapStateToProps
mapStateToProps 는 공식문서에서 다음과 같이 정의하고 있다. connect에 전달되는 번째 인수로, mapStateToProps는 연결된 컴포넌트가 store에서 필요한 데이터의 일부를 선택하는데 사용된다. 이는 store의 state가 변경될 때마다 호출되고, store의 전체 state를 수신하며 이 컴포넌트가 필요로 하는 데이터 객체를 반환해야 한다.
함수는 function mapStateToProps(state, ownProps?) 꼴로 두개의 Argument를 가진다.
🔎state
store.getState()를 호출하여 얻은 값과 동일한 전체 Redux 스토어 상태를 가져온다. 따라서 보통 state로 Argument를 지정한다. 물론 원하는 이름으로 변경해도 되지만 "store 인스턴스"가 아닌 "state 값"이므로 이를 store라고 명명하는 것은 부정확할 것이다.
🔎ownProps (optional)
컴포넌트가 store에서 데이터를 검색하기 위해 해당 컴포넌트의 자체 props를 필요로 하는 경우 사용한다. 이 Argument에는connect에 의해 생성된 래터 구성요소에 주어진 모든 props가 포함된다.
아래는 예제이다 :
// connectedTodo 컴포넌트

function mapStateToProps(state, ownProps) {
  const { visibilityFilter } = state
  const { id } = ownProps
  const todo = getTodoById(state, id)

  // component receives additionally:
  return { todo, visibilityFilter }
}

--------------
// 어플리케이션 내에서 부모컴포넌트는 다음처럼 컴포넌트를 호출할 것이다.
<ConnectedTodo id={123} />
// mapStateToProps에서 리턴한 값이 ConnectedToto의 props로 들어간다.
// 즉, 이 컴토넌트는 props로 id, todo, visibilityFilter를 가지게 된다.
mapDispatchToProps
mapDispatchToProps는 store에 action을 디스패칭하는데에 사용된다. dispatch는 Redux store의 기능이다. store.dispatch를 호출함으로써 action을 dispatch 할 수 있다. 그리고 이것이 상태를 변화시키는 유일한 트리거이다.
React Redux를 사용하면 컴포넌트가 스토어에 직접 엑세스하지 않고 connect를 이용하여 엑세스 할 수 있다. React Redux는 컴포넌트가 action을 디스패치하는 두 가지 방법을 제공한다.
- 기본적으로 연결된 컴포넌트는
props.dispatch를 수신하고 자체적으로 action을 디스패치한다. connect는 호출될 때 디스패치하는 함수를 생성하고, 이를 컴포넌트 props로 전달한다.
위에서 squareClick: (squares) => dispatch(squareClick(squares))에만 Argument가 존재하는데, 이는 action.js에서 액션 생성 함수가 payload를 가지도록 정의했기 때문이다. 즉, squareClick(x)를 호출하면 { payload : x }가 전달된다.
connect
가장 마지막에 위치한 connect를 보면 BoardContainer가 전달되고 있다. 이는 연결후 props를 전달할 주체를 뜻하는데, 함수형 컴포넌트인 BoardContainer를 전달하였기 때문에 다음과 같이 파라미터를 전달 받을 수 있다.
 클래스형 컴포넌트를 사용했다면
 this.props.history로 바로 접근 할 수 있다.
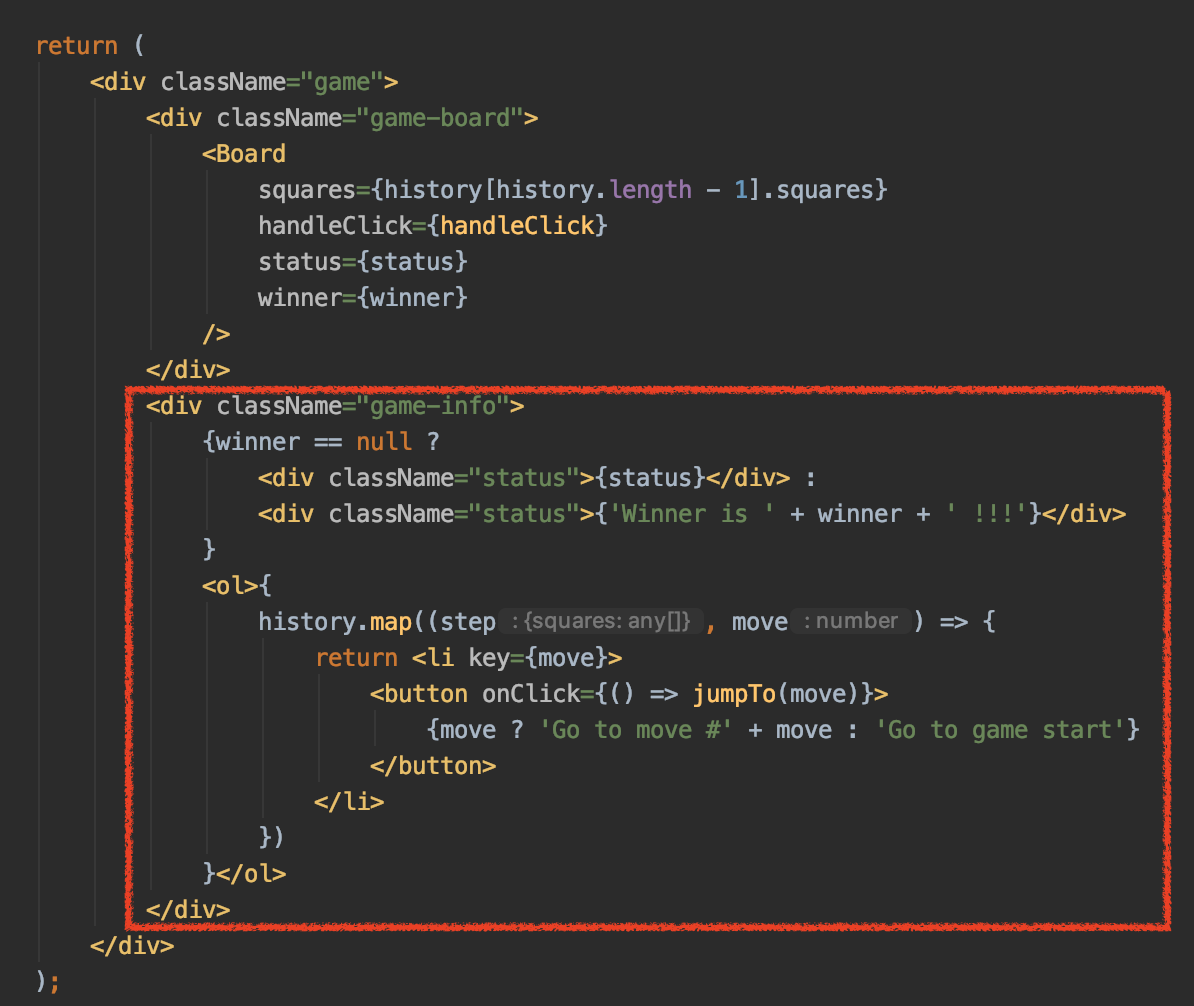
아래 이미지를 참고하며 Game 컴포넌트에서 BoardContainer로 메소드를 옮기자. handleClick 메소드를 Board로 전달하는 것은 동일하므로 getNewSquare, getLocation 함수도 그대로 사용하였다. 단, handleClick 메소드의 if문 내부 로직이 달라진 것을 볼 수 있다.
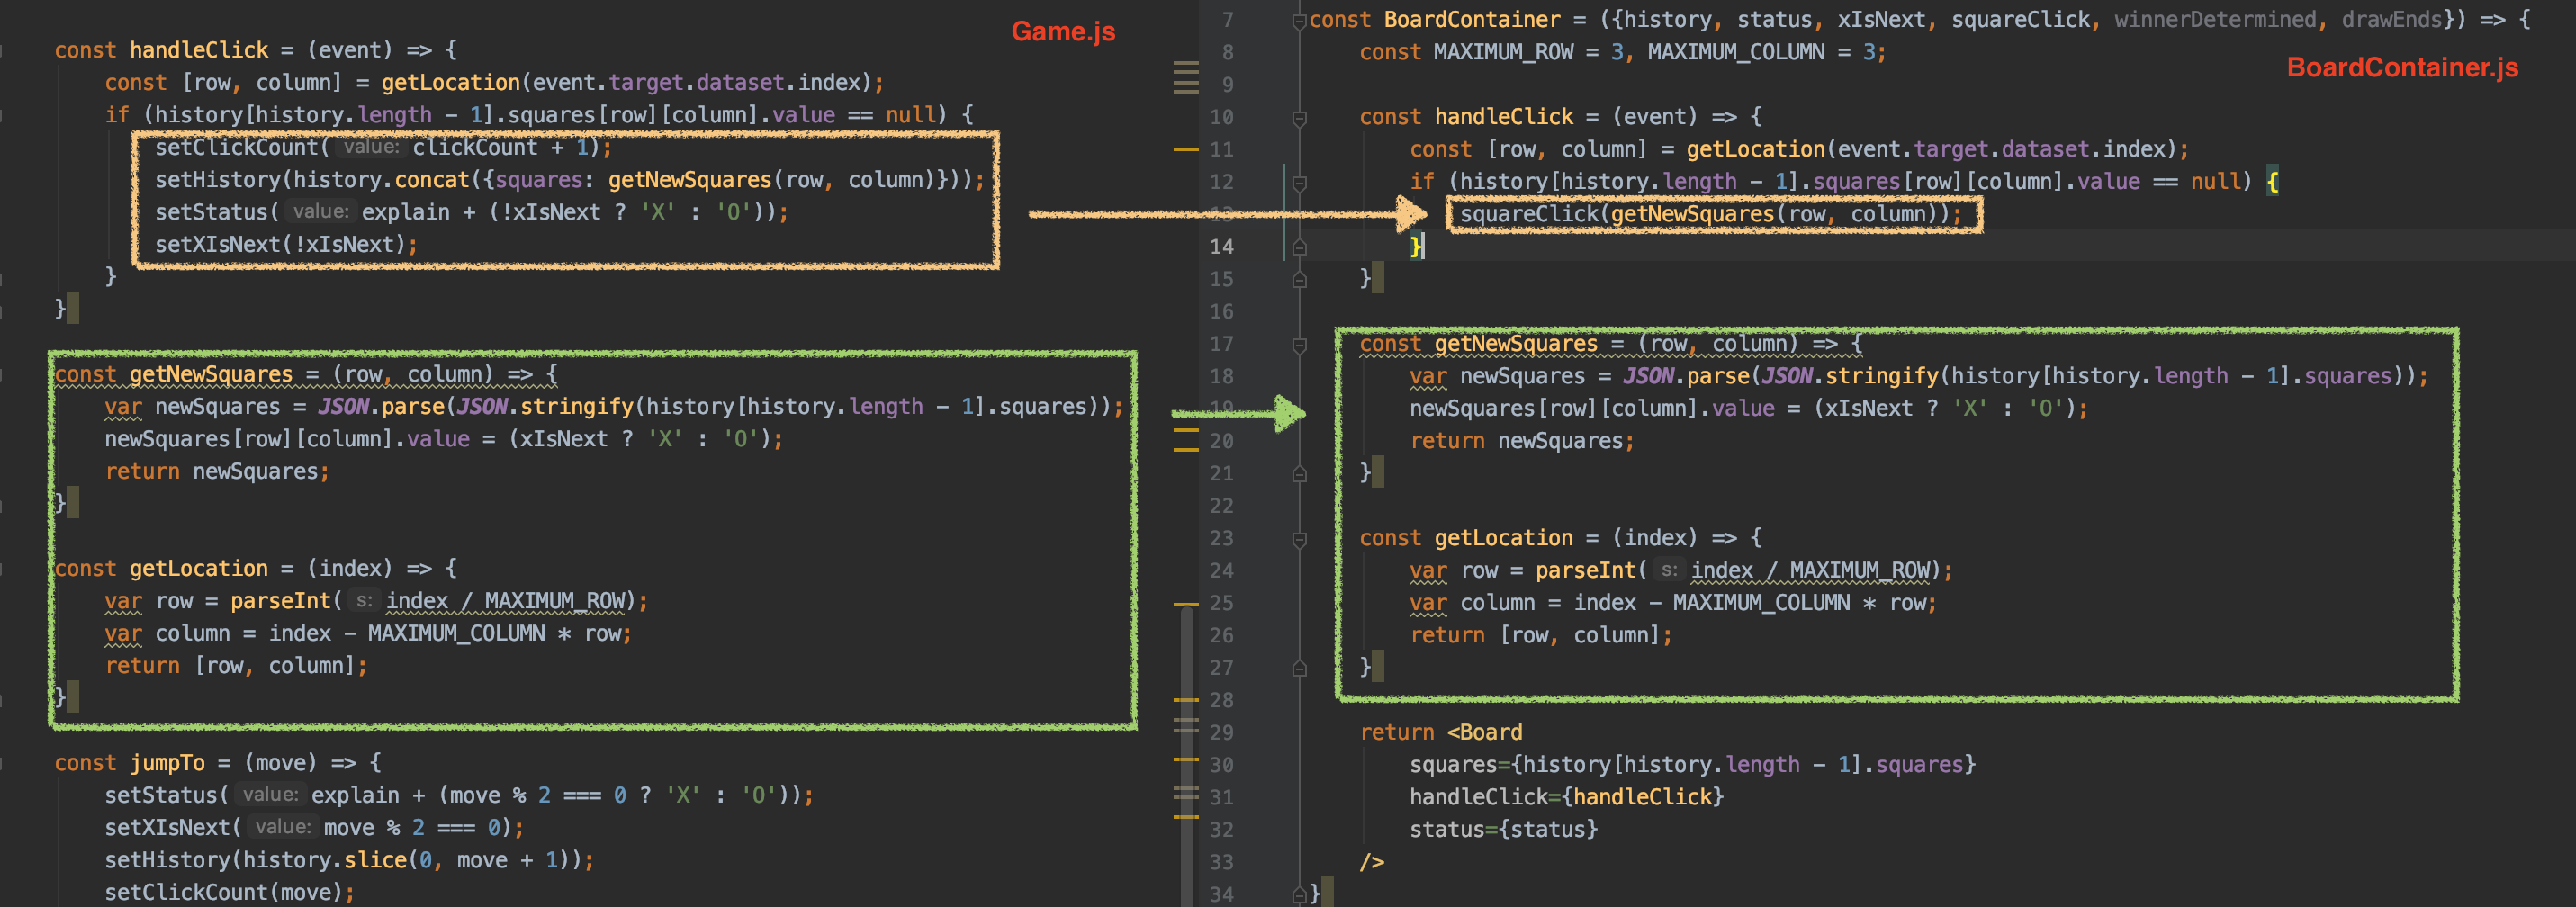
Game.js에서는 각각의 상태를 setXX 함수를 사용해 직접 변경하고 있으나, BoardContainer.js에서는 mapDispatchToProps에 등록한 액션 생성 함수인 squareClick를 호출함으로써 상태를 갱신하고 있다.
Board 컴포넌트에 적절한 argument를 전달하고 이를 반환한다.
전체 코드는 다음과 같다.
import Board from "../components/Board";
import { connect } from 'react-redux';
import React from "react";
import {squareClick, winnerDetermined, drawEnds} from '../store/modules/actions';
const BoardContainer = ({history, status, xIsNext, squareClick, winnerDetermined, drawEnds}) => {
const MAXIMUM_ROW = 3, MAXIMUM_COLUMN = 3;
const handleClick = (event) => {
const [row, column] = getLocation(event.target.dataset.index);
if (history[history.length - 1].squares[row][column].value == null) {
squareClick(getNewSquares(row, column));
}
}
const getNewSquares = (row, column) => {
var newSquares = JSON.parse(JSON.stringify(history[history.length - 1].squares));
newSquares[row][column].value = (xIsNext ? 'X' : 'O');
return newSquares;
}
const getLocation = (index) => {
var row = parseInt(index / MAXIMUM_ROW);
var column = index - MAXIMUM_COLUMN * row;
return [row, column];
}
return <Board
squares={history[history.length - 1].squares}
handleClick={handleClick}
status={status}
/>
}
const mapStateToProps = (state) => ({
history: state.history,
status: state.status,
xIsNext : state.xIsNext
});
const mapDispatchToProps = dispatch => ({
squareClick: (squares) => dispatch(squareClick(squares)),
winnerDetermined: () => dispatch(winnerDetermined()),
drawEnds: () => dispatch(drawEnds())
});
export default connect(
mapStateToProps,
mapDispatchToProps
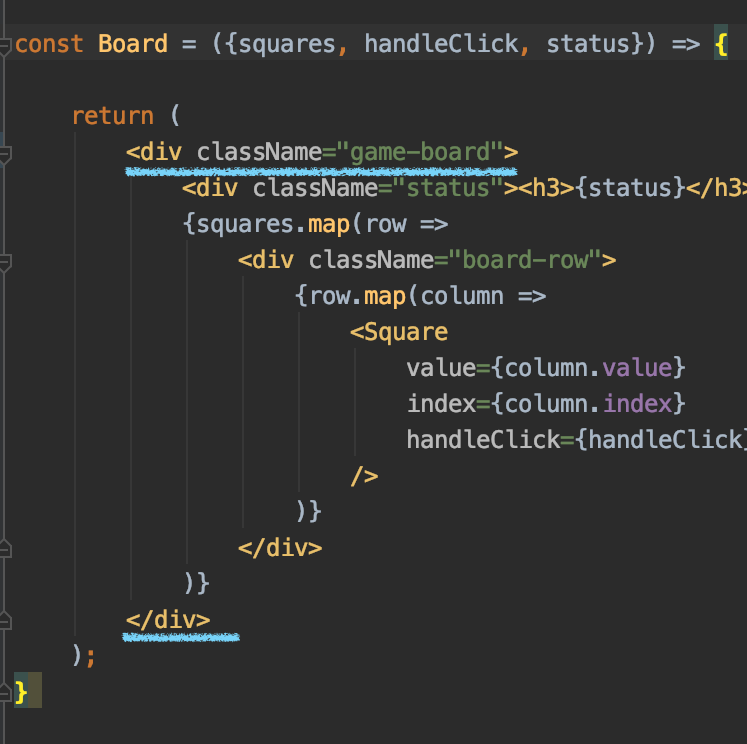
)(BoardContainer);Board.js
import React, {useEffect, useState} from "react";
import Square from "./Square.js";

const Board = ({squares, handleClick, status}) => {

    return (
        <div>
            <div className="status"><h3>{status}</h3></div>
            {squares.map(row =>
                <div className="board-row">
                    {row.map(column =>
                        <Square
                            value={column.value}
                            index={column.index}
                            handleClick={handleClick}
                        />
                    )}
                </div>
            )}
        </div>
    );
}

export default Board;
여기까지 작성한 뒤 실행하면 게임 종료를 판단하지 않고, "O"와 "X"를 번갈아 체크하는 게임이 될 것이다.
게임 종료 로직 추가
Game.js에서useEffect()함수를 BoardContainer로 옮겨온다.clickCountstate가 필요할 것이므로 mapStateToProps에 추가하고, BoardContainer의 파라미터로 받아오도록한다.useEffect의 분기문에서 setXX()를 mapDispatchToProps에 등록한 함수를 이용하여 액션 생성 함수를 호출하는 것으로 변경한다.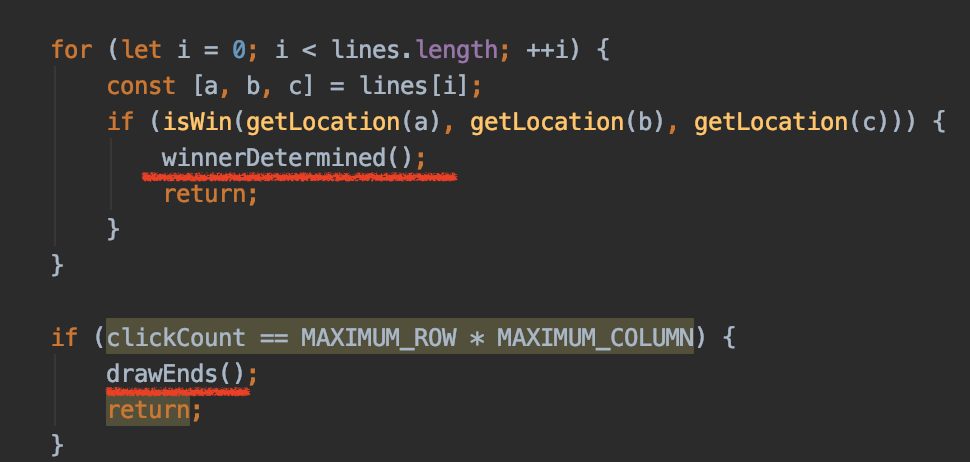
변경된 BoardContainer.js의 전체 코드는 다음과 같다.
import Board from "../components/Board";
import { connect } from 'react-redux';
import React, {useEffect} from "react";
import {squareClick, winnerDetermined, drawEnds} from '../store/modules/actions';


const BoardContainer = ({history, status, xIsNext, clickCount, squareClick, winnerDetermined, drawEnds}) => {
    const MAXIMUM_ROW = 3, MAXIMUM_COLUMN = 3;

    useEffect(() => {
        const lines = [
            [0, 1, 2],
            [3, 4, 5],
            [6, 7, 8],
            [0, 3, 6],
            [1, 4, 7],
            [2, 5, 8],
            [0, 4, 8],
            [2, 4, 6],
        ];

        for (let i = 0; i < lines.length; ++i) {
            const [a, b, c] = lines[i];
            if (isWin(getLocation(a), getLocation(b), getLocation(c))) {
                winnerDetermined();
                return;
            }
        }

        if (clickCount == MAXIMUM_ROW * MAXIMUM_COLUMN) {
            drawEnds();
            return;
        }

    }, [history]);

    const isWin = (...locations) => {
        for (let i = 1; i < locations.length; ++i) {
            const [rowNow, colNow] = locations[i - 1];
            const [rowNext, colNext] = locations[i];
            const mostRecentSquares = history[history.length - 1].squares;
            if (mostRecentSquares[rowNow][colNow].value == null
                || mostRecentSquares[rowNow][colNow].value !== mostRecentSquares[rowNext][colNext].value) {
                return false;
            }
        }
        return true;
    }

    const handleClick = (event) => {
        const [row, column] = getLocation(event.target.dataset.index);
        if (history[history.length - 1].squares[row][column].value == null) {
            squareClick(getNewSquares(row, column));
        }
    }

    const getNewSquares = (row, column) => {
        var newSquares = JSON.parse(JSON.stringify(history[history.length - 1].squares));
        newSquares[row][column].value = (xIsNext ? 'X' : 'O');
        return newSquares;
    }

    const getLocation = (index) => {
        var row = parseInt(index / MAXIMUM_ROW);
        var column = index - MAXIMUM_COLUMN * row;
        return [row, column];
    }

    return <Board
        squares={history[history.length - 1].squares}
        handleClick={handleClick}
        status={status}
    />
}

const mapStateToProps = (state) => ({
    history: state.history,
    status: state.status,
    xIsNext : state.xIsNext,
    clickCount : state.clickCount
});

const mapDispatchToProps = dispatch => ({
    squareClick: (squares) => dispatch(squareClick(squares)),
    winnerDetermined: () => dispatch(winnerDetermined()),
    drawEnds: () => dispatch(drawEnds())
});

export default connect(
    mapStateToProps,
    mapDispatchToProps
)(BoardContainer);
실행해보자 🙋🏻
| drawEnds | winnerDetermined |
|---|---|
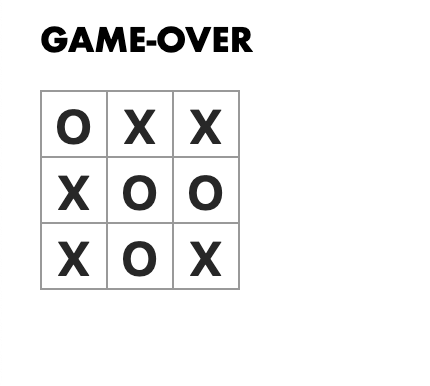 | 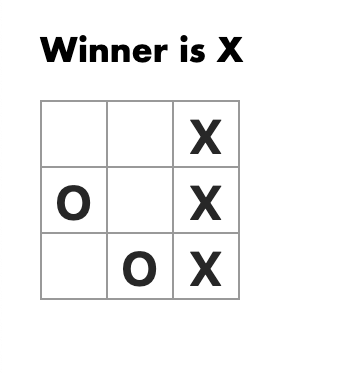 |
history 타임머신 추가하기
이전에 Game.js에서 작성한 타임머신 코드를 보자.
 보다시피 별개의 컴포넌트로 작성돼있지 않다. 이를 컴포넌트로 빼내도록 하겠다.
TimeLine 컴포넌트 만들기
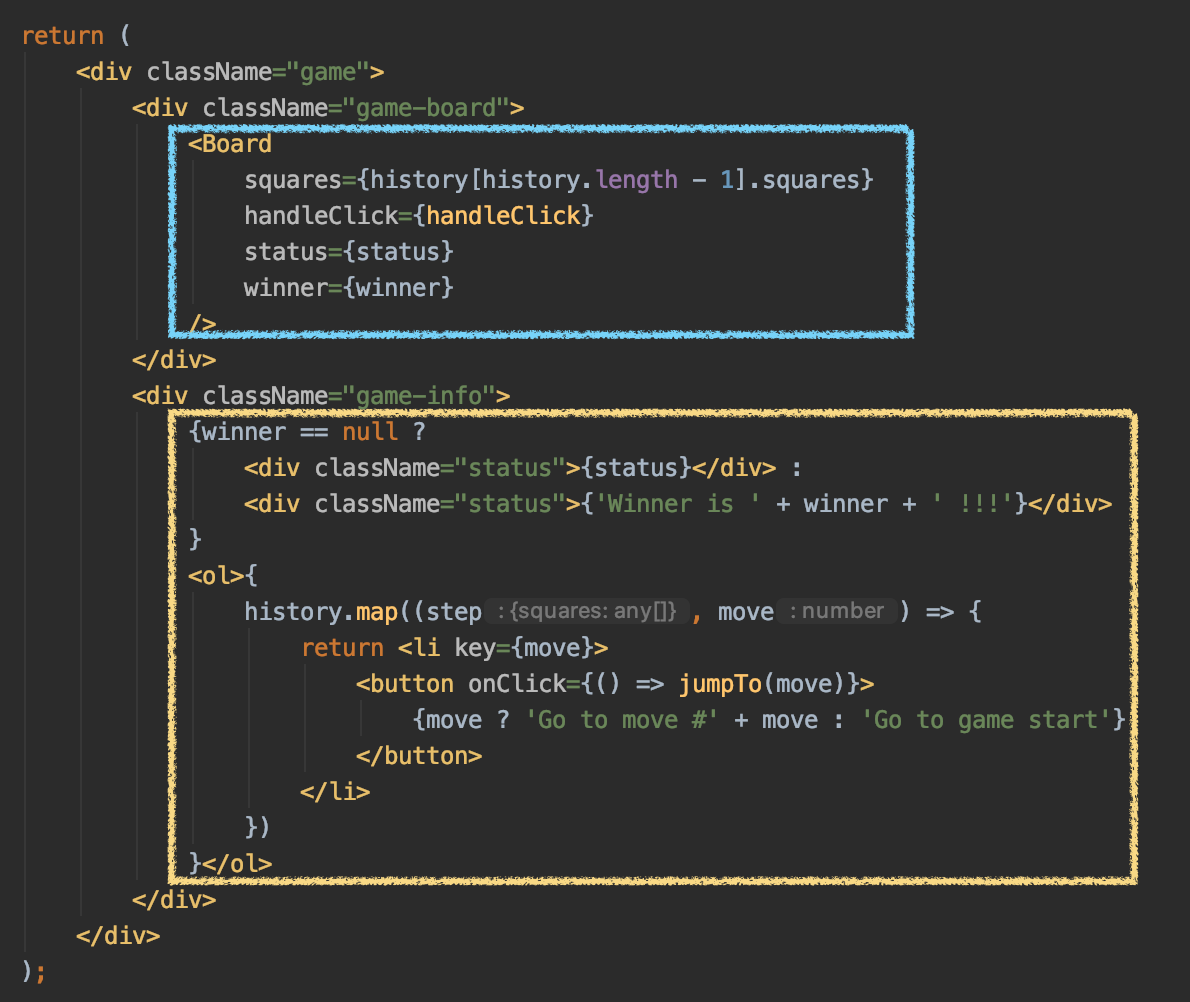 Board와 TimeLine 컴포넌트는 같은 댑스가 되도록 만들 것이다. 따라서 위의 노란 박스를 TimeLine 컴포넌트로 생성한다.
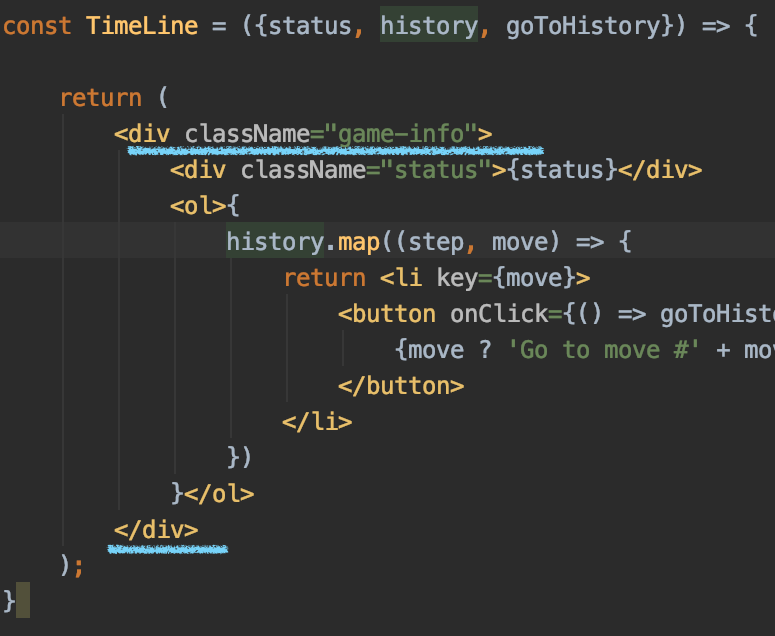
components 패키지 하위에 TimeLine.js 를 생성한다. 코드는 다음과 같다.
import React from "react";

const TimeLine = ({status, history, goToHistory}) => {

    return (
        <div>
            <div className="status">{status}</div>
            <ol>{
                history.map((step, move) => {
                    return <li key={move}>
                        <button onClick={() => goToHistory(move)}>
                            {move ? 'Go to move #' + move : 'Go to game start'}
                        </button>
                    </li>
                })
            }</ol>
        </div>
    );
}

export default TimeLine;
winner state를 제거하고 status 만으로 문구를 보여주고 있으므로 <div className="status">{status}</div>만 남기도록 하였다.
타임라인을 클릭하면 goToHistory 함수가 수행되는데 이는 다음에서 만들 TimeLineContainer에서 전달해주는 액션 생성 함수이다. 원래는 다음과 같이 jumpTo라는 이름을 가진 메소드였으나 역할이 상태를 변경시키는 것 뿐이므로 액션 생성 함수만으로도 충분하다.
TimeLineContainer.js
BoardContainer와 같은 형태로 작성하면 다음과 같은 형태가 나타난다.
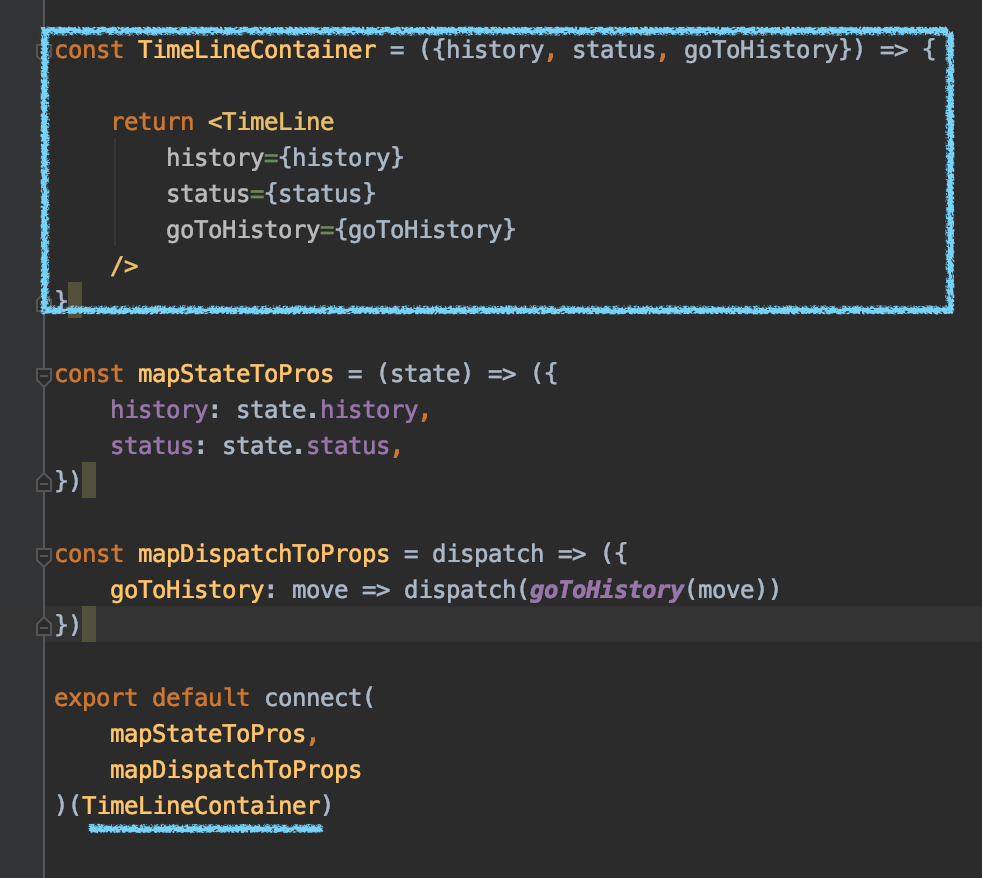 connect에서는 store를
 TimeLineContainer와 연결하고 있으며, 파라미터로 history, status, goToHistory 를 받아온다. 하지만 TimeLineContainer 함수 컴포넌트 내에서는 아무런 작업을 하지 않고 파라미터를 그대로 TimeLine에 전달해주기만 한다.
따라서 connect의 Argument를 TimeLine을 넘김으로써 TimeLineContainer가 스토어와 컴포넌트를 연결해주는 역할로써 작동하도록 아래와 같이 작성하였다.
import TimeLine from "../components/TimeLine";
import {connect} from 'react-redux';
import React from "react";
import {goToHistory} from '../store/modules/actions'

const mapStateToPros = (state) => ({
    history: state.history,
    status: state.status,
})

const mapDispatchToProps = dispatch => ({
    goToHistory: move => dispatch(goToHistory(move))
})

export default connect(
    mapStateToPros,
    mapDispatchToProps
)(TimeLine)
reducers, index
reducers.js
handleActions의 GO_TO_HISTORY 부분을 다음처럼 변경한다.
        [type.GO_TO_HISTORY]: (state, action) => ({
            ...state,
            status: 'Next Player : ' + (action.payload % 2 === 0 ? 'X' : 'O'),
            xIsNext: (action.payload % 2 === 0),
            history: state.history.slice(0, action.payload + 1),
            clickCount: action.payload
        }),
index.js
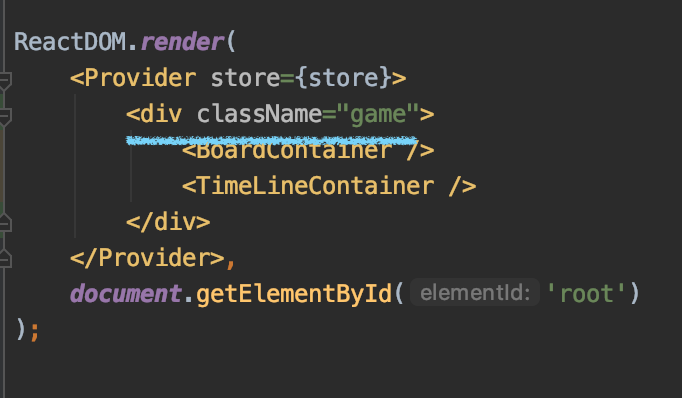
BoardContainer 아래에 TimeLineContainer를 추가한다.
ReactDOM.render(
<Provider store={store}>
<BoardContainer />
<TimeLineContainer />
</Provider>,
document.getElementById('root')
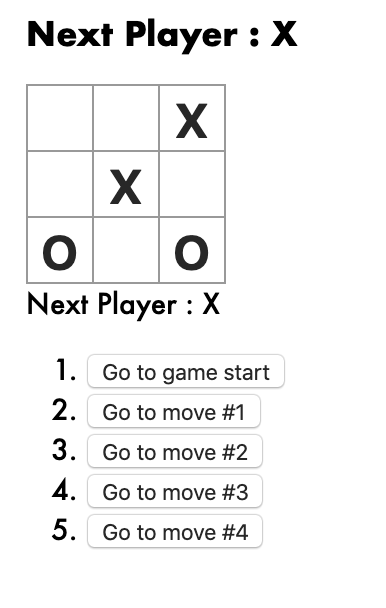
);실행해보면 잘 작동되는 것을 확인 할 수 있을 것이다.
| Go to move #2 클릭 | |
|---|---|
 | 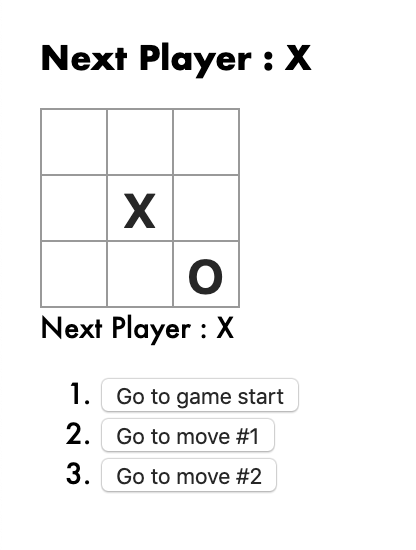 |
✔️ 이전에 올린 글에선 보드의 우측에 타임라인이 위치해 있었는데, 이는 div 태그의 class 속성 때문이다. 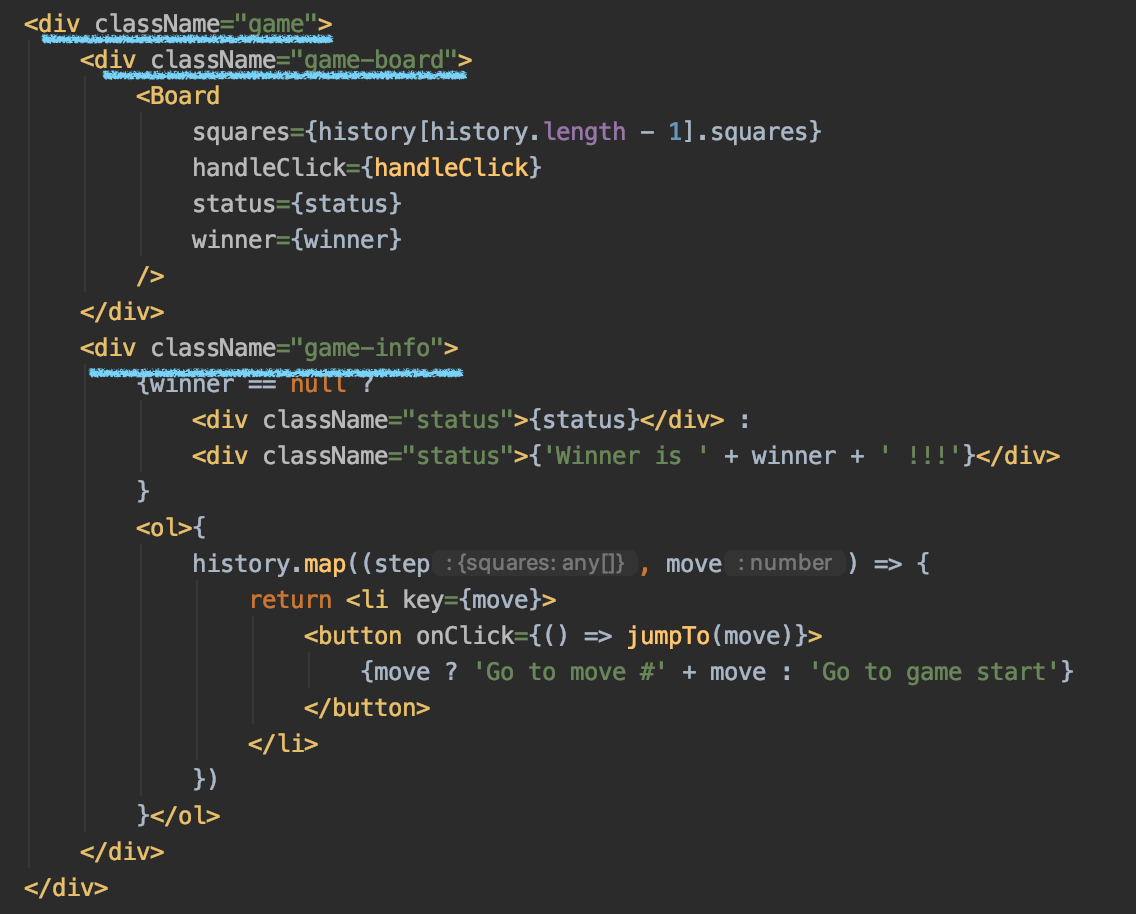 이 세가지 class를 아래처럼 배치해주자
| index.js | Board.js | TimeLine.js |
|---|---|---|
 |  |  |
🙆🏻 완성!

모든 코드는 github에서 확인 할 수 있습니다.