AI가 단순히 두 지점을 왕복운동만 한다면 끔찍할 것이다. 약간 죽은 게임 느낌이랄까? 실제 세상처럼 가까이가면 인지를 해서 쫒아온다면 게임의 몰입도는 더욱 올라갈 것이다. 이번에 CH.5 1주차 5강의에서는 AI Chasing과 Perception에 대해서 공부하였다.
🎮 Chaser AI Controller
PlayerCharater를 Chase하는 AI를 만들기 위해서 Chaser_AIController를 만들었다.
1️⃣ C++ 로직
우선 강의록에 있는 코드스니펫에 있는 것을 복붙하지 않고 한줄한줄 이해하는 느낌으로 따라 작성해보았다.
📌 .h 파일
📋 Chaser_AIController.h
#pragma once

#include "CoreMinimal.h"
#include "AIController.h"
#include "Perception/AIPerceptionComponent.h"
#include "Perception/AISenseConfig_Sight.h"
#include "Chaser_AIController.generated.h"

// AI 상태 열거형 정의
UENUM(BlueprintType)
enum class EAIState : uint8
{
	Idle,
	Suspicious, // 의심 상태
	Chasing
};

UCLASS()
class AI_TEST_API AChaser_AIController : public AAIController
{
	GENERATED_BODY()

public:
	// 추적할 타겟(플레이어, 추후 에디터에서 설정)
	UPROPERTY(EditAnywhere, BlueprintReadWrite, Category = "AI")
	AActor* TargetActor;

	AChaser_AIController();

	// 추적 시작/중지 함수
	UFUNCTION(BlueprintCallable, Category = "AI")
	void StartChasing(AActor* Target);

	UFUNCTION(BlueprintCallable, Category = "AI")
	void StopChasing();

	// 상태 변환 함수
	UFUNCTION(BlueprintCallable, Category = "AI")
	void UpdateAIState();

	// 현재 상태 반환
	UFUNCTION(BlueprintPure, Category = "AI")
	EAIState GetCurrentState() const { return CurrentState; }

	// 감지 이벤트 처리 함수
	UFUNCTION()
	void OnPerceptionUpdated(AActor* Actor, FAIStimulus Stimulus);

	// 추적 거리 설정 1000 unit (10m)
	UPROPERTY(EditAnywhere, BlueprintReadWrite, Category = "AI")
	float ChaseRadius = 1000.0f;

	// 시야 감지 설정
	UPROPERTY(VisibleAnywhere, BlueprintReadOnly, Category = "AI")
	UAISenseConfig_Sight* SightConfig;

	// 거리 설정 변수 추가
	UPROPERTY(EditAnywhere, BlueprintReadWrite, Category = "AI")
	float DetectionRadius = 1500.0f;

	UPROPERTY(EditAnywhere, BlueprintReadWrite, Category = "AI")
	float LoseInterestRadius = 2000.0f;


protected:
	virtual void BeginPlay() override;
	virtual void Tick(float DeltaTime) override;

private:
	// 타겟 추적 여부
	bool bIsChasing = false;

	// 현재 상태 변수
	EAIState CurrentState = EAIState::Idle;

	// 마지막으로 타겟을 본 위치 저장
	FVector LastKnownLocation;
};
✅ 코드리뷰
-
헤더를 보면 AIPerceptionComponent 와 AISenseConfig_Sight의 헤더파일을 전처리하고 있다.
UAIPerceptionComponent- AIController에 붙는 컴포넌트이다.
- AI가 "감각(Sense)"을 통해 월드에서 인식하는 정보를 수집하고 처리하는 핵심 역할
- 인식한 액터 리스트를 유지
- 특정 Sense에 대한 정보 쿼리
- OnPerceptionUpdated, OnTargetPerceptionUpdated 이벤트를 발생
UAISenseConfig_*(Sight, Hearing 등)- 각 감각(Sense)에 대한 설정을 담당하는 클래스
- AIPerceptionComponent가 사용할 감각의 세부 설정값을 담고 있다.
- 예를 들어, Sight의 시야각, 거리, 감지할 Actor 타입 등을 설정 가능
- SightRadius, LoseSightRadius, PeripheralVisionAngleDegrees (Peripheral : 주변의)(시야관련)
- DetectionByAffiliation (적/아군/중립 감지 여부 Affiliation : 입회, 소속)
UAIPerceptionComponent::ConfigureSense로 등록해서 사용
- Enum으로 EAIState를 만들어서 현재 상태를 부여하는 느낌
📌 .cpp 파일
📋 Chaser_AIController.cpp
#include "Chaser_AIController.h"
#include "GameFramework/Character.h"
#include "Kismet/GameplayStatics.h"
#include "DrawDebugHelpers.h"

AChaser_AIController::AChaser_AIController()
{
	PrimaryActorTick.bCanEverTick = true;

	// 시야 감지 설정 생성
	SightConfig = CreateDefaultSubobject<UAISenseConfig_Sight>(TEXT("SightConfig"));
	SightConfig->SightRadius = DetectionRadius;
	SightConfig->LoseSightRadius = LoseInterestRadius;
	SightConfig->PeripheralVisionAngleDegrees = 90.0f;
	SightConfig->DetectionByAffiliation.bDetectEnemies = true;
	SightConfig->DetectionByAffiliation.bDetectNeutrals = true;
	SightConfig->DetectionByAffiliation.bDetectFriendlies = true;

}

void AChaser_AIController::BeginPlay()
{
	Super::BeginPlay();

	// 인지 컴포넌트 초기화 후 컴포넌트 세팅
	if (SightConfig && GetPerceptionComponent())
	{
		GetPerceptionComponent()->ConfigureSense(*SightConfig);
		GetPerceptionComponent()->SetDominantSense(SightConfig->GetSenseImplementation());
		// 인지 이벤트에 델리게이트 바인딩
		GetPerceptionComponent()->OnTargetPerceptionUpdated.AddDynamic(this, &AChaser_AIController::OnPerceptionUpdated);
	}

	// 기본 타겟으로 플레이어 변경 (선택적)
	ACharacter* PlayerCharacter = UGameplayStatics::GetPlayerCharacter(GetWorld(), 0);
	if (PlayerCharacter)
	{
		TargetActor = PlayerCharacter;
	}
}

void AChaser_AIController::Tick(float DeltaTime)
{
	Super::Tick(DeltaTime);

	// 상태 업데이트 추가
	UpdateAIState();

	if (bIsChasing && TargetActor)
	{
		// 플레이어와 거리계산
		APawn* ControlledPawn = GetPawn();
		if (ControlledPawn)
		{
			// location 간 거리를 계산하는 로직
			float Distance = FVector::Dist(ControlledPawn->GetActorLocation(), TargetActor->GetActorLocation());

			// 추적 거리 내에 있을 때만 추적
			if (Distance <= ChaseRadius)
			{
				// 플레이어를 향해 이동
				MoveToActor(TargetActor, 100.0f);

				// 마지막 위치 갱신
				LastKnownLocation = TargetActor->GetActorLocation();

				// 디버그 시각화 추가 (에디터환경에서만 컴파일되도록 처리)
#if WITH_EDITOR
				DrawDebugLine(
					GetWorld(),
					ControlledPawn->GetActorLocation(),
					TargetActor->GetActorLocation(),
					FColor::Red,
					false,
					-1.0f,
					0,
					2.0f
				);
#endif
			}
			else if (Distance > LoseInterestRadius)
			{
				StopMovement();
			}
		}
	}
}

void AChaser_AIController::StartChasing(AActor* Target)
{
	TargetActor = Target;
	bIsChasing = true;

	if (Target)
	{
		// 마지막 위치 업데이트
		LastKnownLocation = Target->GetActorLocation();
	}

	// 상태 변경
	CurrentState = EAIState::Chasing;
}

void AChaser_AIController::StopChasing()
{
	bIsChasing = false;
	StopMovement();

	// 상태 변경
	CurrentState = EAIState::Idle;
}

void AChaser_AIController::UpdateAIState()
{
	if (!TargetActor) return;

	APawn* ControlledPawn = GetPawn();
	if (!ControlledPawn) return;

	float DistanceToTarget = FVector::Dist(ControlledPawn->GetActorLocation(), TargetActor->GetActorLocation());

	switch(CurrentState)
	{
	case EAIState::Idle:
		if (DistanceToTarget <= DetectionRadius)
		{
			CurrentState = EAIState::Suspicious;
		}
		break;

	case EAIState::Suspicious:
		if (DistanceToTarget <= ChaseRadius)
		{
			StartChasing(TargetActor);
		}
		else if (DistanceToTarget > DetectionRadius)
		{
			CurrentState = EAIState::Idle;
		}
		break;

	case EAIState::Chasing:
		if (DistanceToTarget > LoseInterestRadius)
		{
			StopChasing();
		}
		break;
	}
}

// 인지 시스템의 이벤트 발생시 처리하는 함수
void AChaser_AIController::OnPerceptionUpdated(AActor* Actor, FAIStimulus Stimulus)
{
	// 플레이어 캐릭터인지 확인
	ACharacter* PlayerCharacter = UGameplayStatics::GetPlayerCharacter(GetWorld(), 0);

	if (Actor == PlayerCharacter)
	{
		if (Stimulus.WasSuccessfullySensed())
		{
			// 플레이어 감지 성공
			TargetActor = Actor;

			// 거리에 따라 상태 변경
			APawn* ControlledPawn = GetPawn();
			if (ControlledPawn)
			{
				float Distance = FVector::Dist(ControlledPawn->GetActorLocation(), Actor->GetActorLocation());

				if (Distance <= ChaseRadius)
				{
					StartChasing(Actor);
				}
				else if (Distance <= DetectionRadius)
				{
					CurrentState = EAIState::Suspicious;
				}
			}
		}
		else
		{
			// 플레이어 감지 실패
			if (CurrentState == EAIState::Chasing)
			{
				// 마지막으로 본 위치로 이동
				MoveToLocation(LastKnownLocation, 50.0f);

				// 의심 상태로 전환
				CurrentState = EAIState::Suspicious;
			}
		}
	}
}
✅ 코드리뷰
-
생성자에서 UAISenseConfig_Sight의 설정값을 Set
PeripheralVisionAngleDegrees: 인식 시야각
-
BeginPlay에서 TargetActor를 PlayerCharacter로 설정
- AAIController는 기본적으로 UAIPerceptionComponent를 가지고 있다.
- 그래서 AAIController를 상속받는 클래스에서는 굳이 CreateDefaultSubobject를 안 써도 PerceptionComponent의 기능을 사용하는 것이 가능하다.

- SetDominantSense(SenseClass)
- AI Perception이 여러 감각 (Sight, Hearing, Damage 등)을 동시에 사용할 때, 어떤 감각을 우선시할지(대표감각)를 지정하는 함수
- 보통 시야(Sight)를 메인으로 쓰기 때문에
UAISense_Sight::StaticClass()를 넣어준다. - 코드에서는 SightConfig->GetSenseImplementation() 로
GetSenseImplementation()는 자기자신이 어떤 감각 클래스인지 반환하는 함수이다 따라서UAISense_Sight::StaticClass()를 반환한다.
- 인지를 하면
PerceptionComponent::OnTargetPerceptionUpdated가 호출됨. 여기에 커스텀 메소드OnPerceptionUpdated를 델리게이트 바인딩
- AAIController는 기본적으로 UAIPerceptionComponent를 가지고 있다.
-
Tick
UpdateAIState()를 통해 프레임마다 상태 체크- 플레이어와 거리를 계산
FVector::Dist - 플레이어와의 거리가 ChaseRadius 보다 작으면 MoveToActor를 통해 Player를 Chase함.
WITH_EDITOR은 에디터에서만 컴파일되도록 하게하는 매크로( 코드에서는 디버그 라인 생성 )- 플레이어와의 거리가 LoseInterestRadius보다 크면 StopMovement()를 호출
MoveToActor과StopMovement는 부모클래스인 AAIController에 있는 언리얼에 제공하는 함수
-
StartChasing, StopChasing 메서드를 통해 EAIStatus 변화, bIsChasing 토글
-
UpdateAIState() 는 Tick에서 매 프레임마다 호출하는 함수이다.
- 플레이어와(타겟)의 거리를 계산해서 Switch문을 통해 EAIStatus를 갱신
-
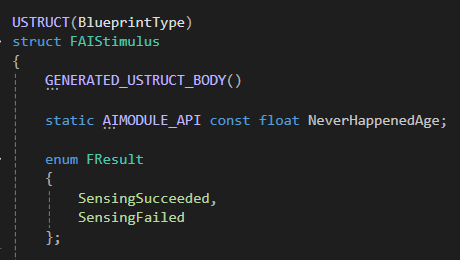
OnperceptionUpdate
- Input Parameter로 인지된 AActor와 정보들을(FAIStimulus) 가지고 온다. (Stimulus : 자극제, 유발제)

- 플레이어 감지를 성공하면 플레이어와의 거리를 통해 StartChasing(Actor)의 호출을 결정하고, 상태를 전환하고 있다.
- 또한 감지가 실패하더라도 Target의 마지막 위치를 저장한 값(LastKnownLocation)을 통해 MoveToLocation을 한다.
2️⃣ Test
📌 Setting
- C++로 만든 Chaser_AIController를 상속받는 BP클래스를 만들어준다.
- 그리고 TargetActor를 안전하게 찾아주게 하기 위해서 안전코드를 Blueprint로 작성

- 그리고 TargetActor를 안전하게 찾아주게 하기 위해서 안전코드를 Blueprint로 작성
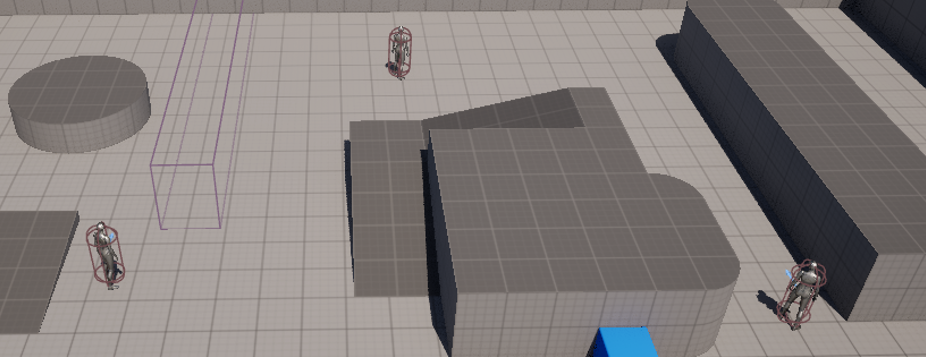
- Test하기 위해 이전에 썼던 BP_RVO_Character의 Controller를 Chaser_AIController로 할당해주었다.

- 맵 상에 BP_RVO_Character 객체를 3개 배치해주었다.
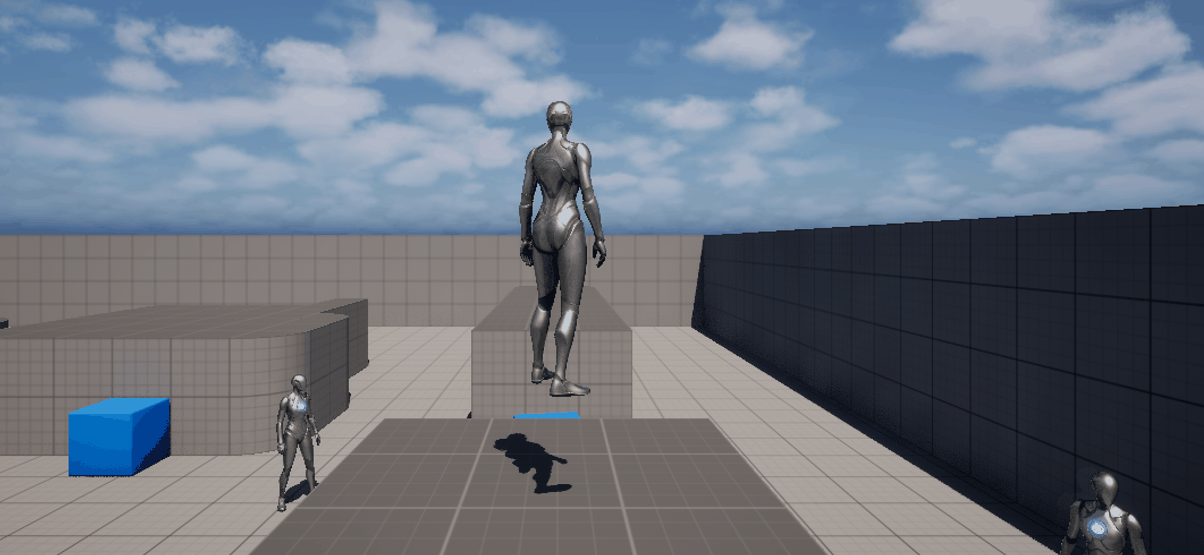
📌 결과
ChaseRadius 밖에 있을 때는 인식하지 못하다가 가까워지니깐 인식하면서 따라오는 것을 볼 수 있다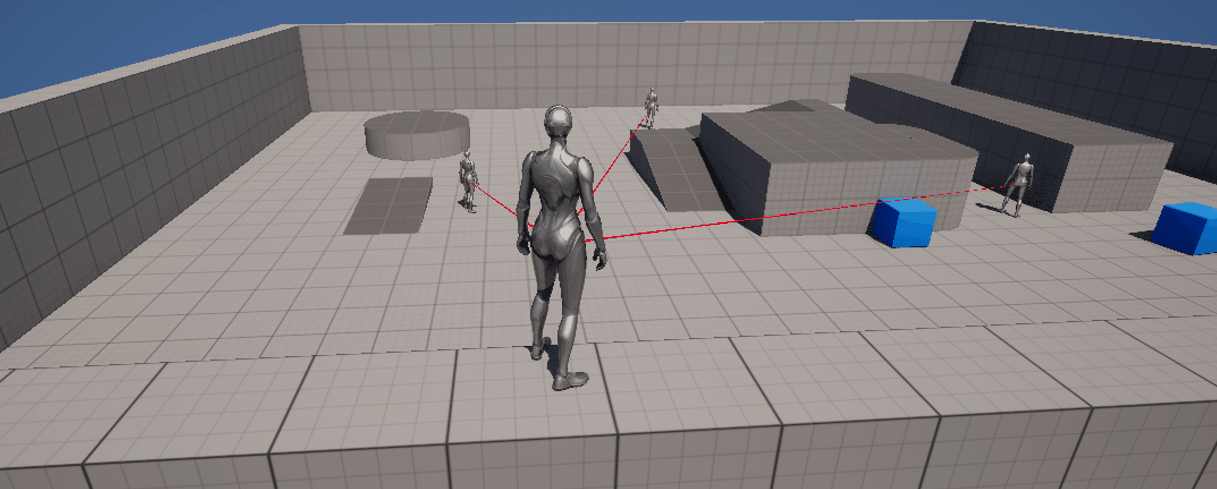
🎮 NavLink
만약 2층에 있는 지형이라면 AI가 따라오지 못할 것이다. 그래서 NavLink를 이용하여 AI들을 Lanch시켜줌으로써 계속해서 Chase하도록 도와준다.
1️⃣ Setting
📌 RecastNavMesh
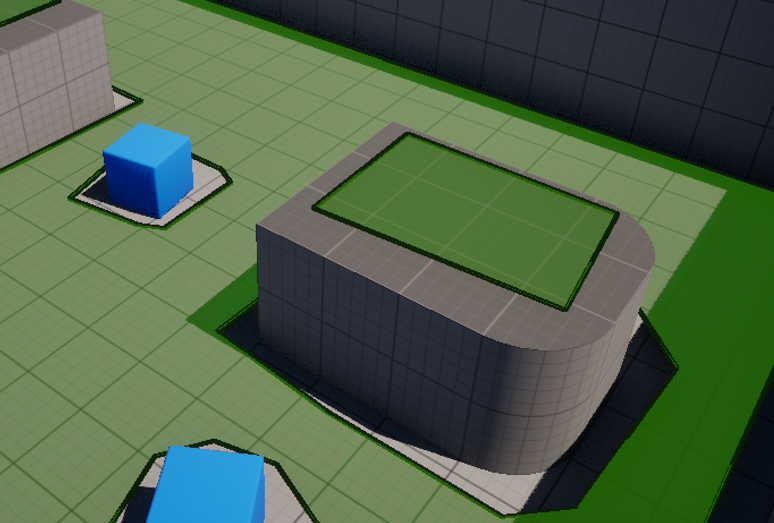
AI가 해당지역을 이동할 수 있도록 NavMesh Bound Volume을 배치하면 Recast NavMesh는 자동생성된다.
👉 생성 흐름
- 월드에 NavMeshBoundsVolume을 추가
- Navigation System이 볼륨을 감지
- Navigation SystemV1 혹은 그 파생에서 NavMeshBoundsVolume을 감지해서 자동으로 RecastNavMesh 인스턴스를 생성
- 레벨 저장 시 자동으로 RecastNavMesh Actor가 생성됨

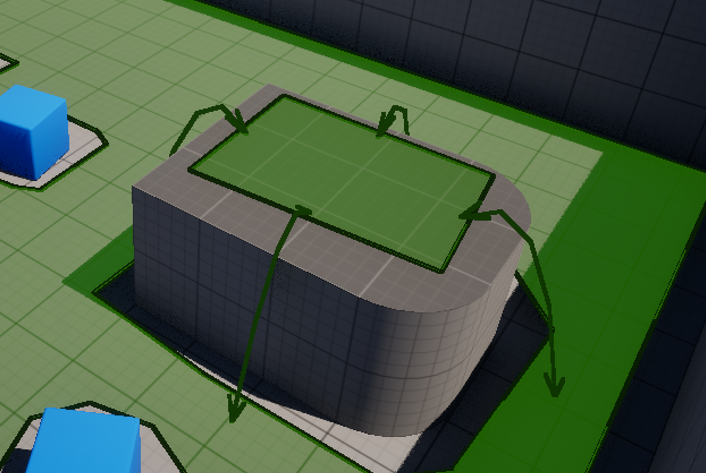
- Detail Pannel에서 Generated Nav Link를 체크
- 체크 전
- 체크 후

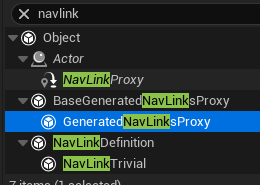
📌 BP_NavLink
그러나 이 상태만으로는 AI가 이동하지 않음 추가로 설정해야 될 것이 NavLink이다.
-
GeneratedNavLinksProxy를 상속받는 BP클래스를 만든다.
-
그리고 아래와 같이 블루프린트 로직을 작성해준다.
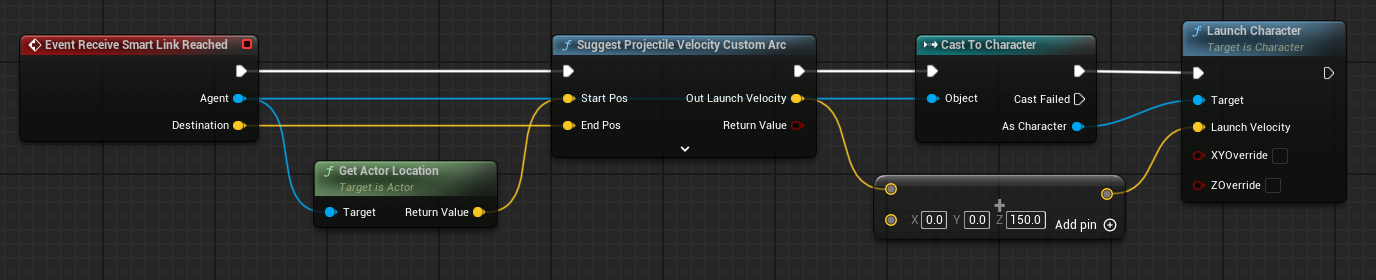
- Receive Smart Link Reached는 Smart Link에 Agent가 도달했을 때 실행되는 이벤트이다.
-
Suggest Projectile Velocity Custom Arc는 시작 위치, 목표 위치, 발사 각도, 중력 등을 고려해서 목표 지점에 도달할 수 있는 초기 발사 속도(velocity vector) 를 계산해주는 노드이다.
- Custom Arc는 SuggestProjectileVelocity의 확장된 버전
- 사용자가 원하는 포물선 높이를 지정할 수 있다.
2️⃣ Test
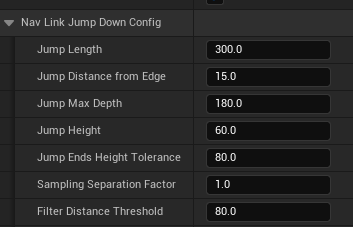
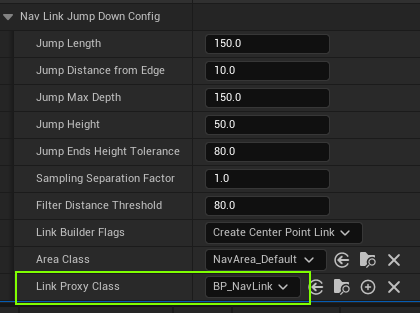
만든 BP_NavLink를 RecastNavMesh에 할당한다.
- Detail Pannel에서 Nav Link Jump Down Config 탭을 확인 → Link Proxy Class에 해당 BP 지정
-
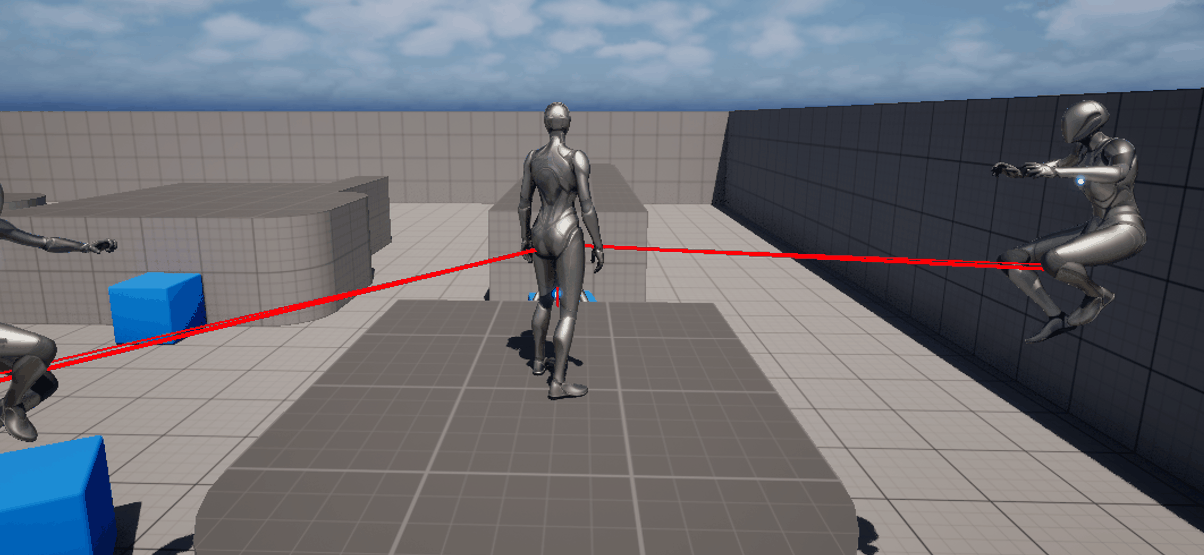
컨트롤이 부족해서 그렇지 링크에 걸리면 점프를 곧 잘하는 모습이다.
-
그래서 좀더 멀리서 점프를 시작해서 잘 올라올 수 있도록 Config의 설정을 다음과 같이 바꿔주었다.
-
한번에 잘 올라오는 모습을 확인할 수 있었다.