[Tensorflow] 3. Natural Language Processing in TensorFlow (2 week Word Embeddings) : Programming (1)
Tensorflow_certification(텐서플로우 자격증)
[Tensorflow] 3. Natural Language Processing in TensorFlow (2 week Word Embeddings) : Programming (1)
IMDB 리뷰 데이터 세트를 사용해 이진 분류기 학습
- 여기서는 긍정적인 영화 리뷰와 부정적인 영화 리뷰를 구별하기 위한 감정 분류 모델을 구축한다.
IMDB 리뷰 데이터 세트에서 이를 훈련시키고 훈련 후 생성된 단어 임베딩을 시각화하는 과정이 담겨있다.
Download the Dataset
- 먼저 작업할 데이터 세트를 가져와야 하는데, 기계 학습을 위해 준비된 데이터 세트 모음인 Tensorflow Datasets를 사용한다.
tensorflow-datasets 패키지가 설치되어 있는지 확인하고 없다면 설치한다. '
!pip install -q tensorflow-datasets- 패키지를 import 한 후에 'imdb_reviews' 를 가져온다.
import tensorflow_datasets as tfds

imdb, info = tfds.load("imdb_reviews", with_info=True, as_supervised=True)

print(imdb)
print(info)
{'train': <_PrefetchDataset element_spec=(TensorSpec(shape=(), dtype=tf.string, name=None), TensorSpec(shape=(), dtype=tf.int64, name=None))>, 'test': <_PrefetchDataset element_spec=(TensorSpec(shape=(), dtype=tf.string, name=None), TensorSpec(shape=(), dtype=tf.int64, name=None))>, 'unsupervised': <_PrefetchDataset element_spec=(TensorSpec(shape=(), dtype=tf.string, name=None), TensorSpec(shape=(), dtype=tf.int64, name=None))>}
tfds.core.DatasetInfo(
    name='imdb_reviews',
    full_name='imdb_reviews/plain_text/1.0.0',
    description="""
    Large Movie Review Dataset. This is a dataset for binary sentiment
    classification containing substantially more data than previous benchmark
    datasets. We provide a set of 25,000 highly polar movie reviews for training,
    and 25,000 for testing. There is additional unlabeled data for use as well.
    """,
    config_description="""
    Plain text
    """,
    homepage='http://ai.stanford.edu/~amaas/data/sentiment/',
    data_dir='/Users/geonheekim/tensorflow_datasets/imdb_reviews/plain_text/1.0.0',
    file_format=tfrecord,
    download_size=80.23 MiB,
    dataset_size=129.83 MiB,
    features=FeaturesDict({
        'label': ClassLabel(shape=(), dtype=int64, num_classes=2),
        'text': Text(shape=(), dtype=string),
    }),
    supervised_keys=('text', 'label'),
    disable_shuffling=False,
    splits={
        'test': <SplitInfo num_examples=25000, num_shards=1>,
        'train': <SplitInfo num_examples=25000, num_shards=1>,
        'unsupervised': <SplitInfo num_examples=50000, num_shards=1>,
    },
    citation="""@InProceedings{maas-EtAl:2011:ACL-HLT2011,
      author    = {Maas, Andrew L.  and  Daly, Raymond E.  and  Pham, Peter T.  and  Huang, Dan  and  Ng, Andrew Y.  and  Potts, Christopher},
      title     = {Learning Word Vectors for Sentiment Analysis},
      booktitle = {Proceedings of the 49th Annual Meeting of the Association for Computational Linguistics: Human Language Technologies},
      month     = {June},
      year      = {2011},
      address   = {Portland, Oregon, USA},
      publisher = {Association for Computational Linguistics},
      pages     = {142--150},
      url       = {http://www.aclweb.org/anthology/P11-1015}
    }""",
)- tfds.load 메소드는 데이터 세트를 작업 디렉토리에 다운로드한다.
데이터세트에 대한 설명을 보려면with_info매개변수를 True로 설정할 수 있다. 반면에as_supervised매개변수는 데이터를 (입력, 레이블) 쌍으로 로드하도록 설정된다.
데이터 세트에는 총 100,000개의 예제가 있으며 학습, 테스트 및 비지도 세트로 분할된다. 이 실습에서는 모델을 학습하려면 라벨이 지정된 예시가 필요하므로 학습 및 테스트 세트만 사용한다.
[2] Split the dataset
- 다운로드한 imdb 데이터 세트를 인쇄해 보면 tf.data.Dataset 개체를 가리키는 사전이 포함되어 있음을 알 수 있다.
아래와 같이 take() 메서드를 사용하고 반복하여 몇 가지 예제의 원시 형식을 미리 볼 수 있다.
for example in imdb['train'].take(2):
    print(example)

# output
(<tf.Tensor: shape=(), dtype=string, numpy=b"This was an absolutely terrible movie. Don't be lured in by Christopher Walken or Michael Ironside. Both are great actors, but this must simply be their worst role in history. Even their great acting could not redeem this movie's ridiculous storyline. This movie is an early nineties US propaganda piece. The most pathetic scenes were those when the Columbian rebels were making their cases for revolutions. Maria Conchita Alonso appeared phony, and her pseudo-love affair with Walken was nothing but a pathetic emotional plug in a movie that was devoid of any real meaning. I am disappointed that there are movies like this, ruining actor's like Christopher Walken's good name. I could barely sit through it.">, <tf.Tensor: shape=(), dtype=int64, numpy=0>)
(<tf.Tensor: shape=(), dtype=string, numpy=b'I have been known to fall asleep during films, but this is usually due to a combination of things including, really tired, being warm and comfortable on the sette and having just eaten a lot. However on this occasion I fell asleep because the film was rubbish. The plot development was constant. Constantly slow and boring. Things seemed to happen, but with no explanation of what was causing them or why. I admit, I may have missed part of the film, but i watched the majority of it and everything just seemed to happen of its own accord without any real concern for anything else. I cant recommend this film at all.'>, <tf.Tensor: shape=(), dtype=int64, numpy=0>)
2024-04-16 13:19:44.013998: W tensorflow/core/kernels/data/cache_dataset_ops.cc:858] The calling iterator did not fully read the dataset being cached. In order to avoid unexpected truncation of the dataset, the partially cached contents of the dataset  will be discarded. This can happen if you have an input pipeline similar to `dataset.cache().take(k).repeat()`. You should use `dataset.take(k).cache().repeat()` instead.
2024-04-16 13:19:44.014383: W tensorflow/core/framework/local_rendezvous.cc:404] Local rendezvous is aborting with status: OUT_OF_RANGE: End of sequence- 각 예제는 먼저 텍스트를 포함하고 그 다음에는 레이블(numpy() 속성에 표시됨)을 포함하는 2요소 텐서의 튜플임을 알 수 있다.
아래의 다음 셀은 모든 학습 및 테스트 문장과 레이블을 별도의 목록으로 가져와서 텍스트를 사전 처리하고 나중에 모델에 제공할 수 있다.
import numpy as np

train_data, test_data = imdb['train'], imdb['test']

training_sentences = []
training_labels = []

testing_sentences = []
testing_labels = []

for s,l in train_data:
    training_sentences.append(s.numpy().decode('utf8'))
    training_labels.append(l.numpy())

for s,l in test_data:
    testing_sentences.append(s.numpy().decode('utf8'))
    testing_labels.append(l.numpy())


print(training_labels[:2])
print(testing_labels[:2])

training_labels_final = np.array(training_labels)
testing_labels_final = np.array(testing_labels)

print(training_labels_final[:2])
print(testing_labels_final[:2])

# output
2024-04-16 13:23:14.442984: W tensorflow/core/framework/local_rendezvous.cc:404] Local rendezvous is aborting with status: OUT_OF_RANGE: End of sequence
[0, 0]
[1, 1]
[0 0]
[1 1]
2024-04-16 13:23:15.981799: W tensorflow/core/framework/local_rendezvous.cc:404] Local rendezvous is aborting with status: OUT_OF_RANGE: End of sequence
[3] Generate Padded Sequences
- 다음은 텍스트 전처리 단계이다.
문장을 토큰화하고 일정한 길이로 채운다. 아래에서는 매개변수를 자체 코드 셀로 분리하여 원하는 경우 나중에 쉽게 조정할 수 있다.
여기서는 단어사전의 최대 길이를 10,000, out-of-vocab은 <OOV> 으로 패딩 길이를 120으로 post 방식으로 초기화했다.
vocab_size = 10000
max_length = 120
embedding_dim = 16
trunc_type='post'
oov_tok = '<OOV>'

from tensorflow.keras.preprocessing.text import Tokenizer
from tensorflow.keras.preprocessing.sequence import pad_sequences

tokenizer = Tokenizer(num_words=vocab_size, oov_token=oov_tok)

tokenizer.fit_on_texts(training_sentences)
word_index = tokenizer.word_index

sequences = tokenizer.texts_to_sequences(training_sentences)
padded = pad_sequences(sequences, maxlen= max_length, truncating=trunc_type)


testing_sequences = tokenizer.texts_to_sequences(testing_sentences)
testing_padded = pad_sequences(testing_sequences, maxlen=max_length, truncating=trunc_type)
[4] Build and Compile the Model
-
데이터가 이미 사전 처리되었으므로 감정 분류 모델 구축을 진행할 수 있다.
입력은 Embedding 레이어가 된다. 여기서 주요 아이디어는 어휘의 각 단어를 벡터로 표현하는 것이다.
이러한 벡터에는 훈련 가능한 가중치가 있으므로 신경망이 학습함에 따라 긍정적인 트윗에 나타날 가능성이 가장 높은 단어는 유사한 가중치로 수렴된다.
마찬가지로, 부정적인 트윗의 단어는 더 밀접하게 클러스터된다. -
Embedding 레이어 후에는 출력을 평면화하여 Dense 레이어에 넣는다.
hidden layer에 대한 다른 아키텍처를 구성할 수도 있다. -
출력 레이어는 두 클래스를 구별하기 위해 시그모이드 활성화를 갖는 단일 뉴런이 된다. 이진 분류기의 일반적인 경우와 마찬가지로 훈련하는 동안 binary_crossentropy를 손실 함수로 사용했다.
import tensorflow as tf

model = tf.keras.models.Sequential([
    tf.keras.layers.Embedding(vocab_size, embedding_dim, input_length=max_length),
    tf.keras.layers.Flatten(),
    tf.keras.layers.Dense(6, activation='relu'),
    tf.keras.layers.Dense(1, activation='sigmoid')
])


model.summary()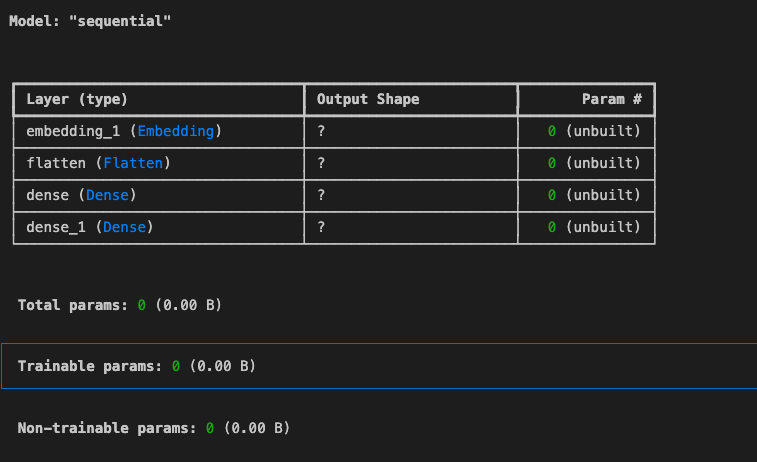
만들어진 모델을 컴파일한다.
model.compile(loss='binary_crossentropy',
              optimizer='adam',
              metrics=['accuracy'])
epoch는 10번으로 하고, 모델을 학습 할때 패딩 시퀀스 학습 데이터와 패딩한 시퀀스 테스트 데이터를 넣어 준다.
num_epochs = 10

model.fit(padded, training_labels_final, epochs=num_epochs,
         validation_data = (testing_padded, testing_labels_final))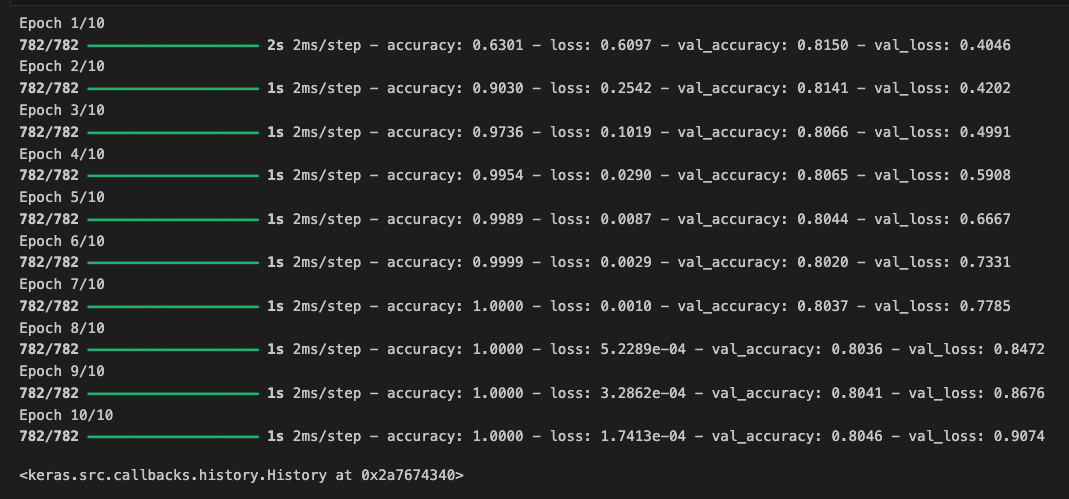
[5] Visualize Word Embeddings
- 훈련 후에는 Embedding 레이어에서 훈련된 가중치를 시각화하여 함께 클러스터링된 단어를 확인할 수 있다.
Tensorflow Embedding Projector는 이전에 정의한 16차원 벡터를 더 적은 구성 요소로 줄여 프로젝터에 플롯할 수 있다. 먼저, 이러한 가중치를 가져와야 한다.
embedding_layer = model.layers[0]

embedding_layer

# output
<Embedding name=embedding_1, built=True>

embedding_weights = embedding_layer.get_weights()[0]
embedding_weights

# output

array([[ 0.0252462 ,  0.00350437, -0.03511397, ..., -0.02874392,
         0.01807347,  0.03341025],
       [ 0.09465139, -0.02939259, -0.01037646, ...,  0.0199787 ,
        -0.01422713,  0.06496327],
       [ 0.08980722,  0.0085519 , -0.07121412, ...,  0.03631669,
         0.0313049 , -0.02600415],
       ...,
       [ 0.05657285, -0.03527293,  0.02544409, ..., -0.08182223,
         0.03334118, -0.01627139],
       [ 0.14808525, -0.02750751,  0.01457902, ...,  0.04010731,
         0.07843924, -0.01247617],
       [ 0.01405793,  0.00085564,  0.10769758, ..., -0.10148508,
        -0.01852202, -0.01725583]], dtype=float32)

embedding_weights.shape
# output
(10000, 16)
시각화 하기 위해서 두 개의 파일을 생성해야 한다.
vecs.tsv - 어휘에 있는 각 단어의 벡터 가중치를 포함
meta.tsv - 어휘의 단어를 포함
이를 위해 reverse_word_index 사전을 사용하면 주어진 색인을 기반으로 단어를 빠르게 검색할 수 있어 유용하다.
예를 들어 reverse_word_index[1]은 항상 index = 1이기 때문에 OOV 토큰을 반환한다. 다행히 Tokenizer 클래스는 이미 index_word 속성을 통해 이 사전을 제공한다.
import io

# Open writeable files
out_v = io.open('vecs.tsv', 'w', encoding='utf-8')
out_m = io.open('meta.tsv', 'w', encoding='utf-8')

# Initialize the loop. Start counting at `1` because `0` is just for the padding
for word_num in range(1, vocab_size):

  # Get the word associated at the current index
  word_name = reverse_word_index[word_num]

  # Get the embedding weights associated with the current index
  word_embedding = embedding_weights[word_num]

  # Write the word name
  out_m.write(word_name + "\n")

  # Write the word embedding
  out_v.write('\t'.join([str(x) for x in word_embedding]) + "\n")

# Close the files
out_v.close()
out_m.close()
이제 루프를 시작하여 파일을 생성할 수 있다. vocab_size-1 번 반복하고 0 키는 패딩용이므로 건너뛴다.