목차
- Spring AI 란
- Spring AI 환경 설정
1. Spring AI 란?
Spring 생태계에서 LLM·Vector DB·임베딩 모델을 통일된 추상화로 사용할 수 있는 공식 AI 프레임워크. OpenAI·Ollama·PgVector 등을 동일 인터페이스로 교체 가능.
💡 ChatClient, VectorStore, EmbeddingModel 세 축으로 구성
단계별 로드맵 베타 VER.
- 로컬 LLM 호스트를 ollama로 Spring AI에 불러오기
2. Spring AI 환경 세팅
1) Ollama 연동하기
로컬 머신에서 LLaMA3·Mistral·Gemma 등 오픈소스 LLM을 도커처럼 pull/run 하는 로컬 LLM 서버. 폐쇄망에서 외부 API 없이 모델 운용 가능.
💡 REST API (localhost:11434) → Spring AI Ollama Adapter와 연동
① CMD에 로컬 LLM 세팅
ollama run llama3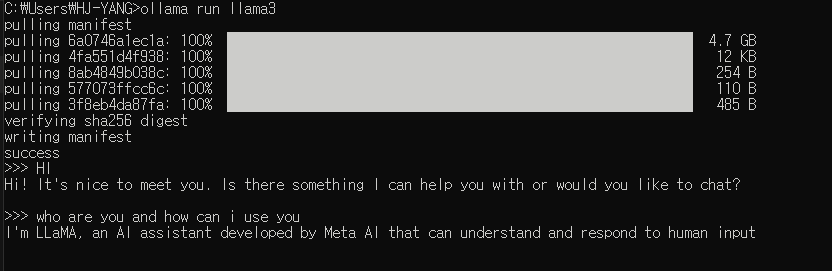
터미널로도 LLM (AI Agent) 사용 가능하다.
물론, GUI가 훨씬 편하겠지만.
llama에 직접 물어보았다.
Q. ollama + spring ai 기반 rag 서비스 모델의 아키텍쳐 구축 절차는 ?
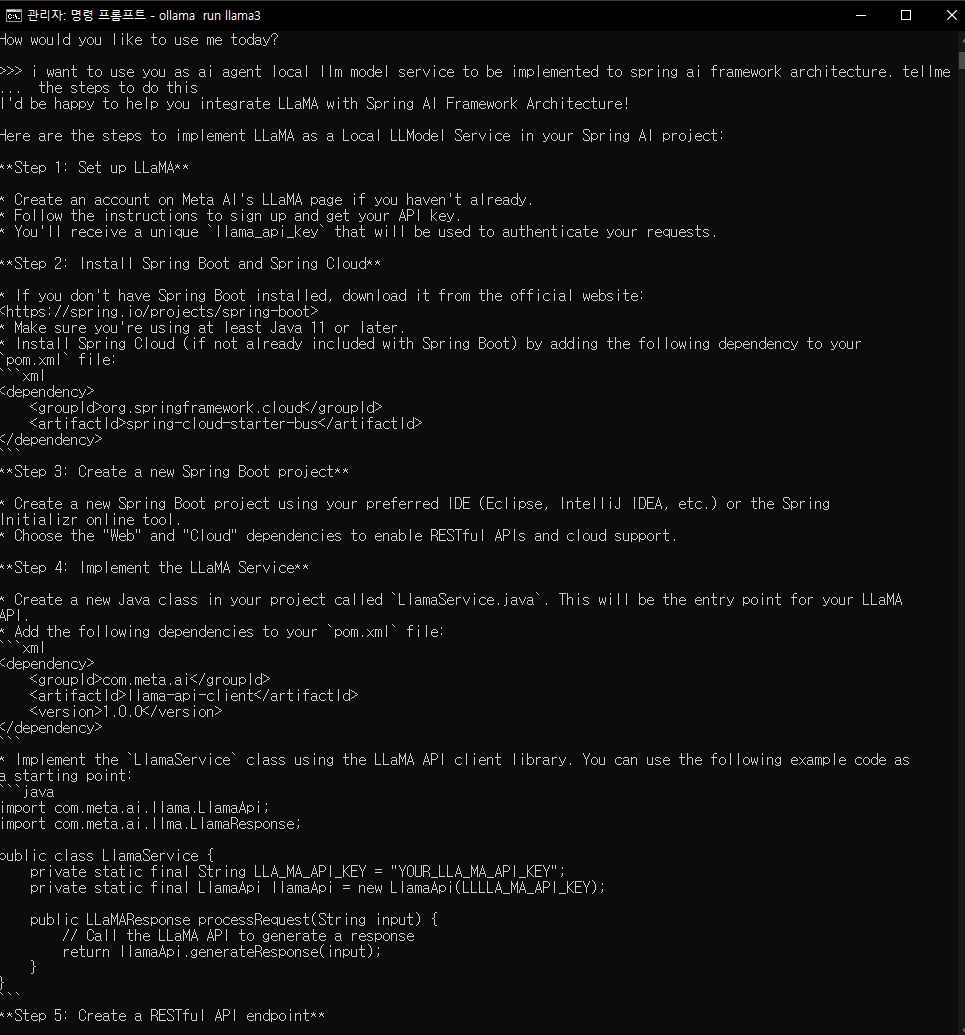
6단계 까지 절차를 상세히 알려주었다.
환경설정을 제외하고 다음의 절차를 참고하면 된다.
Step 4: Implement the LLaMA Service
- Create a new Java class in your project called
LlamaService.java. This will be the entry point for your LLaMA
API. - Add the following dependencies to your
pom.xmlfile:
<dependency>
    <groupId>com.meta.ai</groupId>
    <artifactId>llama-api-client</artifactId>
    <version>1.0.0</version>
</dependency>- Implement the
LlamaServiceclass using the LLaMA API client library. You can use the following example code as
a starting point:
import com.meta.ai.llama.LlamaApi;
import com.meta.ai.llma.LlamaResponse;

public class LlamaService {
    private static final String LLA_MA_API_KEY = "YOUR_LLA_MA_API_KEY";
    private static final LlamaApi llamaApi = new LlamaApi(LLLLA_MA_API_KEY);

    public LLaMAResponse processRequest(String input) {
        // Call the LLaMA API to generate a response
        return llamaApi.generateResponse(input);
    }
}
Step 5: Create a RESTful API endpoint
- Create a new Java class in your project called
LlamaController.java. This will handle incoming requests and
route them to theLlamaServiceclass. - Implement the
LlamaControllerclass using Spring Boot's Web annotation:
import org.springframework.web.bind.annotation.PostMapping;
import org.springframework.web.bind.annotation.RequestBody;
import org.springframework.web.bind.annotation.RestController;

@RestController
public class LlamaController {
    private final LlamaService llamaService;

    public LlamaController(LlamaService llamaService) {
        this.llamaService = llamaService;
    }

    @PostMapping("/llama")
    public LLaMAResponse processRequest(@RequestBody String input) {
        return llamaService.processRequest(input);
    }
}
Step 6: Configure Spring Cloud
- In your
application.propertiesfile, add the following configuration:
spring:
  cloud:
    bus:
      enabled: true
This enables Spring Cloud's event bus, which will allow you to publish and subscribe to events in your
application.
Step 7: Deploy and test
- Build and deploy your Spring Boot project to a cloud platform (e.g., AWS, Google Cloud, Azure) or a local
server. - Test your LLaMA API endpoint using a tool like Postman or cURL. Send a request with the input text you'd
like to process, and verify that you receive a response from LLaMA.
3. Spring AI 환경 세팅
1) build.gradle 추가
plugins {
	id 'java'
	id 'org.springframework.boot' version '4.0.6'
	id 'io.spring.dependency-management' version '1.1.7'
}

group = 'com.github.hjyang.rag'
version = '0.0.1-SNAPSHOT'

java {
	toolchain {
		languageVersion = JavaLanguageVersion.of(17)
	}
}

repositories {
	mavenCentral()
	maven { url 'https://repo.spring.io/milestone' }
}

dependencyManagement {
	imports {
		mavenBom "org.springframework.ai:spring-ai-bom:1.0.0-M4"
	}
}

dependencies {
// Starter 위주로 선언 (Starter가 core와 연관 라이브러리를 자동으로 가져옵니다)
    implementation "org.springframework.ai:spring-ai-openai-spring-boot-starter"
    implementation 'org.springframework.ai:spring-ai-chroma-store-spring-boot-starter'

    // 문서 파싱 라이브러리
    implementation 'org.springframework.ai:spring-ai-pdf-document-reader'
    implementation 'org.springframework.ai:spring-ai-tika-document-reader'

    // Spring Boot 기본 스타터
    implementation 'org.springframework.boot:spring-boot-starter-data-jpa'
    implementation 'org.springframework.boot:spring-boot-starter-web' // webmvc 대신 starter-web 권장

    // Lombok 및 도구
    compileOnly 'org.projectlombok:lombok'
    annotationProcessor 'org.projectlombok:lombok'
    developmentOnly 'org.springframework.boot:spring-boot-devtools'

    // DB
    runtimeOnly 'com.h2database:h2'

    // Test
    testImplementation 'org.springframework.boot:spring-boot-starter-test'
    testCompileOnly 'org.projectlombok:lombok'
    testAnnotationProcessor 'org.projectlombok:lombok'
    testRuntimeOnly 'org.junit.platform:junit-platform-launcher'
}

tasks.named('test') {
	useJUnitPlatform()
}
2) [Ollama] 로컬 LLM API KEY 등록하기
① 등록된 Ollama 모델 확인하기
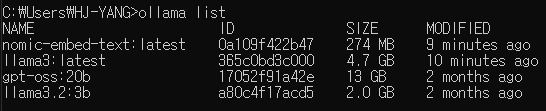
결과에 llama3랑 nomic-embed-text 없으면:
ollama pull llama3
ollama pull nomic-embed-text
ollama pull 이란?
- 모델 원격 저장소에서 llm을 로컬로 가져오는 명령어
ollama run 이란?- 모델을 실행하여 대화 세션을 시작하기 위한 명령어
② Chroma 실행 확인
curl http://localhost:8000/api/v1/heartbeat
-- v1이 안되면 v2로 시도
chroma run --path ./chroma-data --port 8000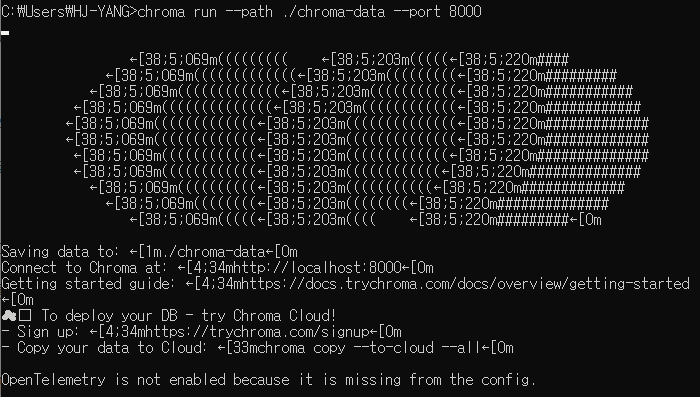
⭕ 올바르게 동작 중인 경우