최종 목표
- EC2에서 Docker 환경으로 Spring Boot (백엔드) + Vue.js (프론트엔드) 배포
- 포트 분리 및 환경별 설정 파일 관리
- 팀 협업을 위한 표준화된 배포 프로세스 구축
우리 프로젝트는 프론트와 백이 분리된 저장소로 되어있다 이거에 맞게 배포를 할 것이다.
이번 포스팅에서는 EC2에서 프로젝트 구조를 만들고 develop 브랜치를 배포해서 테스트! (추후 팀원들과 main 브랜치로 배포)
Git
Git 설치
# Git 설치
sudo yum install -y git
Complete!
폴더를 생성한 후에 Frontend와 Backend를 클론한다 (develop 브랜치를)
# 프로젝트 폴더 생성
mkdir ~/baseball-live-chat && cd ~/baseball-live-chat

# Frontend 클론 (develop 브랜치)
git clone -b develop https://github.com/Baseball-Live-Chat/BLC_Frontend.git frontend

# Backend 클론 (develop 브랜치)
git clone -b develop https://github.com/Baseball-Live-Chat/BLC_Backend.git backend

# 구조 확인
ls -la
이제 각각 frontend 폴더와 backend 폴더가 만들어졌고 그 안에 pom.xml, package.json, 각 폴더에 src 디렉토리가 있는지 확인 한 후에 넘어가자! (만약에 폴더 구조가 다르면 맞춰줘야한다!)
Dockerfile
이제 Dockerfile을 생성할 것이다
- backend/Dockerfile (Spring Boot용)
- frontend/Dockerfile (Vue.js용)
- frontend/nginx.conf (웹서버 설정)
- docker-compose.yml (전체 관리)
이 4가지 파일을 통해 컨테이너 관리를 해줄 수 있다!
그러기 위해서 버전 check
Java 17, Node.js 18, Vue 3.3.0
Backend Dockerfile
# Backend 폴더로 이동
cd ~/baseball-live-chat/backend

# Dockerfile 생성
nano Dockerfile
폴더로 이동 후 Dockerfile 생성
# Build stage
FROM openjdk:17-jdk-slim as build-stage

WORKDIR /app

# Maven wrapper 복사
COPY mvnw .
COPY .mvn .mvn

# 실행 권한 부여
RUN chmod +x ./mvnw

# pom.xml 먼저 복사 (의존성 캐싱)
COPY pom.xml .

# 의존성만 다운로드 (메모리 제한)
RUN MAVEN_OPTS="-Xmx256m" ./mvnw dependency:go-offline -B --no-transfer-progress

# 소스 코드 복사
COPY src src

# 빌드 (메모리 제한, 테스트 건너뛰기)
RUN MAVEN_OPTS="-Xmx512m" ./mvnw clean package -DskipTests -B --no-transfer-progress

# Runtime stage - 더 작은 이미지
FROM openjdk:17-jre-slim as production-stage

WORKDIR /app

# 빌드된 JAR만 복사
COPY --from=build-stage /app/target/*.jar app.jar

# 포트 노출
EXPOSE 8080

# JVM 메모리 제한하여 실행
ENTRYPOINT ["java", "-Xmx256m", "-Xms128m", "-jar", "app.jar"]
컨트롤 X -> Y -> 엔터 누르면 완료!
Frontend Dockerfile
# Frontend 폴더로 이동
cd ~/baseball-live-chat/frontend

# Dockerfile 생성
nano Dockerfile
폴더로 이동 후 Dockerfile 생성
# Build stage - 더 가벼운 이미지 사용
FROM node:18-alpine as build-stage

# 메모리 제한 설정
ENV NODE_OPTIONS="--max-old-space-size=512"

WORKDIR /app

# package.json 먼저 복사 (캐싱 최적화)
COPY package*.json ./

# 의존성 설치 (모든 의존성 포함 - devDependencies도 필요!)
RUN npm ci --silent

# 소스 코드 복사
COPY . .

# 환경 변수 설정
ENV NODE_ENV=production
ENV VUE_APP_API_BASE_URL=/api

# 빌드 실행
RUN npm run build

# Production stage - 더 가벼운 nginx
FROM nginx:alpine as production-stage

# 불필요한 파일 제거
RUN rm -rf /usr/share/nginx/html/*

# 빌드 결과 복사
COPY --from=build-stage /app/dist /usr/share/nginx/html

# nginx 설정 복사
COPY nginx.conf /etc/nginx/nginx.conf

# 포트 노출
EXPOSE 80

# nginx 실행
CMD ["nginx", "-g", "daemon off;"]
컨트롤 X -> Y -> 엔터 누르면 완료!
nginx.conf
# Frontend 폴더로 이동
cd ~/baseball-live-chat/frontend

nano nginx.conf
폴더로 이동 후 Dockerfile 생성
events {
    worker_connections 1024;
}

http {
    include       /etc/nginx/mime.types;
    default_type  application/octet-stream;

    # Gzip 압축 활성화
    gzip on;
    gzip_vary on;
    gzip_min_length 1024;
    gzip_types text/plain text/css text/xml text/javascript application/javascript application/xml+rss application/json;

    server {
        listen 80;
        server_name localhost;
        root /usr/share/nginx/html;
        index index.html;

        # Vue.js SPA 라우팅 지원
        location / {
            try_files $uri $uri/ /index.html;
        }

        # API 요청을 백엔드로 프록시
        location /api/ {
            proxy_pass http://backend:8080/;
            proxy_set_header Host $host;
            proxy_set_header X-Real-IP $remote_addr;
            proxy_set_header X-Forwarded-For $proxy_add_x_forwarded_for;
            proxy_set_header X-Forwarded-Proto $scheme;

            # CORS 헤더 추가
            add_header Access-Control-Allow-Origin *;
            add_header Access-Control-Allow-Methods "GET, POST, PUT, DELETE, OPTIONS";
            add_header Access-Control-Allow-Headers "Content-Type, Authorization, X-Requested-With";

            # OPTIONS 요청 처리
            if ($request_method = 'OPTIONS') {
                return 204;
            }
        }

        # 정적 파일 캐싱
        location ~* \.(js|css|png|jpg|jpeg|gif|ico|svg)$ {
            expires 1y;
            add_header Cache-Control "public, immutable";
        }
    }
}
컨트롤 X -> Y -> 엔터 누르면 완료!
docker-compose.yml
# 프로젝트 루트로 이동
cd ~/baseball-live-chat

# docker-compose.yml 생성
nano docker-compose.yml
폴더로 이동 후 Dockerfile 생성
version: '3.8'

services:
  backend:
    build:
      context: ./backend
      dockerfile: Dockerfile
    ports:
      - "8080:8080"
    environment:
      - SPRING_PROFILES_ACTIVE=dev
      - JAVA_OPTS=-Xmx256m -Xms128m
    networks:
      - blc-network
    container_name: blc-backend
    restart: unless-stopped
    deploy:
      resources:
        limits:
          memory: 400M
        reservations:
          memory: 200M

  frontend:
    build:
      context: ./frontend
      dockerfile: Dockerfile
    ports:
      - "80:80"
    depends_on:
      - backend
    networks:
      - blc-network
    container_name: blc-frontend
    restart: unless-stopped
    deploy:
      resources:
        limits:
          memory: 200M
        reservations:
          memory: 100M

networks:
  blc-network:
    driver: bridge
컨트롤 X -> Y -> 엔터 누르면 완료!
배포 테스트
# 컨테이너 빌드 및 실행
docker-compose up --build
헉 빌드가 메모리가 터졌다.. t2.micro가 확실히 무료 버전이라 Dockerfile이 버티지 못해서 위에 Dockerfile을 수정하고 단계적으로 빌드
Frontend 빌드
cd ~/baseball-live-chat

# Frontend 빌드 (메모리 사용량 확인)
docker build --memory=800m -t blc-frontend ./frontend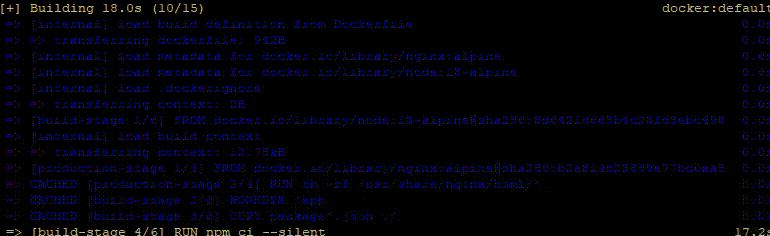
Backend 빌드
# Backend 빌드 (메모리 사용량 확인)
docker build --memory=800m -t blc-backend ./backend
빌드가 성공했으니 전체 실행! 을 하면 안된다 왜냐하면 데이터베이스 연결이 되어있지 않기 때문에 Backend가 데이터베이스에 연결하지 못해서 계속 재시작 할 수 있다.
만약에 프론트엔드만 단독으로 테스트 하고 싶다면
events {
    worker_connections 1024;
}

http {
    include       /etc/nginx/mime.types;
    default_type  application/octet-stream;

    # Gzip 압축 활성화
    gzip on;
    gzip_vary on;
    gzip_min_length 1024;
    gzip_types text/plain text/css text/xml text/javascript application/javascript application/xml+rss application/json;

    server {
        listen 80;
        server_name localhost;
        root /usr/share/nginx/html;
        index index.html;

        # Vue.js SPA 라우팅 지원
        location / {
            try_files $uri $uri/ /index.html;
        }

        # API 요청은 일단 404 반환 (Backend 없으니까)
        location /api/ {
            return 404 "Backend not available in standalone mode";
        }

        # 정적 파일 캐싱
        location ~* \.(js|css|png|jpg|jpeg|gif|ico|svg)$ {
            expires 1y;
            add_header Cache-Control "public, immutable";
        }
    }
}
로 수정하고 빌드한다면
# 기존 컨테이너 제거
docker rm temp-frontend

# Frontend 이미지 다시 빌드
docker build -t blc-frontend ./frontend

# 다시 실행
docker run -d -p 80:80 --name temp-frontend blc-frontend

# 상태 확인
docker ps

# 로그 확인
docker logs temp-frontend
프론트엔드만 확인 가능하다!
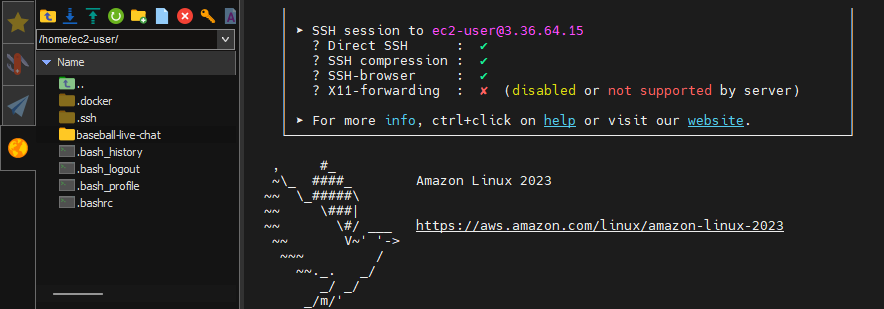
MobaXterm
동료에게 좋은 툴을 추천받고 사용 PuTTY 대신에 사용하는 데 엄청 간편하다!
현재 Frontend 단독 배포만 성공하였고 이제 전체 시스템 배포를 시작해야 한다!
Backend와 데이터베이스를 연동하고 Frontend Backend API 통신을 확인해서 전체 배포를 완성시켜보겠습니다.

잘 읽고갑니다~^^