[Coursera] C1W2 Introduction to TensorFlow , Machine Learning , DeepLearning - Introduction to Computer Vision
DeepLearning.AI TensorFlow Developer

Goal
- training 동안 model 의 loss 와 accuracy 를 추적하기 위한 콜백 function 사용
- layer 의 size 가 network 예측과 training speed 에 미치는 영향 예측
- 네트워크 훈련 속도를 높이기 위한 pixel value normalization 구현
- Fashion MNIST image dataset 을 classifying 하기위한 multilayer neural network 구성
Introduction to Computer Vision
L2 An Introduction to computer vision
컴퓨터가 셔츠 , 티셔츠 그리고 운동화 등을 구분할 수 있게 하는 방법은 대량의 데이터를 제공하여 패턴을 학습 하게 하는 것이다.
Fashion MNIST 데이터를 이용하여 실습해보자.
Fashion MNIST 데이터 특징
- 70K Images : 특성을 학습하기에 충분한 데이터
- 10 Categories
- Images are 28 x 28 : gray scaling 을 이용하여 컴퓨터의 처리량 축소
- 각 데이터는 대상의 특성이 구별될 수 있도록 충분한 정보를 가져야 함.
L3 Writing code to load training data
Tip : 신경망을 구축할 때 일부 데이터를 이용하여 신경망을 훈련시키고 유사한 데이터로 이미지 인식 성능을 확인하는 것이 좋다.
- 7만장 중 6만장의 데이터로 학습 시키고 , 1만장의 데이터로 모델의 성능을 테스트할 수 있음
import tensorflow as tf
from tensorflow as keras

mnist = tf.keras.datasets.fashion_mnist
( train_images , train_labels ) , ( test_images , test_labels ) = mnist.load_data()
labels의 값은 ankle boots 과 같은 string 이 아닌 digit 으로 제공된다.
- 컴퓨터는 텍스트 형태보다 숫자를 더 잘 다룬다.
- digit 형태의 label 은 언어와 관계없이 동일하다. ( 언어에 따른 편향을 줄일 수 있음 )
L4 Coding a Computer Vision Neural Network
model = keras.Sequential([
			keras.layers.Flatten(input_shape = (28,28) ) ,
            keras.layers.Dense( 128, activation = tf.nn.relu ) ,
            keras.layers.Dense( 10 , activation = tf.nn.softmax) # classification 의 개수와 일치해야 함
         ])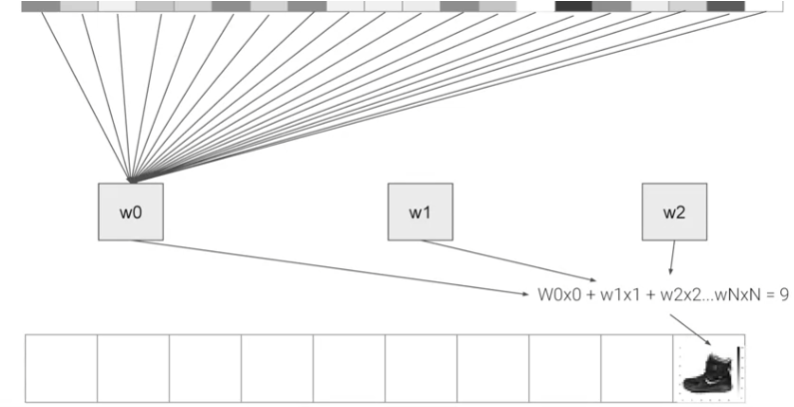
픽셀 값을 입력으로 하여 가중치( W ) 를 학습 , ankle boots 와 같은 대상을 분류할 수 있다.
L5 Walk through a Notebook for computer vision
GOAL : Train Set 에서 0.71 , Test Set 에서 0.66 이상의 정확도를 얻어보자 !
# Import libaray
import tensorflow as tf

# Load the Fashion MNIST dataset
fmnist = tf.keras.datasets.fashion_mnist

# Load the training and test split of the Fashion MNIST dataset
( training_images , training_labels ) , ( test_images , test_labels ) = fmnist.load_data()

# Print Image
import numpy as np
imort matplotlib.pyplot as plt

index = 0
np.set_printoptions( linewidth = 320 )
Print(f'Label : { training_labels[index]}')
print(f'\nImage Pixel Array :\n { training_images[index]}')
plt.imshow( training_images[index])
normalizationImage 를 학습시킬 때 , pixel 값을 0 과 1 사이에 있도록 스케일링하면 더 나은 학습 성능을 보인다.
# Normalize the pixel values of the train and test images
training_images = training_imagaes / 255.0
test_images = test_images / 255.0
Data 를 Training 과 Test 로 나누어 작성한 모델이 얼만큼의 성능을 내는지 테스트 해볼 수 있다.
# Build the classification model
model = tf.keras.models.Sequential( [tf.keras.layers.Flatten() ,
									 tf.keras.layers.Dense( 128, activation=tf.nn.relu) ,
                                     tf.keras.layers.Dense( 10 , activation=tf.nn.softmax) ] )
준비된 model 에 input image 와 label 을 입력으로 주어 학습 해보자.
model.compile( optimizer = tf.optimizers.Adam() ,
			   loss = 'sparse_categorical_crossentropy',
               metrics = ['accuracy']

model.fit( training_images , training_labels , epochs = 5 )

model.evaluate( test_images, test_labels )
Test 해보기
1. Dense layer 의 neuron 개수 늘리기
- 긴 학습시간 , 높아진 정확도
tf.keras.layers.Dense( 1024, activation = tf.nn.relu ) 2. Flatten layer 제거해보기
- Error : labels.shape
must equallogits.shape` except for the last dimension. Received: labels.shape=(32,) and logits.shape=(896, 10)
model = tf.keras.models.Sequential( [ tf.keras.layers.Dense( 64, activvation = 										 tf.nn.relu ) ,
									  tf.keras.layers.Dense( 10 , activation = 										tf.nn.softmax) ] )
3. Epoch 수 늘리고 줄여보기
- epoch 를 늘릴수록 loss 가 줄어들지만 , 어느 이상은 감소하지 않고 때로는 증가할 수도 있다.
- epoch 를 높이는 것은
overfitting의 위험이 있다.
4. Normalization 을 하지 않으면 loss 값이 커진다.
5. Callback function 을 이용하여 원하는 accuracy 에 도달했을 때 학습을 중단해보자 !
class myCallback( tf.keras.callbacks.Callback ) :
	def on_epoch_end( self, epoch , logs = {} ) :
    	if( logs.get( 'accuracy' ) >= 0.6 : # Experiment with changing this value
        	print("\nReached 60% accuracy so cancelling training ! " )
            self.model.stop_training = True

callbacks = myCallback()
mnist = tf.keras.datasets.fashion_mnist
( training_images , training_labels ) , ( test_images , test_labels ) = mnist.load_data()
training_images = training_images / 255.0
test_images = test_images / 255.0

model = tf.keras.models.Sequential( [
	tf.keras.layers.Flatten(),
    tf.keras.layers.Dense( 512, activation=tf.nn.relu ) ,
    tf.keras.layers.Dense( 10 , activation = tf.nn.softmax )
    ])

model.compile( optimizer='adam' , loss = 'sparse_categorical_crossentropy' , metrics=['accuracy'] )

model.fit( training_images, training_labels , epochs = 5 , callbacks=[callbacks])
L6 Using Callbacks to control training
Callback Function instance 를 생성하여 특정 loss 및 accuracy 에 도달했을 때 , 학습을 중단할 수 있다.
Quiz
- True or False : The on_epoch_end function sends a logs object with lots of great information about the current state of training at the start of every epoch
The on_epoch_end function sends a logs object with lots of great information about the current state of training at the end of every epoch.
Week 2: Implementing Callbacks in TensorFlow using the MNIST Dataset
note
- 9번 보다 적은 epoch 에서 목표 도달
- 99%의 정확도에 도달하면 training 중지
- If you add any additional variables, make sure you use the same names as the ones used in the class. This is important for the function signatures (the parameters and names) of the callbacks. (?)
class myCallback ( tf.keras.callbacks.Callback ):
	# Define the correct functoin signature for on_epoch_end
    def on_epoch_end ( self, epoch , logs = {} ) :
    	if logs.get( 'accuracy') is not None and logs.get( 'accuracy') > 0.99:
        	print("\nReached 99% accuracy so cacelling training ! " )
            # Stop training once the above condition is met
            self.model.stop_training = True