[Coursera] C2W4 Convolutional Neural Networks in TensorFlow - Multiclass Classifications
DeepLearning.AI TensorFlow Developer
목록 보기
8/12

GOAL
- Sign Language MNIST dataset 에 대해 multiclass classifier 구축하기
- multiple classification 을 위해 mdoel 을 정의하는 방법과 ImageDataGenerator 의 parameters 를 설정하는 방법 배우기
- 실제 이미지 파일과 다른 포맷으로 인코딩된 이미지의 차이를 이해하고 이 부분이 ImageDataGenereator 를 사용하는 방법에 미치는 영향 학습
- 사용된 image 의 픽셀 정보를 포함하는 raw CSV file 파싱을 위한 helper function 작성
L2 Moving from binary to multi-class classification
가위바위보 데이터셋
: CGI 기반으로 생성되었다. 다양한 인종 , 성별 , 나이 의 가위바위보가 담긴 데이터 셋으로 2,892 장의 이미지를 포함하는 300X300X3 픽셀 이미지이다.
- multi class classifier 를 위한 폴더 구성하기
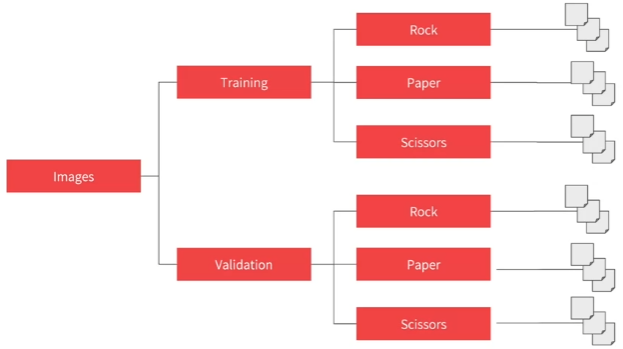
L3 Explore multi-class with Rock Paper Scissors dataset
- training set , validation set , test set 이 있어 모델 구성후 네트워크 테스트까지 가능하다.
ImageDataGenerator 설정하기
class_mode: 'categorical'
train_datagen = ImageDataGenerator( rescale = 1./255 )

train_generator = train_datagen.flow_from_directory(
				  train_dir,
        		  target_size = (300,300),
        		  batch_size = 128,
        		  class_mode = 'categorical')
Model definition
- tf.keras.layers.Dense(3,activation='softmax')])
model = tf.keras.models.Sequential([
tf.keras.layers.Conv2D( 16, (3,3), activation='relu', input_shape = (300,300,3)),
tf.keras.layers.MaxPooling2D(2,2),
tf.keras.layers.Conv2D(32,(3,3),activatino='relu'),
tf.keras.layers.MaxPooling2D(2,2),
tf.keras.layers.Conv2D(64,(3,3),activation='relu'),
tf.keras.layers.MaxPooling2D(2,2),
tf.keras.layers.Flatten(),
tf.keras.layers.Dense(512,activation = 'relu'),
# 분류 대상의 개수 , softmax function
tf.keras.layers.Dense(3,activation='softmax')]) 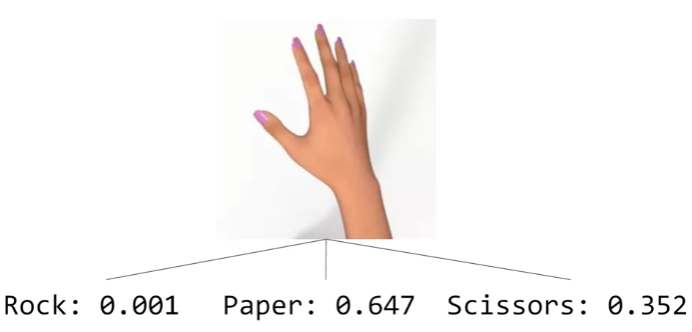
Compile Network
- model.compile(loss='categorical_crossentropy',
optimizer=RMSprop(lr=0.001),
metrics=['acc'])sparse_categorical_crossentropy를 사용해도 된다.- 값이 정수형이라면 sparse_categorical_crossentropy 를 사용하자.
-one-hot encoding후 categorical_crossentropy 를 사용해도 된다.
-sparse_categorical_crossentropy를 사용하면 전체 벡터 대신 단일 정수값을 사용하기 때문에 계산 시간과 메모리가 절약된다는 장점이 있다.
출처: sparse_categorical_crossentropy vs categorical_crossentropy
from tensorflow.keras.optimizers import RMSprop

model.compile(loss='categorical_crossentropy',
optimizer=RMSprop(lr=0.001),
metrics=['acc'])
L4 Train a classifier with Rock Paper Scissors
L5 Test the Rock Paper Scissors classifier
Quiz
-
The diagram for traditional programming had Rules and Data In, but what came out?
Answers
-
Can you use Image augmentation with Transfer Learning?
Yes. It's pre-trained layers that are frozen. So you can augment your images as you train the bottom layers of the DNN with them
프로그래밍 과제: Classification: Beyond two classes
Parsing the dataset
parse_data_from_input함수를 구현해보자.- input 으로 받은 file을 읽어 2개의 numpy array를 반환
- numpy array는 각각 label 과 28x28 이미지 표현을 담는다. (
float64)
( 참고 )- 첫 번째 행은 header 를 표현한다.
- 각 행은 785 개의 comma 로 구분되는 0과 255 사이의 값을 가진다.
- 첫 번째 값은 라벨이고 나머지 값들은 이미지의 픽셀 값이다.
( 힌트 )csv.reader- 읽어들인 파일을 for loop로 접근할 수 있다.
- row[0] : lablel
- row[1:] : image 의 pixel 값
np.loadtxt
def parse_data_from_input( filename ) :
  """
  Parses the images and labels from a CSV file

  Args:
    filename (string): path to the CSV file

  Returns:
    images, labels: tuple of numpy arrays containing the images and labels
  """

  with open( filename ) as file:
      # Use csv.reader , passing in the appropriate delimiter
      # Remember that csv.reader can be iterated and returns one line in each iteration
      csv_reader = csv.reader( file, delimiter=",")
      next( csv_reader , None ) # 첫줄 무시
      all_lines = list( csv_reader )

      labels = np.array([ row[0] for row in all_lines ] ).astype(dtype='float')
      images = np.array([ np.array(row[1:]).reshape((28,28)) for row in all_lines]).astype(dtype='float')

      return images , labels
Visualizing the numpy arrays
- csv 에서 image 로 변환한 결과 확인해보기
# Plot a sample of 10 images from the training set

def plot_categories( training_images, training_labels):
    fig, axes = plt.subplots( 1, 10, figsize = (16,15))
    axes = axes.flatten()
    letters = list(string.ascii_lowercase)

    for k in range( 10 ) :
        img = training_images[k]
        img = np.expand_dims(img,axis=-1)
        img = array_to_img(img)
        ax = axes[k]
        ax.imshow(img,cmap="Greys_r")
        ax.set_title(f"{letters[int(training_labels[k])]}")
        ax.set_axis_off()

    plt.tight_layout()
    plt.show()

plot_categories(training_images, training_lables)
Creating the generators for the CNN
-
ImageDataGenerator를 이용하여train_val_generators함수를 구현해보자.- 이번에 사용하는 dataset image는 target_size 를 조정하지 않아도 된다. 그러니
flow_from_directory말고flow를 사용해보자. - color dimension 추가가 필요하다. 흑백 이미지 데이터로 새로운 차원은 size가 1이어야 한다.
np.expand_dims
- 이번에 사용하는 dataset image는 target_size 를 조정하지 않아도 된다. 그러니
def train_val_generator( training_images training_labels , validation_images , validation_labels ):
  """
  Creates the training and validation data generators

  Args:
    training_images (array): parsed images from the train CSV file
    training_labels (array): parsed labels from the train CSV file
    validation_images (array): parsed images from the test CSV file
    validation_labels (array): parsed labels from the test CSV file

  Returns:
    train_generator, validation_generator - tuple containing the generators
  """

  # In this section you will have to add another dimension to the data
  training_images = np.expand_dims( training_images , axis = -1 )
  validation_images = np.expand_dims( validation_images , axis = -1 )

  # Instantiate the ImageDataGenerator class
  # Don't forget to normalize pixel values
  # and set arguments to augment the iamges( if desired )
  train_datagen = ImageDataGenerator( rescale = 1.0 / 255.0 )

  # Pass in the appropricate arguments to the flow method
  train_generator = train_datagen.flow( x = training_images ,
   					y = training_labels,
   					batch_size = 32)

  validation_datagen = ImageDataGenerator( rescale = 1.0 / 255.0 )

  # Pass in the appropriate arguments to the flow method

  validation_generator = validation_datagen.flow( x = validation_images ,
  					     y = validation_labels,
  					     batch_size = 32 )

return train_generator , validation_generator
Coding the CNN
- keras 의 Sequential 이나 Functional API 를 이용하여 model 을 작성해보자.
( 제한 )2개 이상의 Conv2D 와 MaxPooling2D 를 사용하면 안됨
- Functional API 를 사용해보았다.
- Dense layer 의 kernel 수를 늘렸다.
- training accuracy 는 높아졌지만 , valdiation accuracy 는 낮은 overfitting 양상을 보였다.
- augmentation 을 몽땅 추가하니 속도가 느려지고 정확도도 낮아졌다.
- 흑백 이미지로 shear_rate 과 zoom_rate 만 조절해주니 정확도가 올랐다.
- overfitting 양상이 계속된다고 생각해 dropout 을 추가했다. 정확도가 조금 올랐음
def create_model():

  ### START CODE HERE

  # Define the model
  # Use no more than 2 Conv2D and 2 MaxPooling2D
  img_inputs = tf.keras.Input(shape=(28, 28, 1))
  x = tf.keras.layers.Conv2D(kernel_size = (3,3) , filters=16 ,activation='relu')(img_inputs)
  x = tf.keras.layers.MaxPooling2D((3,3))(x)
  x = tf.keras.layers.Conv2D(kernel_size = (3,3) , filters=32 ,activation='relu')(img_inputs)
  x = tf.keras.layers.MaxPooling2D((3,3))(x)
  x = tf.keras.layers.Flatten()(x)
  x = tf.keras.layers.Dense(1024,activation='relu')(x)
  x = tf.keras.layers.Dropout(0.2)(x)
  predictions = tf.keras.layers.Dense( 26 , activation='softmax')(x)

  model = tf.keras.Model( inputs = img_inputs , outputs = predictions )


  model.compile(optimizer = 'adam',
                loss = 'sparse_categorical_crossentropy',
                metrics=['accuracy'])

  ### END CODE HERE

  return model