[Coursera] C3W2 Neural Language Processing in TensorFlow - Word Embedding
DeepLearning.AI TensorFlow Developer

GOAL
- 토큰이 high dimension space 에서 벡터로써 맵핑되는 Embedding 에 대해 배우기
- Embeddings 와 labelled examples 와 함께 , 벡터 공간에서 유사한 의미를 가진 단어가 비슷한 방향으로 갈 수 있도록 벡터를 조정할 수 있음
- text 의 감성을 이해할 수 있는 neural network 를 훈련하는 과정
- 영화 리뷰 데이터 살펴보기
`( 참고 ) IMDB reviews dataset
- 50,000 개의 movie review 데이터를 포함 ( positive / negative )
L4 Looking into the details
- TensorFlow version 확인하기
- 1.x 라면 아래 코드 적용하기
imdb , info = tfds.load("imdb_reviews" ,with_info = True , as_supervised =True)- Python3 사용하기
데이터 준비하기
import numpy as np
train_data , test_data = imdb['train'] , imdb['test']
text , label 데이터 분리하기
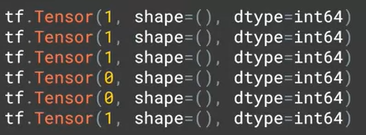
- 각 data 는 tensor 로 저장되어 있음
training_sentences = []
training_labels = []

testing_sentences = []
testing_labels = []

# Loop over all training examples and save the sentences and labels
for s,l in train_data:
    training_sentences.append(s.numpy().decode('utf8'))
    training_labels.append(l.numpy())

# Loop over all test examples and save the sentences and labels
for s,l in test_data:
    testing_sentences.append(s.numpy().decode('uft8'))
    testing_labels.append(l.numpy)

# neural network 는 input type 으로 numpy array 을 사용하므로 변환
training_labels_final = np.array( training_labels )
test_labels_final     = np.array( test_labels )
( 참고 )Tensor 로 저장된 text 와 label
sentences to sequences
vocab_size = 10000
embedding_dim = 16
max_length = 120
trunc_type = 'post'
oov_tok = "<OOV>"

from tensorflow.keras.preprocessing.text import Tokenizer
from tensorflow.keras.preprocessing.sequence import pad_sequences

tokenizer = Tokenizer(num_words = vocab_size , oov_token = oov_tok )
tokenizer.fit_on_texts( training_sentences )
word_index = tokenizer.word_index
sequences = tokenizer.texts_to_sequences(training_sentences)
padded = pad_sequences(sequences , maxlen = max_length , truncating =trunc_type )

testing_sequences = tokenizer.texts_to_sequences(testing_sequences)
testing_padded = pad_sequences( testing_sequences, maxlen=max_length)
모델 구성하기
model = tf.keras.Sequenctial([
	tf.keras.layers.Embedding(vocab_size, embedding_dim, input_length = max_length ) ,
    tf.keras.layers.Flatten(),
    tf.keras.layers.Dense(6,activation='relu'),
    tf.keras.layers.Dense(1,activation='sigmoid')
    ])
L5 How can we use vectors?
- 한 문장에서 인접한 단어들은 벡터공간에서 유사한 벡터 값을 가진다.
model = tf.keras.Sequenctial([
    # size가 16인 2D array 를 반환
    tf.keras.layers.Embedding(vocab_size , embedding_dim , input_length = max_length ) ,
    tf.keras.layers.GlobalAveragePooling1D(),
    # tf.keras.layers.Flatten(),
    tf.keras.layers.Dense( 6, activaiton='relu'),
    tf.keras.layers.Dense( 1, activation='sigmoid')
])-
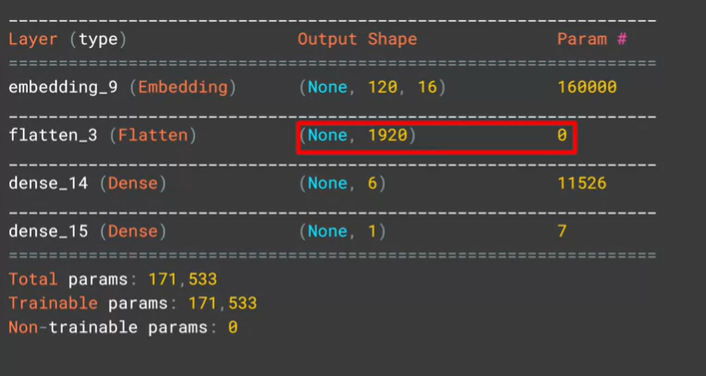
Flatten() 을 사용했을 때 model.summary()
-
GlobalAveragePooling1D() 를 사용했을 때 , model.summary()
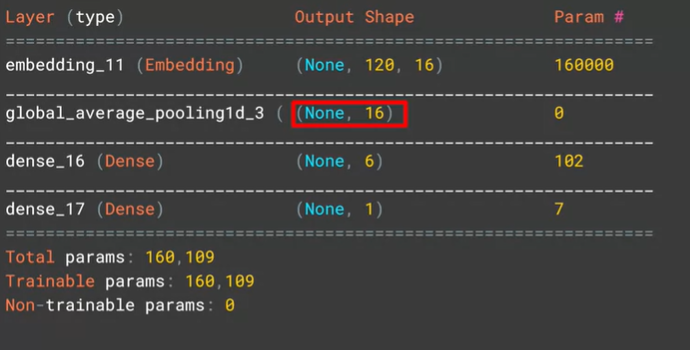
GlobalAveragePooling1D() 를 사용했을 때 조금 더 빠르고 간편했다.
- Flatten() : tensor의 모든 값을 유지하면서 1차원으로 변환
overfitting에 빠질 위험이 있다. 대량의 데이터가 있는 경우에는 좋은 효과를 낼 수 있음- GlobalAveragePooling1D() : 각 feature dimension 에 average pooling 적용
L6 More into the details
model compile 하기
model.compile(loss='binary_crossentropy', optimizer='adam', metrices=['accuracy'])
mdoel.summary()
training 하기
- training 결과를 살펴보면 overfitting 가능성이 있다.
- 이후 강의에서 overfitting 을 방지하는 방법에 대해 알아볼 것
- 적은 효과만 기대할 수 있다..!
num_epochs = 10
model.fit( padded ,
           training_labels_final,
           epochs=num_epochs,
           validation_data = (testing_padded, testing_labels_final) )
Embedding 시각화
e = model.layers[0]
weights = e.get_weights()[0]
print(weights.shape) # shape: (vocab_size, embedding_dim)
# ( 10000 , 16 )- 시각화를 위해 word index 뒤집기
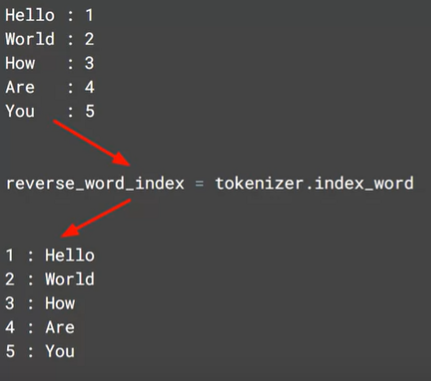
out_v = io.open('vecs.tsv', 'w', encoding='utf-8')
out_m = io.open('meta.tsv', 'w', encoding='utf-8')

for word_num in range ( 1, vocab_size ) :
    word = reverse_word_index[word_num]
    embeddings = wights[word_num]
    out_m.write(word + "\n")
    out_v.write('\t'.join([str(x) for x in embeddings]) + "\n")
out_v.close()
out_m.close()- colab 을 사용한다면 아래 코드로 다운 받을 수 있다.
from google.colab import files

except ImportError:
    pass
else:
    files.download('vecs.tsv')
    files.download('meta.tsv')
군집화된 데이터들 확인하기

L7 Notebook for lesson1
데이터 다운로드
- 로컬
# Install this package if running on your local machine
# !pip install -q tensorflow-datasets- colab 사용
- with_info 를 True 로 주면
print(info)로 데이터 셋의 정보를 볼 수 있다. - train , test , unsupervised 로 구성된 100,0000 개의 데이터셋
- with_info 를 True 로 주면
import tensorflow_datasets as tfds

# Load the IMDB Reviews dataset
imdb, info = tfds.load("imdb_reviews", with_info=True, as_supervised=True)
Split the dataset
- 다운로드 받은 데이터 셋의 타입은 tensor로 구성된
tf.data.Dataset이다. - take( n ) 을 이용하여 n 개의 데이터 셋을 확인할 수 있다.
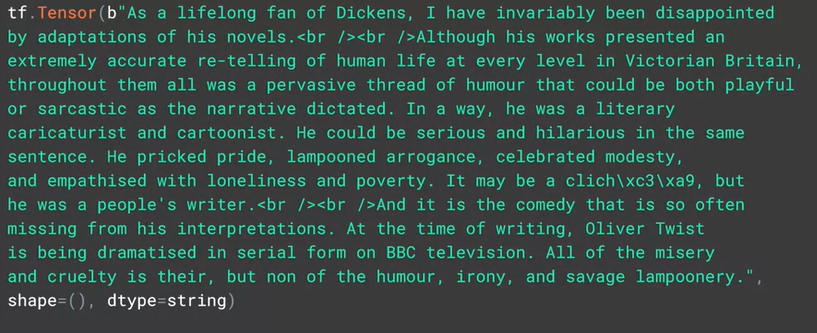
# Take 2 training examples and print its contents
for example in imdb['train'].take(2):
  print(example)
Train / Test 데이터 준비하기
- model 에 input 으로 제공하기 위해
numpy array로 변환하여 데이터 준비
import numpy as np

# Get the train and test sets
train_data , test_data = imdb['train'] , imdb['test']

# Initialize sentences and labels lists
training_sentences = []
training_labels = []

testing_sentences = []
testing_labels = []

# Loop over all training examples and save the sentences and labels
for s,l in train_data:
    training_sentences.append(s.numpy().decode('utf8'))
    training_labels.append(l.numpy())

# Loop over all test examples and save the sentences and labels.
for s,l in test_data:
    testing_sentences.append(s.numpy().decode('utf8'))
    testing_labels.append(l.numpy())

# Convert labels lists to numpy array
training_labels_final = np.array(training_labels)
testing_labels_final = np.array(testing_labels)
Padding 된 sequence 생성하기
- parameter 를 분리하여 별도 코드로 작성함
- 앞 시간에 배웠던 tokenizer 를 이용하여 sequence 화
# Parameters

vocab_size = 10000
max_length = 120
embedding_dim = 16
trunc_type='post'
oov_tok = "<OOV>"
from tensorflow.keras.preprocessing.text import Tokenizer
from tensorflow.keras.preprocessing.sequence import pad_sequences
# Initialize the Tokenizer class
tokenizer = Tokenizer(num_words = vocab_size, oov_token=oov_tok)
# Generate the word index dictionary for the training sentences
tokenizer.fit_on_texts(training_sentences)
word_index = tokenizer.word_index
# Generate and pad the training sequences
sequences = tokenizer.texts_to_sequences(training_sentences)
padded = pad_sequences(sequences,maxlen=max_length, truncating=trunc_type)
# Generate and pad the test sequences
testing_sequences = tokenizer.texts_to_sequences(testing_sentences)
testing_padded = pad_sequences(testing_sequences,maxlen=max_length, truncating=trunc_type)Build and compile the model
( 참고 )word_embeddings 문서보기
- Embedding layer 와 Dense layer 로 구성
- 각 단어를 vectorizing 한 sequence 를 이용하여 weight 가 비슷한 단어끼리 군집화 , positive / negative 분류한다는 아이디어
import tensorflow as tf

## Build the model
model = tf.keras.Sequential([
    tf.keras.layers.Embedding( vocab_size , embedding_dim , input_length = max_length),
    tf.keras.layers.Flatten(),
    tf.keras.layers.Dense( 6, activaiton = 'relu'),
    tf.keras.layers.Dense( 1, activaiton = 'sigmoid')
    ])

# Setup the training parameters
model.compile(loss='binary_crossentropy', optimizer='adam', metrics=['accuracy'])

# Print the model summary
model.summary()
Train the model
- training accuracy 는 꽤 높지만 validation accuracy 가 좋지 못함
- parameter 들을 조정하여
(e.g. the vocab_size, number of Dense neurons, number of epochs, etc.)성능을 높여볼 수 있다.
num_epochs = 10

# Train the model
model.fit(padded, training_labels_final, epochs=num_epochs, validation_data=(testing_padded, testing_labels_final))
Visualize Word Embeddings
- 16차원의 벡터를 더 작은 요소로 줄여 그래프화한다.
# Get the embedding layer from the model (i.e. first layer)
embedding_layer = model.layers[0]

# Get the weights of the embedding layer
embedding_weights = embedding_layer.get_weights()[0]

# Print the shape. Expected is (vocab_size, embedding_dim)
print(embedding_weights.shape)- index 를 key 로 word 를 제공하는
reverse_word_index얻기- ( 참고 )
OOV는 항상 index 1 을 가진다.
- ( 참고 )
# Get the index-word dictionary
reverse_word_index = tokenizer.index_word- 0 는 패딩이므로 제외하고 tsv 파일을 만들어보자
- 로컬 실행
import io

# Open writeable files
out_v = io.open('vecs.tsv','w', encoding='utf-8')
out_m = io.open('meta.tsv','w', encoding='utf-8')

# Initialize the loop. Start counting at '1' becuase '0' is just for the padding
for word_num in range( 1 , vocab_size ) :
    # Get the word associated at the current index
    word_name = reverse_word_index[word_num]

    # Get the embedding weights associated with the current index
    word_embedding = embedding_weights[word_num]

    # Write the word name
    out_m.write(word_name +"\n")

    # Write the word embedding
    out_v.write('\t'.join([str(x) for x in word_embedding])+"\n")

# Close the files
out_v.close()
out_m.close()- 코랩 실행
# Import files utilities in Colab
try:
  from google.colab import files
except ImportError:
  pass

# Download the files
else:
  files.download('vecs.tsv')
  files.download('meta.tsv')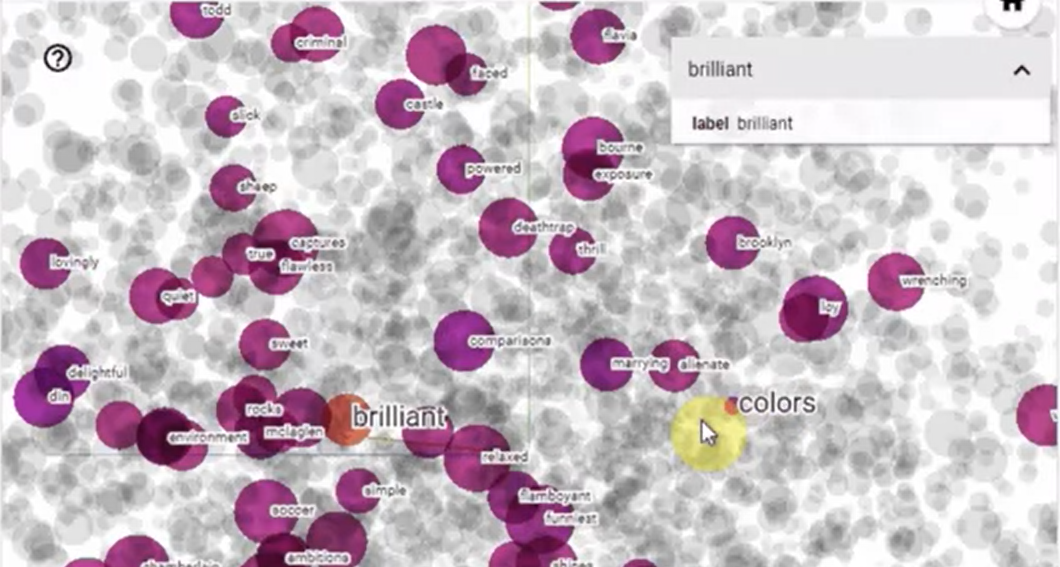
L8 Remember the sarcasm dataset?
library import
import json
import tensorflow as tf

from tensorflow.keras.preprocessing.text import Tokenizer
from tensorflow.keras.preprocessing.sequence import pad_sequences
hyperparameter 설정하기
vocab_size = 10000
embedding_dim = 16
max_length = 32
trunc_type = 'post'
padding_type = 'post'
oov_tok = "<OOV>"
training_size = 20000
dataset 다운로드
dataset 로딩하기
with open("/tmp/sarcasm.json",'r') as f:
    datastore = json.load(f)

sentences = []
labels = []

for item in datastore:
    sentences.append(item['headline'])
    labels.append(item['is_sarcastic'])
L9 Building a classifier for the sarcasm dataset
corpus 를 training set 과 validation set 으로 나눠보자.
training_sentences = sentences[0:training_size]
testing_sentences = sentences[training_size:]
training_labels = labels[0:training_size]
testing_labels = labels[training_size:]
sentences to sequences
tokenizer = Tokenizer(num_words=vocab_size, oov_token=oov_tok)
tokenizer.fit_on_texts(training_sentences)

word_index = tokenizer.word_index

training_sequences = tokenizer.texts_to_sequences(training_sentences)
training_padded = pad_sequences(training_sequences , maxlen=max_length, padding=padding_type , truncating=trunc_type)

testing_sequences = tokenizer.texts_to_sequences(testing_sentences)
testing_padded = pad_sequences(testing_sequences , maxlen = max_length , padding = padding_type , truncating=trunc_type)
모델 구성하기
model = tf.keras.Sequential([
    tf.keras.layers.Embedding(vocab_size , embedding_dim , input_length = max_length),
    tf.keras.layers.GlobalAveragePooling1D(),
    tf.keras.layers.Dense(24,activaiton='relu'),
    tf.keras.layers.Dense(1,activaiton='sigmoid')
    ])

model.compile( loss='binary_crossentropy',optimizer='adam',metrics=['accuracy'])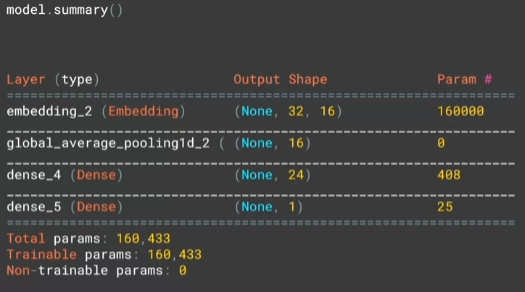
모델 훈련시키기
num_aepochs = 30

history = model.fit(training_padded, training_labels, epochs = num_epochs , valdation = ( testing_padded , testing_labels ) , verbose = 2 )
plotting 하기
import matplotlib.pyplot as plt

def plot_graphs(history, string):
    plt.plot(history.history[string])
    plt.plot(history.history['val_' + string])

    plt.xlabel("Epochs")
    plt.ylabels(string)

    plt.legend([string, 'val_' + string])
    plt.show()

plot_graphs(history,"acc")
plot_graphs(history,"loss")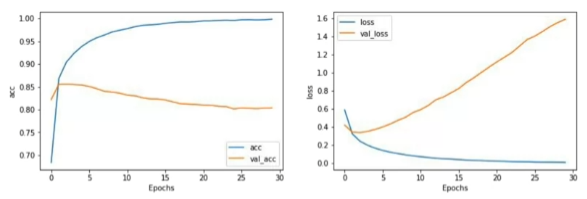
L10 Let's talk about the loss
- epochs 수가 늘어날수록 예측 정확도가 높아질 수 있지만 , 신뢰도는 떨어진다.
- hyper parameters 를 조정하면서 정확도와 신뢰도가 가장 높을 때를 찾아야 한다.
vocab_size 와 max_length 조정
vocab_size = 1000 # 10000
embedding_dim = 16
max_length = 16 # 32
trunc_type = 'post'
padding_type = 'post'
oov_tok = "<OOV>"
training_size = 20000
embedding_dim 조정
- 차이가 거의 없음
vocab_size = 1000 # 10000
embedding_dim = 32 # 16
max_length = 16 # 32
trunc_type = 'post'
padding_type = 'post'
oov_tok = "<OOV>"
training_size = 20000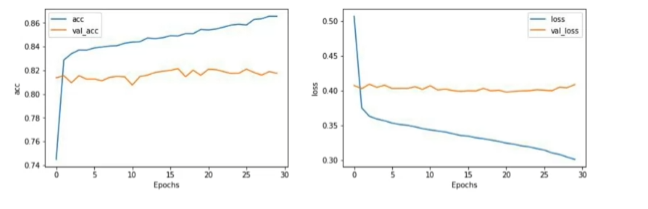
L11 Pre-tokenized datasets
단어의 순서가 단어의 유무만큼 중요하다 !
TensorFlow datasets
L12 Diving into the code( part1 )
- News Headlines Dataset for Sarcasm Detection 를 이용하여 hyper parameters 수정이 결과에 어떤 영향을 미치는지 알아보자
Data loading
import json

# Load the JSON file
with open("./sarcasm.json",'r') as f:
    datastore = json.load(f)

# Initialize the lists
sentences = []
labels = []

# Collect sentences and labels into the lists
for item in datastore:
    sentences.append(item['headline'])
    labels.append(item['is_sarcastic'])
Hyperparameters
- 수정이 쉽도록 별도 변수에 저장
# Number of examples to use for training
training_size = 20000

# Vocabulary size of the tokenizer
vocab_size = 10000

# Maximum length of the padded sequences
max_length = 32

# Output dimensions of the Embedding layer
Split the data
- 앞서 설정한 training_size 만큼을 training 데이터로 나누자.
# Split the sentences
training_sentences = sentences[0:training_size]
testing_sentences = sentences[training_size:]

# Split the labels
training_labels = labels[0:training_size]
testing_labels = labels[training_size:]
Preprocessing the train and test sets
- model 에 입력으로 넣을 수 있도록
Tokenizer와pad_sequences를 이용하여 가공해보기
import numpy as np
from tensorflow.keras.preprocessing.text import Tokenizer
from tensorflow.keras.preprocessing.sequence import pad_sequences

# Parameters for padding and OOV tokens
trunc_type = 'post'
padding_type = 'post'
oov_tok = "<OOV>"

# Initialize the Tokenizer class
tokenizer = Tokenizer(num_words = vocab_size , oov_token = oov_tok )

# Generate the word index dictionary
tokenizer.fit_on_texts( training_sentences )
word_index = tokenizer.word_index

# Generate and pad the training sequences
training_sequences = tokenizer.texts_to_sequences(training_sequences)
training_padded = pad_sequences(training_sequences, maxlen=max_length, padding=padding_type, truncating = trunc_type )

# Generate and pad the testing sequences
testing_sequences = tokenizer.texts_to_sequences(testing_sequences)
testing_padded = pad_sequences( testing_sequences , maxlen= max_length, padding = padding_type , truncating = trunc_type )

# Convert the labels list into numpy arrays
training_labels = np.array(training_labels)
testing_labels = np.array(testing_labels)
Build and Compile the Model
Flatten대신 GlobalAveragePooling1D 사용Notice that it gets the average over 3 arrays (i.e. (10 + 1 + 1) / 3 and (2 + 3 + 1) / 3 to arrive at the final output.
import tensorflow as tf

# Initialize a GlobalAveragePooling1D (GAP1D) layer
gap1d_layer = tf.keras.layers.GlobalAveragePooling1D()

# Define sample array
sample_array = np.array([[10,2],[1,3],[1,1]]])

# Print shape and contents of sample array
print(f'shape of sample_array = {sample_array.shape}')
print(f'sample array: {sample_array}')

# Pass the sample array to the GAP1D layer
output = gap1d_layer(sample_array)

# Print shape and contents of the GAP1D output array
print(f'output shape of gap1d_layer: {output.shape}')
print(f'output array of gap1d_layer: {output.numpy()}')

# ( 10 + 1 + 1 ) / 3 = 4
# ( 2 + 3 + 1 ) / 3 = 2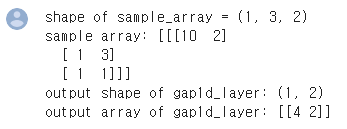
Flatten()에 비해 차원이 축소되고 parameter의 수가 줄어든다는 장점이 있다.
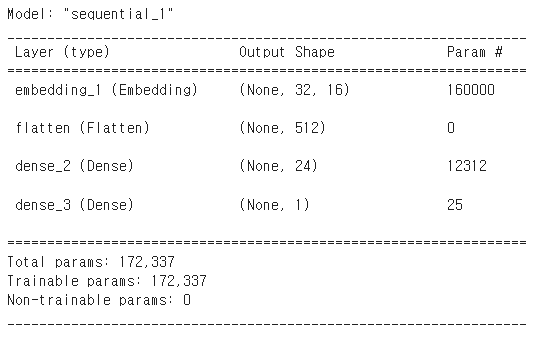
model 생성하기
GlobalAveragePooling1D을 사용했을 때
model = tf.keras.Sequential([
    tf.keras.layers.Embedding(vocab_size, embedding_dim , input_length=max_length),
    tf.keras.layers.GlobalAveragePooling1D(),
    tf.keras.layers.Dense(24, activation='relu'),
    tf.keras.layers.Dense(1,activation='sigmoid')])

model.summary()
Flatten을 사용했을 때
model compile
model.compile(loss='binary_crossentropy',optimizer='adam',metrics=['accuracy'])Train the Model
( 참고 )documentation : verbose 에 따라 출력 로그가 달라진다. 상용레벨에서는 verbose 를 2로 설정하는 것을 추천한다.
결과 그래프로 나타내기
import matplotlib.pyplot as plt
# Plot utility
def plot_graphs(history,string):
plt.plot(history.history[string])
plt.plot(history.history['val_'+string])
plt.xlabel("Epochs")
plt.ylabel(string)
plt.legend([string, 'val_'+string])
plt.show()
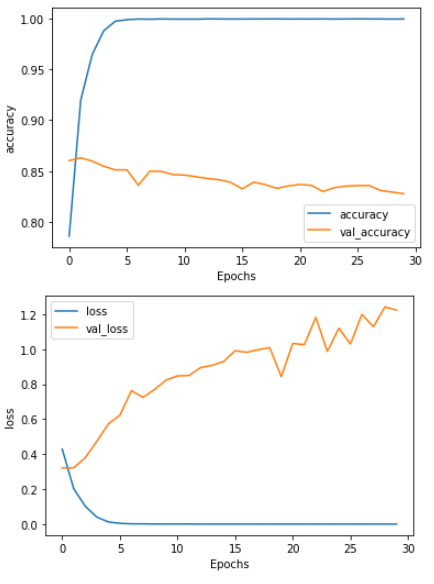
# Plot the accuracy and loss
plot_graphs(history, "accuracy")
plot_graphs(history, "loss")
참고
-
Flatten() 을 사용했을 때 :
overfitting양상을 보임
-
hyperparameters 조정
# Number of examples to use for training
training_size = 20000

# Vocabulary size of the tokenizer
vocab_size = 1000

# Maximum length of the padded sequences
max_length = 16

# Output dimensions of the Embedding layer
embedding_dim = 16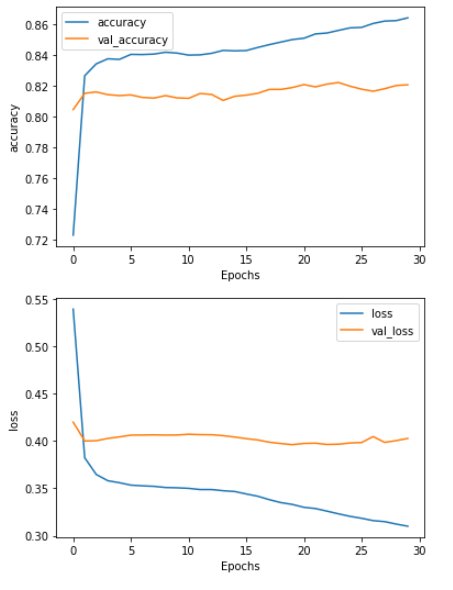
L13 Diving into the code( part2 )
( 참고 )SubwordTextEncoder( 참고 )C3_W2_Lab_3_imdb_subwords.ipynb 코드 바로가기
Tokenizer 를 대신할 수 있는 pre-tokenized dataset 에 대해 알아보자.
TF에서 제공하는 IMDB Reviews 에는 두 가지 타입의 데이터가 있다.
plain_text- this is the default and the one you used in Lab 1 of this weeksubwords8k- a pre-tokenized dataset (i.e. instead of sentences of type string, it will already give you the tokenized sequences). You will see how this looks in later sections.
두 개의 데이터 타입 비교하기
-
plain_text

-
subwords8k


Quiz
- When using IMDB Sub Words dataset, our results in classification were poor. Why?
Sequence becomes much more important when dealing with subwords, but we’re ignoring word positions
Week 2: Diving deeper into the BBC News archive
library import
import io
import csv
import tensorflow as tf
import numpy as np
from tensorflow.keras.preprocessing.text import Tokenizer
from tensorflow.keras.preprocessing.sequence import pad_sequences
import matplotlib.pyplot as plt
text 불러오기
{category,article}로 데이터가 구성되어 있다.
with open("./bbc-text.csv",'r') as csvfile:
    print(f"First line (header) looks like this:\n\n{csvfile.readline()}")
    print(f"Each data point looks like this:\n\n{csvfile.readline()}")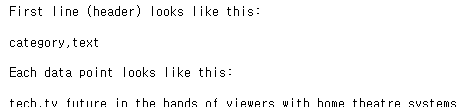
global variables 정의하기
NUM_WORDSEMBEDDING_DIMMAXLENPADDINGOOV_TOKENTRAINING_SPLIT
NUM_WORDS = 1000
EMBEDDING_DIM = 16
MAXLEN = 120
PADDING = 'post'
OOV_TOKEN = "<OOV>"
TRAINING_SPLIT = .8
Loading and pre-processing the data
def remove_stopwords(sentence):
   """
    Removes a list of stopwords

    Args:
        sentence (string): sentence to remove the stopwords from

    Returns:
        sentence (string): lowercase sentence without the stopwords
    """
    # List of stopwords
    stopwords = ["a", "about", "above", "after", "again", "against", "all", "am", "an", "and", "any", "are", "as", "at", "be", "because", "been", "before", "being", "below", "between", "both", "but", "by", "could", "did", "do", "does", "doing", "down", "during", "each", "few", "for", "from", "further", "had", "has", "have", "having", "he", "he'd", "he'll", "he's", "her", "here", "here's", "hers", "herself", "him", "himself", "his", "how", "how's", "i", "i'd", "i'll", "i'm", "i've", "if", "in", "into", "is", "it", "it's", "its", "itself", "let's", "me", "more", "most", "my", "myself", "nor", "of", "on", "once", "only", "or", "other", "ought", "our", "ours", "ourselves", "out", "over", "own", "same", "she", "she'd", "she'll", "she's", "should", "so", "some", "such", "than", "that", "that's", "the", "their", "theirs", "them", "themselves", "then", "there", "there's", "these", "they", "they'd", "they'll", "they're", "they've", "this", "those", "through", "to", "too", "under", "until", "up", "very", "was", "we", "we'd", "we'll", "we're", "we've", "were", "what", "what's", "when", "when's", "where", "where's", "which", "while", "who", "who's", "whom", "why", "why's", "with", "would", "you", "you'd", "you'll", "you're", "you've", "your", "yours", "yourself", "yourselves" ]

    # Sentence converted to lowercase-only
    sentence = sentence.lower()

    words = sentence.split()
    no_words = [ w for w in words if w not in stopwords ]
    sentence = " ".join(no_words)

    return sentencee
Training-Validation Split
def train_val_split( sentences , labels , training_split):
    """
    Splits the dataset into training and validation sets

    Args:
        sentences (list of string): lower-cased sentences without stopwords
        labels (list of string): list of labels
        training split (float): proportion of the dataset to convert to include in the train set

    Returns:
        train_sentences, validation_sentences, train_labels, validation_labels - lists containing the data splits
    """
    ### START CODE HERE

    num_of_sentences = len(sentences)
    training_size = int(num_of_sentences * training_split)

    # Split the sentences and labels into train/validation splits

    train_sentences = sentences[:training_size]
    train_labels = labels[:training_size]

    validation_sentences = sentences[training_size:]
    validation_labels = labels[training_size:]
    ### END CODE HERE

    return train_sentences , validation_sentences , train_labels , validation_labels
Tokenization - Sequences and padding
- training senetences 에 fit 된 Tokenizer 를 반환하는
fit_tokenizer구현하기
def fit_tokenizer(train_sentences , num_words , oov_token):
    """
    Instantiates the Tokenizer class on the training sentences

    Args:
        train_sentences (list of string): lower-cased sentences without stopwords to be used for training
        num_words (int) - number of words to keep when tokenizing
        oov_token (string) - symbol for the out-of-vocabulary token

    Returns:
        tokenizer (object): an instance of the Tokenizer class containing the word-index dictionary
    """

    ### START CODE HERE

    # Instantiate the Tokenizer class. passing in the correct values for num_words and oov_token

    tokenizer = Tokenizer( num_words = NUM_WORDS , oov_token = OOV_TOKEN )

    # Fit the tokenizer to the training sentences
    tokenizer.fit_on_texts(train_sentences)
    ### END CODE HERE

return tokenizer- padded sequences 를 반환하는
seq_and_pad함수 구현
def seq_and_pad( sentences , tokenizer , padding , maxlen ) :
    """
    Generates an array of token sequences and pads them to the same length

    Args:
        sentences (list of string): list of sentences to tokenize and pad
        tokenizer (object): Tokenizer instance containing the word-index dictionary
        padding (string): type of padding to use
        maxlen (int): maximum length of the token sequence

    Returns:
        padded_sequences (array of int): tokenized sentences padded to the same length
    """
    ### START CODE HERE
    # Convert sentences to sequences
    sequences = tokenizer.text_to_sequences(sentences)
    # Pad the sequences using the correct padding and maxlen
    padded_sequences = pad_sequences( sequences , max_len = MAXLEN , padding = PADDING )
    ### END CODE HERE

    return padded_sequences
tokenize_labels 함수 구현
- validation set 에서 발견되지 않는 라벨이 있는 것을 피하기 위해 전체 라벨 대상으로 fit 된 tokenizer 가 필요함
- oov_token 이 필요하지 않음
- 이전 함수에서 numpy array 를 반환하는
pad_sequences를 사용했다. label 에는 해당 함수를 사용할 필요가 없으므로 직접 numpy array 로 변환해야한다. split_labels의 argument 는 특정한 split 의 라벨을 언급한다.(?) 이 함수는 독립적으로 split 되어 작동한다. (?)- 케라스의 Tokenizer 를 사용하면 값이 1 부터 시작한다. 이것은 케라스가 일반적으로 라벨이 0부터 시작하기 때문에 훈련과정에 문제가 있을 것음을 시사한다. 이 문제를 해결하기 위해 마지막 레이어에 뉴런을 추가할 수 있다. 하지만 이런 접근은 다소 hacky 하고 명확하지 않다. 대신에 이 함수가 반환하는 labels 의 모든 값으로부터 1을 뺄 수 있다. numpy array 는 vectorized operations 를 지원하기 때문에 ,
np.array - 1로 목표를 쉽게 달성할 수 있음을 기억하라.
def toeknize_labels(all_labels, split_labels) :
    """
    Tokenizes the labels

    Args:
        all_labels (list of string): labels to generate the word-index from
        split_labels (list of string): labels to tokenize

    Returns:
        label_seq_np (array of int): tokenized labels
    """
    ### START CODE HERE
    # Instantiate the Tokenizer ( no additional arguments needed )
    label_tokenizer = Tokenizer()
    # Fit the tokenizer on all the labels
    label_tokenizer.fit_on_texts( all_labels)

    # Convert labels to sequences
    label_seq = label_tokenizer.texts_to_sequences( split_labels )

   	# Convert sequences to a numpy array. Don't forget to substract 1 from every entry in the array !
    label_seq_np = np.array(label_seq)-1
    ### END CODE HERE

    return label_seq_np
Selecting the model for text classification : create_model 구현
loss function 으로
sparse_categorical_crossentropy를 이용하여 test function 에서 확인되지 않은 category 도 사용할 수 있도록 함.
각 데이터를 알맞은 카테고리로 분류해보자.
- 3개의 parameters 를 가지는 함수로 , 모든 parameters 는 Embedding layer 로 전달된다. 이 레이어는 모델에서 가장 첫 번째로 사용될 것이다.
- 마지막 레이어의 activation function 은 softmax 로 , 5개의 유닛을 가진 Dense layer 여야 한다.
- 적절한 loss function 과 optimizer 를 이용하여 모델을 컴파일 하여야 한다.
- 어떤 architecture 든 쓸 수 있지만 , 성공적으로 문제를 풀기 위해 많은 레이어를 사용할 필요는 없다. Embedding , GlobalAveragePooling1D 그리고 Dense layer 이외의 것은 사용할 필요가 없지만 다른 architecture 를 사용해도 된다.
- 과제 통과를 위해서는 30 epochs 내에서 95%의 training accuracy 와 90%의 validation accuracy 가 필요하다.
def create_model(num_words , embedding_dim , maxlen ) :
    """
    Creates a text classifier model

    Args:
        num_words (int): size of the vocabulary for the Embedding layer input
        embedding_dim (int): dimensionality of the Embedding layer output
        maxlen (int): length of the input sequences

    Returns:
        model (tf.keras Model): the text classifier model
    """
    tf.random.set_seed(123)
    ### START CODE HERE
    model = tf.keras.Sequential([
    	tf.keras.layers.Embedding(num_words , embedding_dim , maxlen ),
        tf.keras.layers.GlobalAveragePooling1D(),
        tf.keras.layers.Dense(32 , activaiton = 'relu')
        tf.keras.layers.Dense( 5 , activation = 'softmax')
    ])

    model.compile( loss ='sparse_categorical_crossentropy',
    optimizer='adam',
    metrics=['accuracy'])
    ### END CODE HERE

    return model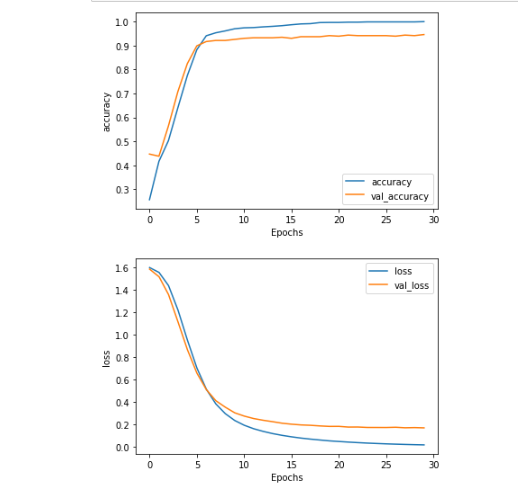
Optional Exercise - Visualizing 3D Vectors
training 에서 사용된 각 단어의 연관 벡터를 3D 공간에서 시각화할 수 있다.
아래 셀을 실행하고 Tensorflow's Embedding Projector 에 방문해보자.
The above is true if global variables are not modified.
Notice that this shape will always be (NUM_WORDS, EMBEDDING_DIM).
# Reverse word index
reverse_word_index = dict([(value , key ) for ( key , value ) in word_index.items()])

# Save the embedding layer
e = model.layers[0]

# Save the weights of the embedding layer
weights = e.get_weights()[0]
print(f"Weights of embedding layer have shape : {weights.shape}")vecs.tsv와meta.tsv생성하기
# Generaste files for embedding visualization
out_v = io.open('vecs.tsv', 'w', encoding = 'utf-8')
out_m = io.open('meta.tsv', 'w', encoding = 'utf-8')
for word_num in range( 1, NUM_WORDS):
    word = reverse_word_index[word_num]
    embeddings = weights[word_num]
    out_m.write(word+"\n")
    out_v.write('\t'.join([str(x) for x in embeddings]) +"\n")

out_v.close()
out_m.close()