
JUnit5
JUnit5 관련 내용에 앞서 테스트에 관련된 내용이 궁금하신 분은 여기를 먼저 읽으시는 것을 추천드립니다.
JUnit5 이란?
JUnit5 = JUnit Platform + JUnit Jupiter + JUnit Vintage
JUnit5는 다음의 3개의 sub-project들의 서로 다른 모듈들로 구성되어있는 테스트 프레임워크 입니다.
JUnit platform
JVM에 testing framework를 돌리기위한 기반이되는 플랫폼입니다. TestEngine API를 정의하고 있습니다. 이 API는 플랫폼에서 testing framework를 개발하기 위한 API 입니다.
command line에서 플랫폼을 실행하기위한 Console Launcher 제공
JUnit4 환경의 플랫폼의 TestEngine을 실행하기위한 JUnit 4 based Runner 제공
JUnit platform 는 인텔리제이나 이클립스 VSCode 등과 같은 IDE들과 Gradle,Maven,Ant와 같은 빌드 툴에 존재하기 때문에 사용이 쉽습니다.
JUnit Jupiter
JUnit Jupiter는 (새로운 프로그래밍 모델)과 (테스트 작성과JUnit5 내부적인 확장을 위한 확장 모델)의 조합입니다.
platform 위에 Jupiter 기반 테스트를 돌리기위한 테스트 엔진을 제공합니다.
JUnit Vintage
JUnit Vintage는 JUnit3와 JUnit4에서 작성된 테스트를 돌리기위한 테스트 엔진을 제공합니다.
지원하는 Java버전
runtime에는 java8이상이 요구되지만 컴파일 타임에는 그 이전 버전도 가능합니다.
테스트의 작성법
import static org.junit.jupiter.api.Assertions.assertEquals;

import example.util.Calculator;

import org.junit.jupiter.api.Test;

class MyFirstJUnitJupiterTests {

    private final Calculator calculator = new Calculator();

    @Test
    void addition() {
        assertEquals(2, calculator.add(1, 1));
    }

}
어노테이션
https://junit.org/junit5/docs/current/user-guide/#writing-tests-annotations
을 참고하시면 됩니다.
테스트 클래스와 메서드
Test class
모든 top-level class, static member class 또는 적어도 하나의 테스트 메서드를 갖는 @Nested class를 의미합니다.
테스트 클래스는 절대 abstract이면 안되며, 단일 생성자를 가져야합니다.
Test Method
@Test, @RepeatedTest ,@ParameterizedTest, @TestFactory, @TestTemplate 가 붙은 메서드들이 테스트 메서드입니다.
Lifecycle Method
@BeforeAll, @AfterAll ,@BeforeEach, @AfterEach 이 붙은 메서드들입니다.
테스트 클래스와 테스트 메서드, 라이프사이클 메서드는 반드시 public일 필요는 없지만, private이면 안됩니다.
standard test class
import static org.junit.jupiter.api.Assertions.fail;
import static org.junit.jupiter.api.Assumptions.assumeTrue;

import org.junit.jupiter.api.AfterAll;
import org.junit.jupiter.api.AfterEach;
import org.junit.jupiter.api.BeforeAll;
import org.junit.jupiter.api.BeforeEach;
import org.junit.jupiter.api.Disabled;
import org.junit.jupiter.api.Test;

class StandardTests {

    @BeforeAll
    static void initAll() {
    }

    @BeforeEach
    void init() {
    }

    @Test
    void succeedingTest() {
    }

    @Test
    void failingTest() {
        fail("a failing test");
    }

    @Test
    @Disabled("for demonstration purposes")
    void skippedTest() {
        // not executed
    }

    @Test
    void abortedTest() {
        assumeTrue("abc".contains("Z"));
        fail("test should have been aborted");
    }

    @AfterEach
    void tearDown() {
    }

    @AfterAll
    static void tearDownAll() {
    }

}
Display Names
test report에 어떻게 보여질지에대해서 명시하는 어노테이션입니다.
각 어노테이션은 상속 상태면 안됩니다.
예시코드는 다음과 같습니다.
import org.junit.jupiter.api.DisplayName;
import org.junit.jupiter.api.Test;

@DisplayName("A special test case")
class DisplayNameDemo {

    @Test
    @DisplayName("Custom test name containing spaces")
    void testWithDisplayNameContainingSpaces() {
    }

    @Test
    @DisplayName("╯°□°)╯")
    void testWithDisplayNameContainingSpecialCharacters() {
    }

    @Test
    @DisplayName("😱")//이런 식으로 이모지도 가능합니다.
    void testWithDisplayNameContainingEmoji() {
    }
}
Assertions
테스트에서 가장 중요한 요소 중 하나인 결과가 제대로 된 것인지 확인하는 메서드입니다.
모든 JUnit 주피터 assertions은 org.junit.jupiter.api.Assertions 에 존재하는static 메서드 입니다.
import static java.time.Duration.ofMillis;
import static java.time.Duration.ofMinutes;
import static org.junit.jupiter.api.Assertions.assertAll;
import static org.junit.jupiter.api.Assertions.assertEquals;
import static org.junit.jupiter.api.Assertions.assertNotNull;
import static org.junit.jupiter.api.Assertions.assertThrows;
import static org.junit.jupiter.api.Assertions.assertTimeout;
import static org.junit.jupiter.api.Assertions.assertTimeoutPreemptively;
import static org.junit.jupiter.api.Assertions.assertTrue;

import java.util.concurrent.CountDownLatch;

import example.domain.Person;
import example.util.Calculator;

import org.junit.jupiter.api.Test;

class AssertionsDemo {

    private final Calculator calculator = new Calculator();

    private final Person person = new Person("Jane", "Doe");

    @Test
    void standardAssertions() {
        assertEquals(2, calculator.add(1, 1));
        assertEquals(4, calculator.multiply(2, 2),
                "The optional failure message is now the last parameter");
        assertTrue('a' < 'b', () -> "Assertion messages can be lazily evaluated -- "
                + "to avoid constructing complex messages unnecessarily.");
    }

    @Test
    void groupedAssertions() {
        // In a grouped assertion all assertions are executed, and all
        // failures will be reported together.
        assertAll("person",
            () -> assertEquals("Jane", person.getFirstName()),
            () -> assertEquals("Doe", person.getLastName())
        );
    }

    @Test
    void dependentAssertions() {
        // Within a code block, if an assertion fails the
        // subsequent code in the same block will be skipped.
        assertAll("properties",
            () -> {
                String firstName = person.getFirstName();
                assertNotNull(firstName);

                // Executed only if the previous assertion is valid.
                assertAll("first name",
                    () -> assertTrue(firstName.startsWith("J")),
                    () -> assertTrue(firstName.endsWith("e"))
                );
            },
            () -> {
                // Grouped assertion, so processed independently
                // of results of first name assertions.
                String lastName = person.getLastName();
                assertNotNull(lastName);

                // Executed only if the previous assertion is valid.
                assertAll("last name",
                    () -> assertTrue(lastName.startsWith("D")),
                    () -> assertTrue(lastName.endsWith("e"))
                );
            }
        );
    }

    @Test
    void exceptionTesting() {
        Exception exception = assertThrows(ArithmeticException.class, () ->
            calculator.divide(1, 0));
        assertEquals("/ by zero", exception.getMessage());
    }

    @Test
    void timeoutNotExceeded() {
        // The following assertion succeeds.
        assertTimeout(ofMinutes(2), () -> {
            // Perform task that takes less than 2 minutes.
        });
    }

    @Test
    void timeoutNotExceededWithResult() {
        // The following assertion succeeds, and returns the supplied object.
        String actualResult = assertTimeout(ofMinutes(2), () -> {
            return "a result";
        });
        assertEquals("a result", actualResult);
    }

    @Test
    void timeoutNotExceededWithMethod() {
        // The following assertion invokes a method reference and returns an object.
        String actualGreeting = assertTimeout(ofMinutes(2), AssertionsDemo::greeting);
        assertEquals("Hello, World!", actualGreeting);
    }

    @Test
    void timeoutExceeded() {
        // The following assertion fails with an error message similar to:
        // execution exceeded timeout of 10 ms by 91 ms
        assertTimeout(ofMillis(10), () -> {
            // Simulate task that takes more than 10 ms.
            Thread.sleep(100);
        });
    }

    @Test
    void timeoutExceededWithPreemptiveTermination() {
        // The following assertion fails with an error message similar to:
        // execution timed out after 10 ms
        assertTimeoutPreemptively(ofMillis(10), () -> {
            // Simulate task that takes more than 10 ms.
            new CountDownLatch(1).await();
        });
    }

    private static String greeting() {
        return "Hello, World!";
    }

}
assertAll은 중간에 하나라도 fail하는 assertion이 있으면 같은 블럭에 있는 애들은 스킵합니다.
선언적 타임아웃과 다르게 assertTimeoutPreemptively( ) 메서드는 호출한 코드와 다른 스레드에서 제공된 실행파일 또는 supplier를 실행합니다.
Third-party Assertion 라이브러리
JUnit 주피터가 제공하는 assertion facility들은 다양한 테스팅 시나리오를 처리하기에 충분하지만, 더 강력하고 추가적인 기능이 필요할 때가 있습니다. 그 때 AssertJ , Hamcrest , Truth 등과 같은 라이브러리를 이용할 수 있습니다.
아래는 JUnit4에서는 지원했지만 JUnit 주피터에서는 제공하지않는 assertThat() 메서드를 Hamcrest 라이브러리에서 사용하는 코드의 예시입니다.
import static org.hamcrest.CoreMatchers.equalTo;
import static org.hamcrest.CoreMatchers.is;
import static org.hamcrest.MatcherAssert.assertThat;

import example.util.Calculator;

import org.junit.jupiter.api.Test;

class HamcrestAssertionsDemo {

    private final Calculator calculator = new Calculator();

    @Test
    void assertWithHamcrestMatcher() {
        assertThat(calculator.subtract(4, 1), is(equalTo(3)));
    }
/*
		@Test
    void standardAssertions() {
        assertEquals(2, calculator.add(1, 1));
        assertEquals(4, calculator.multiply(2, 2),
                "The optional failure message is now the last parameter");
        assertTrue('a' < 'b', () -> "Assertion messages can be lazily evaluated -- "
                + "to avoid constructing complex messages unnecessarily.");
    }
*/
}
Assumption
테스트에서 사용하는 조건문입니다.
import static org.junit.jupiter.api.Assertions.assertEquals;
import static org.junit.jupiter.api.Assumptions.assumeTrue;
import static org.junit.jupiter.api.Assumptions.assumingThat;

import example.util.Calculator;

import org.junit.jupiter.api.Test;

class AssumptionsDemo {

    private final Calculator calculator = new Calculator();

    @Test
    void testOnlyOnCiServer() {
        assumeTrue("CI".equals(System.getenv("ENV")));
        // remainder of test
    }

    @Test
    void testOnlyOnDeveloperWorkstation() {
        assumeTrue("DEV".equals(System.getenv("ENV")),
            () -> "Aborting test: not on developer workstation");
        // remainder of test
    }

    @Test
    void testInAllEnvironments() {
        assumingThat("CI".equals(System.getenv("ENV")),
            () -> {
                // perform these assertions only on the CI server
                assertEquals(2, calculator.divide(4, 2));
            });

        // perform these assertions in all environments
        assertEquals(42, calculator.multiply(6, 7));
    }

}
Disableing Test
테스트를 사용하지 못하게 할 때, 사용합니다.
테스트를 사용하지 못하게 할 때에는 이유를 명시해주는 것을 JUnit 팀에서도 추천하고 있기 때문에, 실무에서 사용할 때는 반드시 이유를 알려주는 습관을 들여야합니다.
import org.junit.jupiter.api.Disabled;
import org.junit.jupiter.api.Test;

@Disabled("Disabled until bug #99 has been fixed")
class DisabledClassDemo {

    @Test
    void testWillBeSkipped() {
    }

}
Conditional Test Execution
os, java runtime 환경 등에 따라서 다르게 테스트를 할 때 사용합니다.
JUnit 5 User Guide를 참고하시면 됩니다.
Tagging과 Filtering
테스트 클래스와 메서드는 @Tag 어노테이션을 통해서 태그를 적용할 수 있습니다. 이 태그들은 필터로 사용됩니다.
태그는 다음의 규약을 따릅니다.
- 태그는 공백이거나 null이면 안됩니다..
- A trimmed tag는 whitespace를 가지면 안됩니다.
- A trimmed tag 는 [ISO control characters](제어 문자 - 위키백과, 우리 모두의 백과사전)안됩니다.
- A trimmed tag는 아래의 예약된 문자들을 포함하면 안됩니다.
, : comma*
( : left parenthesis*
) : right parenthesis*
& : ampersand*
| : vertical bar*
! : exclamation point*
import org.junit.jupiter.api.Tag;
import org.junit.jupiter.api.Test;

@Tag("fast")
@Tag("model")
class TaggingDemo {

    @Test
    @Tag("taxes")
    void testingTaxCalculation() {
    }

}
Test Execution Order
테스트 메서드는 의도적으로 불분명한 결정을 하는 알고리즘을 사용해서 순서가 결정됩니다.
이는 테스트가 이후에 다시 실행했을 때 동일한 순서로 테스트 메소드를 실행하도록 해서 반복 가능한 빌드를 가능하게 해줍니다.
물론, 진정한 의미의 단위 테스트들은 순서에 의존하지않고 실행되어야하지만, 실행 순서를 정해서 실행해야하는 경우가 존재합니다.
예를 들어, 통합 테스트나 기능 테스트를 작성하는 경우에 요구사항에 맞는 순서대로 테스트를 실행해야하는 경우가 있습니다.
테스트 메서드가 실행되는 순서를 정하기 위해서, 테스트 클래스 또는 테스트 인터페이스에 @TestMethodOrder를 붙여줘야합니다.
그리고 MethodOrderer를 구현하거나 내장 MethodOrderer를 사용할 수 있습니다.
내장 MethodOrderer
DisplayName : 디스플레이 네임을 기반으로 테스트 메서드를 영숫자순 으로 정렬 합니다.MethodName : 메서드 이름과 형식 매개변수 목록을 기반으로 테스트 메서드를 영숫자순 으로 정렬 합니다.
OrderAnnotation : 주석을 통해 지정된 값을 기준으로 테스트 방법을 숫자로 정렬 합니다 .
Random : 테스트 방법을 의사 무작위로 주문 하고 사용자 지정 시드 구성을 지원합니다 .
Alphanumeric : 이름과 형식 매개변수 목록을 기반으로 테스트 방법을 영숫자순 으로 정렬 합니다. **메서드 이름에대해서는 사용되지 않고 6.0에서 제거될 예정입니다.
import org.junit.jupiter.api.MethodOrderer.OrderAnnotation;
import org.junit.jupiter.api.Order;
import org.junit.jupiter.api.Test;
import org.junit.jupiter.api.TestMethodOrder;

@TestMethodOrder(OrderAnnotation.class)
class OrderedTestsDemo {

    @Test
    @Order(1)
    void nullValues() {
        // perform assertions against null values
    }

    @Test
    @Order(2)
    void emptyValues() {
        // perform assertions against empty values
    }

    @Test
    @Order(3)
    void validValues() {
        // perform assertions against valid values
    }
}
Test Instance Lifecycle
각각의 테스트 메서드가 독립적으로 실행되고 변하기 쉬운 테스트 인스턴스의 상태로 인해 발생하는 예상치 못한 역효과를 방지하기 위해서 JUnit 은 각각의 테스트 메서드를 실행하기 전에 각각의 테스트 클래스의 인스턴스를 새로 만듭니다.
이러한 메서드마다 부여되는 테스트 인스턴스 생명주기는 JUnit 주피터에서는 디폴트 값이고 모든 이전 버전의 JUnit에서도 유사합니다.
테스트 클래스는 테스트 인스턴스 생명주기 모드가 각각의 메서드마다 활성화된 경우에 조건을 통해서 비활성화된 메서드 역시 테스트 클래스는 인스턴스화가 됩니다.
만약 모든 테스트 메서드가 동일한 테스트 인스턴스에서 사용되어야한다면 @TestInstance(Lifecycle.PER_CLASS)를 어노테이션으로 붙여줘야합니다.
이 모드를 사용할 때, 새로운 테스트 메서드는 테스트 클래스 하나당 한개만 생성되어야합니다. 그렇기 때문에, 테스트 메서드가 인스턴스 변수에 저장된 상태에 의존하고 있다면, @BeforeEach나 @AfterEach 를 이용해서 리셋해준 후에 테스트를 진행해야합니다.
이러한 per-class 모드는 per-method 모드에 비해서 다음과 같은 이점을 가집니다.
1. non-static 메서드 뿐만 아니라 인터페이스의 디폴트 메서드에 @BeforeAll과 @AfterAll 을 붙여줄 수 있습니다.
2. @Nested 테스트 클래스들 안에 있는 @BeforeAll, @AfterAll 메서드를 사용할 수 있게됩니다.
Nested Test
@Nested 테스트는 테스트 작성자에게 여러 그룹의 테스트들 사이의 관계를 표현할 수 있게 해줍니다.
각각의 중첩 테스트들은 자바의 중첩 클래스를 사용하고 테스트 구조에대한 계층적 생각을 가능하게 해줍니다.
아래는 중첩 테스트의 예시 코드입니다.
import static org.junit.jupiter.api.Assertions.assertEquals;
import static org.junit.jupiter.api.Assertions.assertFalse;
import static org.junit.jupiter.api.Assertions.assertThrows;
import static org.junit.jupiter.api.Assertions.assertTrue;
import java.util.EmptyStackException;
import java.util.Stack;
import org.junit.jupiter.api.BeforeEach;
import org.junit.jupiter.api.DisplayName;
import org.junit.jupiter.api.Nested;
import org.junit.jupiter.api.Test;
@DisplayName("A stack")
class TestingAStackDemo {
Stack<Object> stack;
@Test
@DisplayName("is instantiated with new Stack()")
void isInstantiatedWithNew() {
new Stack<>();
}
@Nested
@DisplayName("when new")
class WhenNew {
@BeforeEach
void createNewStack() {
stack = new Stack<>();
}
@Test
@DisplayName("is empty")
void isEmpty() {
assertTrue(stack.isEmpty());
}
@Test
@DisplayName("throws EmptyStackException when popped")
void throwsExceptionWhenPopped() {
assertThrows(EmptyStackException.class, stack::pop);
}
@Test
@DisplayName("throws EmptyStackException when peeked")
void throwsExceptionWhenPeeked() {
assertThrows(EmptyStackException.class, stack::peek);
}
@Nested
@DisplayName("after pushing an element")
class AfterPushing {
String anElement = "an element";
@BeforeEach
void pushAnElement() {
stack.push(anElement);
}
@Test
@DisplayName("it is no longer empty")
void isNotEmpty() {
assertFalse(stack.isEmpty());
}
@Test
@DisplayName("returns the element when popped and is empty")
void returnElementWhenPopped() {
assertEquals(anElement, stack.pop());
assertTrue(stack.isEmpty());
}
@Test
@DisplayName("returns the element when peeked but remains not empty")
void returnElementWhenPeeked() {
assertEquals(anElement, stack.peek());
assertFalse(stack.isEmpty());
}
}
}
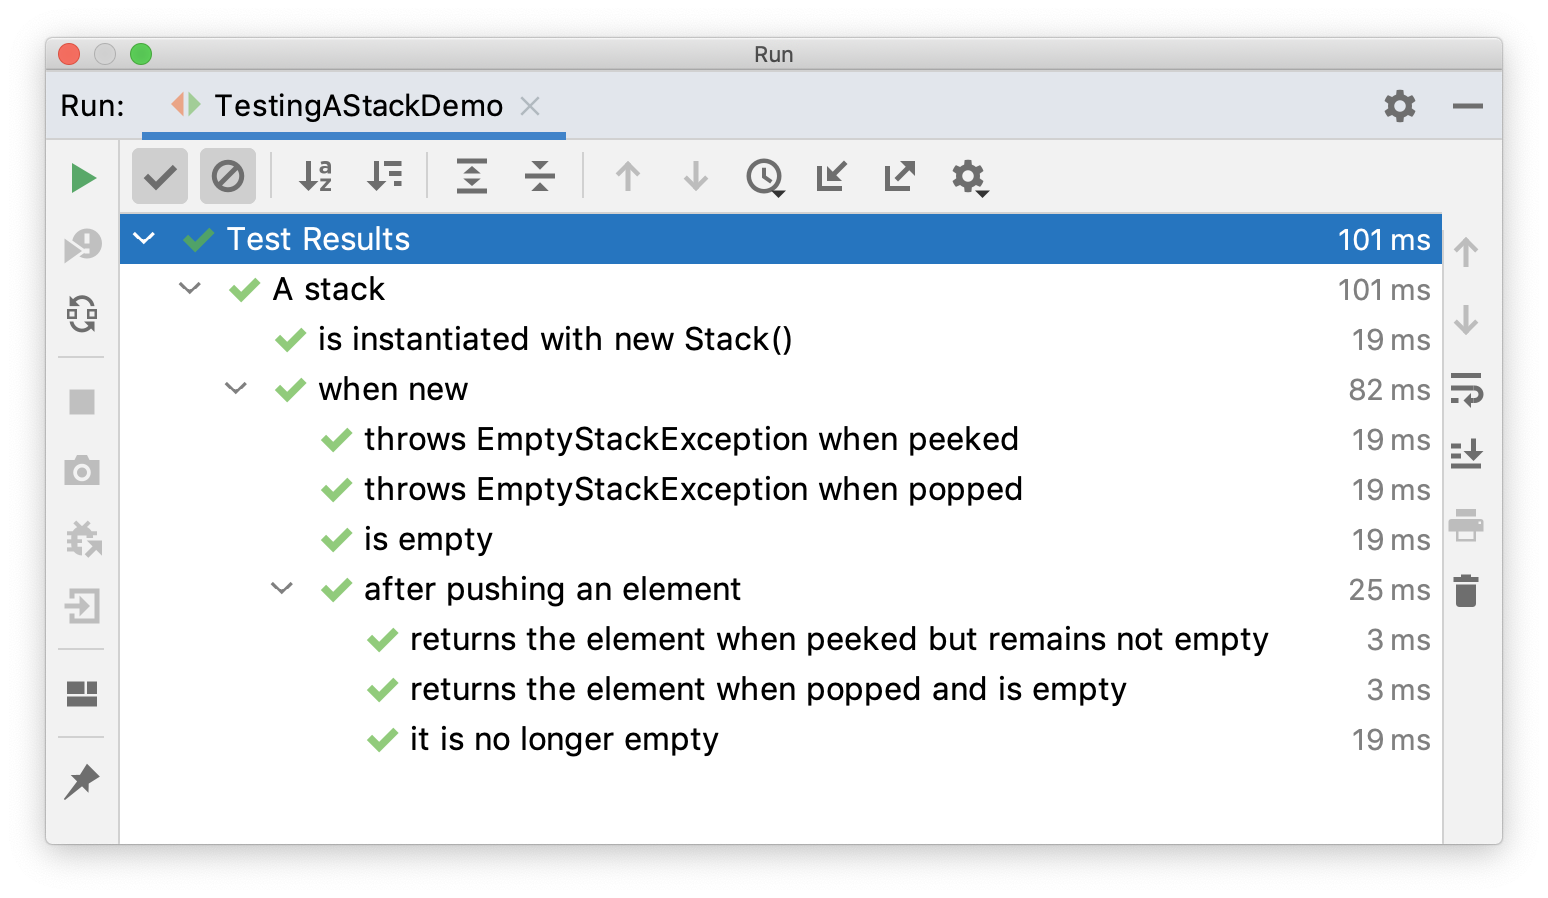
}위를 IDE에서 실행하면 다음과 같은 화면이 나옵니다.
생성자와 메서드에대한 의존성 주입
이전 버전의 JUnit에서는 테스트 생성자나 메서드는 매개변수를 가질 수 없었습니다.
JUnit5에서 JUnit 주피터의 주요 변경 사항 중 하나가 바로 테스트 생성자나 메서드가 매개변수를 가질 수 있게 된 것입니다.
이를 통해서 더 유연한 테스트를 만들 수 있고, 생성자와 메서드에대한 의존성 주입이 가능해집니다.
ParameterResolver는 런타임에 매개변수를 동적으로 확인하려는 테스트 확장을 위한 API를 정의합니다.
테스트 클래스 생성자(테스트 메서드) 또는 life cycle 메서드가 파라미터가 있다면, 그 파라미터는 등록된 ParameterResolver에 의해서 런타임에 해결되어야합니다.
아래의 3개의 내장 resolver는 자동으로 등록됩니다.
TestInfoParameterResolver
생성자나 메서드 파라미터가 TestInfo 타입이면, TestInfoParameterResolver는 현재 컨테이너나 테스트에 해당하는 인스턴스를 제공하거나 매개변수의 값으로 테스트하는 TestInfo 의 인스턴스를 제공합니다. TestInfo는 현재 컨테이너나 테스트의 정보(display name, 테스트 클레스, 테스트 메서디, 관련태그)에대한 정보를 추적할 수 있게 합니다.
다음 코드는 어떻게 TestInfo가 테스트 생성자, @BeforeEach, @Test 메서드에 주입하는지를 보여주는 코드입니다.
import static org.junit.jupiter.api.Assertions.assertEquals;
import static org.junit.jupiter.api.Assertions.assertTrue;

import org.junit.jupiter.api.BeforeEach;
import org.junit.jupiter.api.DisplayName;
import org.junit.jupiter.api.Tag;
import org.junit.jupiter.api.Test;
import org.junit.jupiter.api.TestInfo;

@DisplayName("TestInfo Demo")
class TestInfoDemo {

    TestInfoDemo(TestInfo testInfo) {
        assertEquals("TestInfo Demo", testInfo.getDisplayName());
    }

    @BeforeEach
    void init(TestInfo testInfo) {
        String displayName = testInfo.getDisplayName();
        assertTrue(displayName.equals("TEST 1") || displayName.equals("test2()"));
    }

    @Test
    @DisplayName("TEST 1")
    @Tag("my-tag")
    void test1(TestInfo testInfo) {
        assertEquals("TEST 1", testInfo.getDisplayName());
        assertTrue(testInfo.getTags().contains("my-tag"));
    }

    @Test
    void test2() {
    }
}
RepetitionParameterResolver
만약 @RepeatedTest, @BeforeEach 또는 @AfterEach메서드에 있는 메서드 파라미터가 RepetitionInfo 타입이면, RepetitionInfoParameterResolver는 RepetitionInfo의 인스턴스를 제공합니다.
RepetitionInfo는 현재까지 반복한 횟수와 총 반복횟수에대한 정보를 추적하는데 사용할 수 있습니다.
하지만, RepetitionInfoParameterResolver는 @RepeatedTest의 컨텍스트 바깥쪽에 등록되지않습니다. 이 부분은 잠시 후에 다룰 반복 테스트의 예제에서 확인할 수 있습니다.
TestReporterParameterResolver
만약 생성자나 메서드 파라미터의 타입이 TestReporter라면, TestReporterParameterResolver는 TestReporter의 인스턴스를 제공합니다.
TestReporter는 현재 실행중인 테스트에대한 추가적인 데이터를 만들어내는데 사용됩니다. 이 때 생성된 TestExecutionListener(IDE나 include된 리포트 안에서 보여집니다.) 안에 있는 reportingEntryPublished()를 통해서 사용됩니다.
JUnit5는 흔히 사용하는 stderr, stdout으로 출력하며 문제를 확인하던 부분에 TestReporter를 사용해서 테스트 결과를 확인합니다.
테스트 인터페이스와 디폴트 메서드
JUnit 주피터는 인터페이스 디폴트 메서드에 @Test, @RepeatedTest, @ParameterizedTest, @TestFactory, @TestTemplate, @BeforeEach, @AfterEach를 붙이는 것을 허용합니다.
테스트 인터페이스나 클래스에 @TestInstance(Lifecycle.PER_CLASS)가 붙어있다면 테스트 인터페이스나 인터페이스의 static 메서드와 인터페이스 디폴트 메서드에도 @BeforeAll과 @AfterAll를 붙일 수 있습니다.
반복 테스트
JUnit 주피터는 메서드에 @RepeatedTest를 붙이고 반복될 횟수를 명시해주면 지정된 횟수만큼 테스트를 반복할 수 있게 해줍니다.
각각의 반복 테스트의 호출은 실행과 동일한 수명 주기 콜백과 확장을 제공받는 일반적인 @Test 메서드의 동작과 비슷하게 작동합니다.
다음은 10번 반복하는 테스트에대한 예시 코드입니다.
@RepeatedTest(10)
void repeatedTest() {
    // ...
}
추가적으로 다음의 name 속성들을 이용해서 각 반복에대한 사용자 지정 display name을 구성할 수 있습니다.
- DisplayName : @RepeatedTest 메서드의 display name
- {currentRepetition} : 현재까지 반복한 횟수
- {totalRepetitions} : 총 반복 횟수
디폴트 display name은 다음 패턴을 따릅니다.
repetition {currentRepetition} of {totalReptitions}
현재의 반복과 전체 반복횟수에대한 정보를 추적하기 위해서 개발자는 @RepeatedTest, @BeforeEach, @AfterEach에 RepetitionInfo의 인스턴스를 주입하도록 할 수 있습니다.
다음은 반복 테스트의 예제 코드입니다.
import static org.junit.jupiter.api.Assertions.assertEquals;

import java.util.logging.Logger;

import org.junit.jupiter.api.BeforeEach;
import org.junit.jupiter.api.DisplayName;
import org.junit.jupiter.api.RepeatedTest;
import org.junit.jupiter.api.RepetitionInfo;
import org.junit.jupiter.api.TestInfo;

class RepeatedTestsDemo {

    private Logger logger = // ...

    @BeforeEach
    void beforeEach(TestInfo testInfo, RepetitionInfo repetitionInfo) {
        int currentRepetition = repetitionInfo.getCurrentRepetition();
        int totalRepetitions = repetitionInfo.getTotalRepetitions();
        String methodName = testInfo.getTestMethod().get().getName();
        logger.info(String.format("About to execute repetition %d of %d for %s", //
            currentRepetition, totalRepetitions, methodName));
    }

    @RepeatedTest(10)
    void repeatedTest() {
        // ...
    }

    @RepeatedTest(5)
    void repeatedTestWithRepetitionInfo(RepetitionInfo repetitionInfo) {
        assertEquals(5, repetitionInfo.getTotalRepetitions());
    }

    @RepeatedTest(value = 1, name = "{displayName} {currentRepetition}/{totalRepetitions}")
    @DisplayName("Repeat!")
    void customDisplayName(TestInfo testInfo) {
        assertEquals("Repeat! 1/1", testInfo.getDisplayName());
    }

    @RepeatedTest(value = 1, name = RepeatedTest.LONG_DISPLAY_NAME)
    @DisplayName("Details...")
    void customDisplayNameWithLongPattern(TestInfo testInfo) {
        assertEquals("Details... :: repetition 1 of 1", testInfo.getDisplayName());
    }

    @RepeatedTest(value = 5, name = "Wiederholung {currentRepetition} von {totalRepetitions}")
    void repeatedTestInGerman() {
        // ...
    }

}
위에서 설명한 TestInfo 와 RepetitionInfo를 주입함으러써 위의 코드를 실행하면 다음과 같은 log 정보를 얻을 수 있습니다. (이는 이해를 돕기위해 첨부한 내용입니다.)
INFO: About to execute repetition 1 of 10 for repeatedTest
INFO: About to execute repetition 2 of 10 for repeatedTest
INFO: About to execute repetition 3 of 10 for repeatedTest
INFO: About to execute repetition 4 of 10 for repeatedTest
INFO: About to execute repetition 5 of 10 for repeatedTest
INFO: About to execute repetition 6 of 10 for repeatedTest
INFO: About to execute repetition 7 of 10 for repeatedTest
INFO: About to execute repetition 8 of 10 for repeatedTest
INFO: About to execute repetition 9 of 10 for repeatedTest
INFO: About to execute repetition 10 of 10 for repeatedTest
INFO: About to execute repetition 1 of 5 for repeatedTestWithRepetitionInfo
INFO: About to execute repetition 2 of 5 for repeatedTestWithRepetitionInfo
INFO: About to execute repetition 3 of 5 for repeatedTestWithRepetitionInfo
INFO: About to execute repetition 4 of 5 for repeatedTestWithRepetitionInfo
INFO: About to execute repetition 5 of 5 for repeatedTestWithRepetitionInfo
INFO: About to execute repetition 1 of 1 for customDisplayName
INFO: About to execute repetition 1 of 1 for customDisplayNameWithLongPattern
INFO: About to execute repetition 1 of 5 for repeatedTestInGerman
INFO: About to execute repetition 2 of 5 for repeatedTestInGerman
INFO: About to execute repetition 3 of 5 for repeatedTestInGerman
INFO: About to execute repetition 4 of 5 for repeatedTestInGerman
INFO: About to execute repetition 5 of 5 for repeatedTestInGerman
Parameterized Test
parameterized test는 다른 인자로 테스트를 여러 번 실행할 수 있게합니다.
일반적인 @Test 메서드처럼 선언하지만 @Test 대신 @ParameterizedTest를 사용합니다.
또한, 각 호출에대해서 제공되어 사용될 arguments들의 데이터 소스를 적어도 하나 선언해야합니다.
아래의 코드는 @ValueSource 어노테이션을 이용해서 parameterizedTest를 작성한 예제입니다.
@ParameterizedTest
@ValueSource(strings = { "racecar", "radar", "able was I ere I saw elba" })
void palindromes(String candidate) {
    assertTrue(StringUtils.isPalindrome(candidate));
}
parameterized 테스트는 각각의 호출이 따로따로 report를 하기 때문에 위의 코드를 실행하면 다음과 같은 결과를 얻을 수 있습니다.
palindromes(String) ✔
├─ [1] candidate=racecar ✔
├─ [2] candidate=radar ✔
└─ [3] candidate=able was I ere I saw elba ✔
이때 ValueSource로 사용될 수 있는 것들은 [여기](JUnit 5 User Guide)서 확인할 수 있습니다.
자바에서 형변환이 가능한 것처럼 테스트 코드의 인자들에대해서도 형변환이 됩니다. 관련 내용은 여기서 확인할 수 있습니다.
Test Templates
테스트 템플릿 메서드는 일반적인 테스트가 아니라 테스트 케이스들의 템플릿입니다.
여러번 호출 되도록 디자인이됩니다.
반복 테스트와 Parameterized 테스트는 내장된 테스트 템플릿이라 할 수 있습니다.
Dynamic Test
테스트들은 static하기 때문에, 컴파일 된 이후에 런타임에 일어나는 그 어떠한 것으로도 테스트의 동작을 변경할 수 없습니다.
물론 Assumption이 동적인 동작의 기본 형태를 제공하지만, 그 표현에는 한계가 있습니다.
이런 단점을 해결하기 위해서 JUnit 주피터에는 @TestFactory를 통해서 팩토리 메서드에 의해 런타임에 생성되는 동적인 테스트를 가질 수 있습니다.
@Test 메서드와 다르게 @TestFactory 메서드는 테스트가 아니라 테스트를 위한 팩토리입니다.
그렇기 때문에 동적 테스트는 팩토리의 생성물이라 할 수 있습니다.
@TestFactory 메서드는 반드시 다음 중 하나를 오직 하나만 리턴해야합니다.
DynamicNode, Stream, Collection, Iterable, Iterator, DynamicNode의 배열의 인스턴스
이때 DynamicNode의 인스턴스화 할 수 있는 subclass는 DynamicContainer와 DynamicTest 가 있습니다.
DynamicContainer 인스턴스들은 display name과 dynamic 자손 노드들의 리스트로 구성되어져있습니다. 자손노드들이 dynamic하다는 뜻은 동적 노드들의 무작위로 중첩된 계층 구조가 생성될 수 있다는 의미입니다.
DynamicTest 인스턴스는 lazy하게 실행됩니다. lazy하게 실행하면 동적이면서 비결정적인 테스트의 생성이 가능합니다.
테스트 메서드와 마찬가지로 테스트 팩토리 메서드는 private하거나 static하면 안됩니다. 또한 부가적으로 ParameterResolver에 의해서 처리될 파라미터를 선언하는 것이 가능합니다.
동적 테스트는 런타입에 생성되는 테스트입니다. 그래서 display name과 lambda 표현식이나 메서드 참조변수로서 제공될 수 있는 동적 태스트의 실행 결과를 의미하는 @FunctionalInterface로 구성됩니다. 이때 @FunctionalInterface는 Executable하다고 합니다.
주의사항
동적 테스트의 생명 주기
동적 테스트의 실행 생명 주기는 일반적인 테스트와 많이 다릅니다. 특히 개별적인 동적 테스트를 위한 생명주기 콜백이 없습니다.
이는 @BeforeEach 와 @AfterEach 메서드 그리고 이 메서드들이 상응하는 확장 콜백들이 @TestFactory 메서드용으로 실행되는 것이지 각각의 동적 테스트를 위해 실행되는 것이 아니라는 뜻입니다.
다르게 말하면, 동적 테스트를 위한 람다 표현식 내부의 테스트 필드를 접근하려할 때, 이 필드들은 콜백 메서드나 같은 @TestFactory 메서드에 의해서 생성된 개별적인 동적 테스트의 실행 사이의 콜백 메서드나 확장에 의해서는 재설정이 되지않는다는 뜻입니다.
동적 테스트의 예시코드는 다음과 같습니다.
import static example.util.StringUtils.isPalindrome;
import static org.junit.jupiter.api.Assertions.assertEquals;
import static org.junit.jupiter.api.Assertions.assertFalse;
import static org.junit.jupiter.api.Assertions.assertNotNull;
import static org.junit.jupiter.api.Assertions.assertTrue;
import static org.junit.jupiter.api.DynamicContainer.dynamicContainer;
import static org.junit.jupiter.api.DynamicTest.dynamicTest;

import java.util.Arrays;
import java.util.Collection;
import java.util.Iterator;
import java.util.List;
import java.util.Random;
import java.util.function.Function;
import java.util.stream.IntStream;
import java.util.stream.Stream;

import example.util.Calculator;

import org.junit.jupiter.api.DynamicNode;
import org.junit.jupiter.api.DynamicTest;
import org.junit.jupiter.api.Tag;
import org.junit.jupiter.api.TestFactory;
import org.junit.jupiter.api.function.ThrowingConsumer;

class DynamicTestsDemo {

    private final Calculator calculator = new Calculator();

    // This will result in a JUnitException!
    @TestFactory
    List<String> dynamicTestsWithInvalidReturnType() {
        return Arrays.asList("Hello");
    }

    @TestFactory
    Collection<DynamicTest> dynamicTestsFromCollection() {
        return Arrays.asList(
            dynamicTest("1st dynamic test", () -> assertTrue(isPalindrome("madam"))),
            dynamicTest("2nd dynamic test", () -> assertEquals(4, calculator.multiply(2, 2)))
        );
    }

    @TestFactory
    Iterable<DynamicTest> dynamicTestsFromIterable() {
        return Arrays.asList(
            dynamicTest("3rd dynamic test", () -> assertTrue(isPalindrome("madam"))),
            dynamicTest("4th dynamic test", () -> assertEquals(4, calculator.multiply(2, 2)))
        );
    }

    @TestFactory
    Iterator<DynamicTest> dynamicTestsFromIterator() {
        return Arrays.asList(
            dynamicTest("5th dynamic test", () -> assertTrue(isPalindrome("madam"))),
            dynamicTest("6th dynamic test", () -> assertEquals(4, calculator.multiply(2, 2)))
        ).iterator();
    }

    @TestFactory
    DynamicTest[] dynamicTestsFromArray() {
        return new DynamicTest[] {
            dynamicTest("7th dynamic test", () -> assertTrue(isPalindrome("madam"))),
            dynamicTest("8th dynamic test", () -> assertEquals(4, calculator.multiply(2, 2)))
        };
    }

    @TestFactory
    Stream<DynamicTest> dynamicTestsFromStream() {
        return Stream.of("racecar", "radar", "mom", "dad")
            .map(text -> dynamicTest(text, () -> assertTrue(isPalindrome(text))));
    }

    @TestFactory
    Stream<DynamicTest> dynamicTestsFromIntStream() {
        // Generates tests for the first 10 even integers.
        return IntStream.iterate(0, n -> n + 2).limit(10)
            .mapToObj(n -> dynamicTest("test" + n, () -> assertTrue(n % 2 == 0)));
    }

    @TestFactory
    Stream<DynamicTest> generateRandomNumberOfTestsFromIterator() {

        // Generates random positive integers between 0 and 100 until
        // a number evenly divisible by 7 is encountered.
        Iterator<Integer> inputGenerator = new Iterator<Integer>() {

            Random random = new Random();
            int current;

            @Override
            public boolean hasNext() {
                current = random.nextInt(100);
                return current % 7 != 0;
            }

            @Override
            public Integer next() {
                return current;
            }
        };

        // Generates display names like: input:5, input:37, input:85, etc.
        Function<Integer, String> displayNameGenerator = (input) -> "input:" + input;

        // Executes tests based on the current input value.
        ThrowingConsumer<Integer> testExecutor = (input) -> assertTrue(input % 7 != 0);

        // Returns a stream of dynamic tests.
        return DynamicTest.stream(inputGenerator, displayNameGenerator, testExecutor);
    }

    @TestFactory
    Stream<DynamicTest> dynamicTestsFromStreamFactoryMethod() {
        // Stream of palindromes to check
        Stream<String> inputStream = Stream.of("racecar", "radar", "mom", "dad");

        // Generates display names like: racecar is a palindrome
        Function<String, String> displayNameGenerator = text -> text + " is a palindrome";

        // Executes tests based on the current input value.
        ThrowingConsumer<String> testExecutor = text -> assertTrue(isPalindrome(text));

        // Returns a stream of dynamic tests.
        return DynamicTest.stream(inputStream, displayNameGenerator, testExecutor);
    }

    @TestFactory
    Stream<DynamicNode> dynamicTestsWithContainers() {
        return Stream.of("A", "B", "C")
            .map(input -> dynamicContainer("Container " + input, Stream.of(
                dynamicTest("not null", () -> assertNotNull(input)),
                dynamicContainer("properties", Stream.of(
                    dynamicTest("length > 0", () -> assertTrue(input.length() > 0)),
                    dynamicTest("not empty", () -> assertFalse(input.isEmpty()))
                ))
            )));
    }

    @TestFactory
    DynamicNode dynamicNodeSingleTest() {
        return dynamicTest("'pop' is a palindrome", () -> assertTrue(isPalindrome("pop")));
    }

    @TestFactory
    DynamicNode dynamicNodeSingleContainer() {
        return dynamicContainer("palindromes",
            Stream.of("racecar", "radar", "mom", "dad")
                .map(text -> dynamicTest(text, () -> assertTrue(isPalindrome(text)))
        ));
    }

}
테스트의 제한시간을 설정하는 방법이나 병럴로 실행하는 방법에대한 내용은 각각
[테스트 제한시간 설정](JUnit 5 User Guide), 병렬 실행에서 확인할 수 있습니다.
테스트의 실행
각 IDE에 따른 테스트 환경 설정 및 실행은 [여기](JUnit 5 User Guide)서 확인할 수 있습니다.