GitHub Repository: https://github.com/SihyeonHong/EasiestCV
이번주에 한 일
- 저번 주 작업 마무리
- 탭 내부 contents 이상하게 저장되는 거 수정하기
- Home 페이지에도 저장 버튼 따로 만들기
- 탭 관리 기능 추가하기: 탭 이름 수정, 탭 순서변경, 탭 추가 및 삭제
- 구글 클라우드 스토리지에 프로필 사진 저장하기
1. 저번 주 작업 마무리
1-1. 탭 내부 contents 이상하게 저장되는 거 수정하기
cid가 문제였다.
cid가 뭐냐면 content identifier, 그러니까 각 TabContent마다의 고유한 식별자인데 내가 이걸 바보같이
cid: Math.random()코드에서는 이렇게 해서 0.xxxxxx 이렇게 소수로 설정해놓고는
DB에서 이걸 int로 설정해둔 것이다.
그래서 결국 이게 DB에 들어갈 때 반올림되어 0 or 1로 들어가게 되면서
(cid 주면서) 이거 삭제해줘! -> 모든 cid가 0 or 1로 판단됨 -> DB 내용물의 절반이 랜덤하게 삭제됨
이라는 타노스스러운 상황이 발생한 것.
cid: Math.random() * 10000000,대충 이렇게 만들어줬더니 이제 잘 된다.
아 그리고 삭제 시에 reindex를 깜빡했더라.
어차피 저장 버튼에서 reindex 해주긴 하는데 그래도 저장 안 하고 막 삭제하고 새 column 만들고 하다보면 인덱스가 꼬일 수도 있겠다 싶어서 삭제 시에도 한 번 더 reindex해주기로 했다.
  const deleteColumn = (cid: number) => {
    const confirm = window.confirm("정말 삭제하시겠습니까?");
    if (!confirm) return;
    const newContents = contents.filter((content) => content.cid !== cid);
    const reindex = newContents.map((content, index) => ({
      ...content,
      corder: index,
    }));
    setContents(reindex);
  };
1-2. Home 탭에 저장 버튼 따로 만들기
그냥 코드 옮겨 온 게 전부
  const handleSaveBtn = async () => {
    // update redux into db
    const res = await axios
      .put("/api/put/home", userinfo)
      .then((res) => {
        alert("저장되었습니다.");
      })
      .catch((err) => {
        console.log(err);
      });
  };
원래 '저장하고 로그아웃' 이라는 이름의 기능이었어서 api 이름이 put logout이었는데, 보다시피 put home으로 수정했다.
근데 UI상 자기소개 부분만 저장하는 버튼처럼 보이는 게 좀 마음에 걸린다.
나중에 이미지 저장을 어떻게 할지 기능 구현을 해보고, 이미지랑 자기소개 저장을 따로 할지 같이 할지 정해서 디자인을 수정하든지 해야겠다.
2. 탭 관리
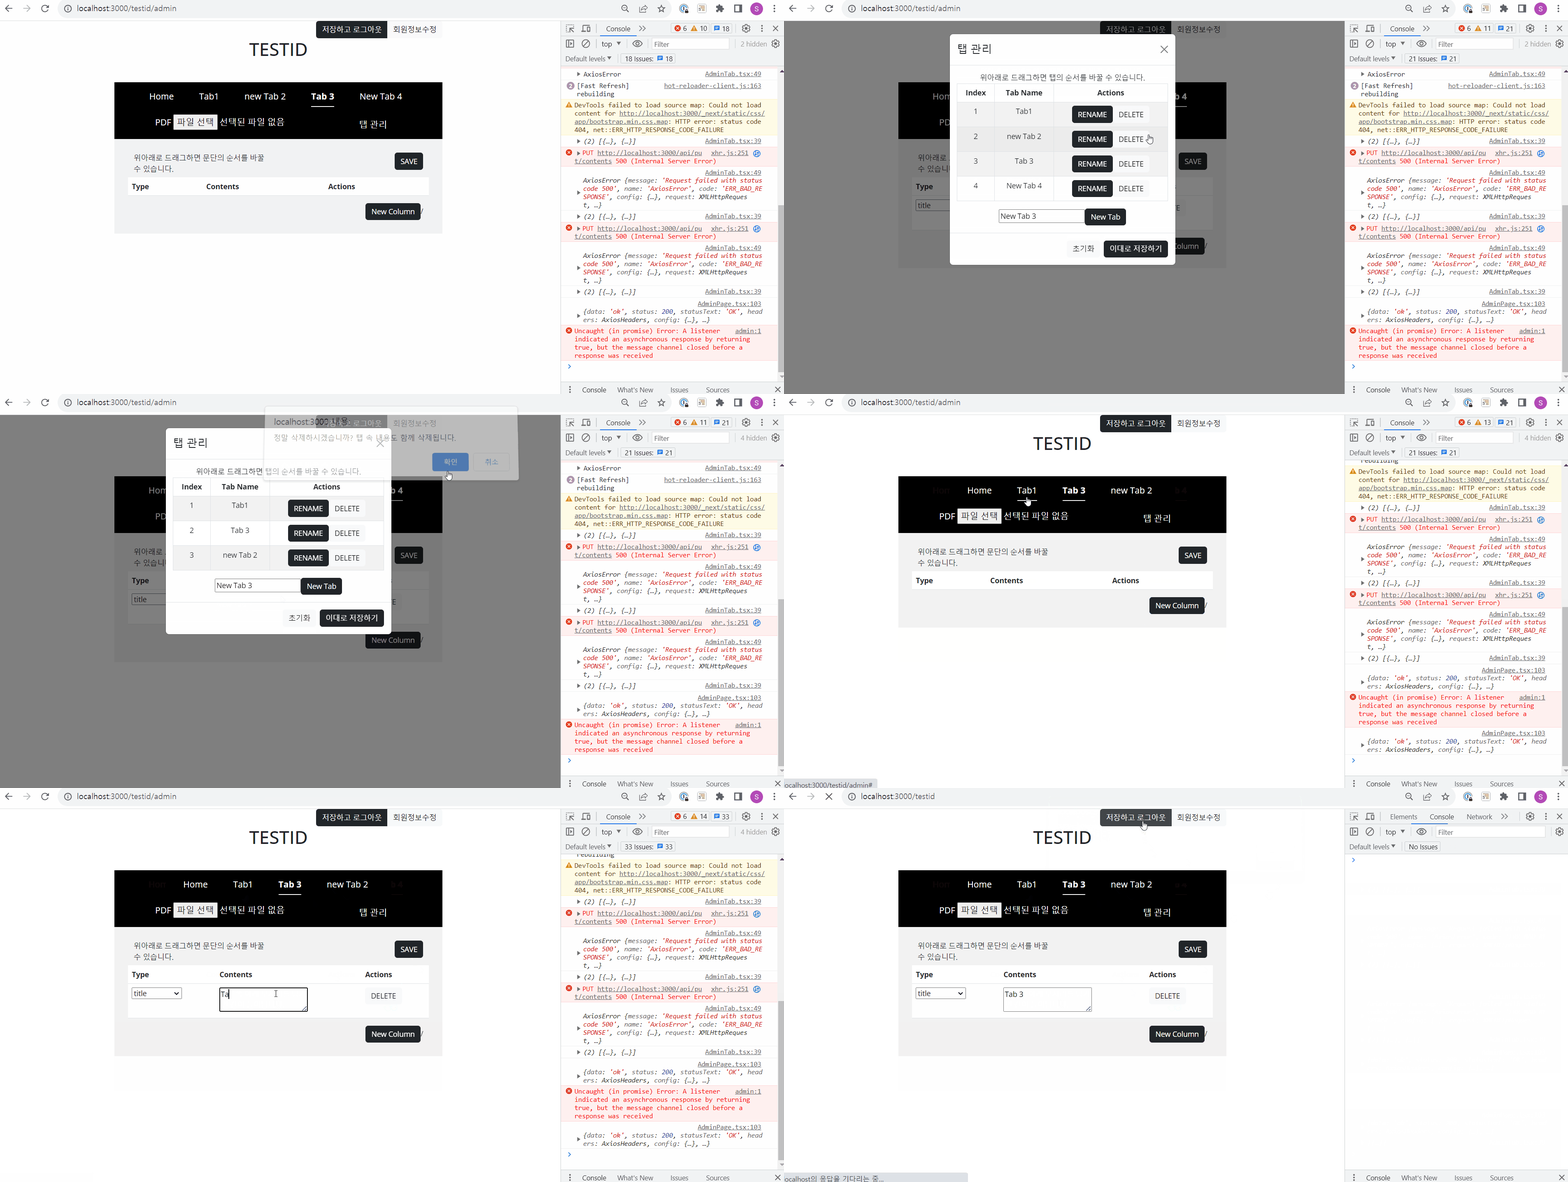
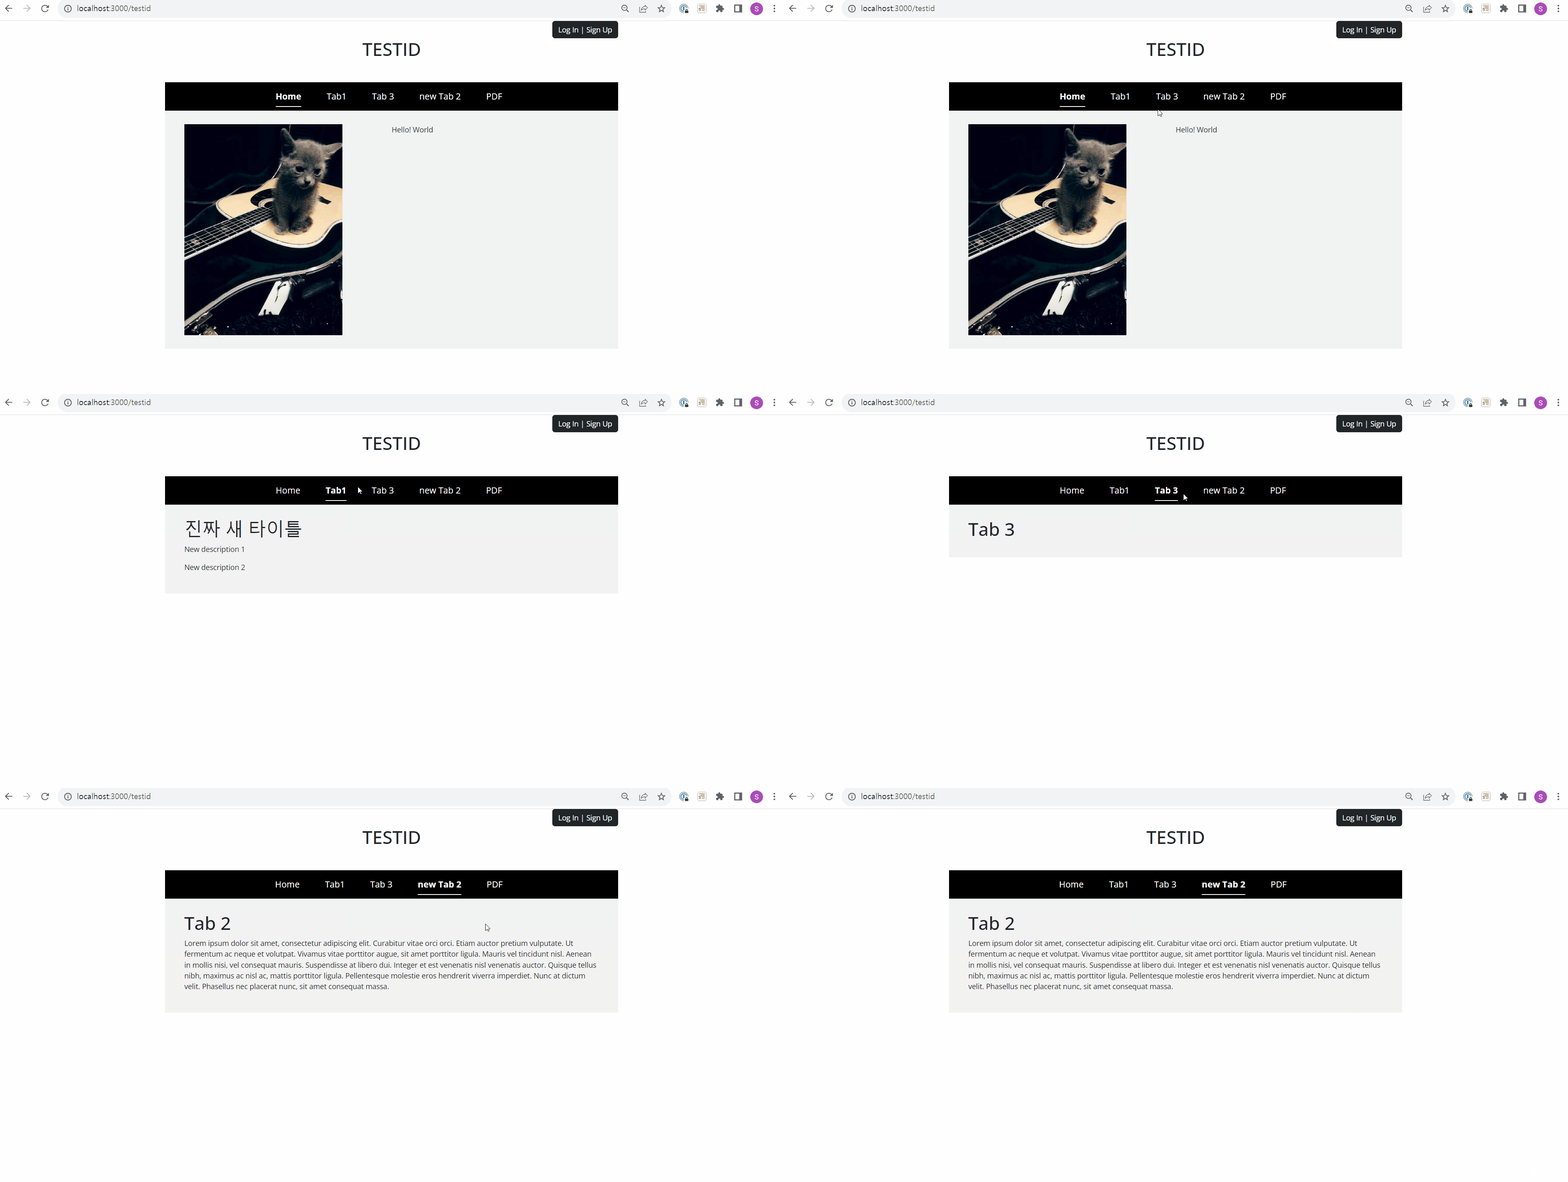
탭 추가, 삭제, 이름 변경, 순서 변경 기능을 구현했다.
순서 변경 기능은 저번 주 Weekly Progress 참고.
프론트엔드
export default function AdminPage() {
  const userid = useSelector((state: RootState) => state.userinfo.userid);
  const tabs = useSelector((state: RootState) => state.tabs);
  const dispatch = useDispatch<AppDispatch>();
  const [tabstate, setTabstate] = useState<Tab[]>(tabs);

  const [activeKey, setActiceKey] = useState<number>(0);
  const [show, setShow] = useState(false);

  const handleClose = () => {
    setTabstate(tabs);
    setShow(false);
  };
  const handleShow = () => {
    setTabstate(tabs);
    setShow(true);
  };

  const [newTabName, setNewTabName] = useState<string>("New Tab");

  const addTab = () => {
    setTabstate([
      ...tabstate,
      {
        userid,
        tid: Math.random() * 1000000,
        tname: newTabName,
        torder: tabstate.length,
      },
    ]);
  };
  const deleteTab = (tid: number) => {
    const confirm = window.confirm(
      "정말 삭제하시겠습니까? 탭 속 내용도 함께 삭제됩니다."
    );
    if (!confirm) return;
    const newTabstate = tabstate.filter((tab) => tab.tid !== tid);
    const reindex = newTabstate.map((tab, index) => ({
      ...tab,
      torder: index,
    }));
    setTabstate(reindex);
  };
  const updateTab = (tid: number, newTabName: string) => {
    setTabstate(
      tabstate.map((tab) =>
        tab.tid === tid ? { ...tab, tname: newTabName } : tab
      )
    );
  };
  //save reference for dragItem and dragOverItem
  const dragItem = useRef<any>(null); // 내가 드래그중인 아이템
  const dragOverItem = useRef<any>(null); // 내가 드래그하고 있는 아이템이 들어갈 위치

  //const handle drag sorting
  const handleSort = () => {
    //duplicate items
    let _tabstate = [...tabstate];

    //remove and save the dragged item content
    const draggedItemContent = _tabstate.splice(dragItem.current, 1)[0];

    //switch the position
    _tabstate.splice(dragOverItem.current, 0, draggedItemContent);

    // update torder based on the current index
    _tabstate = _tabstate.map((item, index) => ({
      ...item,
      torder: index,
    }));

    //reset the position ref
    dragItem.current = null;
    dragOverItem.current = null;

    //update the actual array
    setTabstate(_tabstate);
  };

  const renameTab = (tid: number) => {
    const newTabName = window.prompt("새 탭 이름을 입력하세요.");
    if (!newTabName) return;
    updateTab(tid, newTabName);
  };

  const saveTab = () => {
    // TODO: save tabstate to redux
    dispatch({ type: "tabs/setTabs", payload: tabstate });
    const res = axios
      .put("/api/put/tabs", tabstate)
      .then((res) => {
        console.log(res);
      })
      .catch((err) => {
        console.log(err);
      });
    handleClose();
  };

  return (
  ...
  );
}- JSX 부분은 큰 변화가 없어서 생략.
- 탭 상태 변화를 실시간으로 보여주기 위해 Redux store에 있는 tab 말고 따로 tabstate라는 이름의 state를 만들었다. 이건
탭 관리모달창 안에서만 쓰인다.이대로 저장하기버튼을 누르면 이걸 Redux store로 보내서 NavBar에도 보여주는 식. DB에도 이때 전송된다.
백엔드
import { NextApiRequest, NextApiResponse } from "next";
import { query } from "../../../util/database";
import { Tab } from "@/redux/store";

export default async function handler(
  req: NextApiRequest,
  res: NextApiResponse
) {
  if (req.method === "PUT") {
    // console.log("put_tabs: ", req.body);
    const body: Tab[] = [...req.body];

    try {
      const currentTabs = await query(
        "SELECT tid FROM `easiest-cv`.tabs WHERE userid = ? ",
        [body[0].userid]
      );

      // DB에 있는 탭 목록
      const currentTids = currentTabs.map((tab: Tab) => tab.tid);

      // FE에서 요청받은 탭 목록
      const receivedTids = body.map((tab: Tab) => tab.tid);

      // 새로 추가된 탭
      const newTids = receivedTids.filter(
        (tid: number) => !currentTids.includes(tid)
      );

      // 삭제된 탭
      const deletedTids = currentTids.filter(
        (tid: number) => !receivedTids.includes(tid)
      );

      // 삭제된 탭과 그 내용물 제거
      await Promise.all(
        deletedTids.map(async (tid: number) => {
          await query(
            "DELETE FROM `easiest-cv`.tabs WHERE userid = ? and tid = ?",
            [body[0].userid, tid]
          );
          return query(
            "DELETE FROM `easiest-cv`.contents WHERE userid = ? and tid = ?",
            [body[0].userid, tid]
          );
        })
      );

      // 새로운 탭 추가
      await Promise.all(
        body
          .filter((tab: Tab) => newTids.includes(tab.tid))
          .map(async (tab: Tab) => {
            return query(
              "INSERT INTO `easiest-cv`.tabs (userid, tid, tname, torder) VALUES (?,?,?,?)",
              [tab.userid, tab.tid, tab.tname, tab.torder]
            );
          })
      );

      // 기존 탭 업데이트 (어 이걸 먼저 하면 새로운 탭 아이디 못찾아서 에러 나는 거 아니냐)
      await Promise.all(
        body.map(async (tab: Tab) => {
          return query(
            "UPDATE `easiest-cv`.tabs SET torder = ?, tname = ? WHERE userid = ? and tid = ?",
            [tab.torder, tab.tname, tab.userid, tab.tid]
          );
        })
      );

      res.status(200).json("ok");
    } catch (e: any) {
      console.log("server error", e);
      res.status(500).json({ message: e.message });
    }
  }
}

/* put_tabs:  [
      { userid: 'testid',
        tid: 1,
        tname: 'Tab1',
        torder: 0
      },
      {
        userid: 'testid',
        tid: 982746.9207177691,
        tname: 'tab2',
        torder: 1
      }
]*/- DB에서 기존 탭 가져오기 -> 프론트엔드에서 요청받은 탭 목록과 비교하기 -> 삭제된 탭 제거 -> 새로운 탭 추가 -> 기존 탭 업데이트 순으로 진행된다.
currentTids와 currentTabs의 차이
SELECT tid FROM table 쿼리의 결과:
[ { tid: 1 }, { tid: 2 }, { tid: 3 } ]currentTabs는 이렇게 생긴 배열이다. 그래서 currentTids가 한 번 더 map으로 걸러주는 것.
여기서 Promise.all()이 3개 있잖아(새로운 탭, 삭제된 탭, 기존 탭 업데이트). 이 3가지 작업은 동시에 수행되는 거야?
헷갈려서 ChatGPT한테 물어봄.
아니요, 여기서 세 개의 Promise.all() 구문은 순차적으로 실행됩니다. 즉, 첫 번째 Promise.all()에서 모든 프로미스가 완료된 후에 두 번째 Promise.all()이 실행되고, 두 번째에서 모든 프로미스가 완료된 후에 세 번째 Promise.all()이 실행됩니다.
자바스크립트에서 async/await 문법을 사용하면 await 키워드 다음에 있는 프로미스가 완료될 때까지 다음 줄의 코드 실행을 중지합니다.
여기서 각 Promise.all() 구문 앞에 await 키워드가 있기 때문에, 각 Promise.all()은 완전히 완료된 후에 다음 Promise.all()이나 다음 코드 라인이 실행됩니다.
따라서 코드의 흐름은 다음과 같습니다:
- 새로운 컬럼 추가
- 추가된 컬럼들에 대한 모든 쿼리가 완료될 때까지 기다림
- 삭제된 컬럼 제거
- 삭제 쿼리들이 완료될 때까지 기다림
- 기존 컬럼 업데이트
- 업데이트 쿼리들이 완료될 때까지 기다림
이렇게 await를 사용하면 여러 비동기 작업을 순차적으로 처리할 수 있습니다.
3. 구글 클라우드 스토리지에 프로필 사진 저장하기
구글 클라우드 스토리지를 선택한 이유: 월 5GB까지 무료라서
난 AWS 프리티어는 학교 다닐 때 만료된 지 오래다...ㅎㅎ
단계 요약
- Google Cloud Console에서 새 프로젝트 및 새 버킷 생성
- 인증을 위한 서비스 키 생성
- Next.js에서 GCS 이용하는 코드 구현
- Google Cloud Storage 라이브러리 설치
- Next.js에 GCS 클라이언트 인증 및 초기화 구현
- GCS 파일 업로드&다운로드 함수 구현
- API Route 구현해서 파일 업로드&다운로드 기능 완료
3-1. Google Cloud Console에서 새 프로젝트 및 새 버킷 생성
-
Google Cloud Console 에 들어간다.
-
이 프로젝트 드롭다운을 클릭한다.

-
우측 상단
새 프로젝트클릭
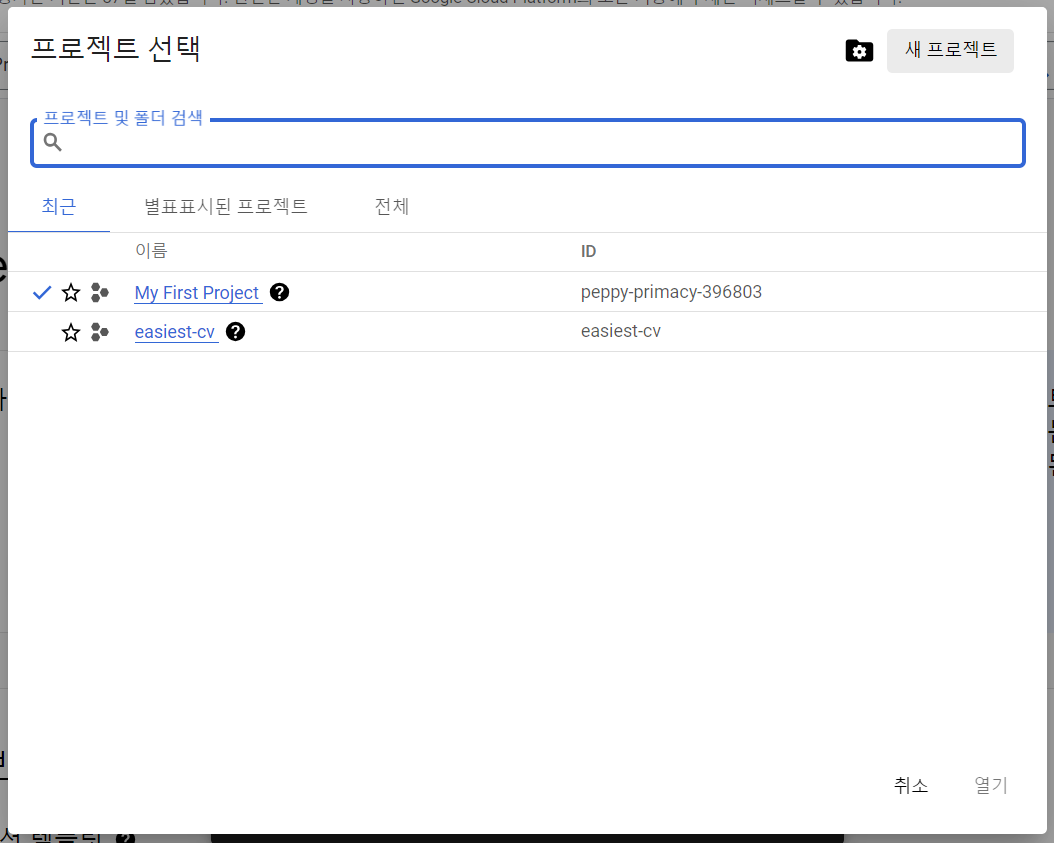
-
프로젝트 이름을 입력한다.
-
프로젝트 이름을 선택하거나 다음 사진에서의 경로대로 따라가서
버킷을 클릭한다.
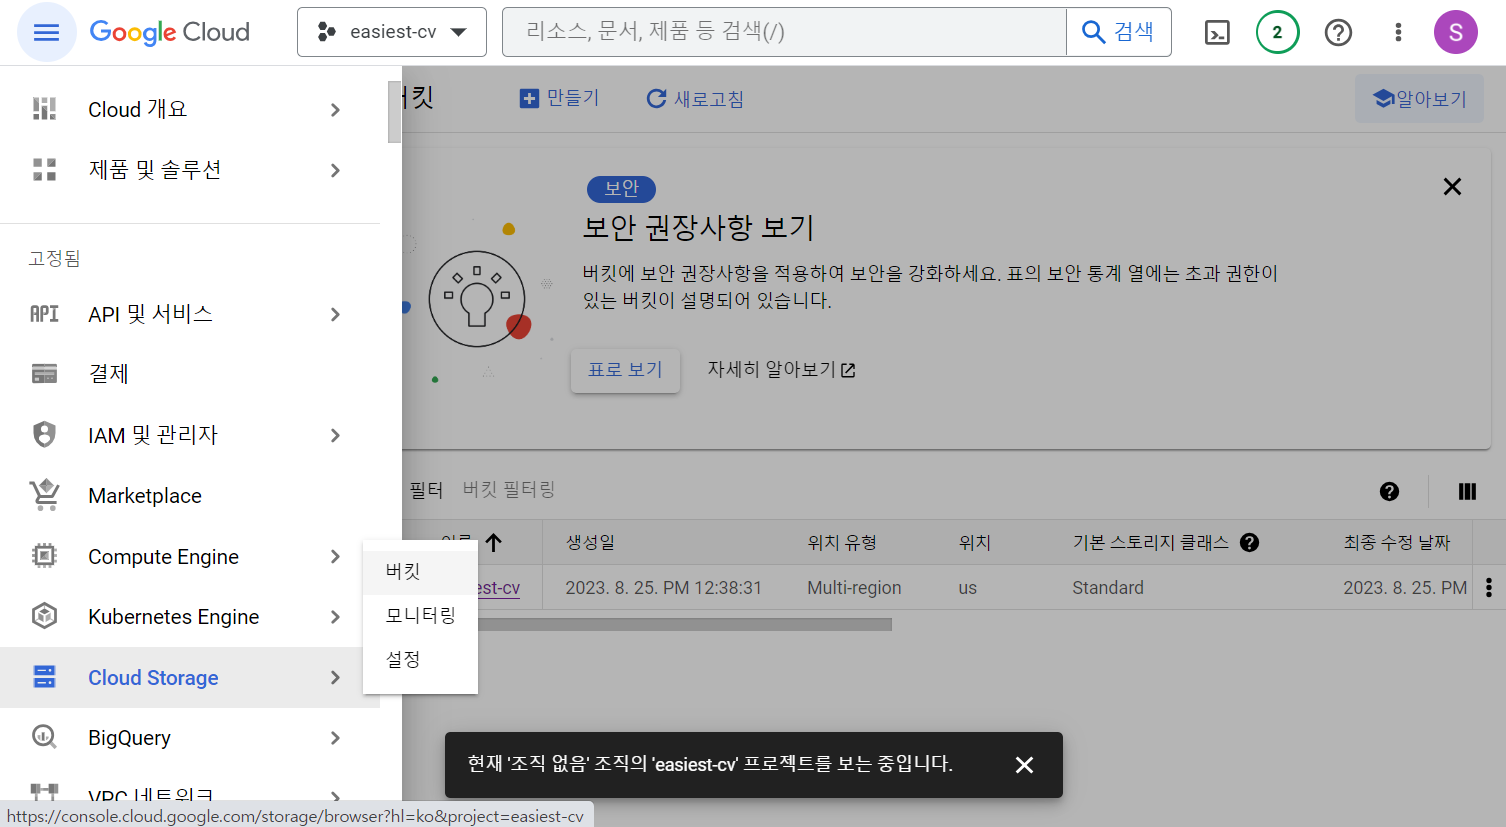
만들기버튼을 눌러 새 버킷을 생성한다.
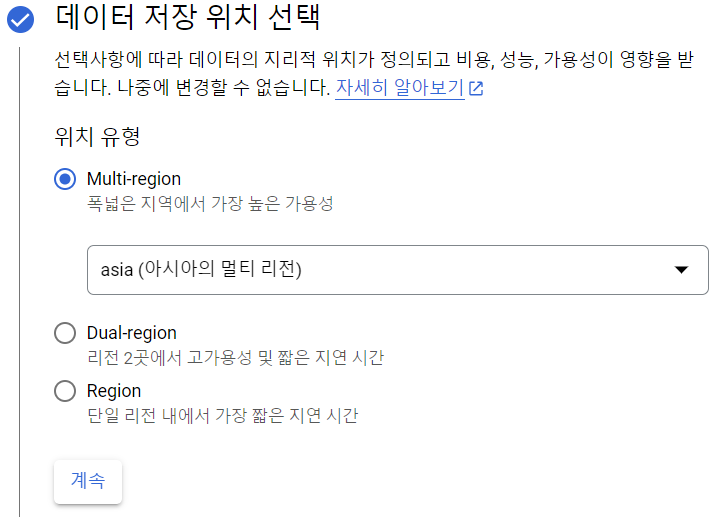
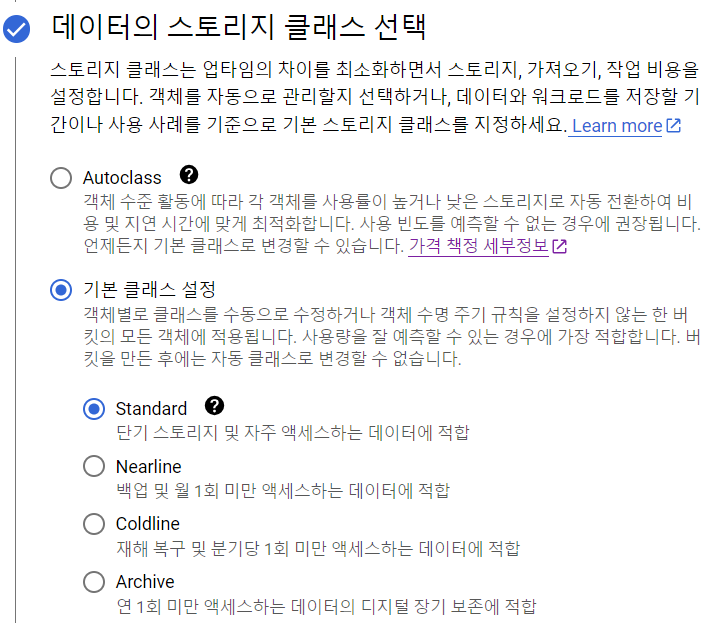
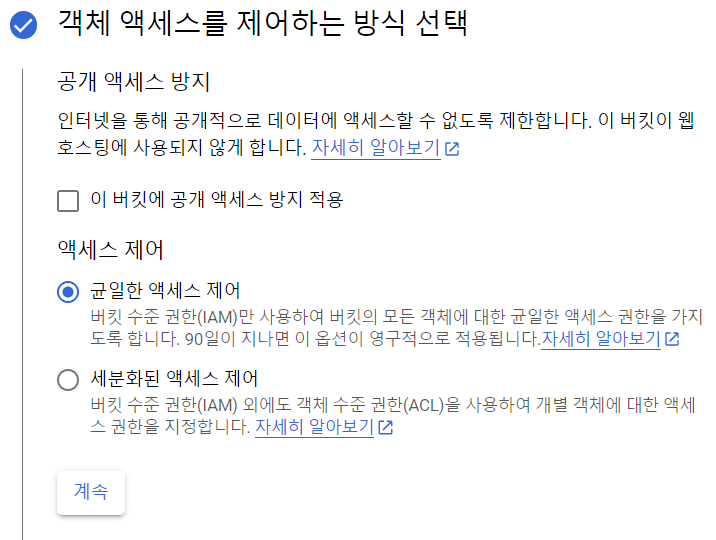
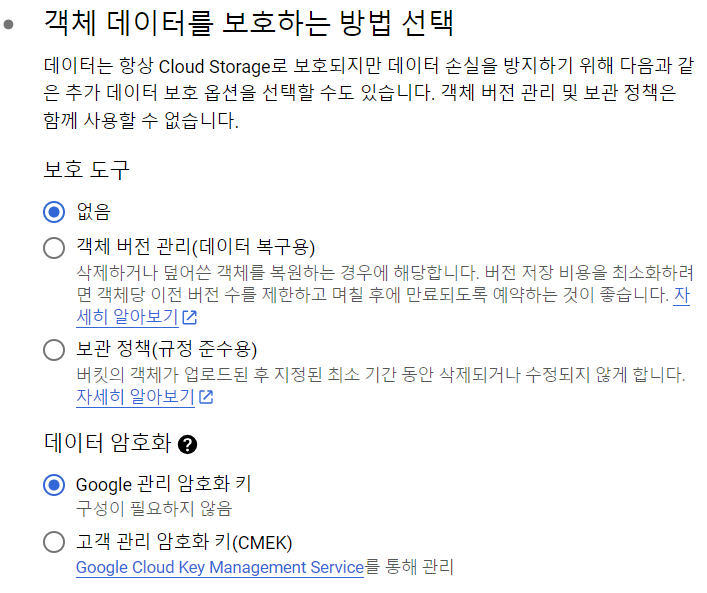
나는 다음과 같은 설정으로 했다. 솔직히 다른 건 잘 몰라서 적당히 골랐고,
공개 엑세스 방지 적용만 해제했다.
왜냐하면 내가 이 클라우드에 넣을 데이터는 사용자의 프로필 사진과 이력서 PDF 파일,
즉 사용자가 모두에게 보여주기 위한 자료들이기 때문이다.
3-2. 인증을 위한 서비스 키 생성
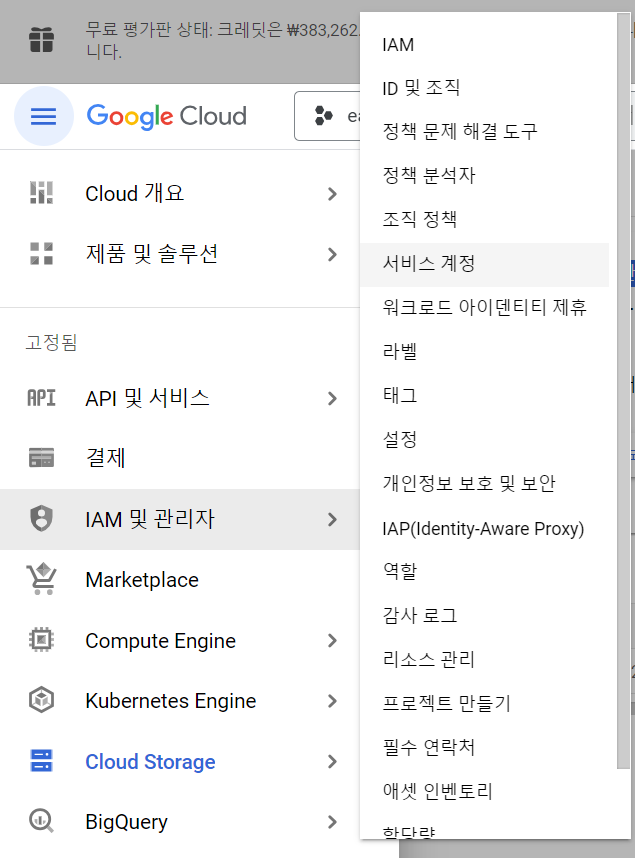
- 위 사진 속 경로로 이동한다.
서비스 계정 만들기버튼을 클릭해서 적당히 계정 이름 지어준 다음에 완료 눌러서 서비스 계정을 생성한다.- 서비스 계정 목록에서 방금 만든 계정을 클릭한다.
- 키 탭을 클릭하고 키 추가 -> 새 키 만들기 -> JSON 선택
- JSON 파일이 자동으로 다운로드된다.
이 JSON 키는 절대! 절대! 공개하면 안 된다! 깃헙에 함부로 올리면 안 된다!
JSON 파일은 대충 이렇게 생겼다.
{
  "type": "service_account",
  "project_id": !@#$%
  "private_key_id": !@#$%
  "private_key": !@#$%,
  "client_email": !@#$%,
  "client_id": !@#$%,
  "auth_uri": !@#$%,
  "token_uri": !@#$%,
  "auth_provider_x509_cert_url": !@#$%,
  "client_x509_cert_url": !@#$%,
  "universe_domain": !@#$%,
}
3-3. Next.js에서 GCS 이용하는 코드 구현
이제 우리 코드로 돌아가 보자.
3-3-1. Google Cloud Storage 라이브러리 설치
npm install @google-cloud/storage3-3-2. Next.js에 GCS 클라이언트 인증 및 초기화 구현
나는 /src/util/gcs.ts 파일을 만들어서 여기에 집어넣었다.
import { Storage } from "@google-cloud/storage";

const storage = new Storage({
  keyFilename: "path_to_your_service_account_json_file.json",
  projectId: "your_project_id"
});

const bucket = storage.bucket("your_bucket_name");
3-3-3. GCS 파일 업로드&다운로드 함수 구현
위와 같은 파일에 계속해서 코드를 작성했다.
import { Storage } from "@google-cloud/storage";

const storage = new Storage({
  keyFilename: "path_to_your_service_account_json_file.json",
  projectId: "your_project_id"
});

const bucket = storage.bucket("your_bucket_name");

export const uploadFile = async (
  filename: string,
  buffer: Buffer,
  type: "image" | "pdf"
) => {
  const file = bucket.file(filename);
  const stream = file.createWriteStream({
    metadata: {
      contentType: type === "image" ? "image/*" : "application/pdf",
    },
  });

  stream.on("error", (err) => {
    console.error("File upload error:", err);
  });

  stream.on("finish", () => {
    console.log(`File ${filename} uploaded successfully.`);
  });

  stream.end(buffer);
};

export const downloadFile = async (filename: string) => {
  const file = bucket.file(filename);

  return new Promise((resolve, reject) => {
    let chunks: Buffer[] = [];
    file
      .createReadStream()
      .on("data", (chunk) => chunks.push(chunk))
      .on("error", (err) => reject(err))
      .on("end", () => resolve(Buffer.concat(chunks)));
  });
};
4. API Route 구현해서 파일 업로드&다운로드 기능 완료
/src/pages/api/post/upload.ts
그냥 시험 삼아 이렇게 작성해서 이미지 파일을 하나 전송해 봤더니
import { NextApiRequest, NextApiResponse } from "next";

export default async function handler( req: NextApiRequest, res: NextApiResponse ) {
	if (req.method === "POST") {
		console.log(req.body);
	}
	res.status(200).json("ok");
}
서버 콘솔창에 이런 식으로 사정없이 깨져서 나온다.
���=���m�̍��cTT\�tYrXW�Au�7�\����5}�ѓ���w>�Z����u}��]��N�1����k�:�����MV K��_k��������<���G��Q���Q���*-�@a�V=]Gt�c���>Y٣.���=�����~k�g.X�ù6j62+$��)V���Uʸ�� ����.+}%~��䱺��=G��Vkd��H�k0~���-ƚ�:����fa�0A�W�@E������Z͕Tc����l�k�V��ڬ�mFf����x\O�6�?�29��'�{>���IEND�B`�
------WebKitFormBoundaryS4ccxsLgqGnD2ESu--정상이다. 파일은 바이너리 형태로 전송되므로 텍스트로 바로 출력하려고 하면 이렇게 나오는 게 맞다.
이미지 파일을 파싱하고 처리하려면 multer와 같은 라이브러리를 미들웨어로 사용해야 한다.
npm install multer
npm install @types/multer
위는 기본, 아래는 타입스크립트용.
import { NextApiRequest, NextApiResponse } from "next";
import multer from "multer";

// Disable Next.js's built-in body parser to allow multer to handle the form data
export const config = {
  api: {
    bodyParser: false,
  },
};

const upload = multer({ storage: multer.memoryStorage() }).single("image");

export default function handler(req: NextApiRequest, res: NextApiResponse) {
  if (req.method === "POST") {
    upload(req, res, (err) => {
      if (err) {
        return res.status(500).json({ error: "Image upload failed." });
      }

      // Access the image file here
      const imageFile = req.file;

      console.log(imageFile);  // The image file details will be displayed in the log

      // Depending on your use case, you can store the image elsewhere,
      // transform it, or use it in any other way.

      res.status(200).json("Image uploaded successfully.");
    });
  } else {
    res.status(405).json({ error: "Method not allowed" });  // Only POST method is allowed
  }
}
아직 안 된다. req에서 빨간 줄이 뜰 것이다.
multer는 Express.js를 기반으로 하기 때문에 Next.js의 NextApiRequest 타입과 multer에서 기대하는 Request 타입이 서로 호환되지 않아서 발생하는 문제이다.
고백하자면 이거 아직 해결 못 했다.
구글링해보니 next-connect 라는 라이브러리를 써서 해결하는 방법이 나오던데 안 되더라.
한 이틀 붙잡고 있다가 이게 일단 타입 문제라니까 잠시 편법을 써서 스킵해 두기로 했다.
export default function handler(req: any, res: any) {일단 이렇게 any 타입으로 설정한 것이다.
그랬을 때 console.log(req.file) 은 다음과 같이 찍힌다.
{
  fieldname: 'image',
  originalname: 'MVC.png',
  encoding: '7bit',
  mimetype: 'image/png',
  buffer: <Buffer 89 50 4e 47 0d 0a 1a 0a 00 00 00 0d 49 48 44 52 00 00 03 02 00 00 02 3d 08 06 00 00 00 89 e7 cf 74 00 00 00 04 67 41 4d 41 00 00 b1 8f 0b fc 61 05 00 ... 25199 more bytes>,
  size: 25249
}
그래서 업로드 API는 다음과 같이 구현했다.
import { NextApiRequest, NextApiResponse } from "next";
import multer from "multer";
import { uploadFile } from "@/util/gcs";

// Disable Next.js's built-in body parser to allow multer to handle the form data
export const config = {
  api: {
    bodyParser: false,
  },
};

const upload = multer({ storage: multer.memoryStorage() }).single("image");

export default function handler(req: any, res: any) {
  if (req.method === "POST") {
    upload(req, res, async (err) => {
      if (err) {
        return res.status(500).json({ error: "Image upload failed." });
      }

      // Access the image file here
      const imageFile = req.file;

      // Upload the image to GCS
      try {
        const uniqueFilename = `${Date.now()}-${imageFile.originalname}`; // To ensure filename is unique
        await uploadFile(uniqueFilename, imageFile.buffer, "image");

        // Construct the public URL for the uploaded image
        const imageUrl = `https://storage.googleapis.com/easiest-cv/${uniqueFilename}`;

        // save this url to DB
        const result = await query(
          "UPDATE `easiest-cv`.userinfo SET img = ? WHERE userid = ?",
          [imageUrl, "testid"]
        );
        res.status(200).json({ imageUrl: imageUrl });
        return;
      } catch (gcsError) {
        console.error("Failed to upload image to GCS:", gcsError);
        res.status(500).json({ error: "Failed to upload image to GCS." });
        return;
      }
    });
  } else {
    res.status(405).json({ error: "Method not allowed" }); // Only POST method is allowed
  }
}- 서로 다른 사용자가 같은 이름의 파일을 올린다든지 할 수도 있으니까, 날짜를 이용해 유니크하게 파일명을 바꿨다.
프론트엔드
AdminHome.tsx
  ...
  const [selectedImg, setSelectedImg] = useState<File | null>(null);
  ...
    const handleImgChange = (e: React.ChangeEvent<HTMLInputElement>) => {
    if (e.target.files && e.target.files[0]) {
      setSelectedImg(e.target.files[0]);
    }
  };

  const handleImgUpload = async () => {
    if (!selectedImg) return;
    const formData = new FormData();
    formData.append("image", selectedImg);
    const res = await axios
      .post("/api/post/upload", formData, {
        headers: {
          "Content-Type": "multipart/form-data",
        },
      })
      .then((res) => {
        alert("이미지가 업로드되었습니다.");
        if (res.data.imageURL) {
          dispatch(setUserInfo({ ...userinfo, img: res.data.imageURL }));
        }
      })
      .catch((err) => {
        console.log(err);
      });
  };
  ....
  <img className="profile-img" src={userinfo.img} />
이미지 파일을 formData 형식으로 전송했다.
userinfo.img에는 https://storage.googleapis.com/easiest-cv/파일명 과 같은 string이 들어있다.
공개 읽기 권한 설정
나는 이 버킷에 프로필 사진과 공개용 PDF파일만 담을 예정이라 버킷 자체를 공개 설정할 것이다.
1. 버킷에 들어가 권한 탭을 들어간다.
2. 밑으로 내려서 액세스 권한 부여 버튼을 클릭한다.
3. 구성원 추가 필드에 allUsers 라고 입력한다.
4. 아래 역할 설정에서 Cloud Storage > 저장소 객체 뷰어(Storage Object Viewer) 를 선택한다
이렇게 설정하면 버킷 내의 모든 객체에 대해 storage.objects.get 권한이 부여되어 누구나 접근할 수 있다.
이제 https://storage.googleapis.com/버킷명/파일명 에 들어가면 파일을 열어볼 수 있는 것이다.
총평
GCS 때문에 좀 헤멨는데 다 하고 나니까 재밌었다고 미화되는 것 같다.
이미지 했으니까 pdf 파일도 똑같이 하면 될 거고.
이제 회원정보수정 기능만 넣으면 얼추 기능은 완성이다.
물론 수정해야 할 부분이 많지만.
예를 들어 비로그인 화면에 들어갈 때 맨 처음에 No Such User가 디폴트로 1초 정도 떴다가 DB에서 해당 유저를 찾고 나서야 사이트가 제대로 뜨는 문제라든가.
탭 간 이동 시 get이 제대로 안 되는 문제도 있고,
텍스트 입력 칸도 너무 조그맣다. 저번에 리액트로 만들 땐 사이즈 컸었는데 왜 작아졌는지도 알아봐야 한다.
아무튼 다음 주에는 대충이나마 완성이 될 것이다.
배포까지 가능했으면 좋겠다. 내가 아직 배포를 안 배워봐서 금방 되는건지 어떤지 잘 모르겠다.
딱 10주차에 완성되면 참 예쁠 텐데.
