1. 모델관리
머신러닝 모델링도 많은 실험을 하게 되는데, 베스트 레시피를 가지고 앞으로 사용하게 될 것.
그런데, 이 때 생기는 여러 부산물들에 대해서 관리하지 않으면 무엇이 베스트 레시피인지, 재현 가능한지, 지켜야할 규칙들에 대해 지켰는지 확인이 불가하게 된다.
- 모델관리 기본
- 모델 메타데이터
모델 메타데이터는 모델이언제만들어졌고,어떤 데이터를 사용해 만들어졌는지 그리고성능은 어떠한지 저장된 데이터 - 모델 아티팩트
모델 아티팩트란 모델의 학습된 결과물로써 모델 파일(pickle, joblib 등)을 의미함 - Feature/Data
모델을 위한Feature,DataData도 버전에 따라 업데이트가 될 수 있음 (레이블링 변경 등)
- 모델 메타데이터
1.1 이런 것을 잘 관리하는 것이 바로 ML flow이다.
- 핵심기능
- Experiment Management & Tracking
- 머신러닝 관련
실험들을 관리하고 각 실험들의 내용을 기록할 수 있음 - 예들 들어, 여러 사람이 하나의 MLflow 서버 위에서 각자 자기 실험을 만들고 공유 가능
- 실험을 정의하고 실험을 실행할 수 있음 이 실행은 머신러닝 훈련 코드를 실행한 기록!
- 각 실행에 사용한 소스코드, 하이퍼파라미터, Metric, 부산물(모델 Artifact, Chat Image)등을 저장
- 머신러닝 관련
- Model Registry
- MLflow로 실행한 머신러닝 모델을 Model Registry(모델 저장소)에 등록할 수 있음
- 모델 저장소에 모델이 저장될 때마다 해당 모델에 버전이 자동으로 올라감 (1 > 2 > 3)
- Model Registry에 등록된 모델은 다른 사람들에게 쉽게 공유 가능하고, 쉽게 활용 가능
- Model Serving
- Model Registry에 등록한 모델을 REST API형태의 서버로 Serving할 수 있음
- Input = Model의 Input
- Output = Model의 Output
- 직접 Docekr Image를 만들지 않아도 생성 가능
- Experiment Management & Tracking
- ML flow Core Component
- Tracking
- 머신러닝 코드 실행, 로깅을 위한 API
- 파라미터, 코드 버전, Metric, Artifact 로깅
- 웹 UI도 제공
- MLflow Tracking을 사용해 여러 실험 결과를 쉽게 기록하고 비교할 수 있음
- 팀에선 다른 사용자의 결과와 비교하며 협업
- Model Registry
- 모델 관리를 위한 체계적인 접근 방식을 제공
- 모델의 버전 관리
- 태그, 별칭 지정, 버저닝, 계보를 포함한 모델의 전체 수명 주기를 관리
- Project
- 머신러닝 코드, Workflow, Artifact의 패키징을 표준화
- 재현이 가능하도록 관련된 내용을 모두 포함하는 개념
- Tracking
1.2 MLflow Hello World
pip install mlflow==2.10.0
mlflow server --host 127.0.0.1 --port 8080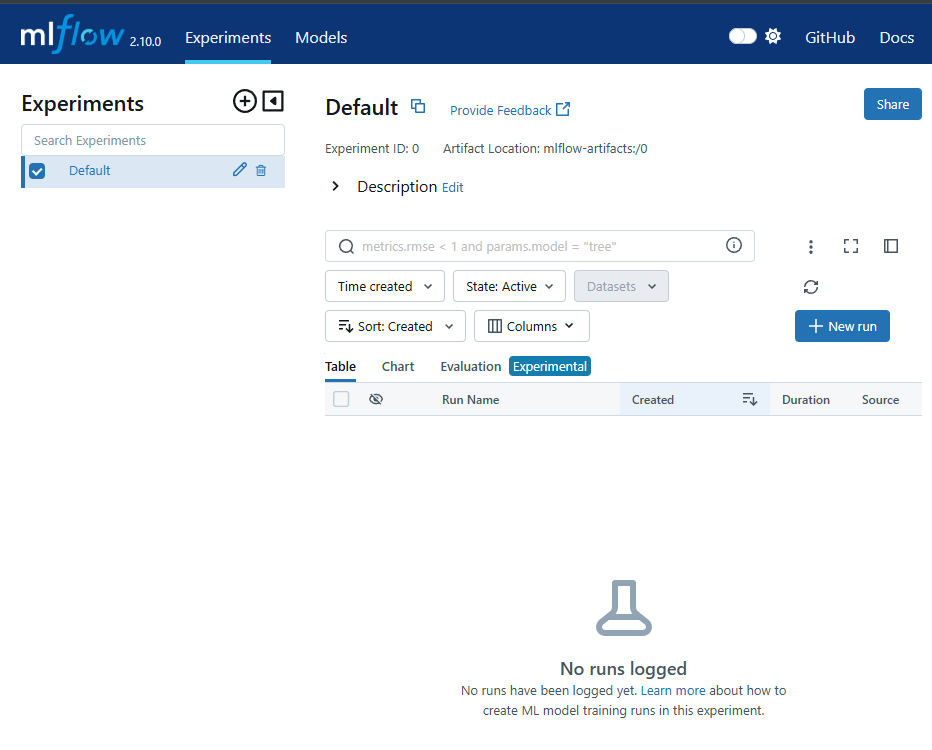
-
Experiment(실험): 프로젝트 폴더와 유사하다.
-
MLFlow에서 제일 먼저 Experiment를 생성
-
하나의 Experimnet는 진행하고 있는 머신러닝 프로젝트 단위로 구성
- 예: 개/고양이 이미지 분류 실험, 택시 수요량 예측 분류 실험
-
정해진 Metric으로 모델을 평가
- 예: RMSE, MSE, MAE, Accuracy
-
하나의 Experiment는 여러 Run(실행)을 가짐
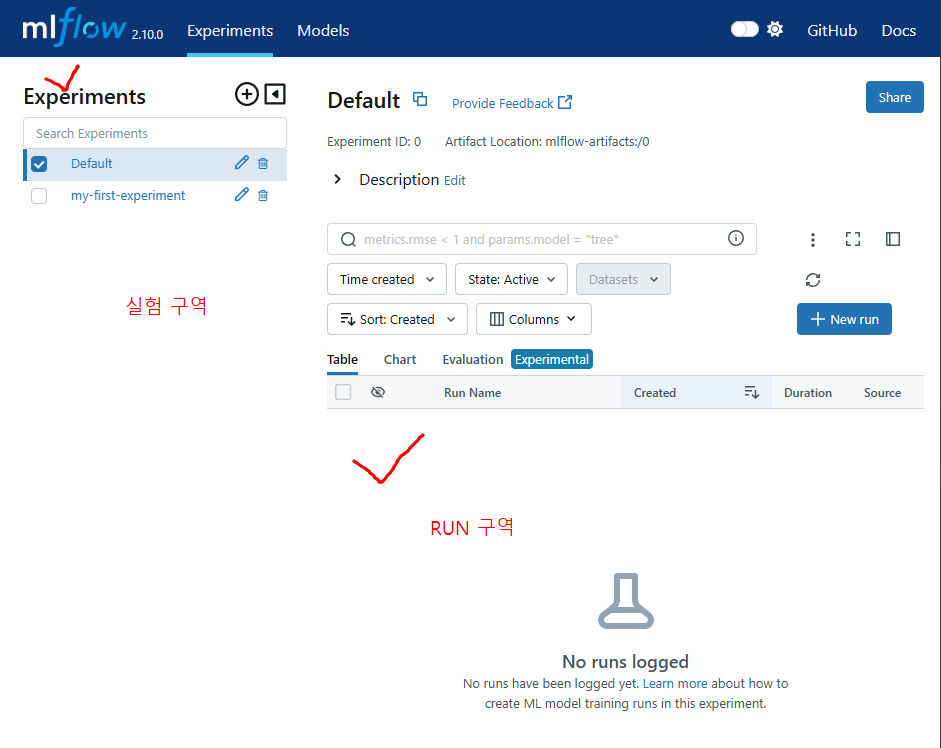
Experiment는 그래서 어떻게 생성하나요?
mlflow experiments create --experiment-name my-first-experiment
-
만약 실험 리스트 확인하고 싶다?
mlflow experiments search

-
모델에 필요한 라이브러리 설치 후 폴더 생성
pip3 install numpy scikit-learn mkdir logistic_regression cd logistic_regression -
train.py 작성하여 집어넣기
import numpy as np from sklearn.linear_model import LogisticRegression import mlflow import mlflow.sklearn if __name__ == "__main__": X = np.array([-2, -1, 0, 1, 2, 1]).reshape(-1, 1) y = np.array([0, 0, 0, 1, 1, 0]) penalty = "elasticnet" l1_ratio = 0.1 lr = LogisticRegression(penalty=penalty, l1_ratio=l1_ratio, solver="saga") lr.fit(X, y) score = lr.score(X, y) print("Score: %s" % score) mlflow.log_param("penalty", penalty) mlflow.log_param("l1_ratio", l1_ratio) mlflow.log_metric("score", score) mlflow.sklearn.log_model(lr, "model") -
프로젝트(MLProject)
- MLflow를 사용한 코드의 프로젝트 메타 정보 저장
- 프로젝트를 어떤 환경에서 어떻게 실행시킬지 정의
- 패키지 모듈의 상단에 위치
-
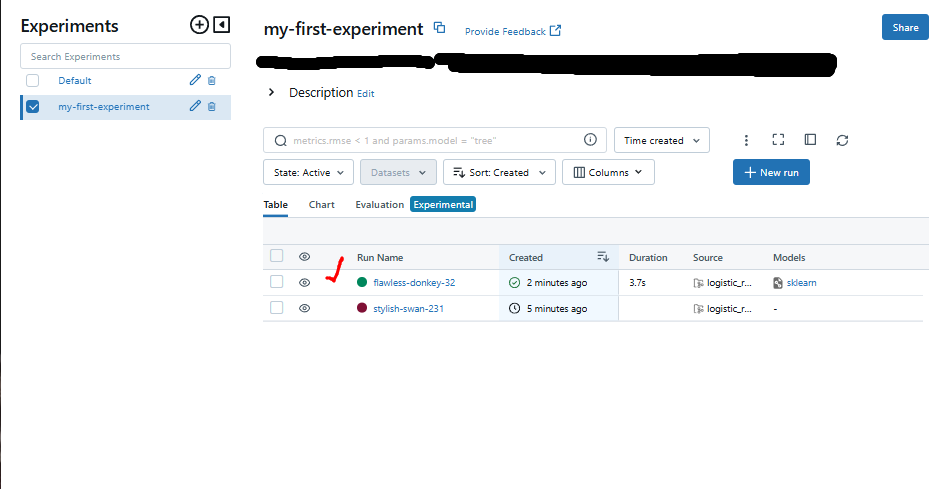
Run(실행)
- 하나의 Run은 코드를 1번 실행한 것을 의미
- 보통 Run은 모델 학습 코드를 실행
- 즉, 한번의 코드 실행 = 하나의 Run 생성
- Run을 하면 여러가지 내용이 기록됨
- Run에서 로깅하는 것들
Source: 실행한 프로젝트의 이름
Version: 실행 Hash
Start/End Time
Parameters: 모델 파라미터
Metrics: 모델의 평가지표, Metric 시각화
Tags: 관련된 Tag
Artifacts: 실행과정에서 생기는 다양한 파일들 (이미지, 모델 Pickle 등)- 이제 실행하고 싶다면 `mlflow run logistic_regression --experiment-name my-first-experiment` - 그런데 현재 Local의 환경 즉, 가상환경을 추가로 생성하는 것이 아닌, 지금의 환경에서 실행하고 싶다면 `mlflow run logistic_regression --experiment-name my-first-experiment --env-manager=local` 이라고 하면 됨.아래는 새롭게 RUN이 생성된 모습!
-
-
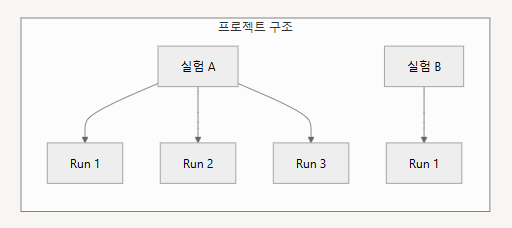
Experiment와 Run의 관계는 아래와 같다
-
로깅을 더 편하게 할 수는 없을까?
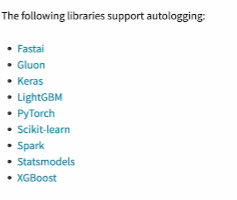
- mlflow.autolog() 을 사용!
import numpy as np from sklearn.linear_model import LogisticRegression import mlflow import mlflow.sklearn if __name__ == "__main__": mlflow.sklearn.autolog() X = np.array([-2, -1, 0, 1, 2]).reshape(-1, 1) y = np.array([0, 0, 1, 1, 1]) penalty = "elasticnet" l1_ratio = 0.1 lr = LogisticRegression(penalty=penalty, l1_ratio=l1_ratio, solver="saga") with mlflow.start_run() as run: lr.fit(X, y) score = lr.score(X, y) print("Score: %s" % score)autolog는 굉장히 유용한 것이 맞으나, 모든 프레임워크에서 사용 가능한 것은 아니다.
- MLflow에서 지원해주는 프레임워크들이 존재한다.
예를들면 Pytorch.nn.Module은 지원하지 않는다... 반면 Pytorch Lightning은 지원!
별도로 로깅하는거 관련해서 Class화 하는 것도 좋을 듯
-
MLflow Parameter
기존에 autolog와 달리 system argument로 받아서 하라고 지정할 수도 있다.# train.py import argparse import sys import numpy as np from sklearn.linear_model import LogisticRegression import mlflow import mlflow.sklearn if __name__ == "__main__": mlflow.sklearn.autolog() X = np.array([2, -1, 0, 1, 2, 1]).reshape(-1, 1) y = np.array([0, 0, 1, 1, 1, 0]) lr = LogisticRegression(solver=sys.argv[1], penalty=sys.argv[2], l1_ratio=float(sys.argv[3])) with mlflow.start_run() as run: lr.fit(X, y) score = lr.score(X, y) print("Score: %s" % score)# python_env.yaml name: tutorial_with_autolog python_env: python_env.yaml # or # conda_env: my_env.yaml # or # docker_env: # image: mlflow-docker-example entry_points: main: parameters: solver: type: string default: "saga" penalty: type: string default: "l2" l1_ratio: type: float default: 0.1 command: "python train.py {solver} {penalty} {l1_ratio}"# MLProejct name: tutorial python_env: python_env.yaml entry_points: main: parameters: regularization: {type: float, default: 0.1} command: "python train.py"아래는 실행하는 코드
Run : -P 옵션으로 파라미터 지정
mlflow run logistic_regression_with_autolog_and_params -P solver="saga" -P penalty="elasticnet" -P l1_ratio=0.03 --experiment-name my-first-experiment --env-manager=local
1.3 MLflow를 통한 작업
-
MLflow를 사용해 Data Scientist와 MLOps Engineer가 협업 가능
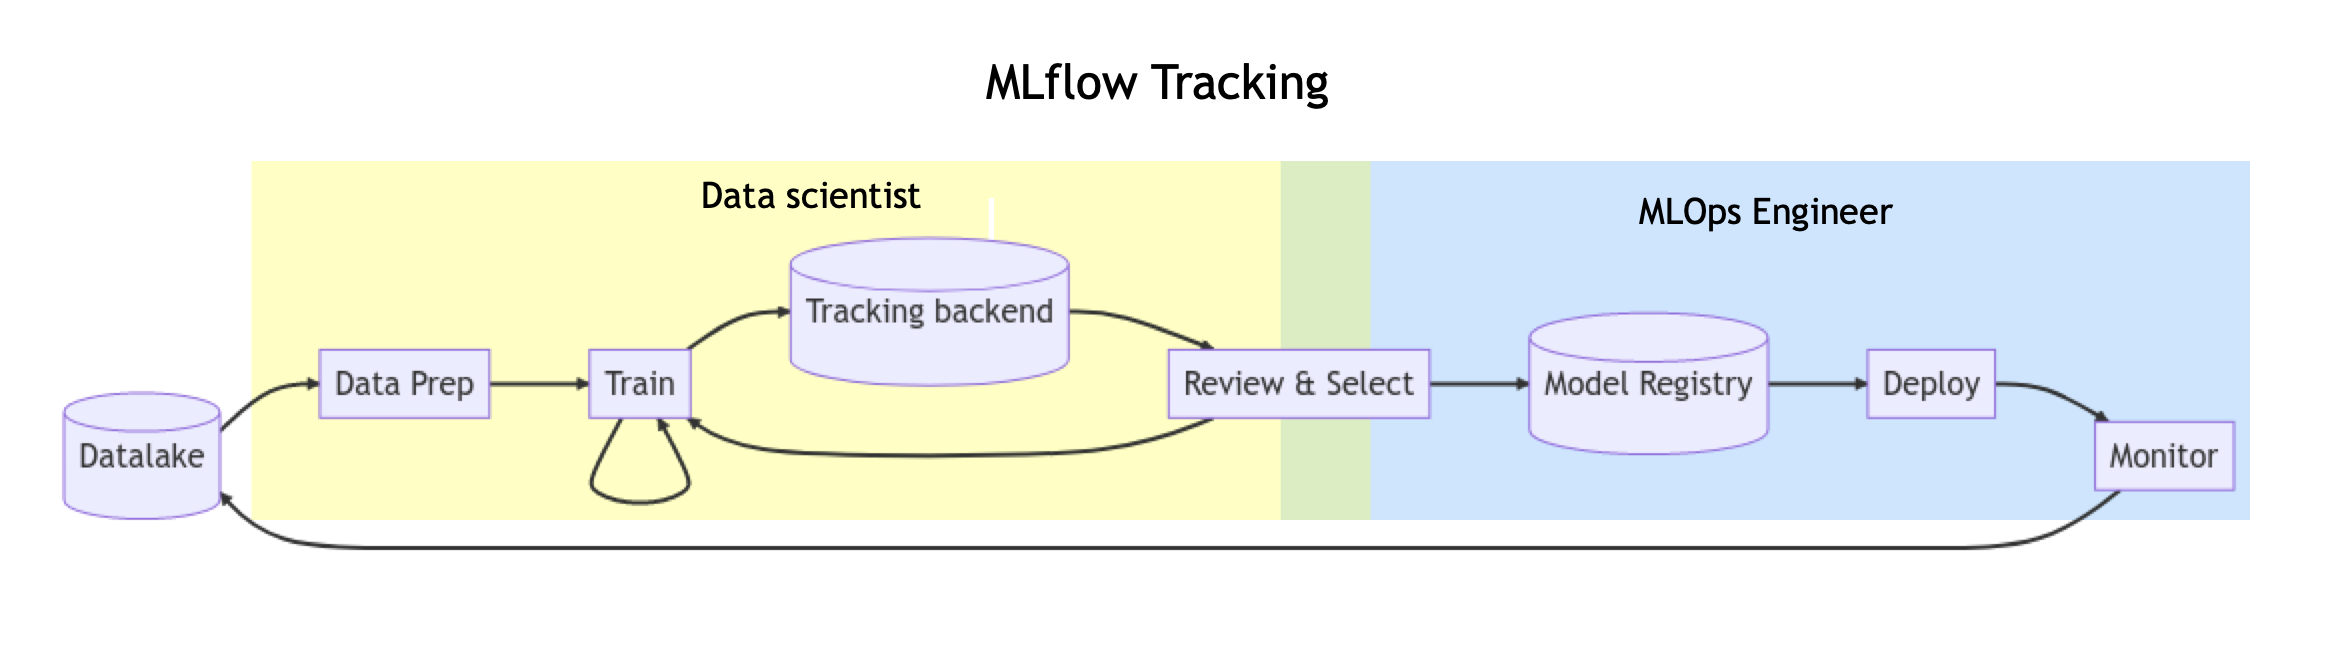
출처: https://mlflow.org/docs/latest/getting-started/quickstart-2/index.html -
특정
Run을 찾고 싶은 경우query문법을 넣을 수도 있고 특정 metric 기준으로 확인할 수 있음
# search_run_example.py
from mlflow import MlflowClient
from mlflow.entities import ViewType

query = "params.l1_ratio = '0.03' and metrics.'training_score' >= 0.65"

run = MlflowClient().search_runs(
    experiment_ids="951661705044407",  # my-first-experiments의 Experiment ID
    # filter_string으로 조건 검색 수행 실시
    filter_string=query,
    run_view_type=ViewType.ACTIVE_ONLY,
    max_results=5,
    order_by=["metrics.training_score DESC"],
)[0]

print(run)
- search_run_and_download.py
from mlflow import MlflowClient, artifacts
from mlflow.entities import ViewType

# 모델 검색을 위한 쿼리 설정
query = "params.lr_ratio = '0.01' and metrics.training_score = '0.85'"

# MLflow 클라이언트를 통한 실험 검색
run = MlflowClient().search_runs(
    experiment_ids="실험ID",
    filter_string=query,
    run_view_type=ViewType.ACTIVE_ONLY,
    max_results=1,
    order_by=["metrics.training_score DESC"]
)[0]

# 검색된 모델 다운로드
def download_model(run_id, model_name="model"):
    print(f"Run ID: {run_id}")
    artifact_uri=f"runs/{run_id}/{model_name}"
    artifacts.download_artifacts(artifact_uri, dst_path=".")
    print("Download Model Finish!")
이렇게 실행하면
Airfact를 다운로드하면 model 폴더에 Artifact가 저장되는 것을 확인 가능
1.4 MLflow 정리
- MLflow를 사용하면 모델 학습하는 과정의 데이터, Artifact 등을 저장할 수 있음
- MLflow의 Web UI를 통해 쉽게 결과를 비교할 수 있음
- MLflow를 통해 모델을 개발하고, 적절한 기준 이상을 배포하는 프로세스로 협업할 수 있음
- 키워드
mlproject, experiment, run, autolog, parameter - MLflow + FastAPI를 통합해서 특정 API에서 모델의 결과를 나타나게 하는 코드를 작성하는 것도 추천
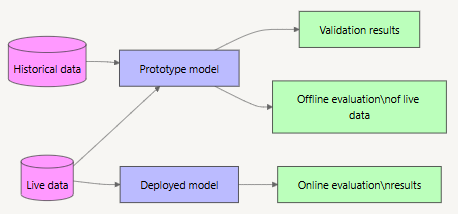
2. 모델 평가
두가지로 나뉜다.
OFFLINE
단순/과거 데이터를 기반/주기성/혹은 배치/훈련 후 정적인 모델 평가
ONLINE
복잡합/실시간 데이터에 기반/즉각적인 성능 평가/모델의 동적인 변화에 빠르게 대응
2.1 OFFLINE 모델 평가
Hold-out Validation
- 데이터를 훈련 세트와 테스트 세트로 나누어 모델을 훈련하고 평가
- 일정 비율의 데이터를 테스트에 예약하여 모델의 일반적인 성능 평가
K-fold cross validation
- 데이터를 K개의 부분 집합(폴드)로 나누고, 각 폴드를 한 번씩 테스트 세트로 사용
- 나머지를 훈련 세트로 사용하여 모델을 K번 평가하는 기술
- 모델의 일반적인 성능을 더 정확하게 평가할 때 활용
Bootstrap resampling
- 중복을 허용하여 원본 데이터셋에서 샘플을 랜덤하게 추출하여 여러 개의 부분 집합을 생성
- 모델을 반복적으로 훈련 및 평가하여 일반화 성능을 추정
- 데이터셋의 분산을 고려하면서 모델의 성능을 더 견고하게 평가
2.2 ONLINE 모델 평가
AB Test
-
같은 양의 트래픽을 두 개 이상의 버전에 전송하고 예측, 예측 결과를 비교 및 분석
-
일반적인 AB 테스트는 통계적 유의미성을 얻기까지 시간이 매우 오래걸려서 Multi-Armed Bandit과 같은 최적화 기법을 같이 쓰기도 함
-
A, B를 나눌 때 트래픽을 반반 또는 user_id 같은 값을 해싱해서 홀/짝으로 나누기도 함
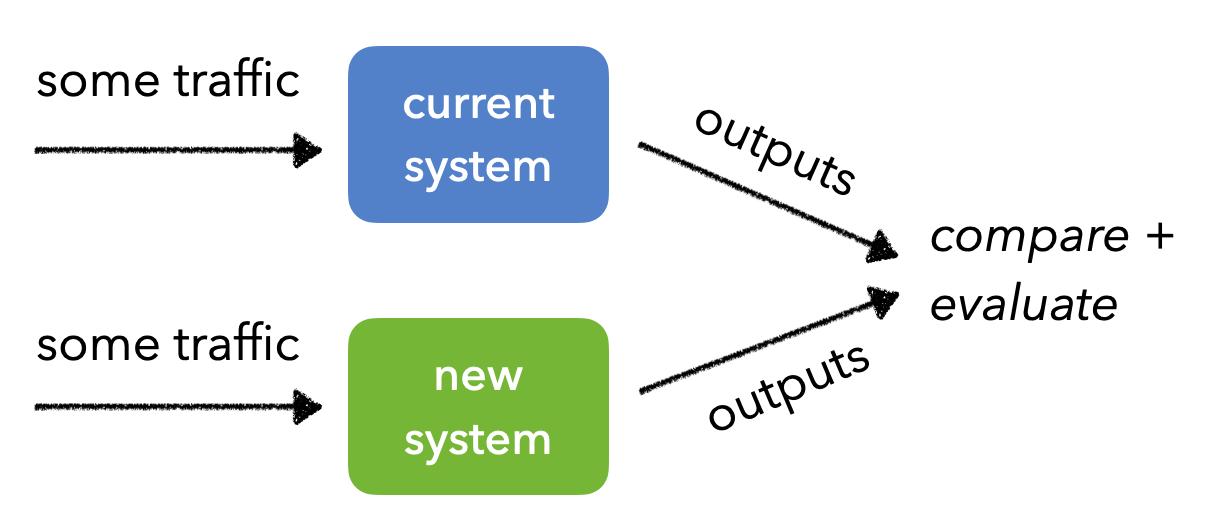
출처: https://madewithml.com/courses/mlops/evaluation/
Canary Test
카나리아(=새 이름)은 석탄 광산에서 유독가스 누출의 위험을 알리는 용도로 사용
탄광에서 유독가스가 많이 발생하면 사람이 죽을 수 있음
카나리아가 사람보다 먼저 죽기 때문에, 이것을 유독가스 누출의 지표로 사용하는 것에서 유래
- 새로운 버전의 모델로 트래픽이 들어가도 문제가 없는지 체크
- 마찬가지로 결과물을 지속적으로 모니터링해서 큰 오차는 없는 지, 결함은 없는지 체크
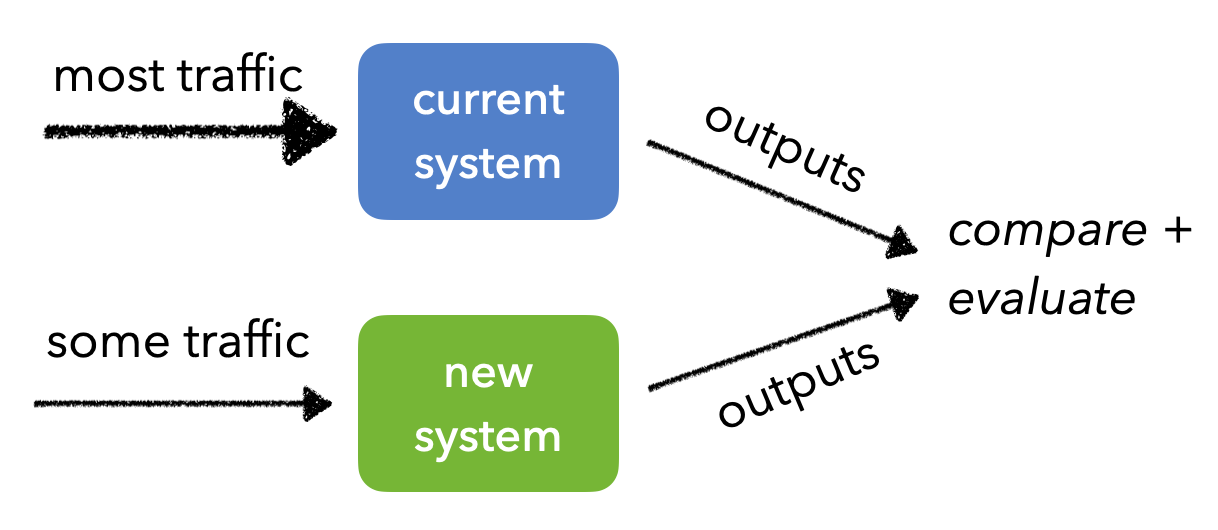
출처: https://madewithml.com/courses/mlops/evaluation/
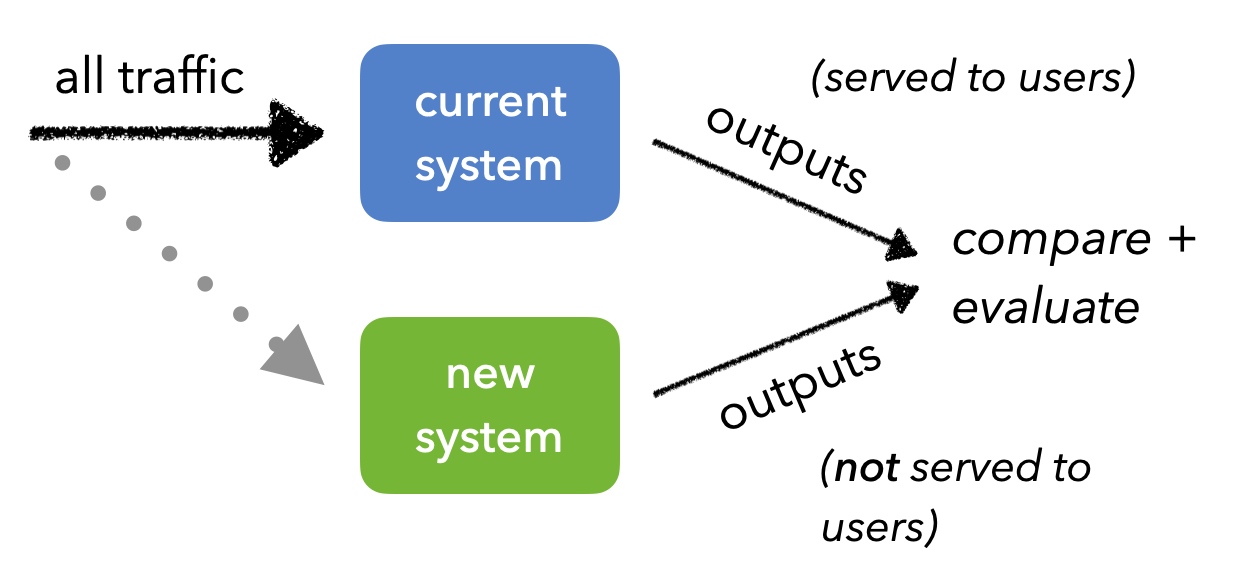
Shadow Test
프로덕션(=운영)과 같은 트래픽을 새로운 버전의 모델에 적용
- 기존에 서빙된 모델에 영향을 최소화
- 새로운 버전의 모델에 정상적으로 예측하는지 확인
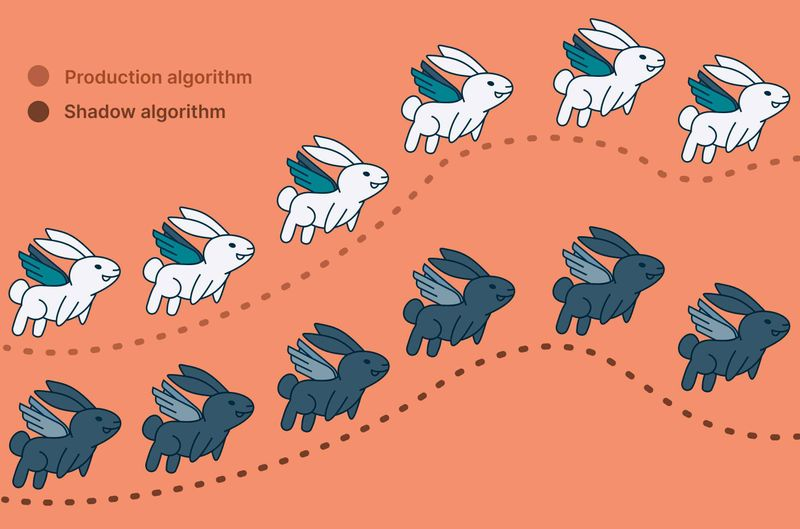
출처: https://www.nextmv.io/blog/what-is-shadow-testing-for-optimization-models-and-decision-algorithms
-
클라 직전까지 예측만 하도록
-
모든 트래픽은 현재 시스템에 전송
-
그림자처럼 같은 트래픽을 새로운 버전에 복제해서 전송
-
유저에게 직접 결과물이 전달되지는 않음(서빙X)
- 새 모델이 이슈가 있더라도 안전함
-
하지만 트래픽 복제 전송을 위한 인프라 구성이 필요함.
출처: https://madewithml.com/courses/mlops/evaluation/
정리
Off-line과 On-line 평가를 반복하면서 최적의 모델을 서빙할 수 있도록 지속적으로 개선
- 머신러닝 시스템 디자인 패턴 - QA Pattern
- Shadow AB-testing pattern
- Online AB-testing pattern
- Loading test pattern
- Antipatterns
- Offline-only pattern