
[1주차 목표]
- 서버와 클라이언트의 역할에 대해 이해한다.
- HTML, CSS의 기초 지식을 이해한다. 부트스트랩을 가져다 쓸 줄 안다!
- Javascript 기초 문법을 익힌다.
HTML 기초
- HTML: 웹페이지의 기본 틀을 만들어준다.
- HTML은 크게 head와 body로 구성된다.
head : 페이지의 속성 정보
body : 페이지의 내용
body 안에 들어가는 대표적인 요소들
<!DOCTYPE html>
<html lang="en">
<head>
<meta charset="UTF-8">
<meta name="viewport" content="width=device-width, initial-scale=1.0">
<title>스파르타코딩클럽 | HTML 기초</title>
</head>
<body>
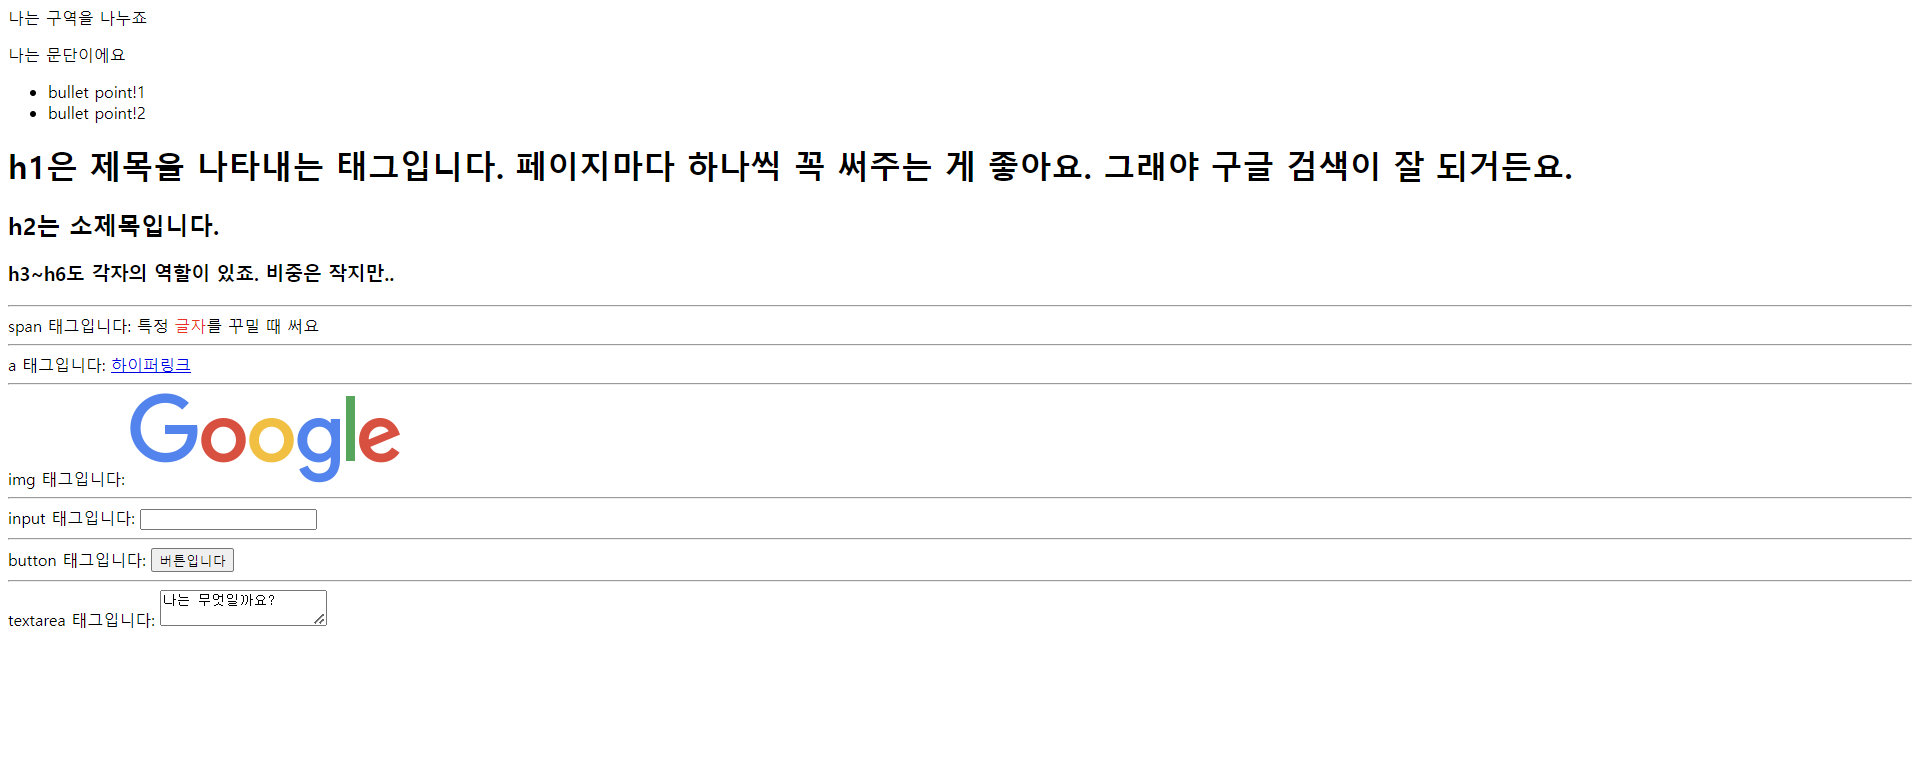
<!-- 구역을 나누는 태그들 -->
<div>나는 구역을 나누죠</div>
<p>나는 문단이에요</p>
<ul>
<li> bullet point!1 </li>
<li> bullet point!2 </li>
</ul>
<!-- 구역 내 콘텐츠 태그들 -->
<h1>h1은 제목을 나타내는 태그입니다. 페이지마다 하나씩 꼭 써주는 게 좋아요. 그래야 구글 검색이 잘 되거든요.</h1>
<h2>h2는 소제목입니다.</h2>
<h3>h3~h6도 각자의 역할이 있죠. 비중은 작지만..</h3>
<hr>
span 태그입니다: 특정 <span style="color:red">글자</span>를 꾸밀 때 써요
<hr>
a 태그입니다: <a href="http://naver.com/"> 하이퍼링크 </a>
<hr>
img 태그입니다: <img src="https://www.google.com/images/branding/googlelogo/1x/googlelogo_color_272x92dp.png" />
<hr>
input 태그입니다: <input type="text" />
<hr>
button 태그입니다: <button> 버튼입니다</button>
<hr>
textarea 태그입니다: <textarea>나는 무엇일까요?</textarea>
</body>
</html>실행 결과
CSS 기초
- CSS: HTML로 만든 뼈대를 꾸며주는 역할
- HTML 부모-자식 구조 살펴보기
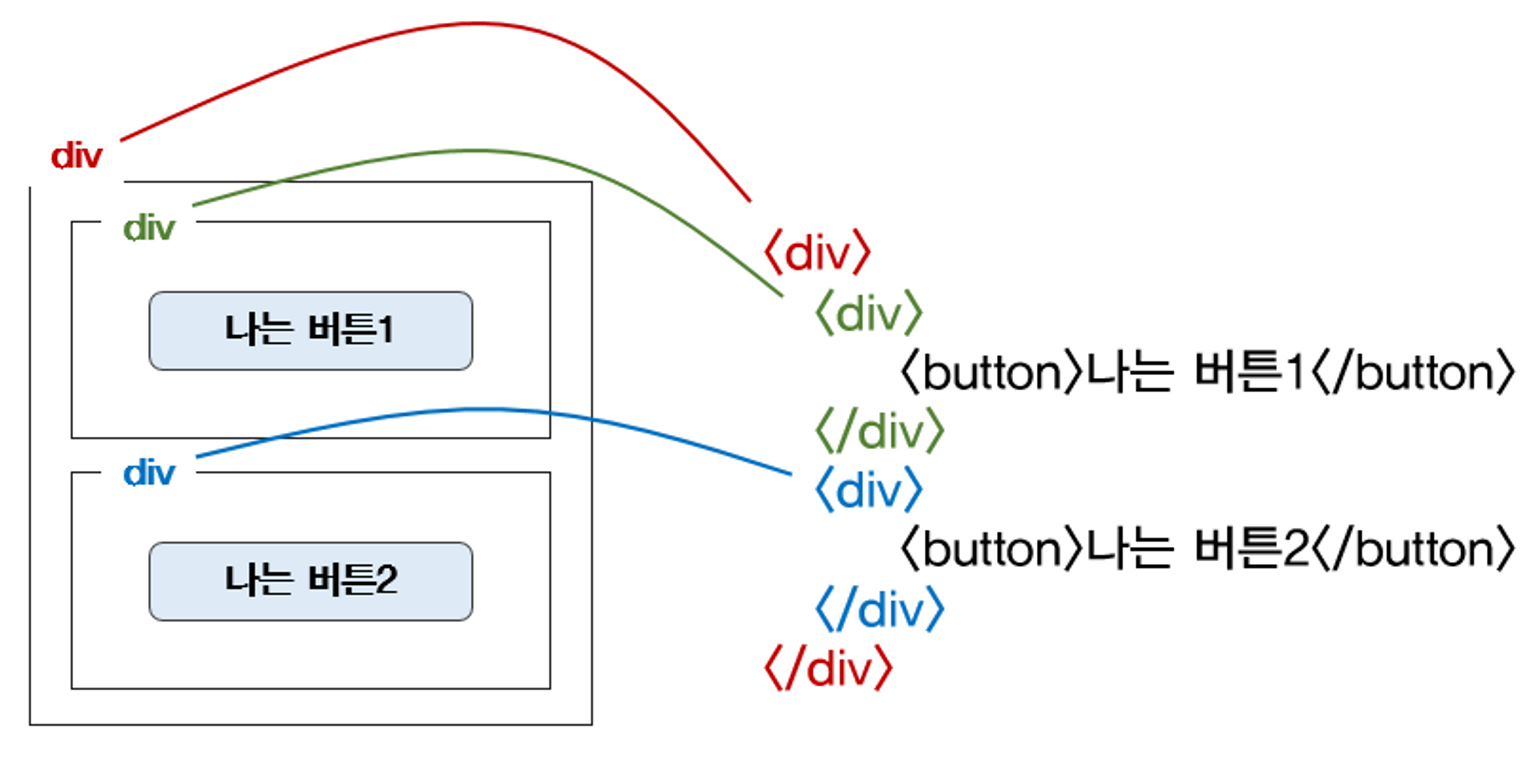
박스의 속성을 바꾸면 안의 내용물도 함께 바뀐다
CSS 사용방법
<head> 태그 안에 <style> 태그로 공간을 만들어 작성한다.
<!DOCTYPE html>
<html lang="en">
<head>
    <meta charset="UTF-8">
    <meta name="viewport" content="width=device-width, initial-scale=1.0">
    <title>스파르타코딩클럽 | HTML 기초</title>
    <style>
    	 → CSS 작성
    </style>
</head>
<body>
	→ html 작성
</body>
</html>
자주 쓰이는 CSS
| 배경관련 |
|---|
| background-color |
| background-image |
| background-size |
| 사이즈 |
|---|
| width |
| height |
| 폰트 |
|---|
| font-size |
| font-weight |
| font-family |
| color |
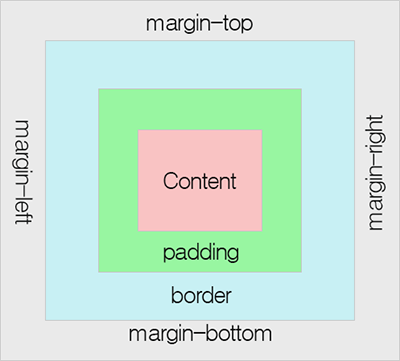
| 간격 |
|---|
| margin |
| padding |
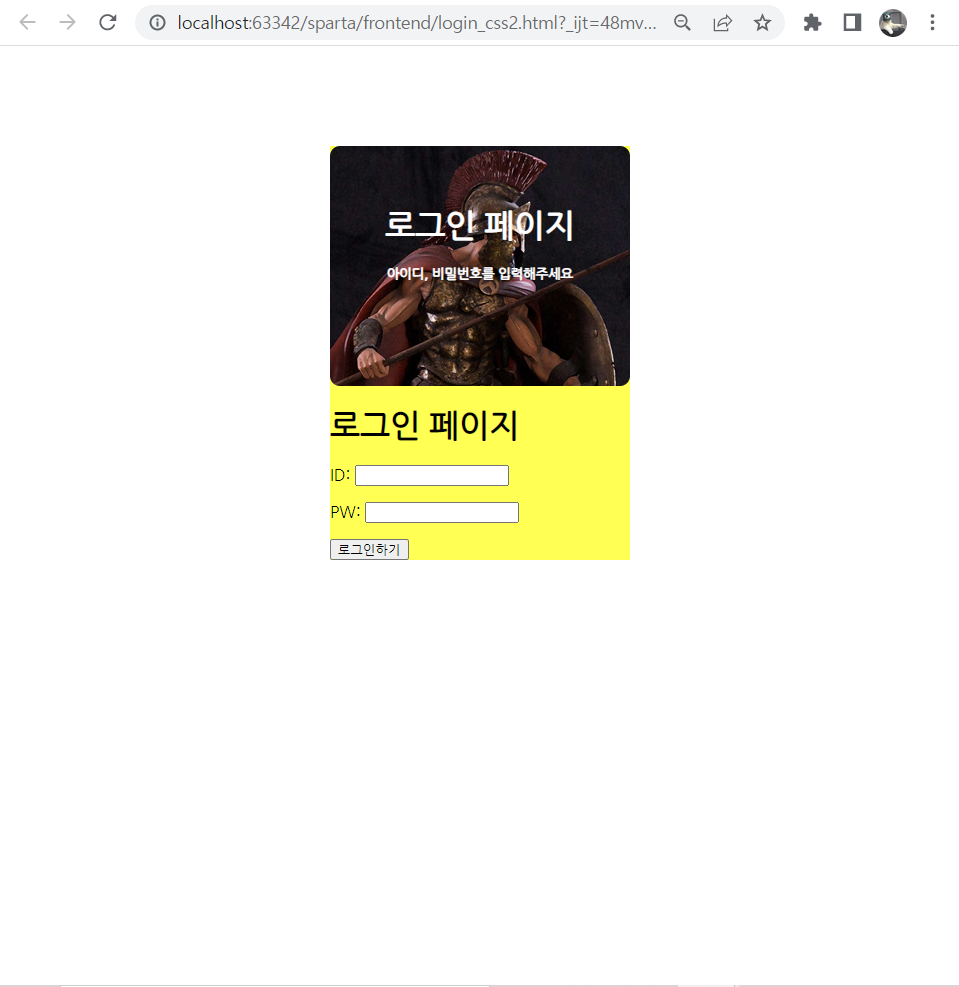
화면 비율 조정하기
- 비율 조정 전 코드, 실행 화면
- 변화를 확인하기 위해서 모든 요소를 감싸고 있는<div>태그의 class="wrap"으로 하여 background-color 속성을 yellow로 주었음.
- div 가로 크기 → 브라우저의 가로 방향이 모두 채워져 있음.
<!DOCTYPE html>
<html lang="en">
<head>
    <meta charset="UTF-8">
    <title>로그인 페이지</title>
    <link href="https://fonts.googleapis.com/css2?family=Nanum+Gothic&family=Yeon+Sung&display=swap" rel="stylesheet">
    <style>
        /* 주석 단축키: ctrl + / */
        /* *{} : 모든 태그에 적용 */
        *{
          font-family: 'Nanum Gothic', sans-serif;
        }

        .mytitle{
            width: 300px;
            height: 200px;

            color: white;

            text-align: center;

            background-image: url("https://www.ancient-origins.net/sites/default/files/field/image/Agesilaus-II-cover.jpg");
            background-size: cover;
            background-position: center;

            border-radius: 10px;

            padding-top: 40px;
        }

        .wrap{
            background-color: yellow;
        }
    </style>
</head>
<body>
    <div class="wrap">
        <div class="mytitle">
            <h1>로그인 페이지</h1>
            <h5>아이디, 비밀번호를 입력해주세요</h5>
        </div>
        <h1>로그인 페이지</h1>
        <p>ID: <input type="text" /></p>
        <p>PW: <input type="text" /></p>
        <button>로그인하기</button>
    </div>
</body>
</html>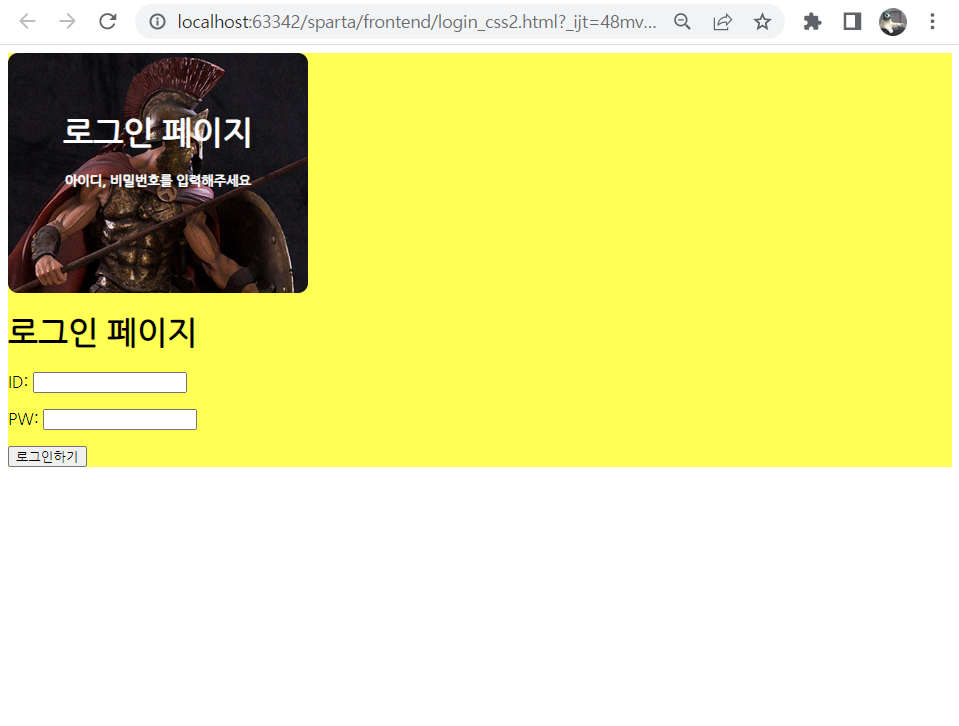
- 비율 조정 후 변경 코드, 실행 화면
div의 가로 크기를 300px로 지정
margin 속성값을 auto로 주어 화면 가운데로 오도록 함.여백 방향 순서
한 개의 값: 네 면의 여백 설정
두 개의 값: top-bottom, left-right 여백 설정
세 개의 값: top, left-right, bottom 여백 설정
네 개의 값: top-right-bottom-left 여백 설정
        .wrap{
            background-color: yellow;
            width: 300px;
            margin: 100px auto;
        }
모바일 처리
- 모바일 처리 전
화면이 잘려서 나옴
<!doctype html>
<html lang="en">

<head>
    <!--  아래 메타 태그: 반드시 head의 처음에 와야 함!  -->
    <meta charset="utf-8">
    <meta name="viewport" content="width=device-width, initial-scale=1, shrink-to-fit=no">

    <!--  부트스트랩 CSS  -->
    <link href="https://cdn.jsdelivr.net/npm/bootstrap@5.0.2/dist/css/bootstrap.min.css" rel="stylesheet"
        integrity="sha384-EVSTQN3/azprG1Anm3QDgpJLIm9Nao0Yz1ztcQTwFspd3yD65VohhpuuCOmLASjC" crossorigin="anonymous">
    <!--  ajax  -->
    <script src="https://ajax.googleapis.com/ajax/libs/jquery/3.5.1/jquery.min.js"></script>
    <!--  부트스트랩 Javascript  -->
    <script src="https://cdn.jsdelivr.net/npm/bootstrap@5.0.2/dist/js/bootstrap.bundle.min.js"
        integrity="sha384-MrcW6ZMFYlzcLA8Nl+NtUVF0sA7MsXsP1UyJoMp4YLEuNSfAP+JcXn/tWtIaxVXM"
        crossorigin="anonymous"></script>

    <title>스파르타코딩클럽 | 부트스트랩 연습하기</title>
    <link href="https://fonts.googleapis.com/css2?family=Gowun+Dodum&display=swap" rel="stylesheet">

    <style>
        * {
            font-family: 'Gowun Dodum', sans-serif;
        }

        .mytitle {

            background-color: green;

            height: 250px;
            width: 100%;

            background-image: linear-gradient(0deg, rgba(0, 0, 0, 0.5), rgba(0, 0, 0, 0.5)), /* 배경 어둡게 */
                url("https://www.ancient-origins.net/sites/default/files/field/image/Agesilaus-II-cover.jpg");
            background-position: center;
            background-size: cover;

            color: white;

            /* 정렬 */
            display: flex;
            flex-direction: column;
            justify-content: center;
            align-items: center;
        }

        /* mytitle의 button 지정하여 적용 */
        .mytitle > button{
            width: 200px;
            height: 50px;

            background-color: transparent;
            color: white;

            border-radius: 50px;
            border: 1px solid white;
            margin-top: 10px;
        }

        /* hover: 마우스 올렸을 때 */
        .mytitle > button:hover{
            border: 2px solid white;
        }

        .mycomment{
            color: gray;
        }

        .wrap{
            width: 1200px;

            margin: 20px auto 5px auto;
            /*margin: auto;*/
        }

        .mypost{

            width: 500px;

            margin: 20px auto 0px auto;

            box-shadow: 0px 0px 3px 0px gray;
            padding: 20px;
        }

        .mybutton{
            display: flex;
            flex-direction: row;
            justify-content: center;
            align-items: center;

            margin-top: 10px;
        }

        .mybutton > button{
            margin-right: 10px;
        }

    </style>
</head>

<body>
    <div class="mytitle">
        <h1>내 생에 최고의 영화들</h1>
        <button>영화 기록하기</button>
    </div>

    <div class="mypost">
        <!--    영화URL    -->
        <div class="form-floating mb-3">
            <input type="email" class="form-control" id="floatingInput" placeholder="name@example.com">
            <label for="floatingInput">영화URL</label>
        </div>

        <!--    선택하기    -->
        <div class="input-group mb-3">
            <label class="input-group-text" for="inputGroupSelect01">별점</label>
            <select class="form-select" id="inputGroupSelect01">
                <option selected>--선택하기--</option>
                <option value="1">⭐</option>
                <option value="2">⭐⭐</option>
                <option value="3">⭐⭐⭐</option>
                <option value="3">⭐⭐⭐⭐</option>
                <option value="3">⭐⭐⭐⭐⭐</option>
            </select>
        </div>

        <!--    코멘트    -->
        <div class="form-floating">
            <textarea class="form-control" placeholder="Leave a comment here" id="floatingTextarea"></textarea>
            <label for="floatingTextarea">코멘트</label>
        </div>

        <!--    버튼    -->
        <div class="mybutton">
            <button type="button" class="btn btn-dark">기록하기</button>
            <button type="button" class="btn btn-outline-dark">닫기</button>
        </div>
    </div>

    <div class="wrap">
        <div class="row row-cols-1 row-cols-md-4 g-4">
            <div class="col"...>
            <div class="col"...>
            <div class="col"...>
            <div class="col"...>
        </div>
    </div>
</body>

</html>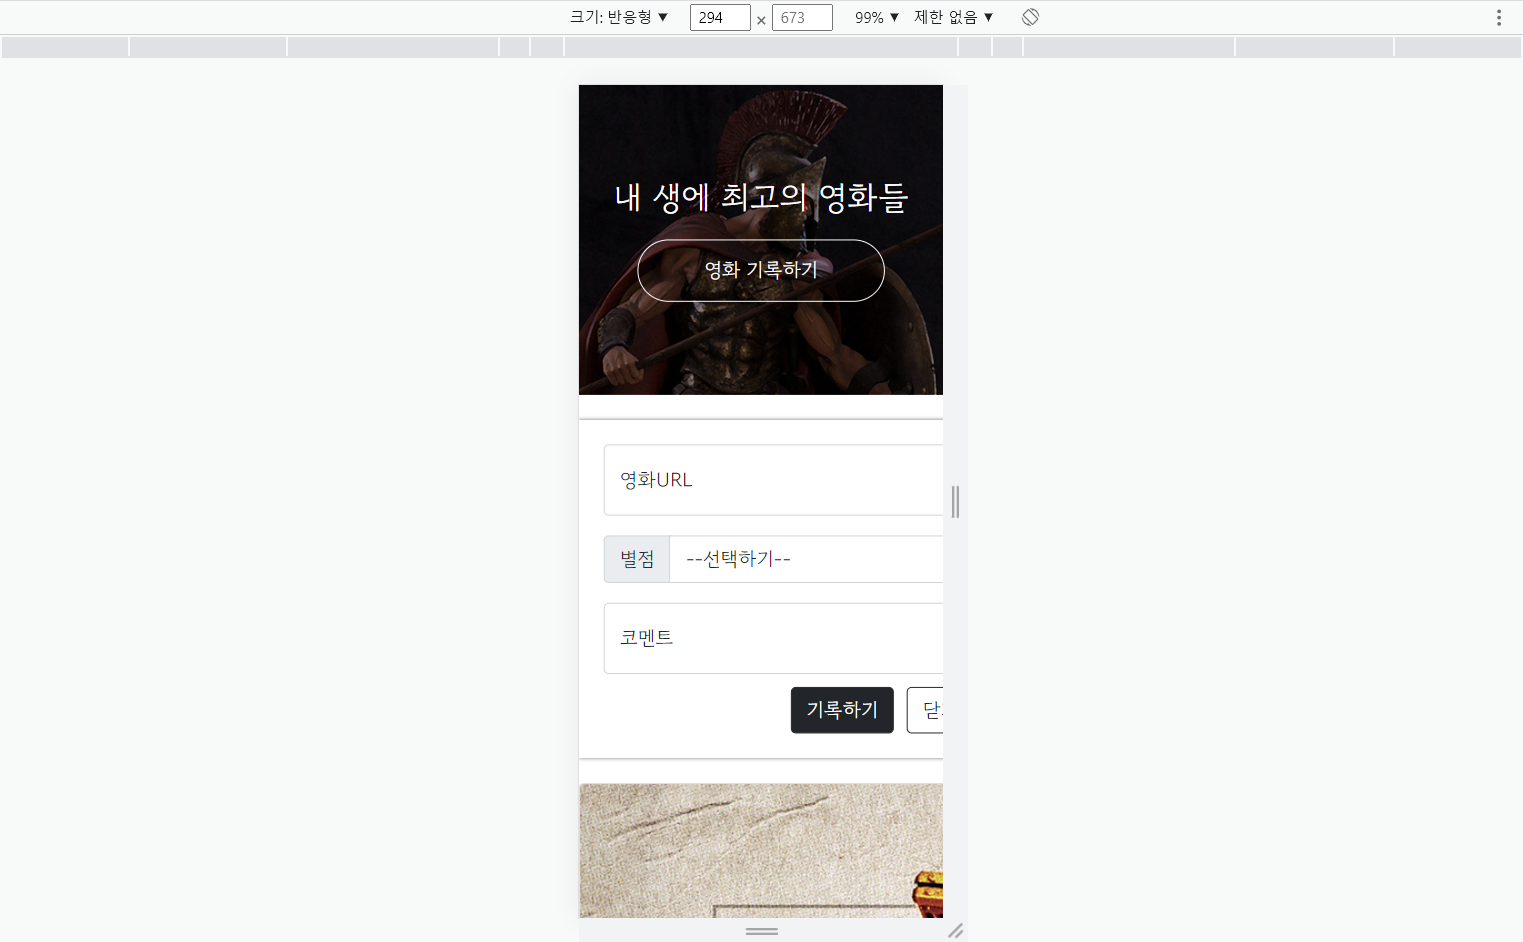
- 모바일 처리 후
화면 비율에 맞춰 보여줌
        .wrap{
            /* 모바일 처리*/
            max-width: 1200px;
            width: 95%;

            margin: 20px auto 5px auto;
            /*margin: auto;*/
        }

        .mypost{
            /*background-color: green;*/

            /* 모바일 처리*/
            max-width: 500px;
            width: 95%;

            margin: 20px auto 0px auto;

            box-shadow: 0px 0px 3px 0px gray;
            padding: 20px;
        }
Summary
HTML은 뼈대
CSS는 꾸미기
외우지 말고 잘 가져다 쓰자

누워있는게 좋은 완벽주의자