
| Section | Section title | Concepts |
|---|---|---|
| Section3 | Coding your first data pipeline with Airflow | DAG Operator Sheduler Web server catchup |
| Section4 | Databases Executors | [Executors] SeqentialExecutor LocalExecutor CeleryExecutor [Databases] SQLite Postgres |
| Section5 | Implementing advanced concepts in Airflow | SubDAG TaskGroups XComs Trigger rules |
Section1 : Course Introduction
Important Prerequisites
-
Virtual box allows you have virtual machine on your computer
-
Everything in airflow is coded in
Python!

Course objective
- a nice overview of Airflow!

Section2 : Getting Started with Airflow
Introduction (5)

At the end of this section,

Why Airflow? (6)
-
Typical use case
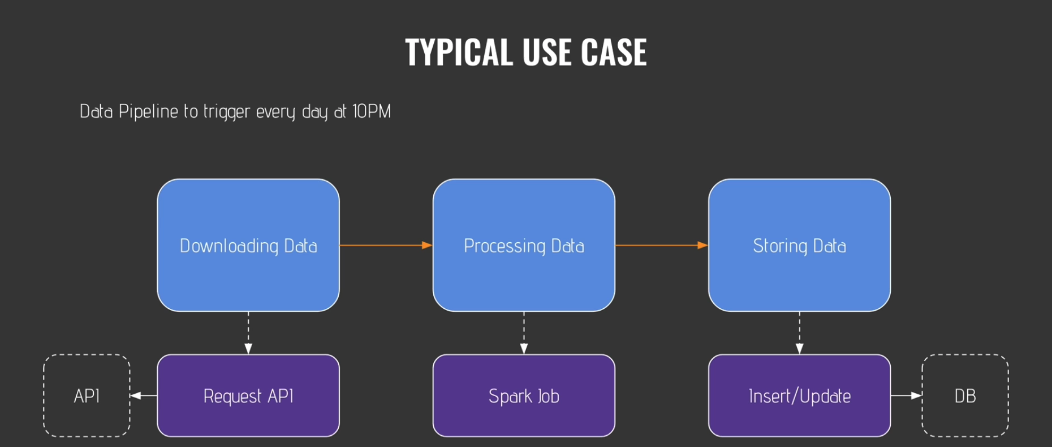
-
What happen if you have problems part of pipeline?
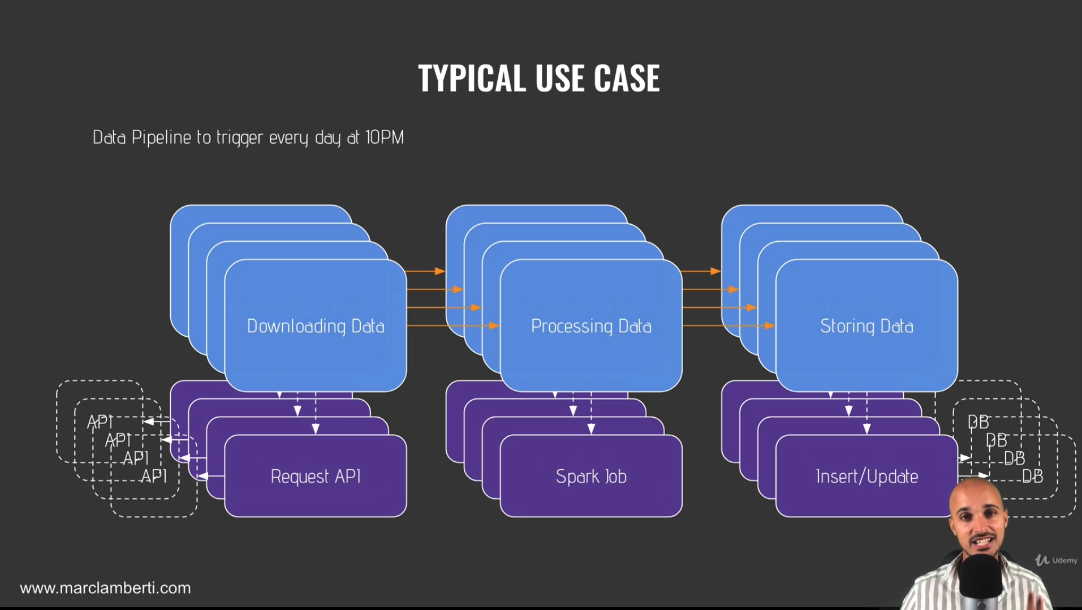
-
What happen if you have hundreds of different data pipelines to manage at the same time?
-
With Airflow,
- able to manage your data pipelines & execute your tasks in a very reliable way
- able to monitor
- able to try tasks automatically
What is Airflow? (7)
- an open source platform to programmatically author, schedule & monitor workflows
- an orchestrator allowing you to execute your tasks at the right time, in the right way, in the right order
Benefit of Airflow
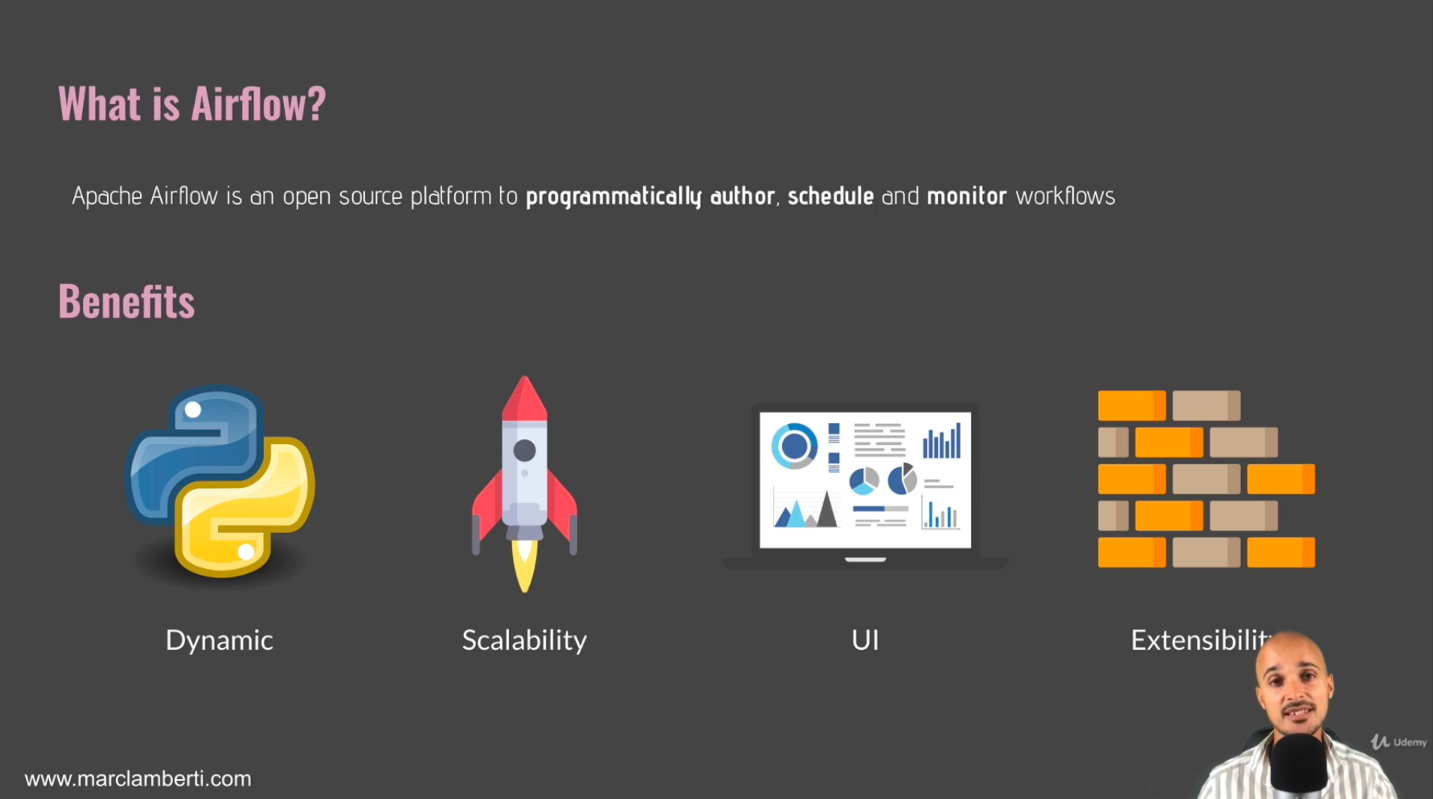
- Dynamic : your data pipelines are dynamic
- indeed, as they are coded in Python, everything that you can do in Python, you can do it in your data pipeline limitless!
- Scalability : Airflow is really scable
- Can execute as many tasks as you want in parallel
- it depends on your architecture & your resources
- UI
- Useful & beautiful, able to monitor data pipelines
- Extensibility
- If there is a new tool that you want to use, you don't have to wait for Airflow to be upgraded
Core component of Airflow
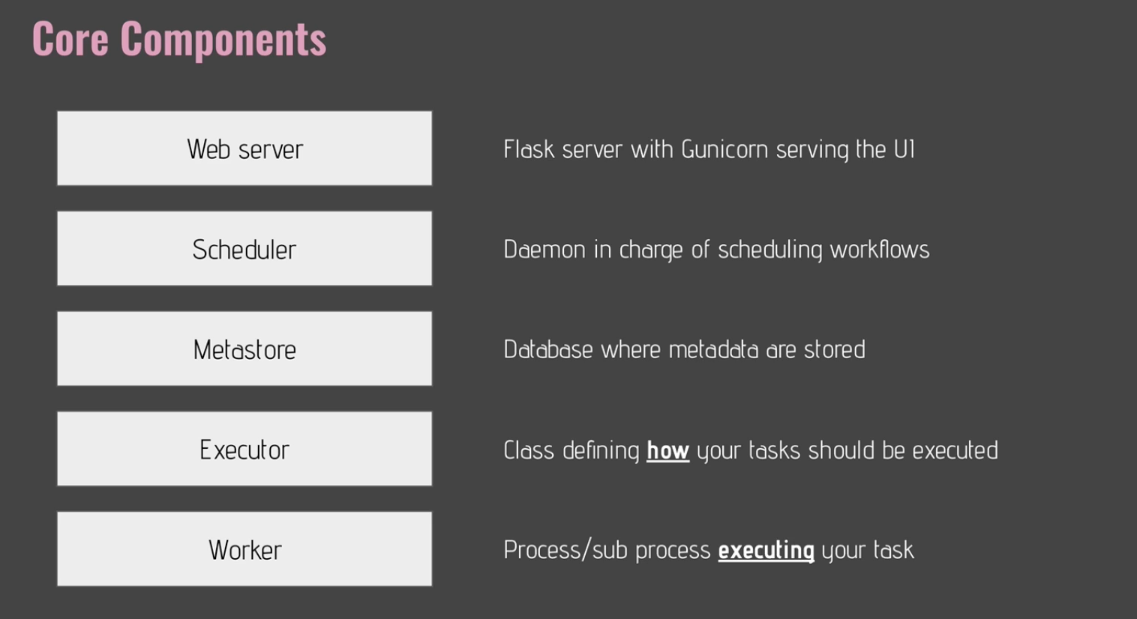
- Web server
- Flask server with Gunicorn serving the UI
- in charge of providing the user interface
- Scheduler
- Daemon in charge of scheduling workflows
- The heart of Airflow
- Metastore
- Database where metadata related to Airflow are stored
- use Postgre as it is the recommended database to use with Airflow
- Also can use mySQL or Oracle
- Executor
- Class defining how your tasks should be executed
- e.g. kubernetess, celery, on the local
- Define how your tasks will be executed
- Worker
- process/subprocess executing your tasks
- Executor vs. Worker
- Executor : defines how the task should be executed
- Worker : is actually the process executing the task
Additional things
- DAG
- Directed Acyclic Graph
- It should have no loop!
- Operator
- Wrapper around the task
- Types
- Action operator
- operator executing function or command
- e.g. bash operator, python operator
- Transfer operator
- Transfer data between a source and a destination
- Sensor operator
- Wait for something to happen before moving to the next task
- Action operator
- Task
- Task : an operator in your data pipeline
- Task instance : as soon as you execute an operator, that operator becomes a task instance
- Workflow
- the combination of all the concepts we have just seen
- a DAG with operators, with tasks, with dependencies
- What Airflow is NOT?
- Not a Data Streaming Souliton
- Neither a Data Processing Framework
- But it is the best orchestrator
How Airflow Works? (8)

Section3 : Coding Your First Data Pipeline with Airflow
Introduction (13)
What is a DAG? (14)
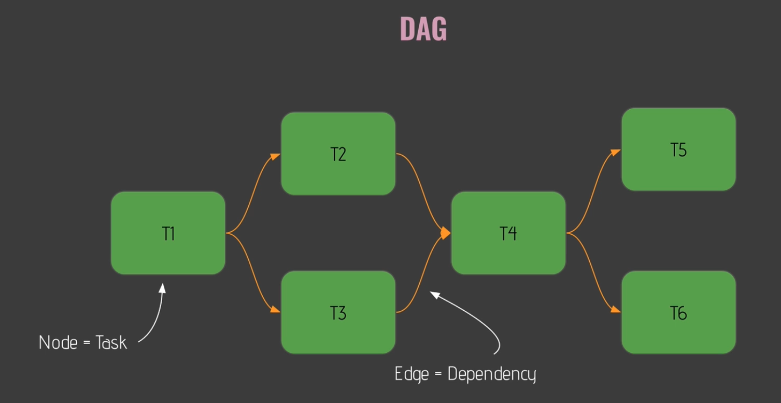
- a data pipeline in Airflow
- Basically, DAG means a directed and acyclic graph
- DAG with
- nodes : corresponding to your task in Airflow
- edges : corresponding to the dependencies between nodes in Airflow
- All tasks(i.e. nodes) will be executed in the order as given from dependencies
- Cf. There is no loop in DAG, and so in my data pipeline!
[Practice] Time to code your first DAG (15)
- 5 tasks
- creating_table
- is_api_available
- extracting_user : simple http operator
- processing_user : using python operator
- stroing_user : bash operator
- Use different operators along the different tasks
[Practice] DAG Skeleton (16)
- user_processing.py
from airflow.models import DAG
from datetime import datetime

default_args = {
	'start_date' : datetime(2020,1,1)

}

with DAG('user_processing', schedule_interval='@daily',
          default_args=default_args,
         catchup=False) as dag:
	# Define tasks/operators
What is a Operator? (17)
- An operator
- a task in data pipeline
- one operator, one task
- Types of operator
| Type | Role |
|---|---|
| Action operators | Execute an action |
| Transfer operators | Transfer data |
| Sensors | Wait for a condition to be met |
[Practice] Creating Table (18)
- creating_table.py
from airflow.models import DAG
from airflow.providers.sqlite.operators.sqlite import SqliteOperator
from datetime import datetime

default_args = {
	'start_date' : datetime(2020,1,1)

}

with DAG('user_processing', schedule_interval='@daily',
          default_args=default_args,
         catchup=False) as dag:

    creating_table = SqliteOperator(
    	task_id='creating_table',
        sqlite_conn_id='db_sqlite',
        sql='''
        	CREATE TABLE users (
            	user_id INTEGER PRIMARY KEY AUTOINCREMENT,
                firstname TEXT NOT NULL,
                lastname TEXT NOT NULL,
                country TEXT NOT NULL,
                username TEXT NOT NULL,
                password TEXT NOT NULL
            );
            '''
    )
or,
from airflow.models import DAG
from airflow.providers.sqlite.operators.sqlite import SqliteOperator
from datetime import datetime

default_args = {
	'start_date' : datetime(2020,1,1)

}

with DAG('user_processing', schedule_interval='@daily',
          default_args=default_args,
         catchup=False) as dag:

    creating_table = SqliteOperator(
    	task_id='creating_table',
        sqlite_conn_id='db_sqlite',
        sql='''
        	CREATE TABLE users (
                firstname TEXT NOT NULL,
                lastname TEXT NOT NULL,
                country TEXT NOT NULL,
                username TEXT NOT NULL,
                password TEXT NOT NULL,
                email TEXT NOT NULL PRIMARY KEY
            );
            '''
)-
install packages including providers!
- In this case, related to sqlite!
$ pip install 'apache-airflow-providers-sqlite' -
In airflow webserver,
- Tab [Admin]>[Connections], add(+) new connection

- Tab [Admin]>[Connections], add(+) new connection
[Practice] The secret weapon! (19)
$ airflow tasks test {dag_id} {task_id} {start_date in YYYY-MM-DD}[Practice] Is API available? (21)
from airflow.models import DAG
from airflow.providers.sqlite.operators.sqlite import SqliteOperator
from airflow.providers.http.sensors.http import HttpSensor

from datetime import datetime

default_args = {
	'start_date' : datetime(2020,1,1)
}

with DAG('user_processing', schedule_interval='@daily',
          default_args=default_args,
         catchup=False) as dag:

    creating_table = SqliteOperator(
    	task_id='creating_table',
        sqlite_conn_id='db_sqlite',
        sql='''
        	CREATE TABLE users (
                firstname TEXT NOT NULL,
                lastname TEXT NOT NULL,
                country TEXT NOT NULL,
                username TEXT NOT NULL,
                password TEXT NOT NULL,
                email TEXT NOT NULL PRIMARY KEY
            );
            '''
    )

    is_api_available = HttpSensor(
    	task_id='is_api_available',
        http_conn_id='user_api',
        endpoint='api/'
)-
In airflow webserver,
- Tab [Admin]>[Connections], add(+) new connection
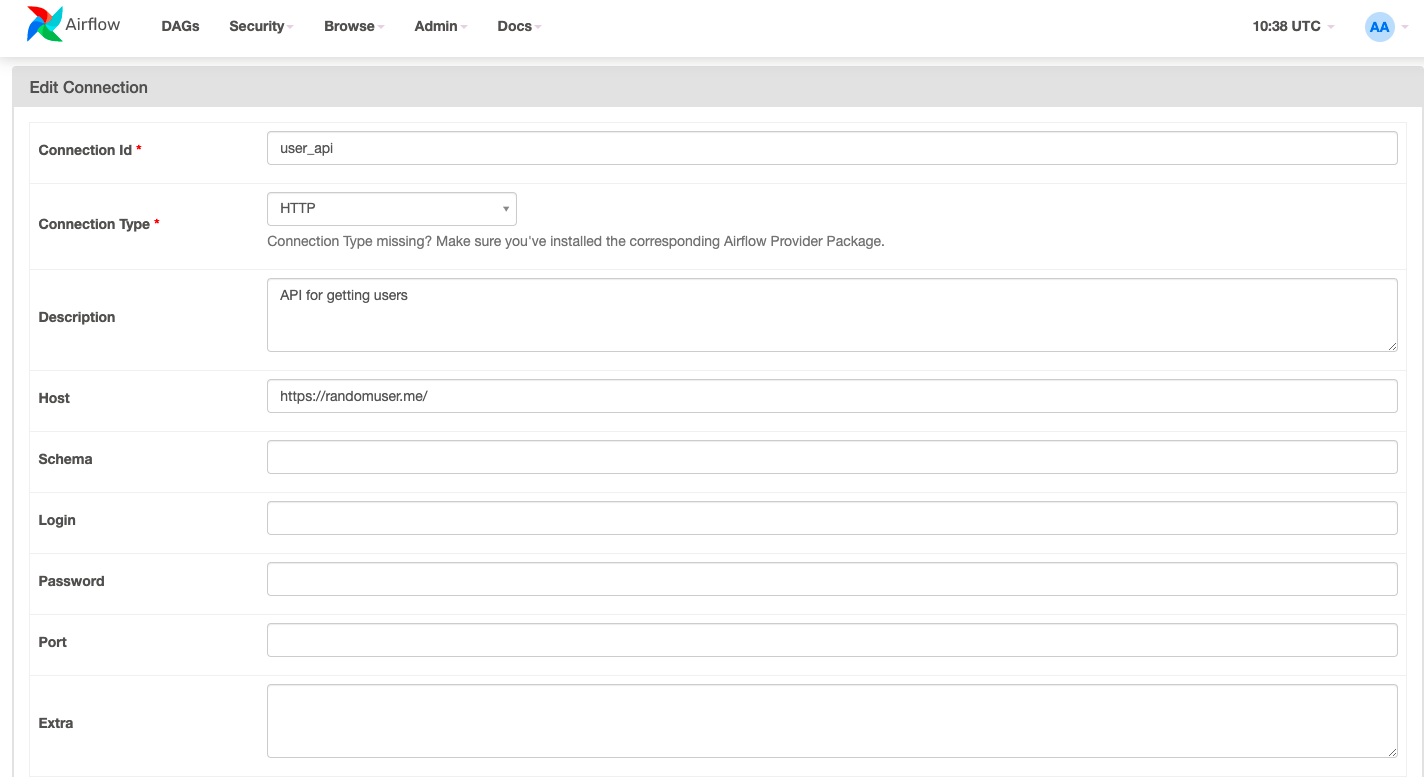
- Tab [Admin]>[Connections], add(+) new connection
-
In terminal,
$ pip install 'apache-airflow-providers-http'- To test, in terminal
$ airflow tasks test {dag_id} {task_id} {execution date in YYYY-MM-DD}e.g.
$ airflow tasks test user_processing is_api_available 2020-01-01[Practice] Extracting Users (22)
from airflow.models import DAG
from airflow.providers.sqlite.operators.sqlite import SqliteOperator
from airflow.providers.http.sensors.http import HttpSensor
from airflow.providers.http.operators.http import SimpleHttpOperator

from datetime import datetime
import json

default_args = {
	'start_date' : datetime(2020,1,1)
}

with DAG('user_processing', schedule_interval='@daily',
          default_args=default_args,
         catchup=False) as dag:

    creating_table = SqliteOperator(
    	task_id='creating_table',
        sqlite_conn_id='db_sqlite',
        sql='''
        	CREATE TABLE users (
                firstname TEXT NOT NULL,
                lastname TEXT NOT NULL,
                country TEXT NOT NULL,
                username TEXT NOT NULL,
                password TEXT NOT NULL,
                email TEXT NOT NULL PRIMARY KEY
            );
            '''
    )

    is_api_available = HttpSensor(
    	task_id='is_api_available',
        http_conn_id='user_api',
        endpoint='api/'
    )

    extracting_user = SimpleHttpOperator(
        task_id='extracting_user',
        http_conn_id='user_api',
        endpoint='api/',
        method='GET',
        response_filter=lambda response: json.loads(response.text),
        log_response=True
)- In terminal,
$ airflow tasks test user_processing extracting_user 2020-01-01[Practice] Processing users (23)
from airflow.models import DAG
from airflow.providers.sqlite.operators.sqlite import SqliteOperator
from airflow.providers.http.sensors.http import HttpSensor
from airflow.providers.http.operators.http import SimpleHttpOperator
from airflow.operators.python import PythonOperator

from datetime import datetime
from pandas import json_normalize
import json

default_args = {
	'start_date' : datetime(2020,1,1)
}

def _processing_user():

with DAG('user_processing', schedule_interval='@daily',
          default_args=default_args,
         catchup=False) as dag:

    creating_table = SqliteOperator(
    	task_id='creating_table',
        sqlite_conn_id='db_sqlite',
        sql='''
        	CREATE TABLE users (
                firstname TEXT NOT NULL,
                lastname TEXT NOT NULL,
                country TEXT NOT NULL,
                username TEXT NOT NULL,
                password TEXT NOT NULL,
                email TEXT NOT NULL PRIMARY KEY
            );
            '''
    )

    is_api_available = HttpSensor(
    	task_id='is_api_available',
        http_conn_id='user_api',
        endpoint='api/'
    )

    extracting_user = SimpleHttpOperator(
        task_id='extracting_user',
        http_conn_id='user_api',
        endpoint='api/',
        method='GET',
        response_filter=lambda response: json.loads(response.text),
        log_response=True
    )

    processing_user = PythonOperator(
        task_id='processing_user',
        python_callable=_processing_user
)- In terminal
$ airflow tasks test user_processing extracting_user 2020-01-01from airflow.models import DAG
from airflow.providers.sqlite.operators.sqlite import SqliteOperator
from airflow.providers.http.sensors.http import HttpSensor
from airflow.providers.http.operators.http import SimpleHttpOperator
from airflow.operators.python import PythonOperator
from datetime import datetime
from pandas import json_normalize
import json
default_args = {
'start_date' : datetime(2020,1,1)
}
def _processing_user(ti):
users=ti.xcom_pull(task_ids=['extracting_user'])
if not len(users) or 'results' not in users[0]:
raise ValueError('User is empty')
user = users[0]['results'][0]
processed_user=json_normalize({
'firstname': user['name']['first'],
'lastname': user['name']['last'],
'country': user['location']['country'],
'username': user['login']['username'],
'password': user['login']['password'],
'email': user['email']
})
processed_user.to_csv('/tmp/processed_user.csv', index=None, header=False)
with DAG('user_processing', schedule_interval='@daily',
default_args=default_args,
catchup=False) as dag:
creating_table = SqliteOperator(
task_id='creating_table',
sqlite_conn_id='db_sqlite',
sql='''
CREATE TABLE users (
firstname TEXT NOT NULL,
lastname TEXT NOT NULL,
country TEXT NOT NULL,
username TEXT NOT NULL,
password TEXT NOT NULL,
email TEXT NOT NULL PRIMARY KEY
);
'''
)
is_api_available = HttpSensor(
task_id='is_api_available',
http_conn_id='user_api',
endpoint='api/'
)
extracting_user = SimpleHttpOperator(
task_id='extracting_user',
http_conn_id='user_api',
endpoint='api/',
method='GET',
response_filter=lambda response: json.loads(response.text),
log_response=True
)
processing_user = PythonOperator(
task_id='processing_user',
python_callable=_processing_user
)- In terminal,
$ airflow tasks test user_processing processing_user 2020-01-01[Practice] Storing users (24)
from airflow.models import DAG
from airflow.providers.sqlite.operators.sqlite import SqliteOperator
from airflow.providers.http.sensors.http import HttpSensor
from airflow.providers.http.operators.http import SimpleHttpOperator
from airflow.operators.python import PythonOperator
from airflow.operators.bash import BashOperator

from datetime import datetime
from pandas import json_normalize
import json

default_args = {
	'start_date' : datetime(2020,1,1)
}

def _processing_user(ti):
    users=ti.xcom_pull(task_ids=['extracting_user'])
    if not len(users) or 'results' not in users[0]:
        raise ValueError('User is empty')
    user = users[0]['results'][0]
    processed_user=json_normalize({
        'firstname': user['name']['first'],
        'lastname': user['name']['last'],
        'country': user['location']['country'],
        'username': user['login']['username'],
        'password': user['login']['password'],
        'email': user['email']
    })
    processed_user.to_csv('/tmp/processed_user.csv', index=None, header=False)

with DAG('user_processing', schedule_interval='@daily',
          default_args=default_args,
         catchup=False) as dag:

    creating_table = SqliteOperator(
    	task_id='creating_table',
        sqlite_conn_id='db_sqlite',
        sql='''
        	CREATE TABLE users (
                firstname TEXT NOT NULL,
                lastname TEXT NOT NULL,
                country TEXT NOT NULL,
                username TEXT NOT NULL,
                password TEXT NOT NULL,
                email TEXT NOT NULL PRIMARY KEY
            );
            '''
    )

    is_api_available = HttpSensor(
    	task_id='is_api_available',
        http_conn_id='user_api',
        endpoint='api/'
    )

    extracting_user = SimpleHttpOperator(
        task_id='extracting_user',
        http_conn_id='user_api',
        endpoint='api/',
        method='GET',
        response_filter=lambda response: json.loads(response.text),
        log_response=True
    )

    processing_user = PythonOperator(
        task_id='processing_user',
        python_callable=_processing_user
    )

    storing_user = BashOperator(
        task_id='storing_user',
        bash_command='echo -e ".separator ","\n.import /tmp/processed_user.csv users" | sqlite3 /Users/LeeHyangki/airflow/airflow.db'
)- In terminal,
$ cd /airflow
$ sqlite3 airflow.db- Now, I'm in sqlite!
SELECT * FROM users; # gives nothing- In terminal,
$ airflow tasks test user_processing storing_user 2020-01-01 - Again,
$ sqlite3 airflow.dbSELECT * FROM users; # Now, there are results![Practice] Order matters (25)
- How can we define order?
- We are going to use dependency!
- Below of python DAG code,
creating_table >> is_api_available >> extracting_user >> processing_user >> storing_user[Practice] Your data pipeline in action (26)
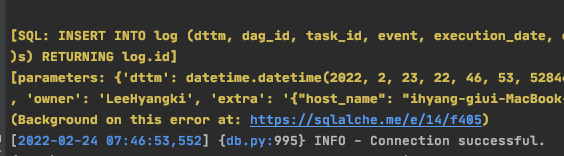
-
How can we fix this issue?
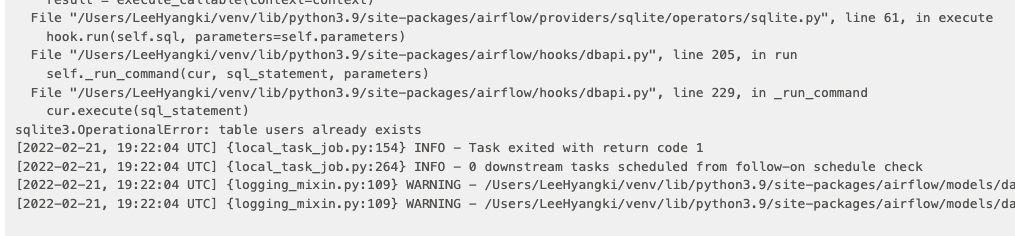
-
Fix the DAG code [creating_table] fucntion as below:
creating_table = SqliteOperator(
    	task_id='creating_table',
        sqlite_conn_id='db_sqlite',
        sql='''
        	CREATE TABLE IF NOT EXISTS users (
                firstname TEXT NOT NULL,
                lastname TEXT NOT NULL,
                country TEXT NOT NULL,
                username TEXT NOT NULL,
                password TEXT NOT NULL,
                email TEXT NOT NULL PRIMARY KEY
            );
            '''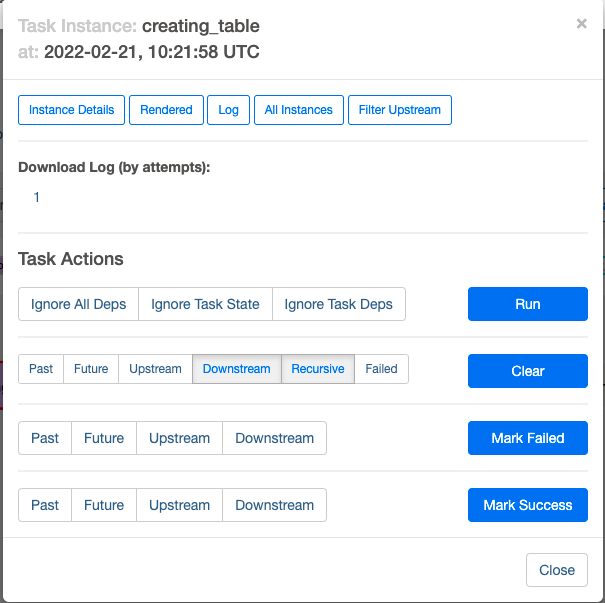
)- Click [Clear] button to restart task!
Dag scheduling (27)
| Item | Description | Example |
|---|---|---|
| start_date | When your dag would start being scheduled | 2020-01-01 |
| schedule_interval | Defining the frequency at which your data pipeline would be triggered | 2020-01-01 10:10AM |
| execution_date | 2020-01-01 10AM |
Backfilling and catchup (28)
- What if you make a mistake in your data pipeline
- Pause your dag fix your issue reschedule your dag
- What will happen in that period of time(when stop triggering data pipeline again)?
- What if you want to start your data pipeline 2 weeks ago?
- What airflow does this automatically for you?
- Backfillng and
catchup!
- Backfillng and
[Option catchup]
- By default, airflow will automatically run all the non-triggered dag runs
catchup = Truein functionDAG
- When you set
catchup = True, all the non-triggered dag runs starting from the latest execution date will be automatically triggered, NOT from the start date
[Time zone in airflow]
- All dates(start_date, execution_date, ...) in airflow are UTC
- If you don't want to mass up time zone, please keep everything in airflow UTC!
- When you want to schedule your data pipeline 2020/01/01 10:00 AM in your local time zone,
- check what that date in UTC
- define the date in your data pipeline
Section4 : Databases and executors
Introduction (29)

- This section is super important if you want to use Airflow in production
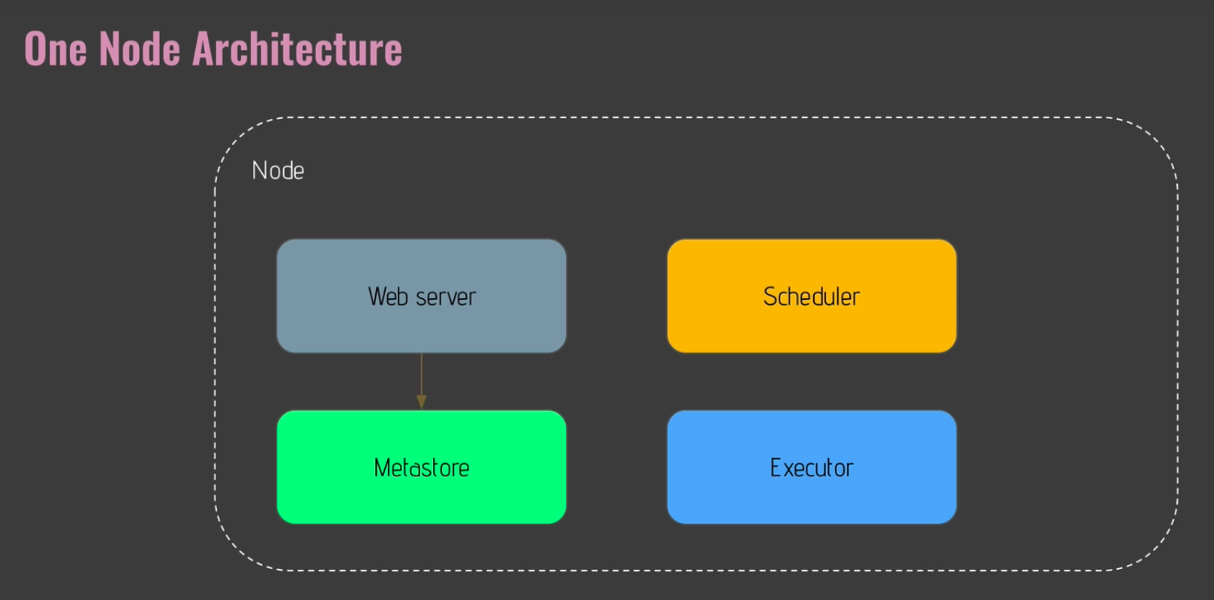
The default configuration (30)
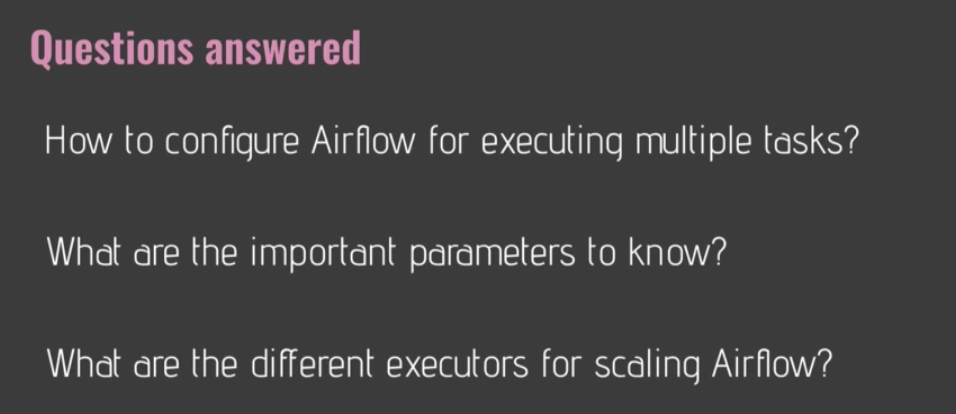
[Questions]
- How many tasks can I execute in parallel with that default configuration?
- What is exactly the default configuration?
- How can I change that default configuration in order to execute as many tasks as I want?
[Answers]
- Your tasks are executed sequentially one after the other, because the default executor is the sequential executor!
- Two parameters in order to configure your executor
- sql_alchemy_conn
$ airflow config get-value core sql_alchemy_conn

- By default, you get a connection to sqlite database which you can find under the folder airflow corresponding to that file airflow.db
- sqlite does not allow multiple writes at the same time!
- executor
$ airflow config get-value core executor

- By default, we get sequential executor
- sql_alchemy_conn
[Practice] Start scaling with the local executor (31)
- Sequential executor is extremly useful
- if you want to debug your data pipeline
- if you want to do some experiments
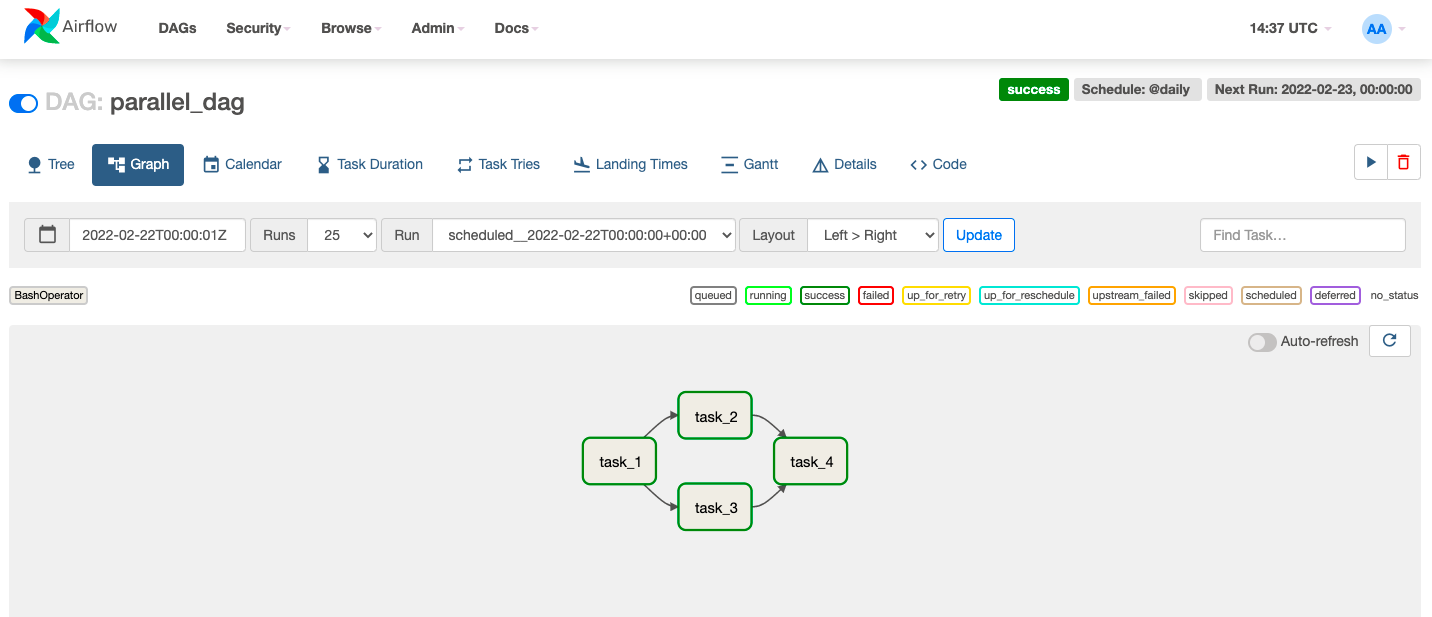
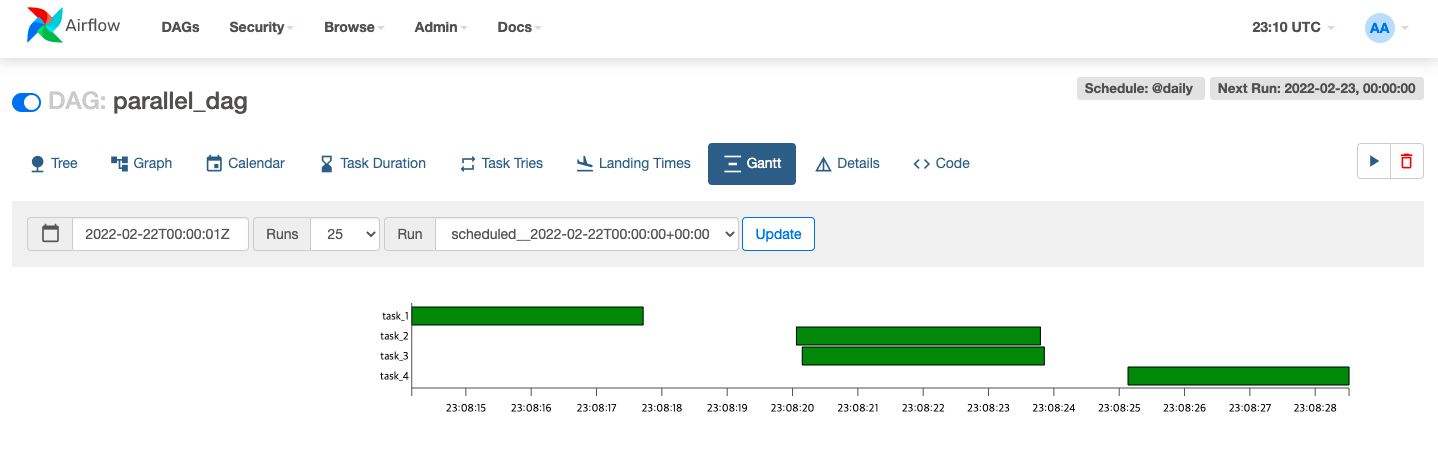
- How can you execute
task_2andtask_3at the same time? - What if you want to start scaling Airflow as you will use it in production, what is the easiest way?
- There are two things to change:
- database : from SQLite to PostgreSQL
- executor : from sequential executor to local executor
- as soon as you execute a task, a set process is created & that task is executed inside that subprocess
[Step1. database]
- Install PostgreSQL by
$ brew install postgresql - Go to PostgreSQL :
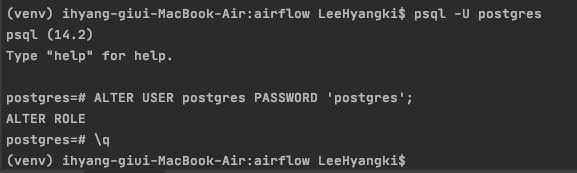
$ /usr/local/opt/postgres/bin/createuser -s postgres$ psql -U postgres
- In PostgreSQL :
ALTER USER postgres PASSWORD 'postgres';
- Install airflow with PostgreSQL :
$ pip install 'apache-airflow[postgres]'
- Fix airflow.cfg file
sql_alchemy_connpart as below :- from sqlite path to
postgresql+psycopg2://postgres:postgres@localhost/postgres

- we can check the currently used DB in airflow by
$ airflow db check
- from sqlite path to
[Step2. executor]
- Change executor from
SequentialExecutortoLocalExecutor

[Next stpe]
- Stop the older terminal (by ctrl+C) Stop the webserver
- Go to first terminal and hit
$ airflow db init
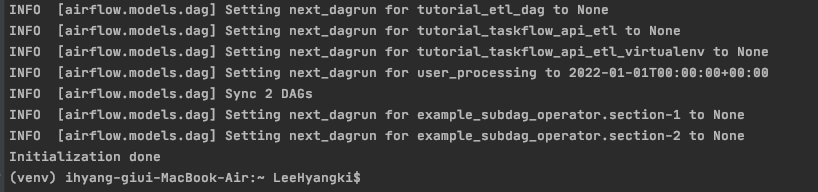
- Create user by
$ airflow users create -u admin -p admin -r Admin -f admin -l admin -e admin@airflow.com

- In new terminal, start webserver by
$ airflow webserver - In new terminal again, start scheduler by
$ airflow scheduler - Start webserver UI in http://localhost:8080
[What is the difference?]
Scale to the infinity with the Celery Executor (32)
- If you have hundreds of tasks to execute, obviously a single machine won't be enough at some point
- In order to scale as much as you need, you need to find another executor : 2 Executors
- Celery executor
- Kubernetes executor
- How to scale airflow as much as you need?
- all executors use a queue in order to execute your tasks in the right order
- having a queue is extremly important in order to keep the order in which your tasks should be executed
- what if instead of having a process putting out the tasks from the queue, you have a machine(worker)?
- that means you have a dedicated machine where your tasks are executed as well, and so you have more resources and ultimately you are able to execute as many tasks as you need
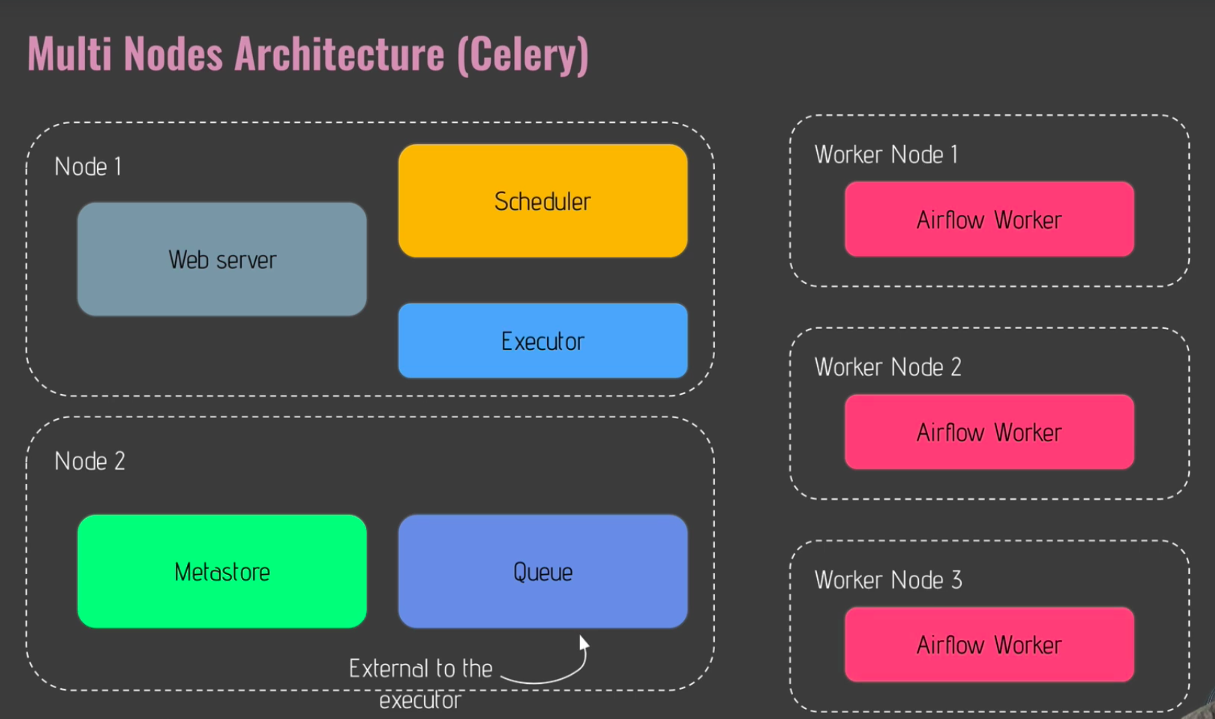
- The celery executor
- a distributed task system
- with celery executor, you are able to spread your work, able to execute your tasks among multiple machines
- basically, your tasks are executed in workers (machines)
- the more workers you have, the more tasks can be executed
- With celery executor, instead of having the queue inside of the executor, that queue is outside of it
- it is a 3rd party tool, and in that case it is redis (in node3, table below)
- redis is an in-memory database and we can use it as a queue system or messege broker system with the celery executor
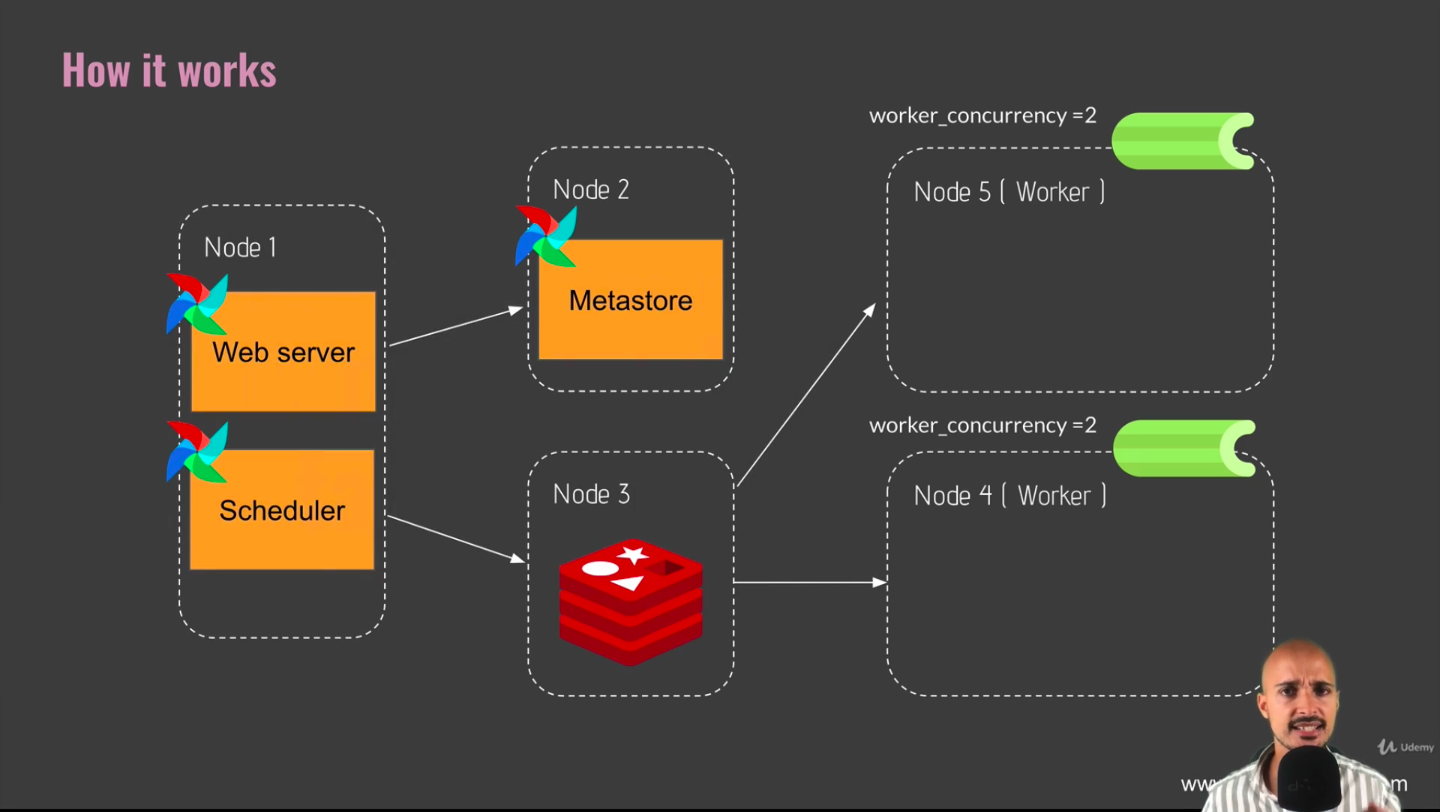
- each time you execute a task, that task is pushed first in redis and then a worker or machine will pull the task from redis in order to execute it
- parameter
worker_concurrency- number of tasks that you can execute at most in each of your workers
- defined in airflow.cfg file!
- What to remember :
- Celery executor allows you to execute your tasks on multiple machines
- Whereas, the local executor you are able to execute your task on the single machine
- you have to install an externel tool corresponding to the queue, where your tasks will be pushed and pulled out by the workers : redis
- each worker corresponding to machine, and so each machine has an airflow instance running where the tasks will be executed
- you have to make sure that all of your machines share the same dependecies
- e.g., if you have a task interacting with AWS, you have to make sure that boto3 which is the Python module in order to interact with AWS, is installed on all of your machines
- Celery executor allows you to execute your tasks on multiple machines
[Practice] Scaling Airflow with the Celery Executor in action! (33)
pip install 'apache-airflow[celery]'brew install redissudo nano /usr/local/etc/redis.conf- change
supervised notosupervised systemd - exit by ctrl + x, and save the file
brew services start redisredis-cli ping- in airflow.cfg, change things as below:
executor = CeleryExecutorbroker_url = redis://localhost:6379/0result_backend = db+postgresql://postgres:postgres@localhost/postgres
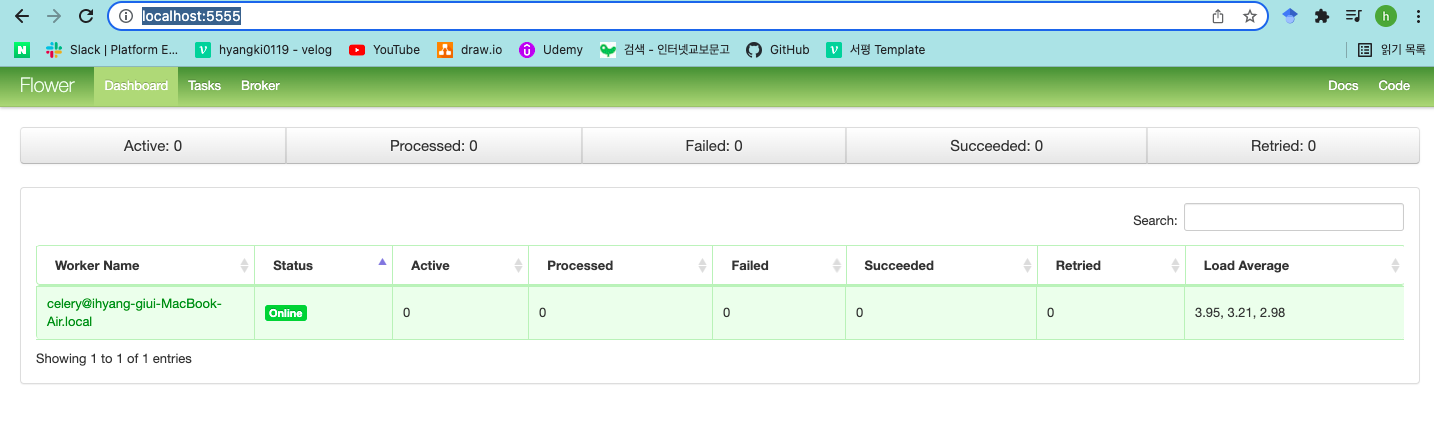
- How to start flower?
- In new terminal,
- go into the virtual env
$ airflow celery flower- in http://localhost:5555/, can check UI for flower!
- How can we add new machine(worker)?
- In new terminal,
- go into the virtual env
$ airflow celery worker- By executing this command, you are specifying the current machine where that command is executed is the worker, so that machine can be used in order to execute your tasks
- Keep in mind, in that case, we are executing that command on the same machine where airflow is running
- But in real scenario,you will actually execute that command on all the machine or on each machine that you want to add to your airflow instance to your celery cluster
- Before executing the tasks, start airflow!
- In 2nd terminal,
- go into the virtual env
$ airflow webserver- Then, open the 3rd terminal,
- go into the virtual env
$ airflow scheduler
- Check the UI
- in http://localhost:8080 : webserve
- in http://localhost:5555 : flower
- What about if we want to limit the number of tasks that we can execute?
- What about if we want to limit the number of dag runs that we can execute at the same time?
- What about if we want to limit the number of tasks that we can execute on each worker / on each machine?
- That's where you need to know some parameters that you will use a lot
Concurrency, the parameter you must know! (35)
- Being able to choose the right executor depending on your work load is super important! How to do that?
[Types of executor]
- Basically, you have sequential executor, in order to
- debug your tasks
- make some experiments
as you are about to execute one task after the other
- When you want to start getting Airflow, you will use local executor because pretty simple, easy to set up
- change the database to Postgres
- change the executor setting to local executor
- As soon as you know the resources of a single machine is not enough to execute all of your tasks, you will move to another executor that can be the celery executor
- as the celery executor allows you to execute your tasks among multiple machines
- you can execute as many tasks as you want
- you just need to add a new machine each time you need more resources
[Parameters regarding concurrency]
- Paramter need to know in order to fully control the way of your tasks are executed in Airflow
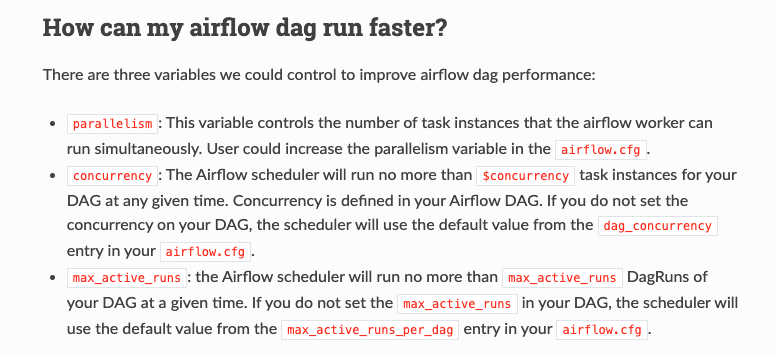
- parallelism
- the number of task instances that the airflow worker can run simultaneously
- defines the total number of tasks that you can execute in your entire Airflow instances (across all the dags, all the workers)
- In airflow.cfg,
parallelism=32by default - But usually, you want to limit the number of tasks that you can execute at the same time, for a specific dag dag_concurrency
- dag_concurrency
- The Airflow scheduler will run no more than
$concurrencytask instances for your DAG at any given time (for each worker) - the maximum number of tasks you can execute for a given dag across all of its dag run
- In airflow.cfg,
dag_concurrency - In your DAG,
concurrency- the exact same parameter
dag_concurrencybut applied only to this specific dag
- the exact same parameter
- The Airflow scheduler will run no more than
- max_active_runs
- the Airflow scheduler will run no more than
max_active_runsDagRuns of your DAG at a given time - to limit the number of dag runs that you can execute at the same time
- In airflow.cfg,
max_active_runs_per_dag - In your DAG,
max_active_runs
- the Airflow scheduler will run no more than
- parallelism

(그림 출처)
[Practice] Concurrency in practice (36)
- parallelism
- the maximum number of tasks that you can execute in parallel for your entire Airflow instances
- dag_concurrency
- the maximum number of tasks that you can execute in parallel for given dag across all of its dag run
- max_active_runs_per_dag
- the maximum number of dag runs that can be executed in parallel for a given dag
Section5 : Implementing Advanced Concepts in Airflow
Introduction (38)
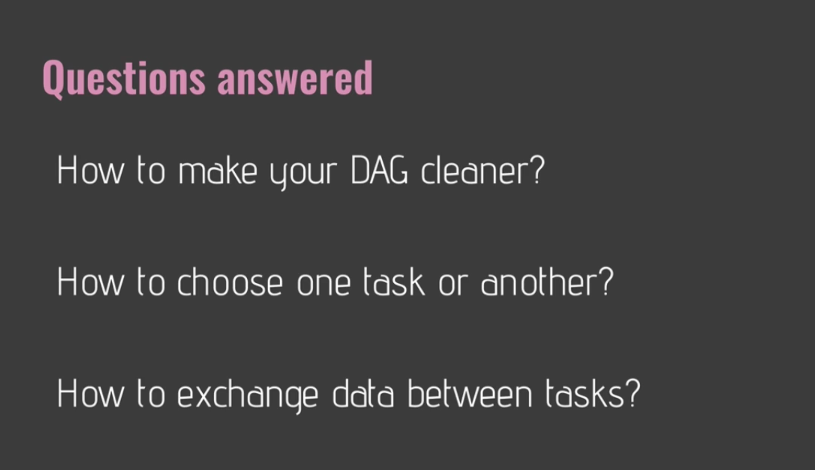
- How to make your DAG cleaner?
- By grouping tasks having the same functionality
- How to choose one task or another?
- According to condition
- How to exchange(share) data between tasks?

Adios Repetitive Patterns (39)


[Practice] Minimising DAGs with SubDAGs (40)
-
subdag
- a dag inside another dag
-
dags/{dag_file}.py
from airflow import DAG
from airflow.operators.bash import BashOperator
from airflow.operators.subdag import SubDagOperator
from subdags.subdag_parallel_dag import subdag_parallel_dag

from datetime import datetime

default_args = {
    'start_date': datetime(2020, 1, 1)
}

with DAG('parallel_dag', schedule_interval='@daily',
         default_args=default_args,
         catchup=True) as dag:
    task_1 = BashOperator(
        task_id='task_1',
        bash_command='sleep 3'
    )

    processing = SubDagOperator(
        task_id='processing_tasks',
        subdag=subdag_parallel_dag('parallel_dag', 'processing_tasks', default_args)
    )

    task_4 = BashOperator(
        task_id='task_4',
        bash_command='sleep 3'
    )

task_1 >> processing >> task_4- dags/subdags/{subdag_file}.py
from airflow import DAG
from airflow.operators.bash import BashOperator

def subdag_parallel_dag(parent_dag_id, child_dag_id, default_args):
    with DAG(dag_id=f'{parent_dag_id}.{child_dag_id}', default_args=default_args) as dag:
        task_2 = BashOperator(
            task_id='task_2',
            bash_command='sleep 3'
        )

        task_3 = BashOperator(
            task_id='task_3',
            bash_command='sleep 3'
        )

return dag- Subdag is not recommended at all
- You should not use subdag
- DEADLOCKS
- at some points, you might not be able to execute any more tasks in your airflow instance
- COMPLEXITY
- new folder, new function, new dags sharing the same default arguments
- Sequential executor
- By default!
- Even if in airflow.cfg, we have local executor!
- DEADLOCKS
[Practice] Adios SubDAGs, Welcome TaskGroups! (41)
- dags/{dag_file}.py
from airflow import DAG
from airflow.operators.bash import BashOperator
from airflow.utils.task_group import TaskGroup


from subdags.subdag_parallel_dag import subdag_parallel_dag

from datetime import datetime

default_args = {
    'start_date': datetime(2020, 1, 1)
}

with DAG('parallel_dag', schedule_interval='@daily',
         default_args=default_args,
         catchup=True) as dag:
    task_1 = BashOperator(
        task_id='task_1',
        bash_command='sleep 3'
    )

    with TaskGroup('processing_tasks') as processing_tasks:
        task_2 = BashOperator(
            task_id='task_2',
            bash_command='sleep 3'
        )

        task_3 = BashOperator(
            task_id='task_3',
            bash_command='sleep 3'
        )

    task_4 = BashOperator(
        task_id='task_4',
        bash_command='sleep 3'
    )

task_1 >> processing_tasks >> task_4- Task group : super powerful, super flexible
- Forget about subdags, and go with task groups!
Sharing data between tasks with XComs (42)
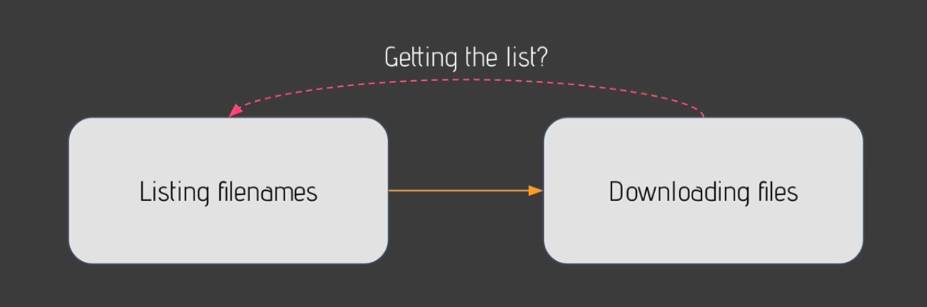
- You want to share some data between your tasks
- How can you make sure that whenever you do that, you won't explode the memory of Airflow?
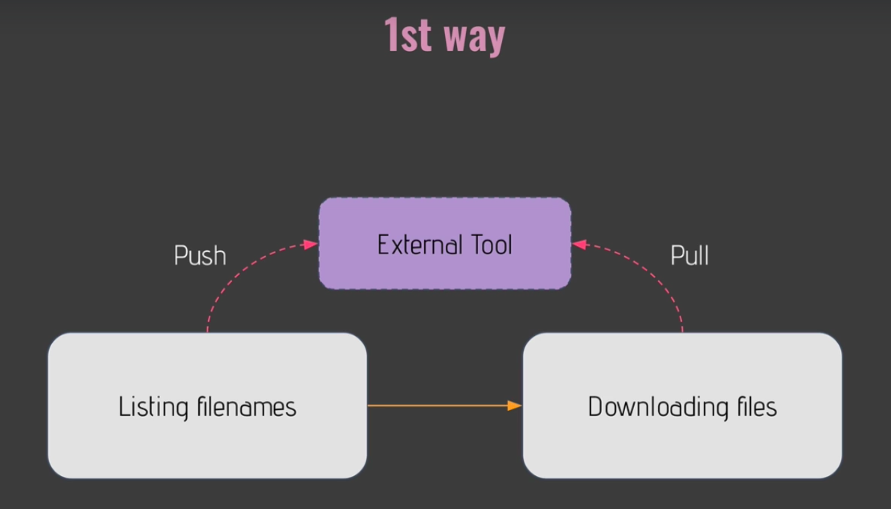
- Way 1) Exeternal tool
- Database, AWS S3, ...
- Works well, byt adds complexity to your data pipeline
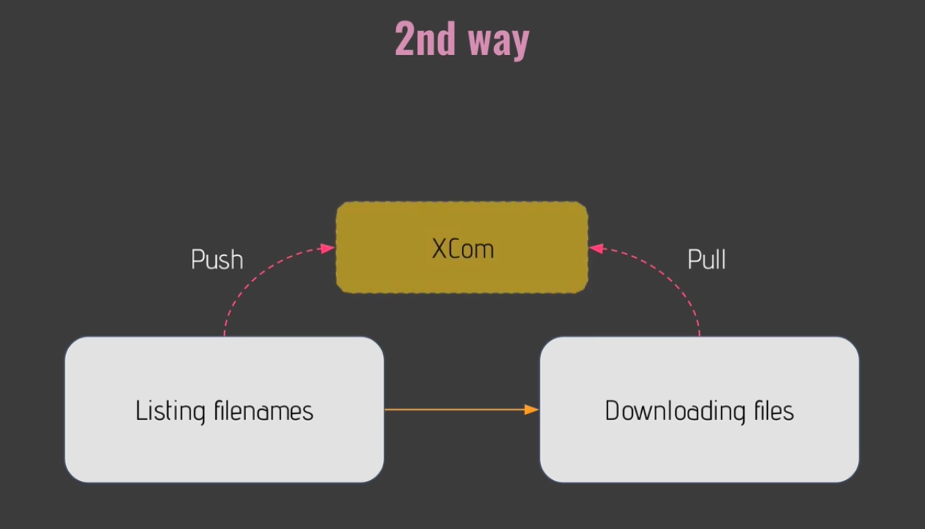
- Way 2) XComs
- means "cross communication"
- allows to exchange small amount of data
- XComs is a little object with
- Key : which is used as an identifier in order to pull your data from another task
- Value : correspoding to the data
- Xcome are limited in size!
- If your airflow meta database is size!
- SQLite : 2GB
- Postgres : 1GB
- mySQL : 64KB
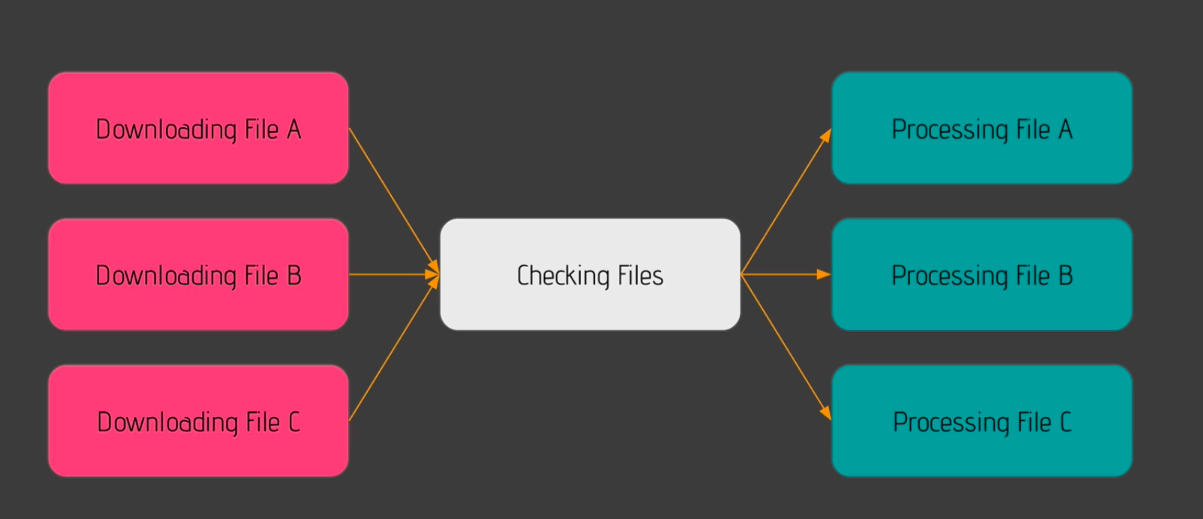
[Practice] XComs in action! (43)
- In order to choose the best performing machine learning model!
from airflow import DAG
from airflow.operators.bash import BashOperator
from airflow.operators.python import PythonOperator
from airflow.operators.subdag import SubDagOperator
from airflow.utils.task_group import TaskGroup

from random import uniform
from datetime import datetime

default_args = {
    'start_date': datetime(2020, 1, 1)
}

def _training_model(ti):
    accuracy = uniform(0.1, 10.0)
    print(f'model\'s accuracy: {accuracy}')
    ti.xcom_push(key='model_accuracy', value=accuracy)

def _choose_best_model(ti):
    print('choose best model')
    accuracies = ti.xcom_pull(key='model_accuracy', task_ids=[
        'processing_tasks.training_model_a',
        'processing_tasks.training_model_b',
        'processing_tasks.training_model_c'
    ])
    print(accuracies)

with DAG('xcom_dag', schedule_interval='@daily', default_args=default_args, catchup=False) as dag:

    downloading_data = BashOperator(
        task_id='downloading_data',
        bash_command='sleep 3',
        do_xcom_push=False
    )

    with TaskGroup('processing_tasks') as processing_tasks:
        training_model_a = PythonOperator(
            task_id='training_model_a',
            python_callable=_training_model
        )

        training_model_b = PythonOperator(
            task_id='training_model_b',
            python_callable=_training_model
        )

        training_model_c = PythonOperator(
            task_id='training_model_c',
            python_callable=_training_model
        )

    choose_model = PythonOperator(
        task_id='choose_model',
        python_callable=_choose_best_model
    )

    downloading_data >> processing_tasks >> choose_model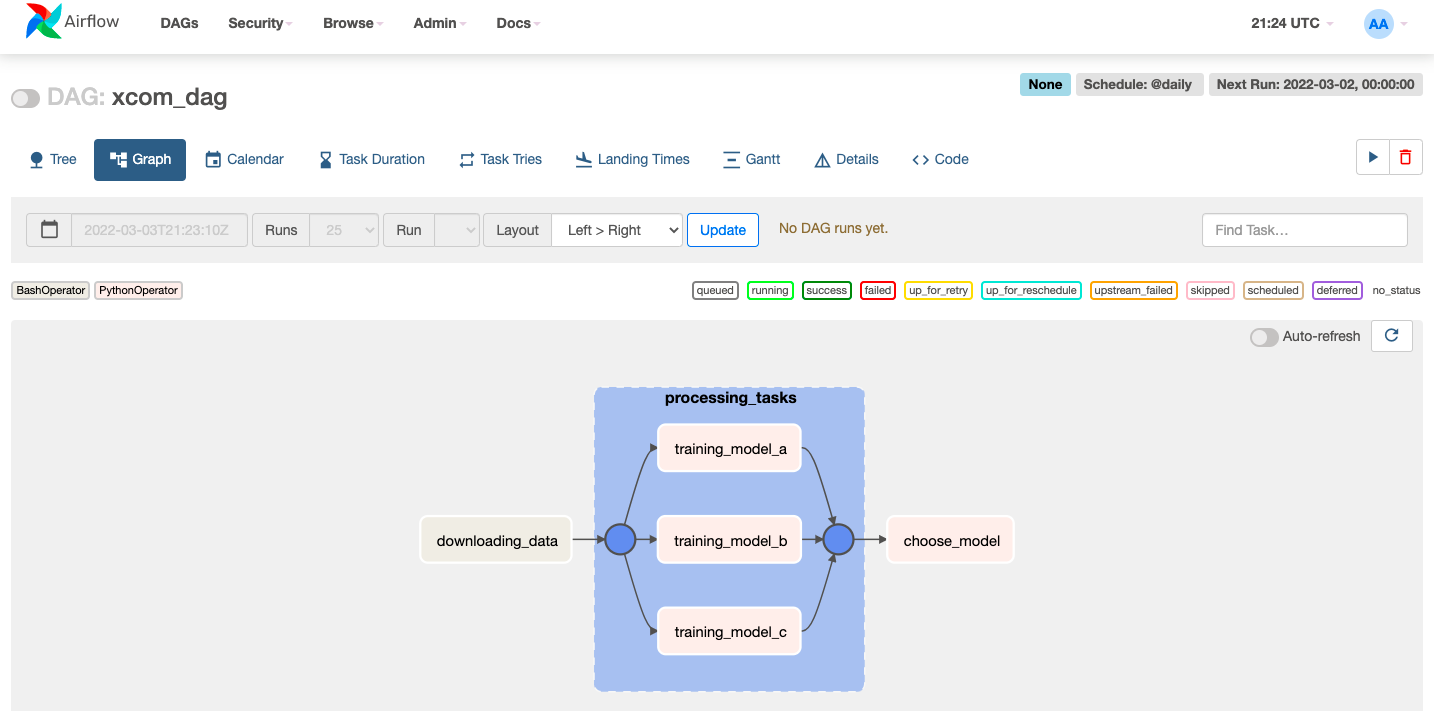
- Cf. If you push twice xcom with the same key and the same execution date, the previous xcom will be overwritten by the new one
- BashOperator makes xcom by dafault!
- If you don't want, set
do_xcom_push=False!
- If you don't want, set
Choosing a specific path in your DAG (44)
- Tho choose one task or another accorging to criteria or value
- e.g. you might extract a value from your database, if that value is
- empty execute one task
- not empty execute another task
- e.g. you might extract a value from your database, if that value is
- How to?
BranchPythonOperator- allows you to execute one task or another by returning the task id of the task that you want to execute
[Practice] Executing a task according to a condition (45)
- 1st example
from airflow import DAG
from airflow.operators.bash import BashOperator
from airflow.operators.python import PythonOperator, BranchPythonOperator
from airflow.operators.subdag import SubDagOperator
from airflow.utils.task_group import TaskGroup
from airflow.operators.dummy import DummyOperator

from random import uniform
from datetime import datetime

default_args = {
    'start_date': datetime(2020, 1, 1)
}

def _training_model(ti):
    accuracy = uniform(0.1, 10.0)
    print(f'model\'s accuracy: {accuracy}')
    ti.xcom_push(key='model_accuracy', value=accuracy)

def _choose_best_model(ti):
    print('choose best model')
    accuracies = ti.xcom_pull(key='model_accuracy', task_ids=[
        'processing_tasks.training_model_a',
        'processing_tasks.training_model_b',
        'processing_tasks.training_model_c'
    ])
    print(accuracies)

def _is_accurate(ti):
    ti.xcom_pull(key='model_accura')
    return('accurate')

with DAG('xcom_dag', schedule_interval='@daily', default_args=default_args, catchup=False) as dag:

    downloading_data = BashOperator(
        task_id='downloading_data',
        bash_command='sleep 3',
        do_xcom_push=False
    )

    with TaskGroup('processing_tasks') as processing_tasks:
        training_model_a = PythonOperator(
            task_id='training_model_a',
            python_callable=_training_model
        )

        training_model_b = PythonOperator(
            task_id='training_model_b',
            python_callable=_training_model
        )

        training_model_c = PythonOperator(
            task_id='training_model_c',
            python_callable=_training_model
        )

    choose_model = PythonOperator(
        task_id='choose_model',
        python_callable=_choose_best_model
    )

    accurate = DummyOperator(
        task_id='accurate'
    )

    inaccurate = DummyOperator(
        task_id='inaccurate'
    )

    downloading_data >> processing_tasks >> choose_model
choose_model >> [accurate, inaccurate]- 2nd example
from airflow import DAG
from airflow.operators.bash import BashOperator
from airflow.operators.python import PythonOperator, BranchPythonOperator
from airflow.operators.subdag import SubDagOperator
from airflow.utils.task_group import TaskGroup
from airflow.operators.dummy import DummyOperator
from random import uniform
from datetime import datetime
default_args = {
'start_date': datetime(2020, 1, 1)
}
def _training_model(ti):
accuracy = uniform(0.1, 10.0)
print(f'model\'s accuracy: {accuracy}')
ti.xcom_push(key='model_accuracy', value=accuracy)
def _choose_best_model(ti):
print('choose best model')
accuracies = ti.xcom_pull(key='model_accuracy', task_ids=[
'processing_tasks.training_model_a',
'processing_tasks.training_model_b',
'processing_tasks.training_model_c'
])
for accuracy in accuracies:
if accuracy > 2:
return 'accurate'
return('inaccurate')
with DAG('xcom_dag', schedule_interval='@daily', default_args=default_args, catchup=False) as dag:
downloading_data = BashOperator(
task_id='downloading_data',
bash_command='sleep 3',
do_xcom_push=False
)
with TaskGroup('processing_tasks') as processing_tasks:
training_model_a = PythonOperator(
task_id='training_model_a',
python_callable=_training_model
)
training_model_b = PythonOperator(
task_id='training_model_b',
python_callable=_training_model
)
training_model_c = PythonOperator(
task_id='training_model_c',
python_callable=_training_model
)
choose_model = PythonOperator(
task_id='choose_model',
python_callable=_choose_best_model
)
accurate = DummyOperator(
task_id='accurate'
)
inaccurate = DummyOperator(
task_id='inaccurate'
)
storing = DummyOperator(
task_id='storing'
)
downloading_data >> processing_tasks >> choose_model
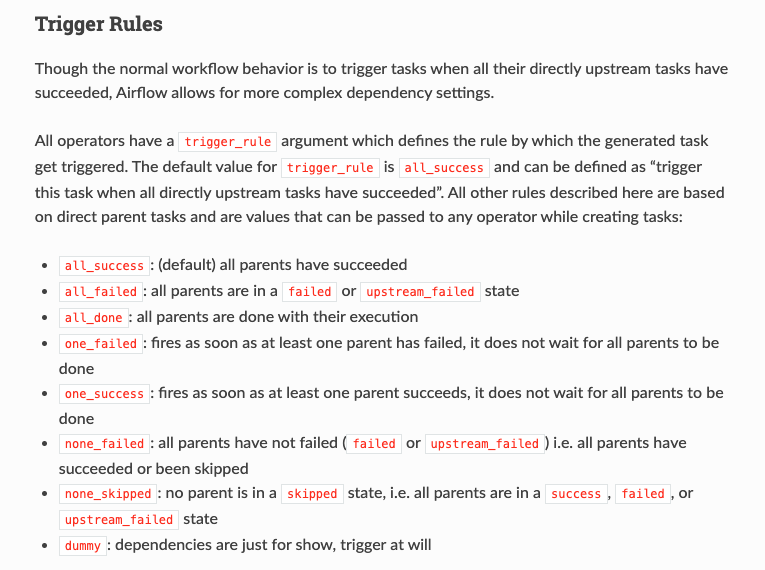
choose_model >> [accurate, inaccurate] >> storingTrigger rules or how tasks get triggered (46)

[Trigger rules]
-
Allow you to change the default behavior of your tasks
-
You can choose how a task is getting triggered by changing its trigger rules
- e.g. if you want to execute a task as soon as one of its upstream task fails, you will use trigger rules
- e.g. if you want to execute a task as soon as all the upstream tasks have failed, you will define a trigger rules for that
-
There are 9 different trigger rules in order to change the way your tasks are getting triggered in your data pipelines
-
Airflow Documentation : Trigger rules
all_successall_failedall_done
- execute the task, whatever the status of the upstream tasks
one_success
- trigger the task as soon as one of thr upstream tasks succeeds
one_failednone_failed
- trigger the task as long as your parent tasks have succeeded or have been skiiped
- all parents have to either succeed or be skipped
none_failed_or_skipped
- trigger the task as long as all parents haven't failed but at least one parent succeed
- at least one parent has to succeed in order to trigger the task
[Practice] Changing the way your tasks are triggered (47)
- dags/{dag_file}.py
all_succeed
from airflow import DAG
from airflow.operators.bash import BashOperator

from datetime import datetime

default_args = {
    'start_date': datetime(2020, 1, 1)
}

with DAG('trigger_rule', schedule_interval='@daily', default_args=default_args, catchup=False) as dag:

    taks_1 = BashOperator(
        task_id='task_1',
        bash_command='exit 0',
        do_xcom_push=False
    )

    taks_2 = BashOperator(
        task_id='taks_2',
        bash_command='exit 0',
        do_xcom_push=False
    )

    taks_3 = BashOperator(
        task_id='taks_3',
        bash_command='exit 0',
        do_xcom_push=False
    )

    [taks_1, taks_2] >> taks_3
all_failed
from airflow import DAG
from airflow.operators.bash import BashOperator

from datetime import datetime

default_args = {
    'start_date': datetime(2020, 1, 1)
}

with DAG('trigger_rule', schedule_interval='@daily', default_args=default_args, catchup=False) as dag:

    taks_1 = BashOperator(
        task_id='task_1',
        bash_command='exit 1',
        do_xcom_push=False
    )

    taks_2 = BashOperator(
        task_id='taks_2',
        bash_command='exit 1',
        do_xcom_push=False
    )

    taks_3 = BashOperator(
        task_id='taks_3',
        bash_command='exit 0',
        do_xcom_push=False,
        trigger_rule='all_failed'
    )

    [taks_1, taks_2] >> taks_3
all_done
from airflow import DAG
from airflow.operators.bash import BashOperator

from datetime import datetime

default_args = {
    'start_date': datetime(2020, 1, 1)
}

with DAG('trigger_rule', schedule_interval='@daily', default_args=default_args, catchup=False) as dag:

    taks_1 = BashOperator(
        task_id='task_1',
        bash_command='exit 1',
        do_xcom_push=False
    )

    taks_2 = BashOperator(
        task_id='taks_2',
        bash_command='exit 0',
        do_xcom_push=False
    )

    taks_3 = BashOperator(
        task_id='taks_3',
        bash_command='exit 0',
        do_xcom_push=False,
        trigger_rule='all_done'
    )

    [taks_1, taks_2] >> taks_3
one_failed
from airflow import DAG
from airflow.operators.bash import BashOperator

from datetime import datetime

default_args = {
    'start_date': datetime(2020, 1, 1)
}

with DAG('trigger_rule', schedule_interval='@daily', default_args=default_args, catchup=False) as dag:

    taks_1 = BashOperator(
        task_id='task_1',
        bash_command='exit 1',
        do_xcom_push=False
    )

    taks_2 = BashOperator(
        task_id='taks_2',
        bash_command='sleep 30',
        do_xcom_push=False
    )

    taks_3 = BashOperator(
        task_id='taks_3',
        bash_command='exit 0',
        do_xcom_push=False,
        trigger_rule='one_failed'
    )

    [taks_1, taks_2] >> taks_3
Section6 : Creating Airlfow Plugins with Elasticsearch and PostgreSQL
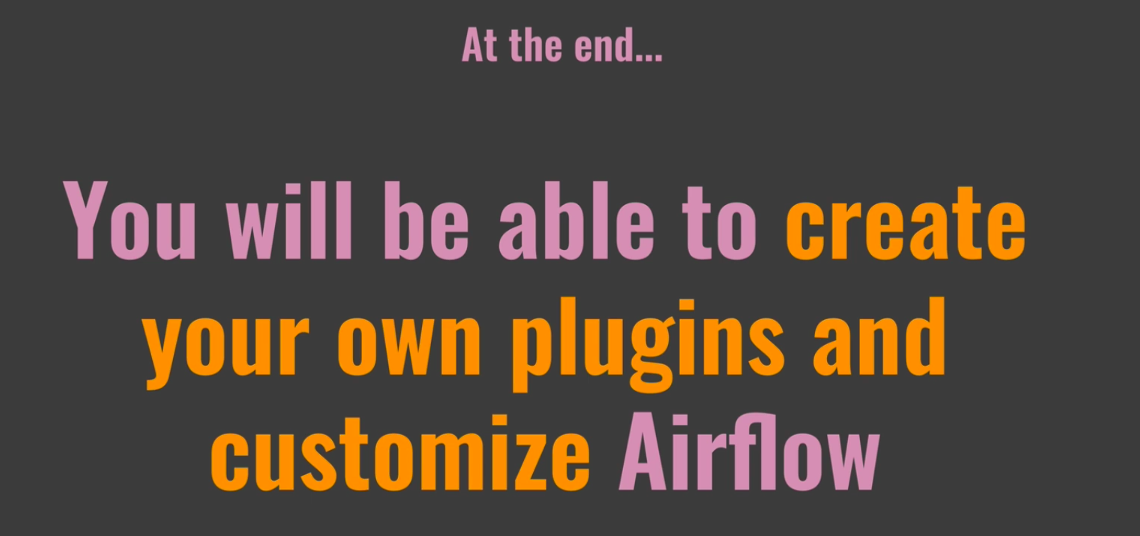
Introduction (48)
- A new aspect of Airlfow : plugin
- you can customize Airflow as much as you want
- as soon as a newl tool is out, you don't have to wait for the community or for someone else to create the new operator
- you can create your own operator right away
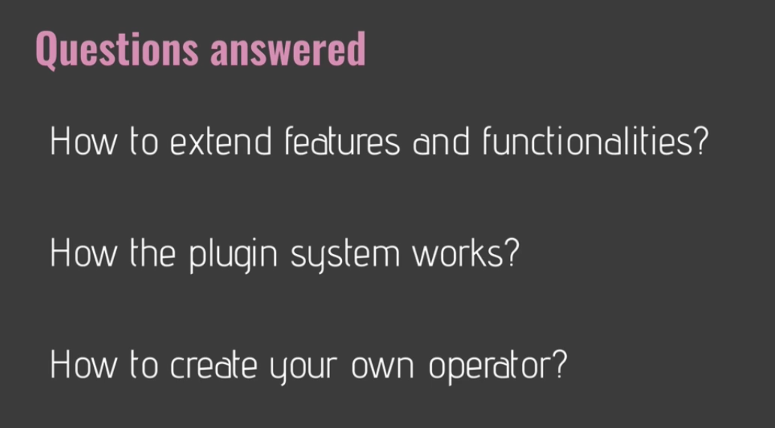
How the plugin system works? (50)
- Plugin system in Airflow
- What you need to create plugins
- Where you should put them
- What you can customize in Airflow
- Airflow is not only powerful because you can conde you data pipelines using Python, but you can extend its functionalities and features so that at the end you will get to know, for instance, fitting with your needs
- What you cna customized in Airflow
- Operators
- Views
- User interface : new pages, new menu links,...
- Hooks
- How can we add plugins in Airflow?
- By default, there are 3 folders that Airflow monitors for you
- plugins
- config
- dags
- By default, there are 3 folders that Airflow monitors for you
- How plugins are loaded in Airflow
- Lazy loaded
- which meanas whenever you add a new plugin in your airflow instance, you have to restart it
- Otherwise Airflow won't be aware of your new plugin
- Once you have added your plugins, you can definitely modify it without having to restart your airflow instance again and again
- You can modify that behavior by changing the parameter lazy_load_plugins
- But strongly advise you to keep the default setting as you might end up with weird behaviors in you airflow instance
- Lazy loaded
[Practice] Creating a hook interating with Elasticsearch (51)
- A plugin interating with ElasticSearch
- Two things:
- hook : in order to interact with ElasticSearch
- operator : in order to transfer data from Postgres to ElasticSearch
- Two things:
- BaseHook
- is used by all hooks in order to share minimum attributes & methods
- also whenever a class inherits from BaseHook, that indicates to Airflow that 'This class is a Hook'
- plugins/elasticsearch_plugin/hooks/elastic_hook.py
from airflow.hooks.base import BaseHook

from elasticsearch import Elasticsearch

es = Elasticsearch()

class ElasticHook(BaseHook):

    def __init__(self, conn_id='elasticsearch_default', *args, **kwargs):
        super().__init__(*args, **kwargs)
        conn = self.get_connection(conn_id)

        conn_config = {}
        hosts = []

        if conn.host:
            hosts = conn.host.split(',')
        if conn.port:
            conn_config['port'] = int(conn.port)
        if conn.login:
            conn_config['http_auth'] = (conn.login, conn.password)

        self.es = Elasticsearch(hosts, **conn_config)
        self.index = conn.schema

    def info(self):
        return self.es.info()

    def set_index(self, index):
        self.index = index

    def add_doc(self, index, doc_type, doc):
        self.set_index(index)
        res = self.es.index(index=index, doc_type=doc_type, doc=doc)
return res- dags/elasticsearch_dag.py
from airflow import DAG
from elasticsearch_plugin.hooks.elastic_hook import ElasticHook
from airflow.operators.python import PythonOperator

from datetime import datetime

default_args = {
    'start_date': datetime(2022, 1, 1)
}

def _print_es_info():
    hook = ElasticHook()
    print(hook.info())

with DAG('elasticsearch_dag', schedule_interval='@daily',
         default_args=default_args,
         catchup=False) as dag:

    print_es_info = PythonOperator(
        task_id='print_es_info',
        python_callable=_print_es_info
    )
[Practice] Creating the PostgresToElasticOperator (52)
- plugins/elasticsearch_plugin/hooks/elastic_hook.py
from airflow.hooks.base import BaseHook

from elasticsearch import Elasticsearch

es = Elasticsearch()

class ElasticHook(BaseHook):

    def __init__(self, conn_id='elasticsearch_default', *args, **kwargs):
        super().__init__(*args, **kwargs)
        conn = self.get_connection(conn_id)

        conn_config = {}
        hosts = []

        if conn.host:
            hosts = conn.host.split(',')
        if conn.port:
            conn_config['port'] = int(conn.port)
        if conn.login:
            conn_config['http_auth'] = (conn.login, conn.password)

        self.es = Elasticsearch(hosts, **conn_config)
        self.index = conn.schema

    def info(self):
        return self.es.info()

    def set_index(self, index):
        self.index = index

    def add_doc(self, index, doc_type, doc):
        self.set_index(index)
        res = self.es.index(index=index, doc_type=doc_type, body=doc)
return res- plugins/elasticsearch_plugin/operators/postgres_to_elastic.py
from airflow.models import BaseOperator
from airflow.providers.postgres.hooks.postgres import PostgresHook
from elasticsearch_plugin.hooks.elastic_hook import ElasticHook

from contextlib import closing
import json

class PostgresToElasticOperator(BaseOperator):

    def __init__(self, sql, index,
                 postgres_conn_id='postgres_default',
                 elastic_conn_id='elasticsearch_default', *args, **kwargs):
        super(PostgresToElasticOperator, self).__init__(*args, **kwargs)

        self.sql = sql
        self.index = index
        self.postgres_conn_id = postgres_conn_id
        self.elastic_conn_id = elastic_conn_id

    def execute(self, context):
        es = ElasticHook(conn_id=self.elastic_conn_id)
        pg = PostgresHook(postgress_conn_id=self.postgres_conn_id)
        with closing(pg.get_conn()) as conn:
            with closing(conn.cursor()) as cur:
                cur.itersize = 1000
                cur.execute(self.sql)
                for row in cur:
                    doc = json.dumps(row, indent=2)
es.add_doc(index=self.index, doc_type='external', doc=doc)- dags/elasticsearch_dag.py
from airflow import DAG
from elasticsearch_plugin.hooks.elastic_hook import ElasticHook
from elasticsearch_plugin.operators.postgres_to_elastic import PostgresToElasticOperator
from airflow.operators.python import PythonOperator

from datetime import datetime

default_args = {
    'start_date': datetime(2022, 1, 1)
}

def _print_es_info():
    hook = ElasticHook()
    print(hook.info())

with DAG('elasticsearch_dag', schedule_interval='@daily',
         default_args=default_args,
         catchup=False) as dag:

    print_es_info = PythonOperator(
        task_id='print_es_info',
        python_callable=_print_es_info
    )

    connections_to_es = PostgresToElasticOperator(
        task_id='connections_to_es',
        sql='SELECT * FROM connection',
        index='connections'
    )

print_es_info >> connections_to_es- To start psql, on mac,
$ psql postgres$ curl -X GET "http://localhost:9200/connections/_search" -H "Content-type: application/json" -d '{"query":{"match_all":{}}}'Section7 : Using Apache Airflow with Docker

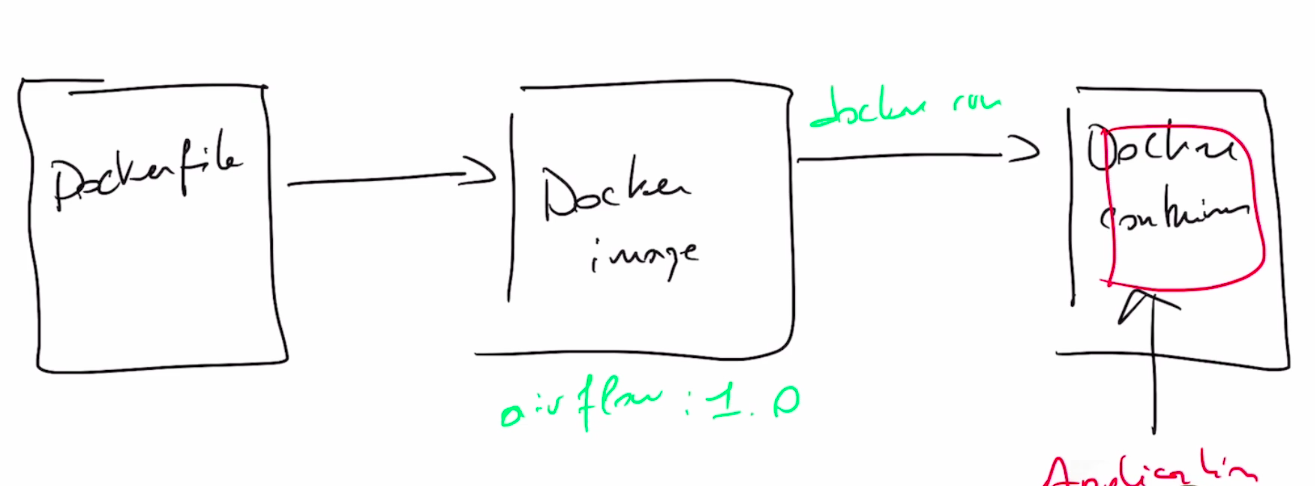
Quick reminder about docker (54)
- Docker allows you to install and run software regardless of the installed dependencies and the operating system used
- With docker, you are able to run you applications on any operating system without worrying about dependencies
-
Docker compose

-
It is better to seperate your containers according to the components you want to run : webserver, scheduler, DB
- All of these containers will share the same network
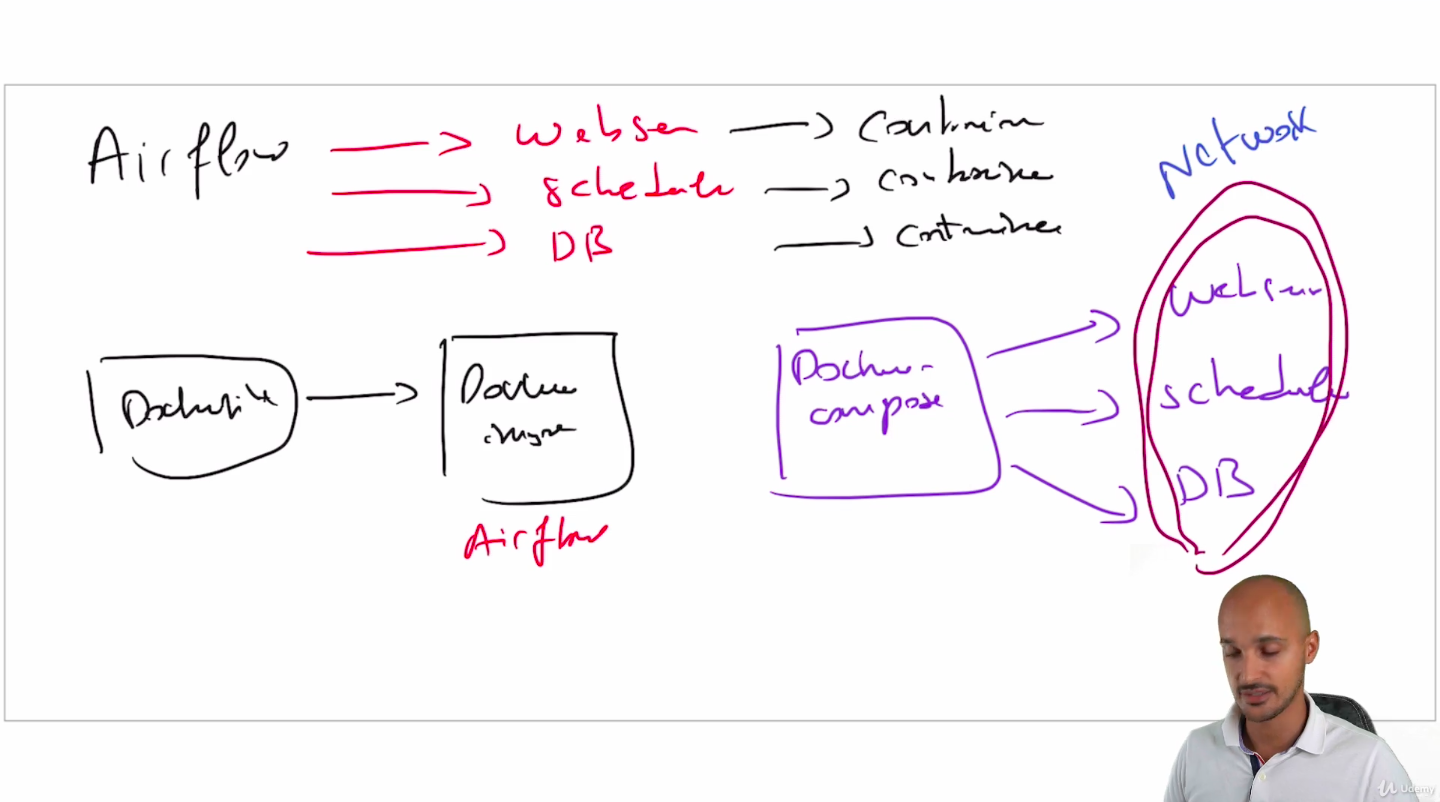
- All of these containers will share the same network