BLENDING
- 그리려고 하는 픽셀과 프레임버퍼에 저장된 픽셀 간의 연산
- 대부분의 경우 반투명한 오브젝트를 그리는 경우에 사용함
- 포토샵에서 제공하는 레이어, 노말, 에드, 번, 라이트닝 오버레이 등의 연산
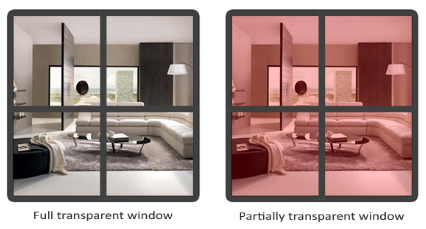
블랜딩 함수
- 블랜딩 활성화
glEnable(GL_BLEND);- 블랜딩 함수
glBlendFunc(GL_SRC_ALPHA, GL_ONE_MINUS_SRC_ALPHA);- 위의 값이 디폴트
- 두 개의 인자 사용
-
블랜딩 수식
glBlendFunc으로F값을 설정할 수 있음glBlendEquation으로 가운데 연산자 설정 가능
![[blending_equation.png]]- source color : 내가 지금 그릴려고하는 픽셀의 색상
- destination color: 이미 그 컬러 버퍼에 그려져 있는 컬러
- F는 Factor:
glBlendFunc으로 설정
-
예시
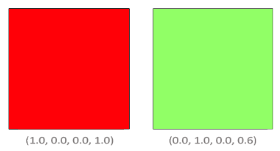

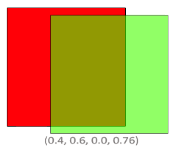
-
glBlendFunc에서 사용 가능한 인자
-GL_ZERO,GL_ONE
-GL_SRC_COLOR,GL_SRC_ALPHA
-GL_ONE_MINUS_SRC_COLOR,GL_ONE_MINUS_SRC_ALPHA
-GL_DST_COLOR,GL_DST_ALPHA
-GL_ONE_MINUS_DST_COLOR,GL_ONE_MINUS_DST_ALPHA
-GL_CONSTANT_COLOR,GL_CONSTANT_ALPHA
-GL_ONE_MINUS_CONSTANT_COLOR,GL_ONE_MINUS_CONSTANT_ALPHA -
glBlendFuncSeparate함수를 이용하여 color / alpha 별로 별도의 수식 적용 가능
glBlendFuncSeparate(GL_SRC_ALPHA, GL_ONE_MINUS_SRC_ALPHA, GL_ONE, GL_ZERO);- (source color, destination color, source alpha, destination alpha)
glBlendEquation에서 사용 가능한 인자
-GL_FUNC_ADD:src + dst
-GL_FUNC_SUBTRACT:src - dst
-GL_FUNC_REVERSE_SUBTRACT:dst - src
-GL_MIN:min(src, dst)
-GL_MAX:max(src, dst)
실습 텍스처
- 예제에 사용될 반투명 텍스처 다운로드
- blending_transparent_window.png
- ![[blending_transparent_window.png]]
텍스처 쉐이더 수정
shader/texture.fs수정
#version 330 core
in vec4 vertexColor;
in vec2 texCoord;
out vec4 fragColor;

uniform sampler2D tex;

void main() {
    fragColor = texture(tex, texCoord);
}
텍스처 프로그램 추가
Context에m_textureProgram멤버 추가
- 텍스처 프로그램을 로딩하기 위해
	bool Init();
	ProgramUPtr m_program;
	ProgramUPtr m_simpleProgram;
ProgramUPtr m_textureProgram;Context::Init()에서m_textureProgram초기화
	m_textureProgram = Program::Create("./shader/texture.vs", "./shader/texture.fs");
	if (!m_textureProgram)
		return false;
plane(판) 메쉬 생성 함수 작성
Mesh::CreatePlane()함수 추가
CLASS_PTR(Mesh);
class Mesh {
public:
	static MeshUPtr Create(
	    const std::vector<Vertex>& vertices,
	    const std::vector<uint32_t>& indices,
	    uint32_t primitiveType);
	static MeshUPtr CreateBox();
static MeshUPtr CreatePlane();Mesh::CreatePlane()함수 구현
MeshUPtr Mesh::CreatePlane() {
	std::vector<Vertex> vertices = {
		Vertex { glm::vec3(-0.5f, -0.5f, 0.0f), glm::vec3( 0.0f,  0.0f, 1.0f), glm::vec2(0.0f, 0.0f) },
	    Vertex { glm::vec3( 0.5f, -0.5f, 0.0f), glm::vec3( 0.0f,  0.0f, 1.0f), glm::vec2(1.0f, 0.0f) },
	    Vertex { glm::vec3( 0.5f,  0.5f, 0.0f), glm::vec3( 0.0f,  0.0f, 1.0f), glm::vec2(1.0f, 1.0f) },
	    Vertex { glm::vec3(-0.5f,  0.5f, 0.0f), glm::vec3( 0.0f,  0.0f, 1.0f), glm::vec2(0.0f, 1.0f) },
	};

	std::vector<uint32_t> indices = {
		0,  1,  2,  2,  3,  0,
	};

	return Create(vertices, indices, GL_TRIANGLES);
}
창문 만들기
-
CreatePlane()과m_textureProgram,texture.fs를 사용 -
Context에m_plane멤버 및m_windowTexture추가
	MeshUPtr m_box;
	MeshUPtr m_plane;

	MaterialPtr m_planeMaterial;
	MaterialPtr m_box1Material;
	MaterialPtr m_box2Material;
	TexturePtr m_windowTexture;
m_windowTexture는 굳이Material일 필요가 없음, 단일 텍스처만사용하면 된다.
Context::Init()에서m_plane,m_windowTexture초기화
m_plane = Mesh::CreatePlane();m_windowTexture = Texture::CreateFromImage(
Image::Load("./image/blending_transparent_window.png").get());Context::Render()에서m_plane,m_windowTexture,m_textureProgram으로 드로잉
	glEnable(GL_BLEND);
	glBlendFunc(GL_SRC_ALPHA, GL_ONE_MINUS_SRC_ALPHA);

	m_textureProgram->Use();
	m_windowTexture->Bind();
	m_textureProgram->SetUniform("tex", 0);

	modelTransform =
		glm::translate(glm::mat4(1.0f), glm::vec3(0.0f, 0.5f, 4.0f));
	transform = projection * view * modelTransform;
	m_textureProgram->SetUniform("transform", transform);
	m_plane->Draw(m_textureProgram.get());
상세 설명:
블랜딩 활성화
glEnable(GL_BLEND);
glBlendFunc(GL_SRC_ALPHA, GL_ONE_MINUS_SRC_ALPHA);- source color:
GL_SRC_ALPHA= 알파 값 곱하기 - destination color(버퍼에 이미 저장되어 있는 컬러):
GL_ONE_MINUS_SRC_ALPHA= 1-소스 컬러의 알파값를 곱한다.
텍스처 바인딩
m_textureProgram->Use();
m_windowTexture->Bind();
m_textureProgram->SetUniform("tex", 0);- 사실 텍스처 바인딩하는건 항상 헷갈림
그리기
modelTransform =
	glm::translate(glm::mat4(1.0f), glm::vec3(0.0f, 0.5f, 4.0f));
transform = projection * view * modelTransform;
m_textureProgram->SetUniform("transform", transform);
m_plane->Draw(m_textureProgram.get());
여러개의 창문
- 창문을 여러 개로 늘려보자
	modelTransform =
		glm::translate(glm::mat4(1.0f), glm::vec3(0.2f, 0.5f, 5.0f));
	transform = projection * view * modelTransform;
	m_textureProgram->SetUniform("transform", transform);
	m_plane->Draw(m_textureProgram.get());

	modelTransform =
		glm::translate(glm::mat4(1.0f), glm::vec3(0.4f, 0.5f, 6.0f));
	transform = projection * view * modelTransform;
	m_textureProgram->SetUniform("transform", transform);
m_plane->Draw(m_textureProgram.get());-
빌드 및 결과
- 정면에서 보면 정확한 결과물
- 뒤에서 보면 잘못된 결과 발생 -
잘못된 결과가 발생하는 원인
- 카메라 앞의 유리창을 먼저 그리는 경우
- 카메라와 가까운 유리창이 depth buffer 값을 갱신
- 뒤의 유리창은 depth test를 통과하지 못하고 그려지지 않음
해결 방법
투명한 부분을 그리는 문제 (창틀 구석)
-
fragment discard
- fragment shader에서 discard를 호출하면 해당 픽셀을 그리지 않을 수 있음
- 해당 픽셀을 그리지 않으므로 해당 픽셀의 depth test도 하지 않게 된다. -
shader/texture.fs를 다음과 같이 수정
#version 330 core
in vec4 vertexColor;
in vec2 texCoord;
out vec4 fragColor;

uniform sampler2D tex;

void main() {
    vec4 pixel = texture(tex, texCoord);
    if (pixel.a < 0.01)
        discard;
    fragColor = pixel;
}- 픽셀의 알파값이 0.01 보다 작으면 해당 픽셀을 버림.
카메라와 가까운 부분을 먼저 그려 뒤의 블랜딩 plane이 안보이는 경우 (반투명한 유리)
- 해결책
- 그리기 전 보는 방향을 기준으로 반투명한 물체를 sort하기
- order-independency transparency
FACE CULLING
- 삼각형을 이루는 점의 순서에 따라 앞면/뒷면을 결정
- 일반적으로 반시계방향(CCW)을 앞면으로 취급
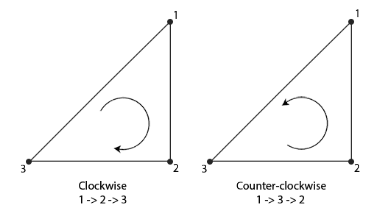
오브젝트를 그릴때 보이는 부분만 그리자! 안보이는 부분은 뭐하러 그리냐
- Face culling
- 앞면/뒷면을 그리지 않도록 추려내는 작업
- 뒷면은 그리지 않는다
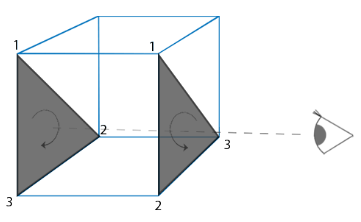
glEnable(GL_CULL_FACE); // face culling 활성화
glDisable(GL_CULL_FACE); // face culling 비활성화
glFrontFace(GL_CCW); // CCW 방향의 면을 앞면으로 설정
glCullFace(GL_BACK); // 뒷면을 그리지 않기
glCullFace(GL_FRONT); // 앞면을 그리지 않기- 기본적으로
-glDisable(GL_CULL_FACE)
-glFrontFace(GL_CCW)
-glCullFace(GL_BACK)
출처
OpenGL course 10-02: 스텐실, 블랜딩, 컬링
https://heinleinsgame.tistory.com/26
