[참고]
https://www.youtube.com/watch?v=Sr5UOR4llXY&t=41s - 리액트 네이티브 기본 강좌
https://reactnative.dev/docs/getting-started - 리액트 네이티브 doc
https://reactnavigation.org/docs/getting-started - React Navigaton doc
https://www.notion.so/inryuuu/183db98181a847448e0c41a6434e15de - notion 스터디 기록
현재 유튜브 "스피드잡스"님의 리액트 네이티브 기본 강좌를 통해 컴포넌트, 네비게이션 등의 기초를 다진 상태이다.
일단 우리 프로젝트는 Expo CLI가 아닌 React-Native CLI로 구축하기로 결정하였다.


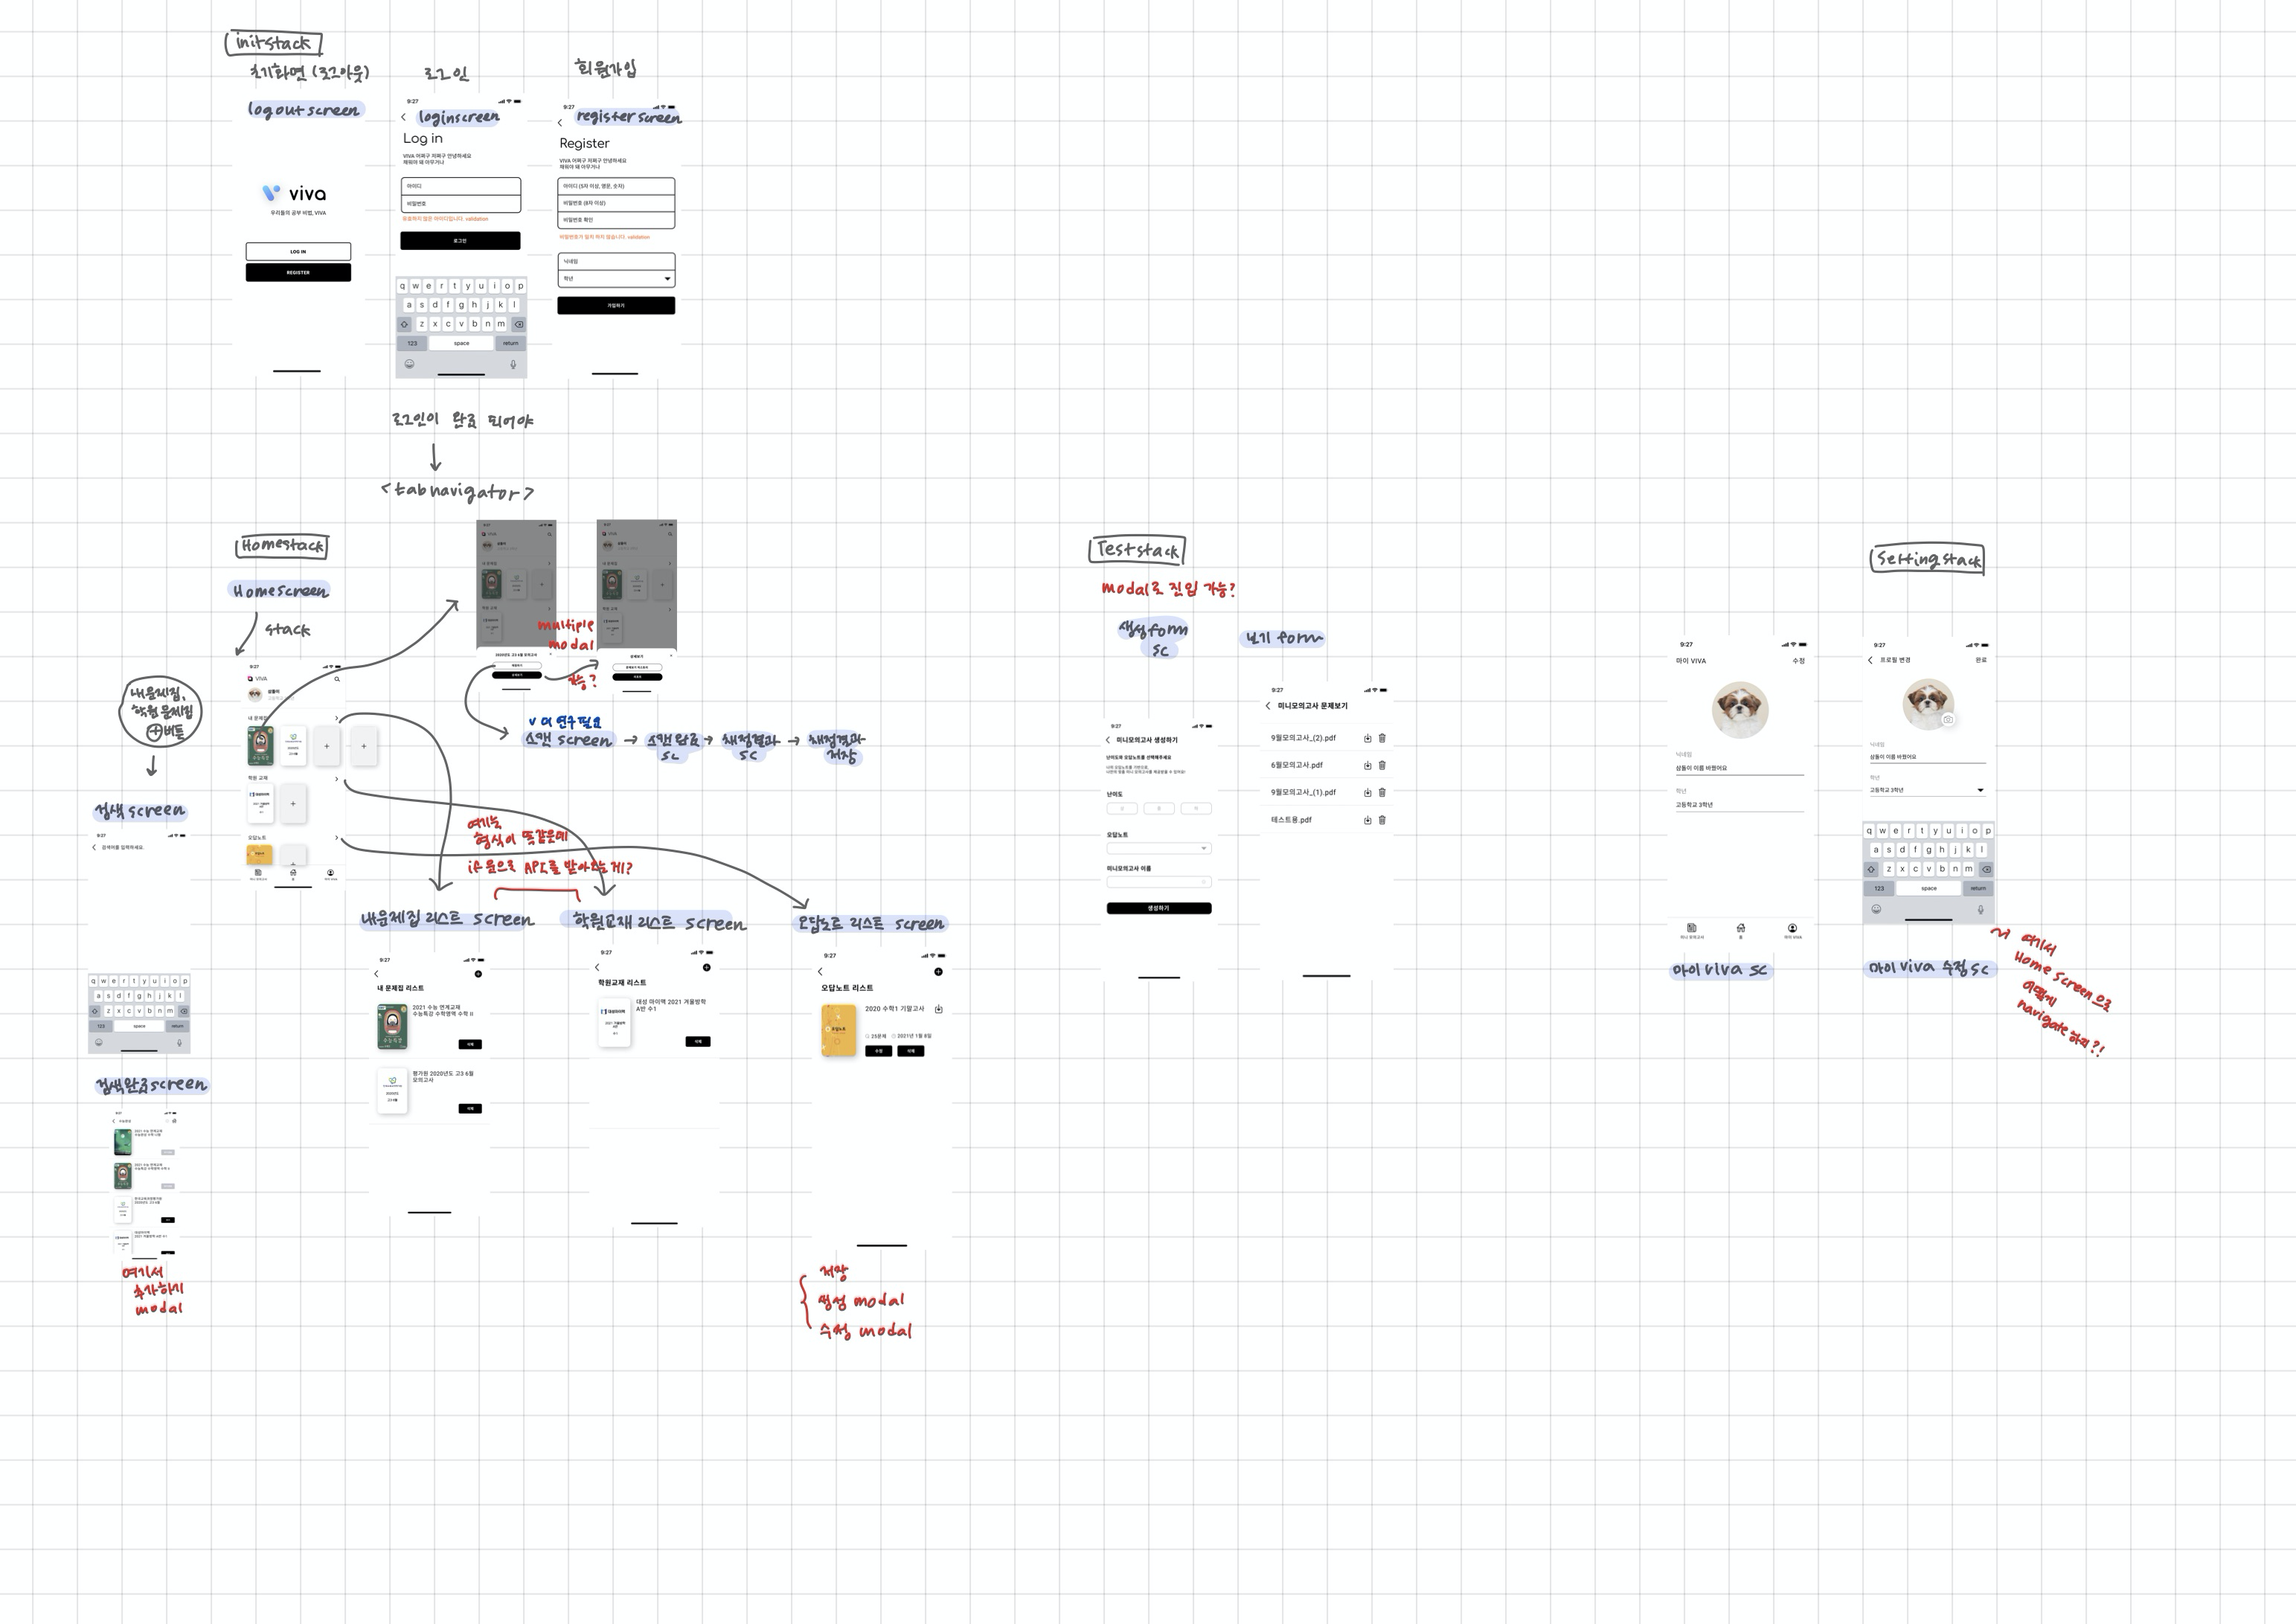
figma툴을 이용해 만든 초기 프로토타입이며, 일단 이 3가지 화면을 구현해보고자 한다. (그림만 그리는 것)
+)
얄팍한 네비게이터 지식으로 구상해본 앱 전체 구상도(?)
프로젝트 생성, 라이브러리 설치
프로젝트 생성
react-native init VivaApp네비게이션 설치, 셋업
npm install @react-navigation/native @react-navigation/stack
npm install react-native-reanimated react-native-gesture-handler react-native-screens react-native-safe-area-context @react-native-community/masked-view
LogoutScreen UI 잡기

먼저, 프로젝트에 Componets 디렉토리를 생성하여
LogoutScreen.js를 생성한다. 이 화면은 앱을 처음 켰을 때 나올 화면!!
App.js
import React from 'react';
import {SafeAreaView, StyleSheet} from 'react-native';
import LogoutScreen from './Components/LogoutScreen';

import 'react-native-gesture-handler';
import {NavigationContainer} from '@react-navigation/native';
import {createStackNavigator} from '@react-navigation/stack';
const Stack = createStackNavigator();

const App: () => React$Node = () => {
  return (
    <NavigationContainer>
      <Stack.Navigator>
        <Stack.Screen
          name="Logout"
          component={LogoutScreen}
          options={{headerShown: false}}
        />
      </Stack.Navigator>
    </NavigationContainer>
  );
};

const styles = StyleSheet.create({});

export default App;
App.js에 스택을 쌓아준다! 일단..은.... 음 스택이든 탭이든 일단 그려보자.
LogoutScreen.js
import React from 'react';
import {StyleSheet, View, Text, Image, SafeAreaView} from 'react-native';

const LogoutScreen: () => React$Node = () => {
  return (
    <View style={styles.container}>
      <View style={{flex: 1.5}} />
      <View style={{flex: 2}}>
        <View style={styles.logoArea}>
          <Image
            source={require('../src/viva-logo-with-txt.png')}
            style={{width: '55%', resizeMode: 'contain'}}
          />
        </View>
        <View style={styles.btnArea} />
      </View>
      <View style={{flex: 1}} />
    </View>
  );
};

const styles = StyleSheet.create({
  container: {
    flex: 1, //전체의 공간을 차지한다는 의미
    flexDirection: 'column',
    backgroundColor: 'white',
  },
  logoArea: {
    flex: 0.5,
    justifyContent: 'center',
    alignItems: 'center',
    backgroundColor: 'red',
  },
  btnArea: {
    flex: 1,
    backgroundColor: 'orange',
  },
});
export default LogoutScreen;

이제 버튼을 그려야하는데, Button 컴포넌트는 안드로이드와 ios에서 일관성이 없기 때문에
TouchableOpacity 컴포넌트를 사용하기로 했다.
또한 반응형으로 레이아웃을 조절하기 위해
react-native-responsive-screen 을 설치해줬다.
[참고]
https://www.npmjs.com/package/react-native-responsive-screen
LogoutScreen.js
import React from 'react';
import {
  widthPercentageToDP as wp,
  heightPercentageToDP as hp,
} from 'react-native-responsive-screen';

import {
  StyleSheet,
  View,
  Text,
  Image,
  SafeAreaView,
  TouchableOpacity,
} from 'react-native';

const LogoutScreen: () => React$Node = () => {
  return (
    <View style={styles.container}>
      <View style={{flex: 1.5}} />
      <View style={{flex: 2}}>
        <View style={styles.logoArea}>
          <Image
            source={require('../src/viva-logo-with-txt.png')}
            style={{width: wp(55), resizeMode: 'contain'}}
          />
        </View>
        <View style={styles.btnArea}>
          <TouchableOpacity style={styles.btnoutline}>
            <Text>LOGIN</Text>
          </TouchableOpacity>
        </View>
        <View style={styles.btnArea}>
          <TouchableOpacity style={styles.btn}>
            <Text style={{color: 'white'}}>REGISTER</Text>
          </TouchableOpacity>
        </View>
      </View>
      <View style={{flex: 1}} />
    </View>
  );
};

const styles = StyleSheet.create({
  container: {
    flex: 1, //전체의 공간을 차지한다는 의미
    flexDirection: 'column',
    backgroundColor: 'white',
  },
  logoArea: {
    flex: 0.5,
    justifyContent: 'center',
    alignItems: 'center',
    // backgroundColor: 'red',
    paddingBottom: wp(15),
  },
  btnArea: {
    height: hp(8),
    // backgroundColor: 'orange',
    justifyContent: 'center',
    alignItems: 'center',
    paddingBottom: hp(1.5),
  },
  btn: {
    flex: 1,
    width: wp(75),
    borderRadius: 5,
    justifyContent: 'center',
    alignItems: 'center',
    backgroundColor: 'black',
  },
  btnoutline: {
    flex: 1,
    width: wp(75),
    borderRadius: 5,
    justifyContent: 'center',
    alignItems: 'center',
    backgroundColor: 'white',
    borderWidth: 1,
  },
});
export default LogoutScreen;

완성 화면
LoginScreen UI 잡기

일단 header comtomize 하는 부분은 다음에 하기로 한다 ㅜㅠ
우선 App.js Stack에 LogoutScreen.js 추가해준다.
const App: () => React$Node = () => {
  return (
    <NavigationContainer>
      <Stack.Navigator>
        <Stack.Screen
          name="Logout"
          component={LogoutScreen}
          options={{headerShown: false}}
        />
        <Stack.Screen
          name="Login"
          component={LoginScreen}

        />
      </Stack.Navigator>
    </NavigationContainer>
  );
};
다음으로
LogoutScreen.js 에서 Login 버튼을 눌렀을 때 LoginScreen.js로 가야 하므로
LogoutScreen.js
function LogoutScreen({navigation}) {

<View style={styles.btnArea}>
          <TouchableOpacity
            style={styles.btnoutline}
            onPress={() => navigation.navigate('Login')}>
            <Text>LOGIN</Text>
          </TouchableOpacity>
        </View>
버튼을 눌렀을 때, navigation을 사용하여 이동할 수 있도록 설정해준다.
함수 파라미터로 {navigation}를 넣어줘야 props로 받아오는 거 같다.
LoginScreen.js
import React from 'react';
import {
  widthPercentageToDP as wp,
  heightPercentageToDP as hp,
} from 'react-native-responsive-screen';

import 'react-native-gesture-handler';

import {
  StyleSheet,
  View,
  Text,
  Image,
  TouchableOpacity,
  TextInput,
} from 'react-native';

function LogoutScreen({navigation: {navigate}}) {
  return (
    <View style={styles.container}>
      <View style={styles.topArea}>
        <View style={styles.titleArea}>
          <Image
            source={require('../src/Login.png')}
            style={{width: wp(30), resizeMode: 'contain'}}
          />
        </View>
        <View style={styles.TextArea}>
          <Text style={styles.Text}>Viva 어쩌고 저쩌고..</Text>
          <Text style={styles.Text}>로그인을 하여라</Text>
        </View>
      </View>

      <View style={styles.formArea}>
        <TextInput style={styles.textFormTop} placeholder={'아이디'} />
        <TextInput style={styles.textFormBottom} placeholder={'비밀번호'} />
        <Text style={styles.TextValidation}>유효하지 않은 ID입니다.</Text>
      </View>
      <View style={{flex: 0.75}}>
        <View style={styles.btnArea}>
          <TouchableOpacity style={styles.btn}>
            <Text style={(styles.Text, {color: 'white'})}>로그인</Text>
          </TouchableOpacity>
        </View>
      </View>
      <View style={{flex: 3}} />
    </View>
  );
}

const styles = StyleSheet.create({
  container: {
    flex: 1, //전체의 공간을 차지한다는 의미
    flexDirection: 'column',
    backgroundColor: 'white',
    paddingLeft: wp(7),
    paddingRight: wp(7),
  },
  topArea: {
    flex: 1,
    paddingTop: wp(2),
  },
  titleArea: {
    flex: 0.7,
    justifyContent: 'center',
    paddingTop: wp(3),
  },
  TextArea: {
    flex: 0.3,
    justifyContent: 'center',
    backgroundColor: 'white',
  },
  Text: {
    fontSize: wp('4%'),
  },
  TextValidation: {
    fontSize: wp('4%'),
    color: 'red',
    paddingTop: wp(2),
  },

  formArea: {
    justifyContent: 'center',
    // paddingTop: wp(10),
    flex: 1.5,
  },
  textFormTop: {
    borderWidth: 2,
    borderBottomWidth: 1,
    borderColor: 'black',
    borderTopLeftRadius: 7,
    borderTopRightRadius: 7,
    width: '100%',
    height: hp(6),
    paddingLeft: 10,
    paddingRight: 10,
  },
  textFormBottom: {
    borderWidth: 2,
    borderTopWidth: 1,
    borderColor: 'black',
    borderBottomRightRadius: 7,
    borderBottomLeftRadius: 7,
    width: '100%',
    height: hp(6),
    paddingLeft: 10,
    paddingRight: 10,
  },
  btnArea: {
    height: hp(8),
    // backgroundColor: 'orange',
    justifyContent: 'center',
    alignItems: 'center',
    paddingBottom: hp(1.5),
  },
  btn: {
    flex: 1,
    width: '100%',
    borderRadius: 7,
    justifyContent: 'center',
    alignItems: 'center',
    backgroundColor: 'black',
  },
});
export default LogoutScreen;
레이아웃을 이렇게 짜는 게 맞는지 모르겠지만 여기저기 참고하면서 CSS와 친해져보았읍니다.
일단 완성 화면! 문제는 헤더.. 헤더를 커스터마이즈 해야한다.

아무튼 끝~~
다음에 할 일은
- 헤더 커스터마이즈
- RegisterScreen 만들기
- 로그인 한 후에는 TabNavigor안에 Home, Test, Mypage 스택이 들어가 있는 구성으로 구현해야 함