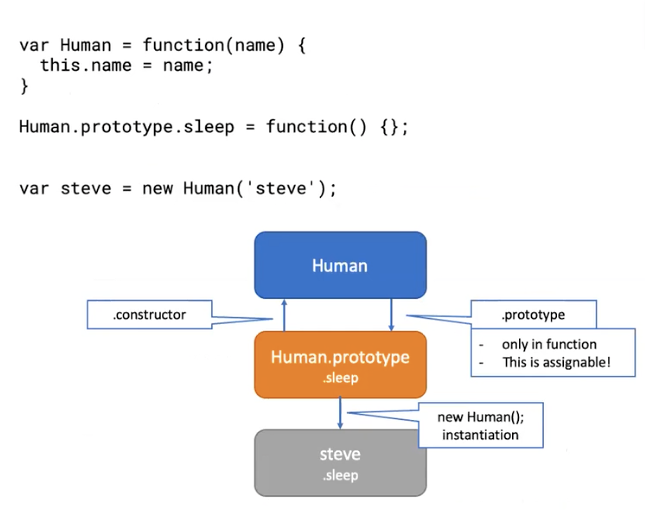
Javascript는 oop를 바라보고 만든 언어가 아니였다.
다만 학술적 연구에 의해서 oop처럼 쓸 수 있게 노력해왔고, se5까지는 클래스라는 개념이없었기에 미흡했다면 se6로 넘어 오면서 'class'란 개념이 생기고 제대로 oop를 활용할 수 있게 되었다.
몇가지 기본 개념
- 모든 function에는 prototype이라는 속성이 존재한다. (assign가능)
- prototype은 모델의 청사진을 만들 때 쓰는 원형 객체(original form)
- .constructor(생성자) -> 특정 객체가 생성될 때 실행되는 코드(인스턴스가 초기화 될 때 실행하는 생성자 함수)
- this -> 함수가 실행될 때, 해당 scope마다 생성되는 고유한 실행 context(execution context) new 키워드로 인스턴스를 생성했을 때는 해당 인스턴스가 바로 this의 값이 됨(아래 예제)
function Car(brand,name,color){ // Car는 클래스다
  this.brand = brand; //this 객체 **이 예제에서는 avante === this 같다. 중요
  this.name = name;
  this.color = color;
} // function Car(){} 전체가 constructor(생성자) 함수이다.

Car.prototype.drive = function(){ //여기서 Car.prototype은 prototype의 객체로 속성이나 메서드를 정의 할 수 있다.
	console.log(this.name + '가 운전을 시작');
}

let avante = new Car('hyundai', 'avante', 'black'); //여기서 avante가 인스턴스가 된다.
avante.color; //'black';
avante.drive(); // 'avante가 운전을 시작'
이해를 돕기 위한 다른 예제

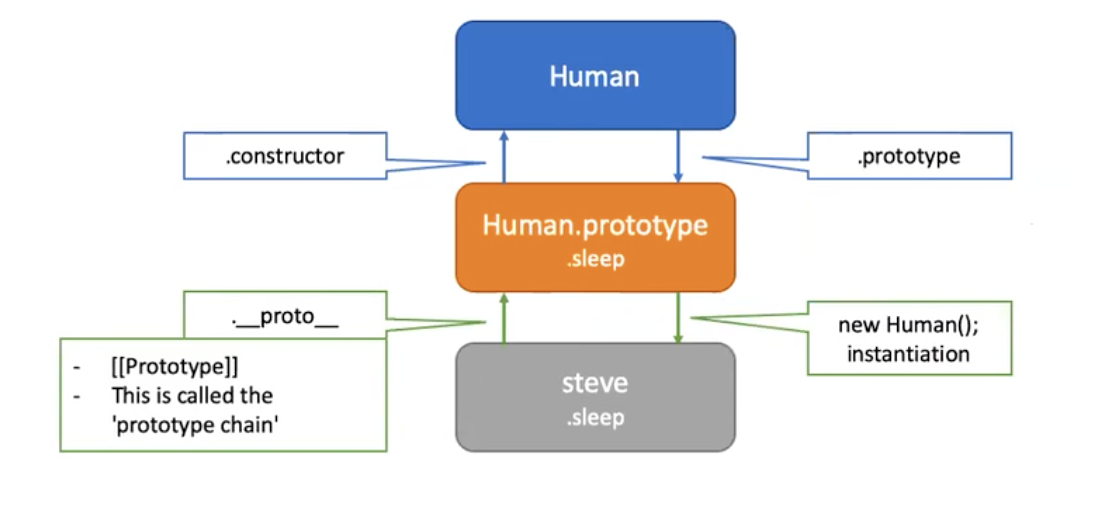
Prototype chain
Human.protoype 과 steve의 관계
steve.__proto__ === Human.prototype //true
  var Array = function(location) {
  	[native code]
  }
  Array.prototype.push = function() {};
  Array.prototype.slice = function() {};
  ...
  var arr = new Array();
배열을 만들 때도 같은 방식으로 만들어진다.
이 밑으로는 레거시한 방식으로 문제를 보고 그 다음에 class 도입 후에 어떻게 코드가 달라지는지 기술할 예정이다.
var Human = function(name) {
	this.name = name;
}
Human.prototype.sleep = function() {};

var steve = new Human('steve');

var Student = function(name) {
}

Student.prototype.learn = function() {};

var john = new Student('john');

john.learn();
john.sleep();
여기서 문제는 john.sleep()이 실행될 수 있게 코드를 바꾸어줘야한다.(이게 프로토 체인이겠지?)
하지만, SE5까지 클래스를 쓰지않고 이 john.sleep()을 실행 시키기 위해서는 몇가지 제약 사항을 다 클리어 해줘야한다.
그 중하나가
Student.prototype = Object.create(Human.prototype); //object.create는 첫 번째 인자로 들어가는 프로토타입 객체를 인자로 프로토타입을 만든다
// 배열도 슬라이스 카피하는 것 처럼 생각
//쉽게 생각하면 인자에 객체를 넣고 이것을 prototype 형태로 만든다(copy한다고 생각하자)
Student.prototype.learn = function () {}
여기까지만 하면 끝날 것 같지만 100% 완벽한 OOP 구현이 안된다.
왜냐하면 프로토타입 체인을 확인 해보면
Student.__proto__ // __sleep__과 __learn__의 관계가 명확하게 표시가 되지 않는다.
Student.__proto__.constructor  // 원하는 student 함수가 아닌 human의 함수가 출력이되어버림.
왜냐하면 현재 Human.prototype의 카피는 constructor를 Human으로 바라 보고있다.
그래서 이 연결고리를 다시 잘 이어붙이기 위해서
Student.prototype = Object.create(Human.prototype);
Student.prototype.constructor = Student; // 이 문장을 추가 해준다.
Student.prototype.learn = function () {}
이 것으로 상속을 제대로 만들어 줄 수 있다.
근데 문제가 또 있다. Student의 context가 만들어 질 뿐 Human으로 context가 전달이 안된다.
이걸 Human(위) 까지 올려주기 위해서
var Human = function(name) {
	this.name = name;
	}
	Human.prototype.sleep = function() {
		console.log(this.name + ' is sleeping...');
};

var steve = new Human('steve');

var Student = function(name) {
	Human.call(this, name); // Human.apply(this, arguments)
}

Student.prototype = Object.create(Human.prototype);

Student.prototype.constructor = Student;

Student.prototype.learn = function() {};

var john = new Student('john');

john.learn();
john.sleep(); // john is sleeping...
Human.call(this, name)을 추가해줘야한다.
이래야 상속이 잘 완료된다.
그리고 이제 세상이 발전해서 SE6의 class(클래스)가 나오고 위의 과정이 간단하게
해결된다.
class Human {
	constructor(name) {
		this.name = name;
	}

	sleep() {
	}

}
var steve = new Human('steve');


class Student extends Human { // 예전 방식의 프로토타입 및 컨스트럭트 연결을 extends가 한번에 해결해준다..
	constructor(name) {
           super(name); //this로 전달해야 할 부분을 super로 대체한다.
	}
  	learn() {
    }

}

var john = new Student('john');

john.learn();
john.sleep(); // john is sleeping...
class Student extends Human {
learn() { //위와 같은 경우 컨스트럭트부분이 같다면 생략이 가능하다
}
}
var john = new Student('john');이 때, 다형성을 주기 위해서 인스턴스 마다 연결된 결과 값을 주게하려면 어떻게 해야 할까?
구버전
Human.prototype.sleep = function() { console.log("Zzz") }

Student.prototype.sleep = function() {
   Human.prototype.sleep.apply(this);  //apply이 대신 call해도 인자는 하나라 똑같다. 이 this값에 의해서 Human.prototype.sleep과 값이 공유가 된다.
   console.log("Don't sleep");
}
신버전
class Human {
	constructor(name) {
            this.name = name;
	}

	sleep() {
            console.log("Zzz");
	}

}
class Student extends Human {
  	sleep(){
    	   super.sleep(); // super에 의해서 Human의 sleep과 공유 된다.
      	   console.log("Don't sleep");
    }

  	learn() {
    }

}
현재는 위와 같은 방식으로 작성이 되어지고 있지만
어떠한 과정으로 간편하게 대체되었는지 알아보는 것도 중요하다.
