Normalizer Free Networks (High-Performance Large-Scale Image Recognition Without Normalization)
Image Classification
주제: ImageNet dataset에서 BatchNorm 없이 ResNet을 잘 트레이닝하는 것
핵심 키워드: Normalizer-Free Network, Adaptive Gradient Clipping
Summary
-
ImageNet Top-1 Accuracy (출처: https://paperswithcode.com)
-
ImageNet Top-1 Accuracy vs Training Latency
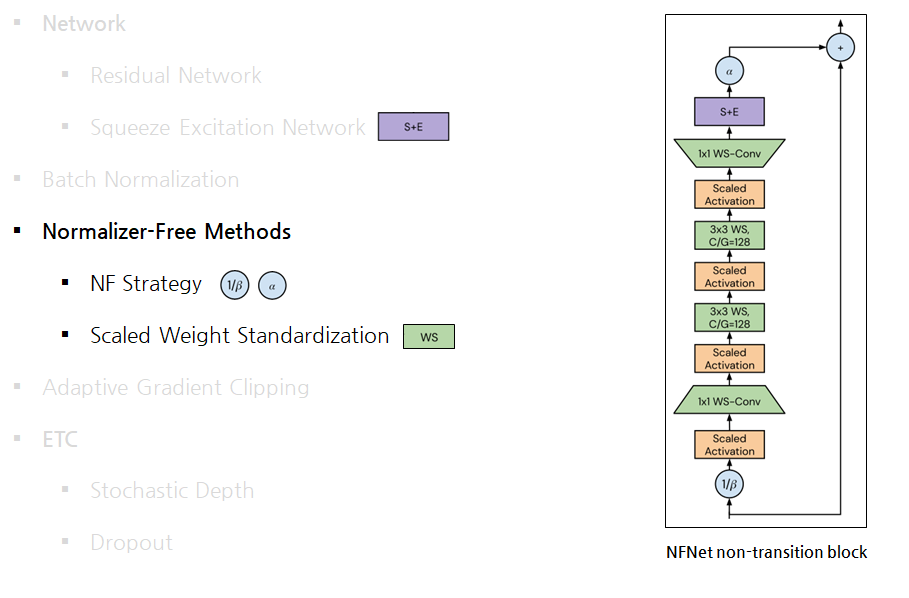
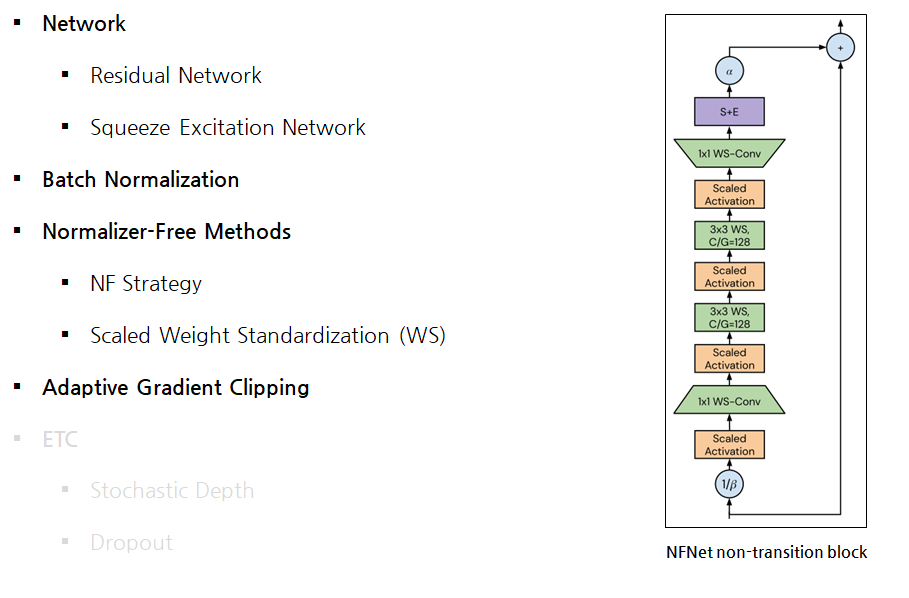
Normalizer-Free Network
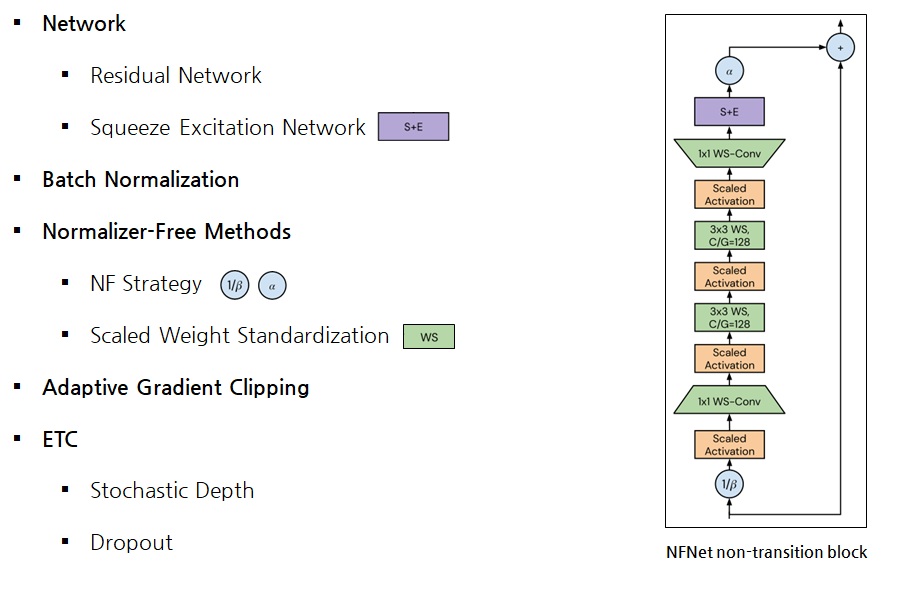
Network
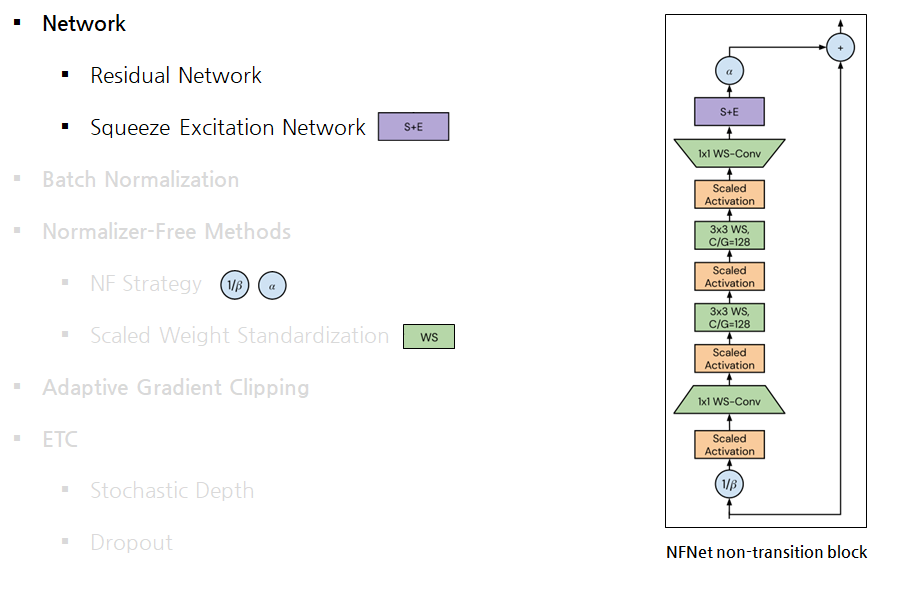
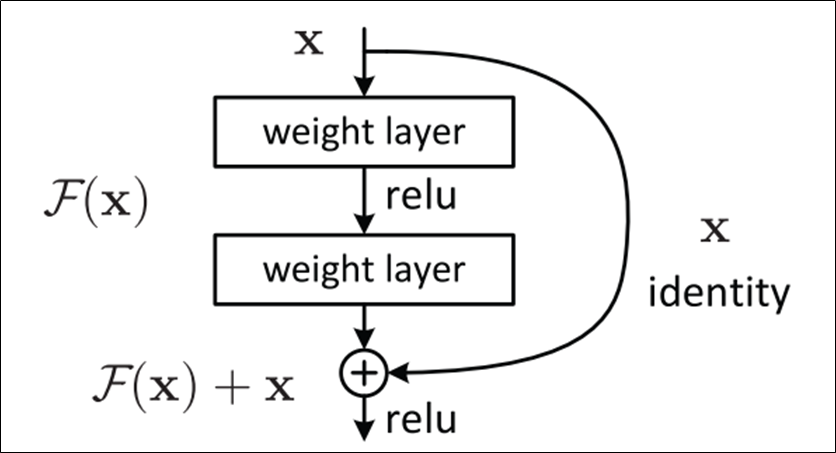
Residual Network
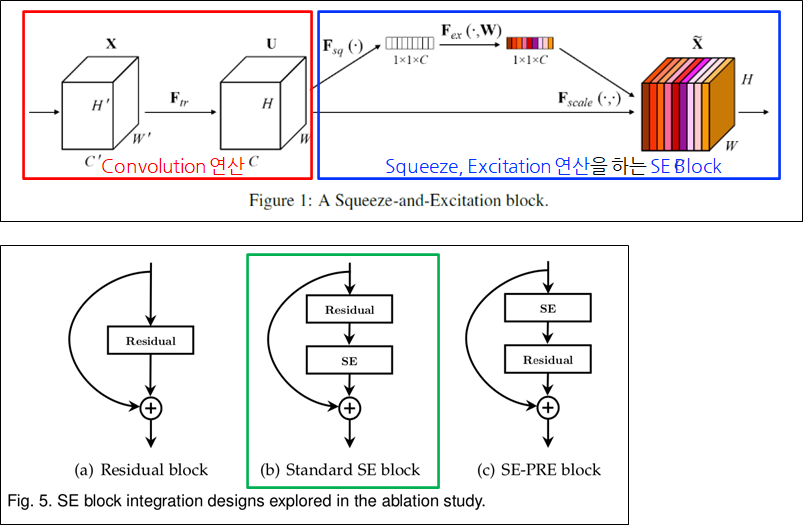
Squeeze Excitation Network
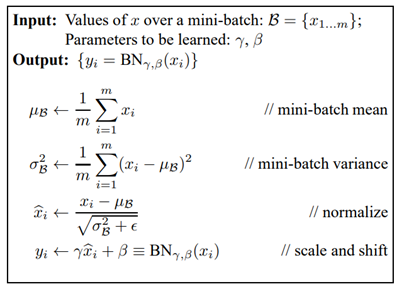
Batch Normalization
Cons and Pros
- Cons (하지만 BatchNorm을 제거하면 BatchNorm의 단점은 신경 쓸 필요가 없음)
Surprisingly expensive during training, incurring memory overheadIntroduces a train-test discrepancy (statistics/hidden hyper-parameters)Hard to replicate and often the cause of bugs, especially during distributed trainingPoor performance for small batch sizes
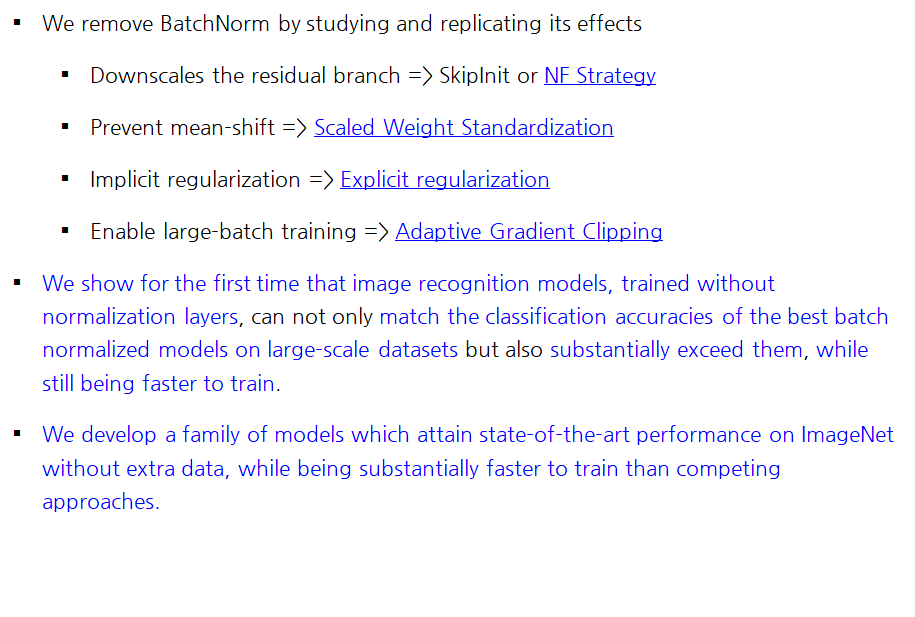
- Pros (중요한 것은 BatchNorm을 제거하면서 사라지는 BatchNorm의 장점을 보완하는 방법)
- Downscales the residual branch => SkipInit or NF Strategy
- Prevent mean-shift => Scaled Weight Standardization
- Implicit regularization => Explicit regularization
- Enable large-batch training => Adaptive Gradient Clipping
저자는 우측의 방법들이 BatchNorm의 각 장점을 보완하는 방법이지만 각 방법이 최선의 방법인지에 대한 확신은 없다고 함.
- 이후 BatchNorm의 장점을 보완하는 방법을 하나씩 살펴봄.
Normalizer-Free Methods
Downscales the residual branch => SkipInit
-
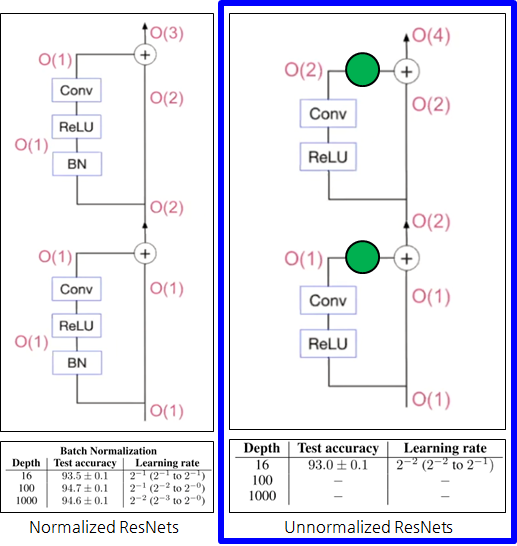
Normalized ResNets
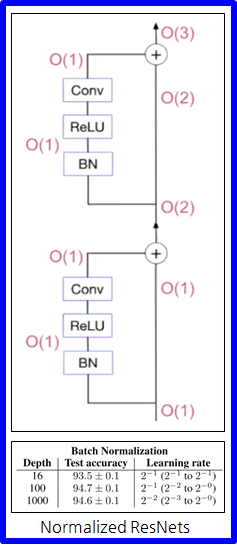
- 이 그림은 설명의 편의를 위해 블럭마다 BN-ReLU-Conv가 1개씩 있고 2 depth인 ResNet
- 그림에서 괄호안에 적힌 숫자는 입력 피쳐의 분산
- Residual block을 지날때마다 분산이 어떻게 증가하는지 보면
- 결과적으로는 1, 2, 3 같이 리니어하게 증가함.
Cov(Residual branch, Skip path) = 0이라서 위와 같이 계산이 가능함.
- 아래 표를 보면, Depth가 16, 100, 1000 처럼 깊어져도 성능이 잘 나옴
-
Unnormalized ResNets
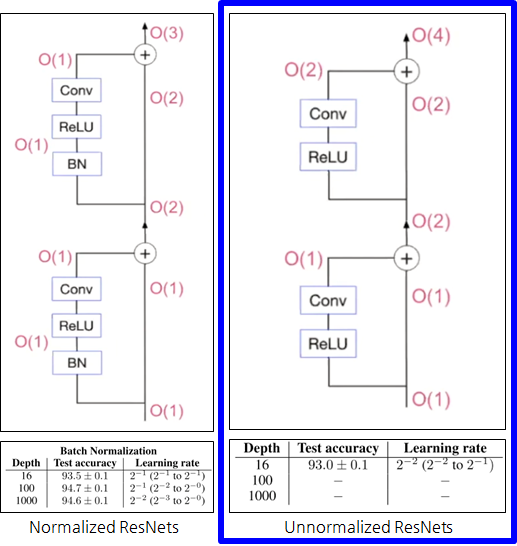
- 이전과 다르게 Residual branch에 BatchNorm이 없으므로, 분산이 1로 초기화되지 못함.
- 피쳐의 분산은 2의 제곱으로 늘어남.
- 트레이닝하면 16 depth 까지는 잘 동작하지만
- 그 이상의 depth로 블럭을 늘렸을 때는 잘 동작하지 않음.
-
Downscales the residual branch => SkipInit
- 그래서 예전에 어떤 논문에서 SkipInit 것을 개발함.
- Residual branch의 끝에 scalar 학습 변수를 두고 곱셈을 통해 다운스케일링을 함.
-
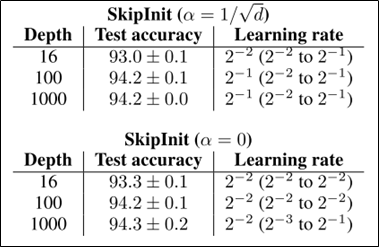
SkipInit: initialize learnable scalar multiplier to ≤1/√𝑑 𝑜𝑟 0 at end of residual branch
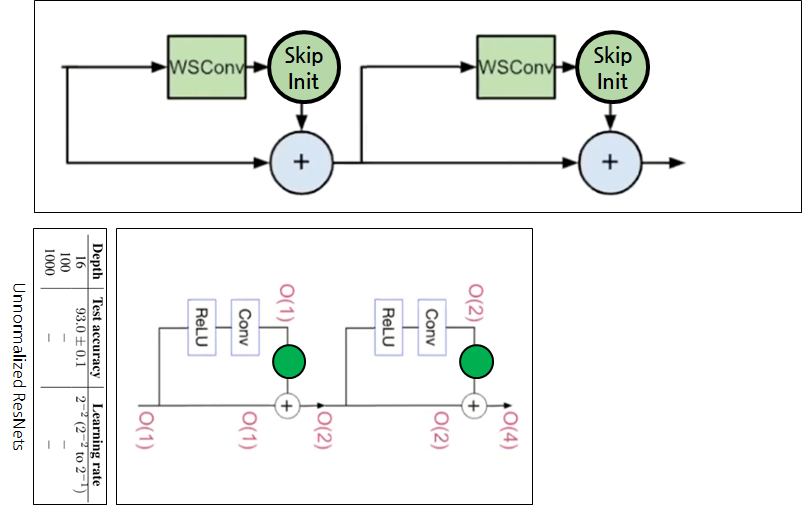
- 실제로는 위쪽 그림처럼 적용됨.
- 다른점은 Weight Standardization이 적용된 Conv도 같이 사용함.
- Weight Standardization은 추후 설명
- SkipInit이 스칼라 값을 곱해주는 이유는 약 2가지
- 작은 값을 곱해서 BatchNorm의 downscale을 대신하여 분산을 낮춰줌.
- 처음에 0 또는 1/√𝑑 같은 아주 작은 값을 사용하는데, BatchNorm을 사용하지 않는 경우 트레이닝 초기에 Residual block이 Identity function처럼 동작하게 하면 잘 된다는 연구 결과들이 있었음.
- 만약 0으로 초기화하면
Residual branch = 0이되고, Skip path만 살아남기때문에 Identity function처럼 작동함. - 이와 유사한 방법으로 각 Residual block의 마지막 Convolution을 0으로 초기화하고, 다른 학습 변수들의 초기화값을 일일히 설정해주는 Fixup Initialization라는 방법이 있음.
-
SkipInit을 사용하면 깊은 Depth에서도 배치놈없이 잘 트레이닝된다는 결과
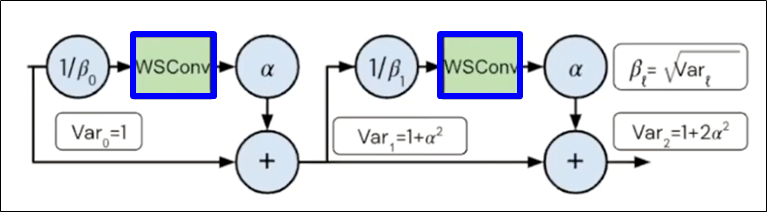
Downscales the residual branch => NF Strategy
- NF Strategy: a scalar hyperparameter α, typically set to a small value like 𝛼=0.2
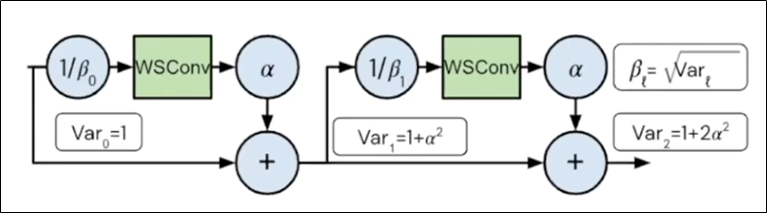
- 2개의 Constant scalar 변수가 추가되는데 알파는 하이퍼파라미터, 베타는 알파로 계산되는 값
- 베타: 분산의 제곱근인 표준편차 값입니다. BatchNorm 처럼 분산을 1로 만드는 것이 목적
- 알파: 곱셈을 통해 Residual branch의 분산을 알파제곱으로 만드는 것이 목적
- 0.2 정도의 작은 값을 사용함.
- NF Strategy만 적용했을 때 테스트 결과는 나와있지 않지만, SkipInit보다는 좋을 것으로 생각됨.
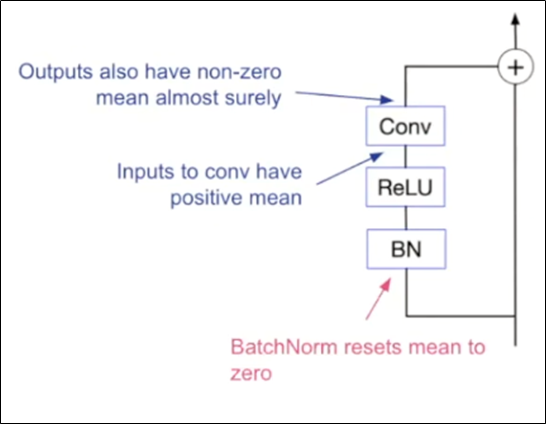
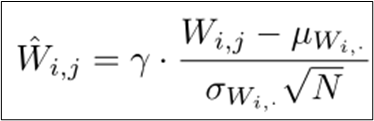
Prevent mean-shift => Scaled Weight Standardization
-
(Batch) Normalization vs (Weight) Standardization
- 용어의 차이가 있는데 실제로 계산 방식이 다른 걸까 ? X
- Normalization
- Standardization
-
Batch Normalization vs Weight Standardization
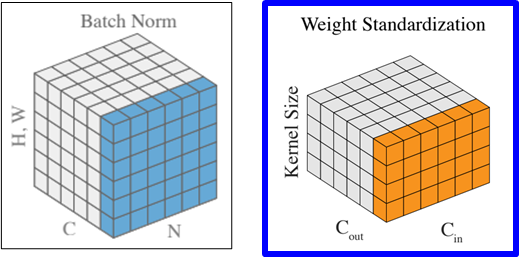
- Batch Normalization: 입력을 정규화
- Weight Standardization: 학습 변수를 정규화
-
Weight Standardization
-
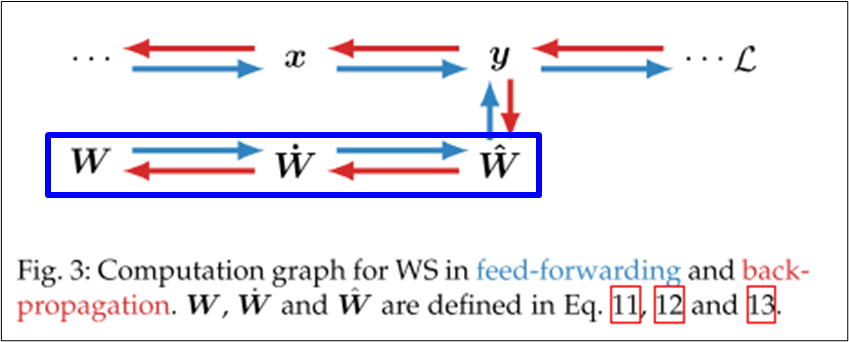
Weight Standardization prevent mean-shift ?
- g(x) : activation function
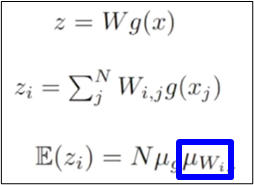
- g(x) : activation function
-
구현 코드 (이해하기 어렵지 않음)

-
Scaled Weight Standardization
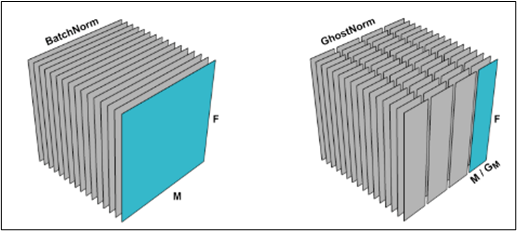
Implicit regularization => Explicit regularization
- Ghost Normalization ( TODO.. 나중에 해당 논문 살펴보기 )
Adaptive Gradient Clipping
Enable large-batch training => Adaptive Gradient Clipping
-
위에서 BatchNorm의 3가지 장점을 보완했지만, 2048배치 이상에서 성능이 떨어짐 ㅠ

- 좌측 그림에서 파선은 아마 좀 더 큰 모델이거나 NFResNet이 아닌 NFNet으로 생각됨.
- 저자들은 Language Model에서 큰 배치크기로 트레이닝을 할 때 Gradient clipping을 적용하면 잘 되는 것을 보고
- Gradient Clipping을 잘 쓰면 큰 배치크기로 NF-ResNet을 트레이닝 할 수 있겠다라고 가정함.
-
Gradient Clipping
-
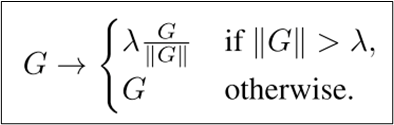
Adaptive Gradient Clipping
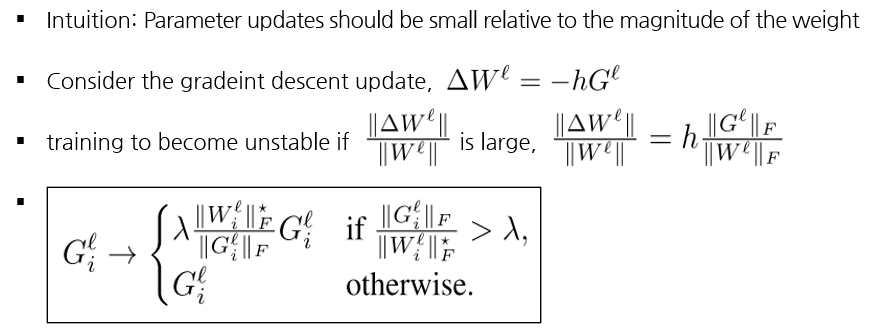
- 예전에는 Gradient norm이 커지면 unstable 하다 였는데
- if문의 좌측에 있는 metric이 커지면 unstable 하다로 바뀌었음.
- 다시 정리해보자면
- 어떤 metric을 사용해서 람다 스레숄드를 보다 크면
- gradient의 방향으로 Weight norm * 람다만큼 gradient를 적용하겠다는 아이디어
- 개인적인 생각으로는 의식이 흐름이 역으로 진행된 것 같음
- 파라미터를 gradient의 방향인데 현재 Weight 크기에서 람다만큼 적용한다는 식을 먼저 생각하고
- 역으로 끼워 맞춘 것 같다는 개인적인 생각
- 실제 구현에서는 0으로 나누지 않기위해서, 0이면 아주 작은 입실론 값을 대신 사용하도록 되어있음.
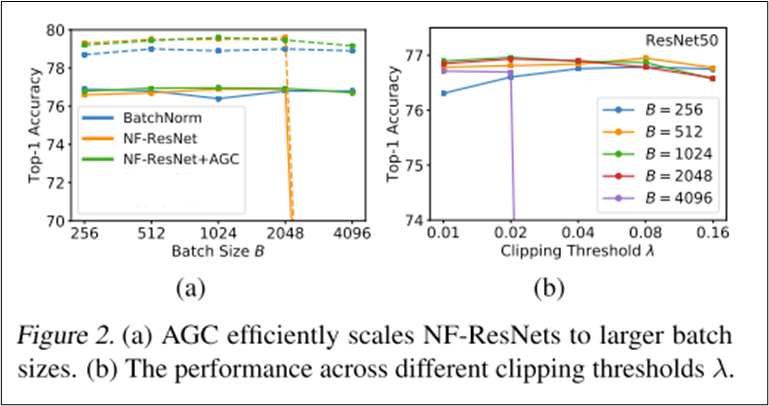
- 결론: NF-ResNet + AGC를 같이 썼을 때 큰 배치 트레이닝이 잘 됨.
- 람다값은 배치크기가 클수록 작은 값을 사용해야 하는데, 4096배치까지는 0.01을 사용했다고 함.
- 추가 정보
- 마지막 Linear layer는 clipping하지 않는게 좋음
- Initial convolution을 clipping하지 않아도 트레이닝이 안정적으로 동작할 수 있음
ETC
- Stochastic Depth, Drop out 생략
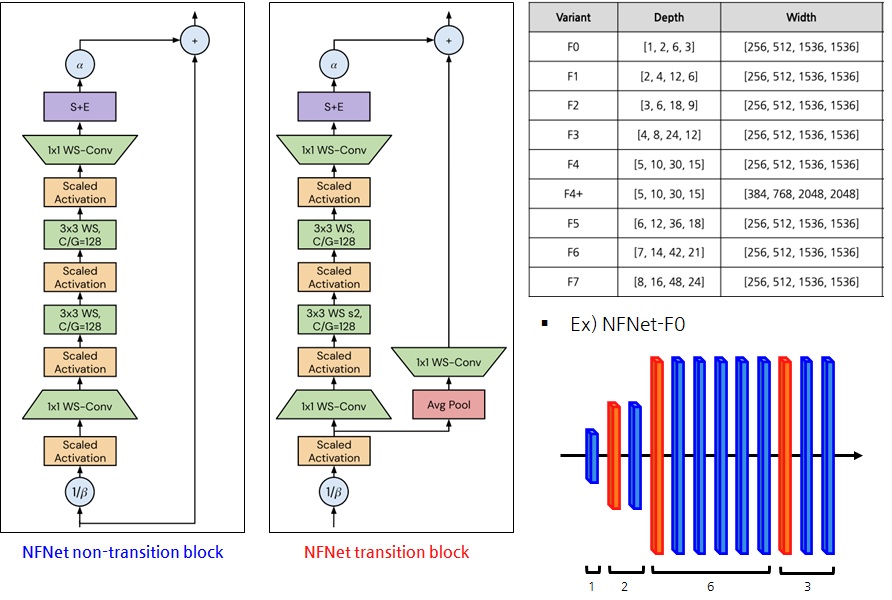
Normalizer-Free Network Family
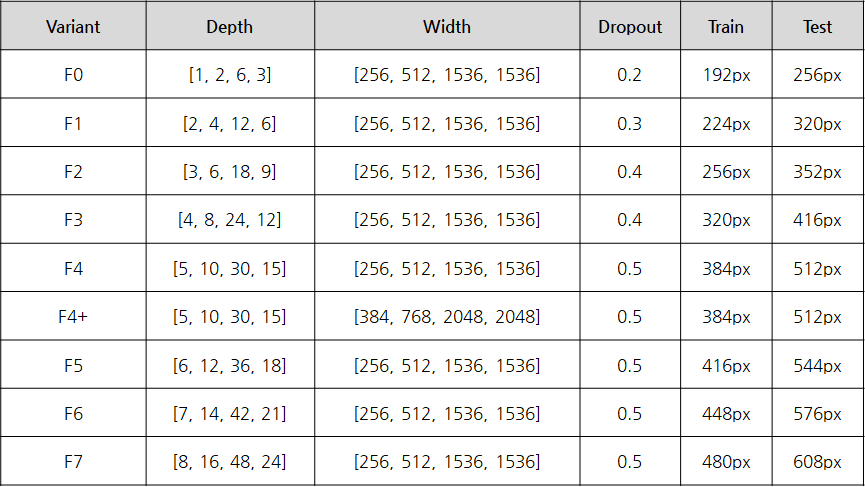
- ResNet에서 Width는 256, 512, 1024, 2048와 같은 패턴을 사용한 반면
- NFNet에서 Width는 256, 512, 1536, 1536과 같은 패턴이 잘 동작했다고 함.
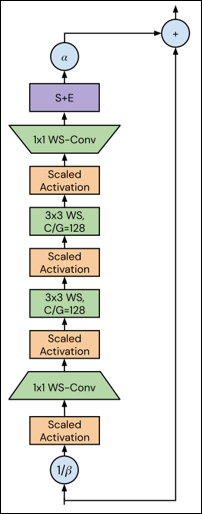
Normalizer-Free Network Transition Block
Experiments
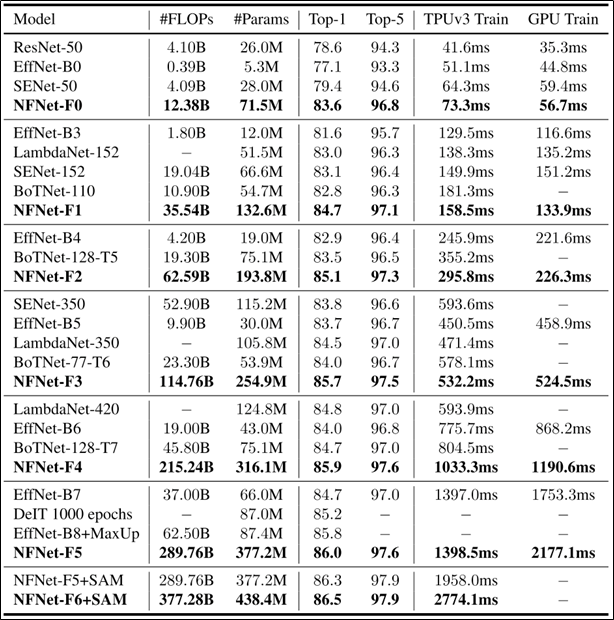
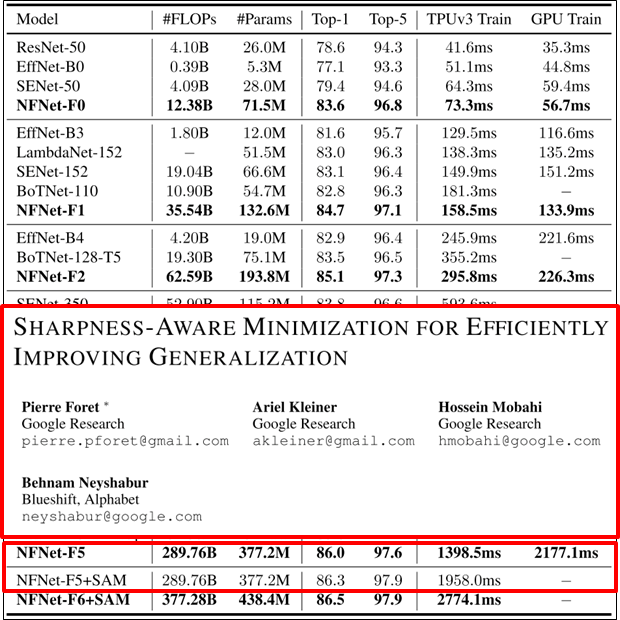
- SAM 이것도 나중에 살펴보기 😂
Conclusion
Reference
-
논문 (일부 논문은 필요한 부분만 읽음)
- ✔ High-Performance Large-Scale Image Recognition Without Normalization (2021): https://arxiv.org/abs/2102.06171
- ✔ Squeeze-and-Excitation Networks (2017)
- Characterizing signal propagation to close the performance gap in unnormalized ResNets (2021)
- Batch Normalization Biases Residual Blocks Towards the Identity Function in Deep Networks (2020)
- Deep Weight Normalization: A Simple Reparameterization to Accelerate Training of Deep Neural Networks (2016)
- …
-
✔ 유튜브 (저자 설명): https://www.youtube.com/watch?v=-UAehZdX_xM&ab_channel=UCLCentreforArtificialIntelligence
-
✔ 구현코드: http://dpmd.ai/nfnets