GlassMorphism Advanced
구현 목표

- 글래스모피즘 구현
- 복수 카드 뷰 → 겹쳐 보이기
- 드래그 제스처, 확대 기능, 투명도
구현 태스크
- 투명 백그라운드 컬러
- 프론트 카드 뷰
- 카드 뷰 클릭 시 백그라운드 컴포넌트 변화
- 카드 뷰 개수 변경
핵심 코드
private var backgroundView: some View {
        ZStack {
            AngularGradient(gradient: Gradient(colors: [.red, .pink, .cyan, .yellow, .red]), center: .center, angle: .degrees(120))
            LinearGradient(gradient: Gradient(colors: [Color.white.opacity(0), Color.white.opacity(1)]), startPoint: .bottom, endPoint: .top)
            Circle()
                .frame(width: 400, height: 400)
                .offset(x: isAnimating ? 100 : 150, y: isAnimating ? -100 : -200)
                .foregroundColor(Color.purple.opacity(0.6))
                .blur(radius: 8)
            Circle()
                .frame(width: 400, height: 400)
                .offset(x: isAnimating ? -100 : -150, y: isAnimating ? -100 : -200)
                .foregroundColor(Color.blue.opacity(0.3))
                .blur(radius: 8)
            Circle()
                .frame(width: 400, height: 400)
                .offset(x: isAnimating ? 0 : 30, y: isAnimating ? 100 : 150)
                .foregroundColor(Color.cyan.opacity(0.3))
                .blur(radius: 8)
        }
        .hueRotation(.degrees(isAnimating ? 30 : 0))
        .ignoresSafeArea()
}- 백그라운드 뷰
AngularGradient,LinearGradient등 색깔을 아름답게 표현하는 그레디언트 기법을 백그라운드 컬러에 적용 → 반투명 카드 뷰를 통해 비춰보일 수 있음
private var cardView: some View {
        VisualEffectBlurView(blurStyle: .systemThinMaterialLight, vibrancyStyle: .fill) {
            Text("UI Design")
                .font(.headline)
                .foregroundColor(isAnimating ? .gray : .black)
                .bold()
        }
        .frame(maxWidth: .infinity, maxHeight: isAnimating ? 400 : 220)
        .mask(RoundedRectangle(cornerRadius: 30, style: .continuous))
        .overlay(RoundedRectangle(cornerRadius: 30, style: .continuous).stroke(lineWidth: 0.5).fill(Color.white))
        .shadow(color: Color.black.opacity(0.3), radius: 20, x: 0, y: 10)
        .padding()
        .blendMode(.softLight)
}SwiftUIX프레임워크(SPM으로 설치)가 제공하는 블러링 기법이 적용된 뷰 → 블러링 스타일 커스텀 가능
소스 코드
import SwiftUI
import SwiftUIX
struct GlassmorphismAdvancedBootCamp: View {
@State private var isAnimating: Bool = false
@State private var viewState = CGSize.zero
@State private var cardCount: Int = 3
private func getYOffset(_ cardIndex: Int) -> CGFloat {
return CGFloat((cardCount - cardIndex - 1) * 20 * -1)
}
private func getPadding(_ cardIndex: Int) -> CGFloat {
return CGFloat((cardCount - 1 - cardIndex) * 10)
}
private func getDuration(_ cardIndex: Int) -> Double {
return 1.0 - (Double(cardIndex) * 0.2)
}
var body: some View {
ZStack {
backgroundView
nameView
VStack {
Spacer()
ZStack {
ForEach(0..<cardCount-1, id:\.self) { cardIndex in
cardView
.offset(y: getYOffset(cardIndex))
.padding(getPadding(cardIndex))
.offset(x: viewState.width, y: viewState.height)
.animation(.easeInOut(duration: getDuration(cardIndex)))
}
cardView.offset(x: viewState.width, y: viewState.height)
.animation(.spring(), value: viewState)
.gesture(
DragGesture()
.onChanged({ value in
viewState = value.translation
})
.onEnded({ value in
viewState = .zero
})
)
}
}
}
.onTapGesture {
withAnimation(.spring()) {
isAnimating.toggle()
}
}
}
}
extension GlassmorphismAdvancedBootCamp {
private var backgroundView: some View {
ZStack {
AngularGradient(gradient: Gradient(colors: [.red, .pink, .cyan, .yellow, .red]), center: .center, angle: .degrees(120))
LinearGradient(gradient: Gradient(colors: [Color.white.opacity(0), Color.white.opacity(1)]), startPoint: .bottom, endPoint: .top)
Circle()
.frame(width: 400, height: 400)
.offset(x: isAnimating ? 100 : 150, y: isAnimating ? -100 : -200)
.foregroundColor(Color.purple.opacity(0.6))
.blur(radius: 8)
Circle()
.frame(width: 400, height: 400)
.offset(x: isAnimating ? -100 : -150, y: isAnimating ? -100 : -200)
.foregroundColor(Color.blue.opacity(0.3))
.blur(radius: 8)
Circle()
.frame(width: 400, height: 400)
.offset(x: isAnimating ? 0 : 30, y: isAnimating ? 100 : 150)
.foregroundColor(Color.cyan.opacity(0.3))
.blur(radius: 8)
}
.hueRotation(.degrees(isAnimating ? 30 : 0))
.ignoresSafeArea()
}
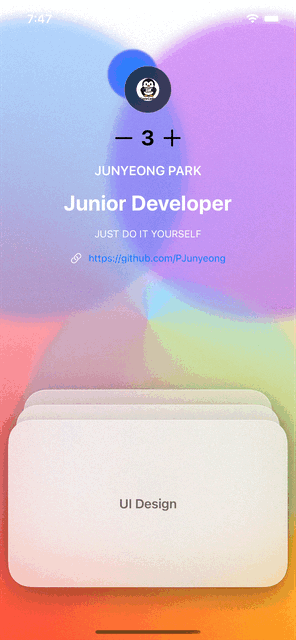
private var nameView: some View {
VStack(alignment: .center, spacing: 16) {
Image("avatar")
.resizable()
.aspectRatio(contentMode: .fill)
.frame(width: 30, height: 30)
.mask(Circle())
.padding()
.background(VisualEffectBlurView(blurStyle: .regular))
.mask(Circle())
.overlay(
Circle()
.stroke(lineWidth: 0.5)
.fill(Color.white)
)
.mask(Circle())
.background(
angularView
.offset(x: isAnimating ? -10 : -20, y: isAnimating ? -10 : -20)
)
HStack(alignment: .center) {
Spacer()
Button {
if cardCount - 1 > 0 {
cardCount -= 1
}
} label: {
Image(systemName: "minus")
.font(.title)
.foregroundColor(.black)
}
Text("\(cardCount)")
.font(.title)
.fontWeight(.bold)
.foregroundColor(.black)
Button {
if cardCount + 1 <= 5 {
cardCount += 1
}
} label: {
Image(systemName: "plus")
.font(.title)
.foregroundColor(.black)
}
Spacer()
}
Text("Junyeong Park".uppercased())
.font(.headline)
.fontWeight(.semibold)
Text("Junior Developer")
.font(.title)
.bold()
Text("JUST DO IT YOURSELF")
.foregroundColor(.white)
.font(.footnote)
HStack {
Image(systemName: "link")
Text("https://github.com/PJunyeong")
}
.font(.footnote)
Spacer()
}
.padding(.top, 40)
}
private var angularView: some View {
AngularGradient(gradient: Gradient(colors: [.red, .pink, .cyan, .yellow, .red]), center: .center)
.frame(width: 84, height: 84)
.mask(Circle())
.overlay(
RadialGradient(gradient: Gradient(colors: [.blue, .purple, .systemBlue]),
center: .center,
startRadius: 1,
endRadius: 150)
)
.frame(width: 66, height: 66)
.mask(Circle())
.blur(radius: 1)
}
private var cardView: some View {
VisualEffectBlurView(blurStyle: .systemThinMaterialLight, vibrancyStyle: .fill) {
Text("UI Design")
.font(.headline)
.foregroundColor(isAnimating ? .gray : .black)
.bold()
}
.frame(maxWidth: .infinity, maxHeight: isAnimating ? 400 : 220)
.mask(RoundedRectangle(cornerRadius: 30, style: .continuous))
.overlay(RoundedRectangle(cornerRadius: 30, style: .continuous).stroke(lineWidth: 0.5).fill(Color.white))
.shadow(color: Color.black.opacity(0.3), radius: 20, x: 0, y: 10)
.padding()
// .blendMode(.softLight)
}
}- 버튼을 통한 카드 뷰 개수 조정
ForEach를 통해 동적으로 카드 뷰 표현- 카드 뷰 개수에 따른 오프셋, 패딩 값, 애니메이션 시간 조정
- 드래그 제스처, 탭 제스처를 통한 카드 뷰 형태 및 위치 조정
- 애니메이션 효과 적용
구현 화면

확실히 시뮬레이터 GIF는 기존의 화질을 잘 담지 못하는 듯.

JUST DO IT