Create a custom navigation bar and link in SwiftUI | Advanced Learning #12
NavigationView
구현 목표
- 커스텀 네비게이션 뷰 사용 → 코드 하단에서 실제 이동은 기본 네비게이션 뷰, 링크 사용
- 디폴트 네비게이션 뷰: 메모리 최적화, 스와이프 백 가능 + 커스텀 가능한 네비게이션 뷰 활용하기
구현 태스크
PreferenceKey: 네비게이션 타이틀, 네비게이션 서브타이틀, 네비게이션 백버튼히든 등 값 전달 → 네비게이션 링크의destination단의 네비게이션 바 뷰의 값 상태 변경 가능- 뷰 익스텐션: 익스텐션 함수를 통해
Preference값 등록 자동화
핵심 코드
struct CustomNavView<Content:View>: View {
    let content: Content

    init(@ViewBuilder content: () -> Content) {
        self.content = content()
    }
    var body: some View {
        NavigationView {
            CustomNavBarContainerView {
                content
            }
            .navigationBarHidden(true)
        }
        .navigationViewStyle(.stack)
    }
}- 디폴트 네비게이션 뷰를 내장
- 디폴트 네비게이션 뷰와 마찬가지로
@ViewBuilder프로토콜을 준수하는 뷰 컨텐츠를 클로저 형태로 받아 뷰를 그리기 - 네비게이션 커스텀 뷰를 사용하고 있기 때문에 기존 뷰 비활성화(히든)
- 백 버튼 활용을 위한 네비게이션 스타일 스택 사용
import SwiftUI

struct CustomNavLink<Label: View, Destination: View>: View {
    let destination: Destination
    let label: Label
    init(destination: Destination, @ViewBuilder label: () -> Label) {
        self.destination = destination
        self.label = label()
    }
    var body: some View {
        NavigationLink {
            CustomNavBarContainerView {
                destination
                    .navigationBarHidden(true)
            }
        } label: {
            label
        }
    }
}- 디폴트 네비게이션 링크를 내장
- 디폴트 네비게이션 링크와 마찬가지로
@ViewBuilder프로토콜을 준수하는 라벨 뷰 컨텐츠를 클로저로 받아 뷰를 그리기 - 커스텀 네비게이션 바를 사용하고 있기 때문에 디폴트 네비게이션 바는 히든
소스 코드
import SwiftUI

struct CustomNavBarView: View {
    @Environment(\.presentationMode) var presentationMode
    let showBackButton: Bool
    let title: String
    let subtitle: String?
    var body: some View {
        HStack {
            if showBackButton {
                backButton
            }
            Spacer()
            titleSection
            Spacer()
            if showBackButton {
                backButton
                .opacity(0)
            }
        }
        .padding()
        .tint(.white)
        .foregroundColor(.white)
        .font(.headline)
        .background(.blue)
    }
}

extension CustomNavBarView {
    private var backButton: some View {
        Button {
            presentationMode.wrappedValue.dismiss()
        } label: {
            Image(systemName: "chevron.left")
        }
    }
    private var titleSection: some View {
        VStack(spacing: 4) {
            Text(title)
                .font(.title)
                .fontWeight(.semibold)
            if let subtitle = subtitle {
                Text(subtitle)
            }
        }
    }
}HStack으로 백버튼, 타이틀, 서브타이틀을 그리는 뷰- 백버튼 활용을 위한
presentationMode환경변수 사용 →dismiss직접 사용도 가능
import SwiftUI

struct CustomNavBarContainerView<Content: View>: View {
    let content: Content
    @State private var showBackButton: Bool = true
    @State private var title: String = ""
    @State private var subtitle: String? = nil
    init(@ViewBuilder content: () -> Content) {
        self.content = content()
    }

    var body: some View {
        VStack(spacing: 0) {
            CustomNavBarView(showBackButton: showBackButton, title: title, subtitle: subtitle)
            content
                .frame(maxWidth: .infinity, maxHeight: .infinity)
        }
        .onPreferenceChange(CustomNavBarTitlePreferenceKey.self) { value in
            title = value
        }
        .onPreferenceChange(CustomNavBarSubtitlePreferenceKey.self) { value in
            subtitle = value
        }
        .onPreferenceChange(CustomNavBarBackButtonHiddenPreferenceKey.self) { value in
            showBackButton = !value
        }
    }
}- 커스텀 네비게이션 바 + 컨텐츠 뷰를 가지고 있는 컨테이너 뷰
- 네비게이션 타이틀, 서브타이틀, 백버튼 히든 여부를
PreferenceKey로 등록, 값 변화에 따라 상태값을 주기 위한@State선언 - 네비게이션 뷰 이외의 뷰 역시
@ViewBuilder프로토콜을 준수, 뷰 자체를 그리기 위한 클로저를 입력값으로 받기
import SwiftUI

struct CustomNavBarTitlePreferenceKey: PreferenceKey {
    static var defaultValue: String = ""
    static func reduce(value: inout String, nextValue: () -> String) {
        value = nextValue()
    }
}

struct CustomNavBarSubtitlePreferenceKey: PreferenceKey {
    static var defaultValue: String? = nil
    static func reduce(value: inout String?, nextValue: () -> String?) {
        value = nextValue()
    }
}

struct CustomNavBarBackButtonHiddenPreferenceKey: PreferenceKey {
    static var defaultValue: Bool = false
    static func reduce(value: inout Bool, nextValue: () -> Bool) {
        defaultValue = nextValue()
    }
}

extension View {
    func customNavigationTitle(_ title: String) -> some View {
        preference(key: CustomNavBarTitlePreferenceKey.self, value: title)
    }
    func customNavigationSubtitle(_ subtitle: String?) -> some View {
        preference(key: CustomNavBarSubtitlePreferenceKey.self, value: subtitle)
    }
    func customNavigationBarBackButtonHidden(_ hidden: Bool) -> some View {
        preference(key: CustomNavBarBackButtonHiddenPreferenceKey.self, value: hidden)
    }
    func customNavBarItems(title: String = "", subtitle: String? = nil, hidden: Bool = false) -> some View {
        self
            .customNavigationTitle(title)
            .customNavigationSubtitle(subtitle)
            .customNavigationBarBackButtonHidden(hidden)
    }
}- 네비게이션 바 뷰의 타이틀, 서브타이틀, 백버튼히든 여부 값을 부모 뷰 단에서 자식 뷰로 전달할 때 사용할
PreferenceKey등록 - 뷰 익스텐션을 통한 함수화
- 세 개의 함수를 한 번에 활용한 함수 적용
import SwiftUI

struct CustomNavView<Content:View>: View {
    let content: Content

    init(@ViewBuilder content: () -> Content) {
        self.content = content()
    }
    var body: some View {
        NavigationView {
            CustomNavBarContainerView {
                content
            }
            .navigationBarHidden(true)
        }
        .navigationViewStyle(.stack)
    }
}

struct CustomNavLink<Label: View, Destination: View>: View {
    let destination: Destination
    let label: Label
    init(destination: Destination, @ViewBuilder label: () -> Label) {
        self.destination = destination
        self.label = label()
    }
    var body: some View {
        NavigationLink {
            CustomNavBarContainerView {
                destination
                    .navigationBarHidden(true)
            }
        } label: {
            label
        }
    }
}

extension UINavigationController {
    open override func viewDidLoad() {
        super.viewDidLoad()
        interactivePopGestureRecognizer?.delegate = nil
    }
}- 위에서 설명한 것과 같은 디폴트 네비게이션 뷰, 링크를 내장한 커스텀 뷰
- 스와이프 백 기능을 활용하기 위한
interactivePopGestureRecognizer적용. 디폴트 네비게이션 뷰가 살아 있기 때문에 적용 가능
import SwiftUI
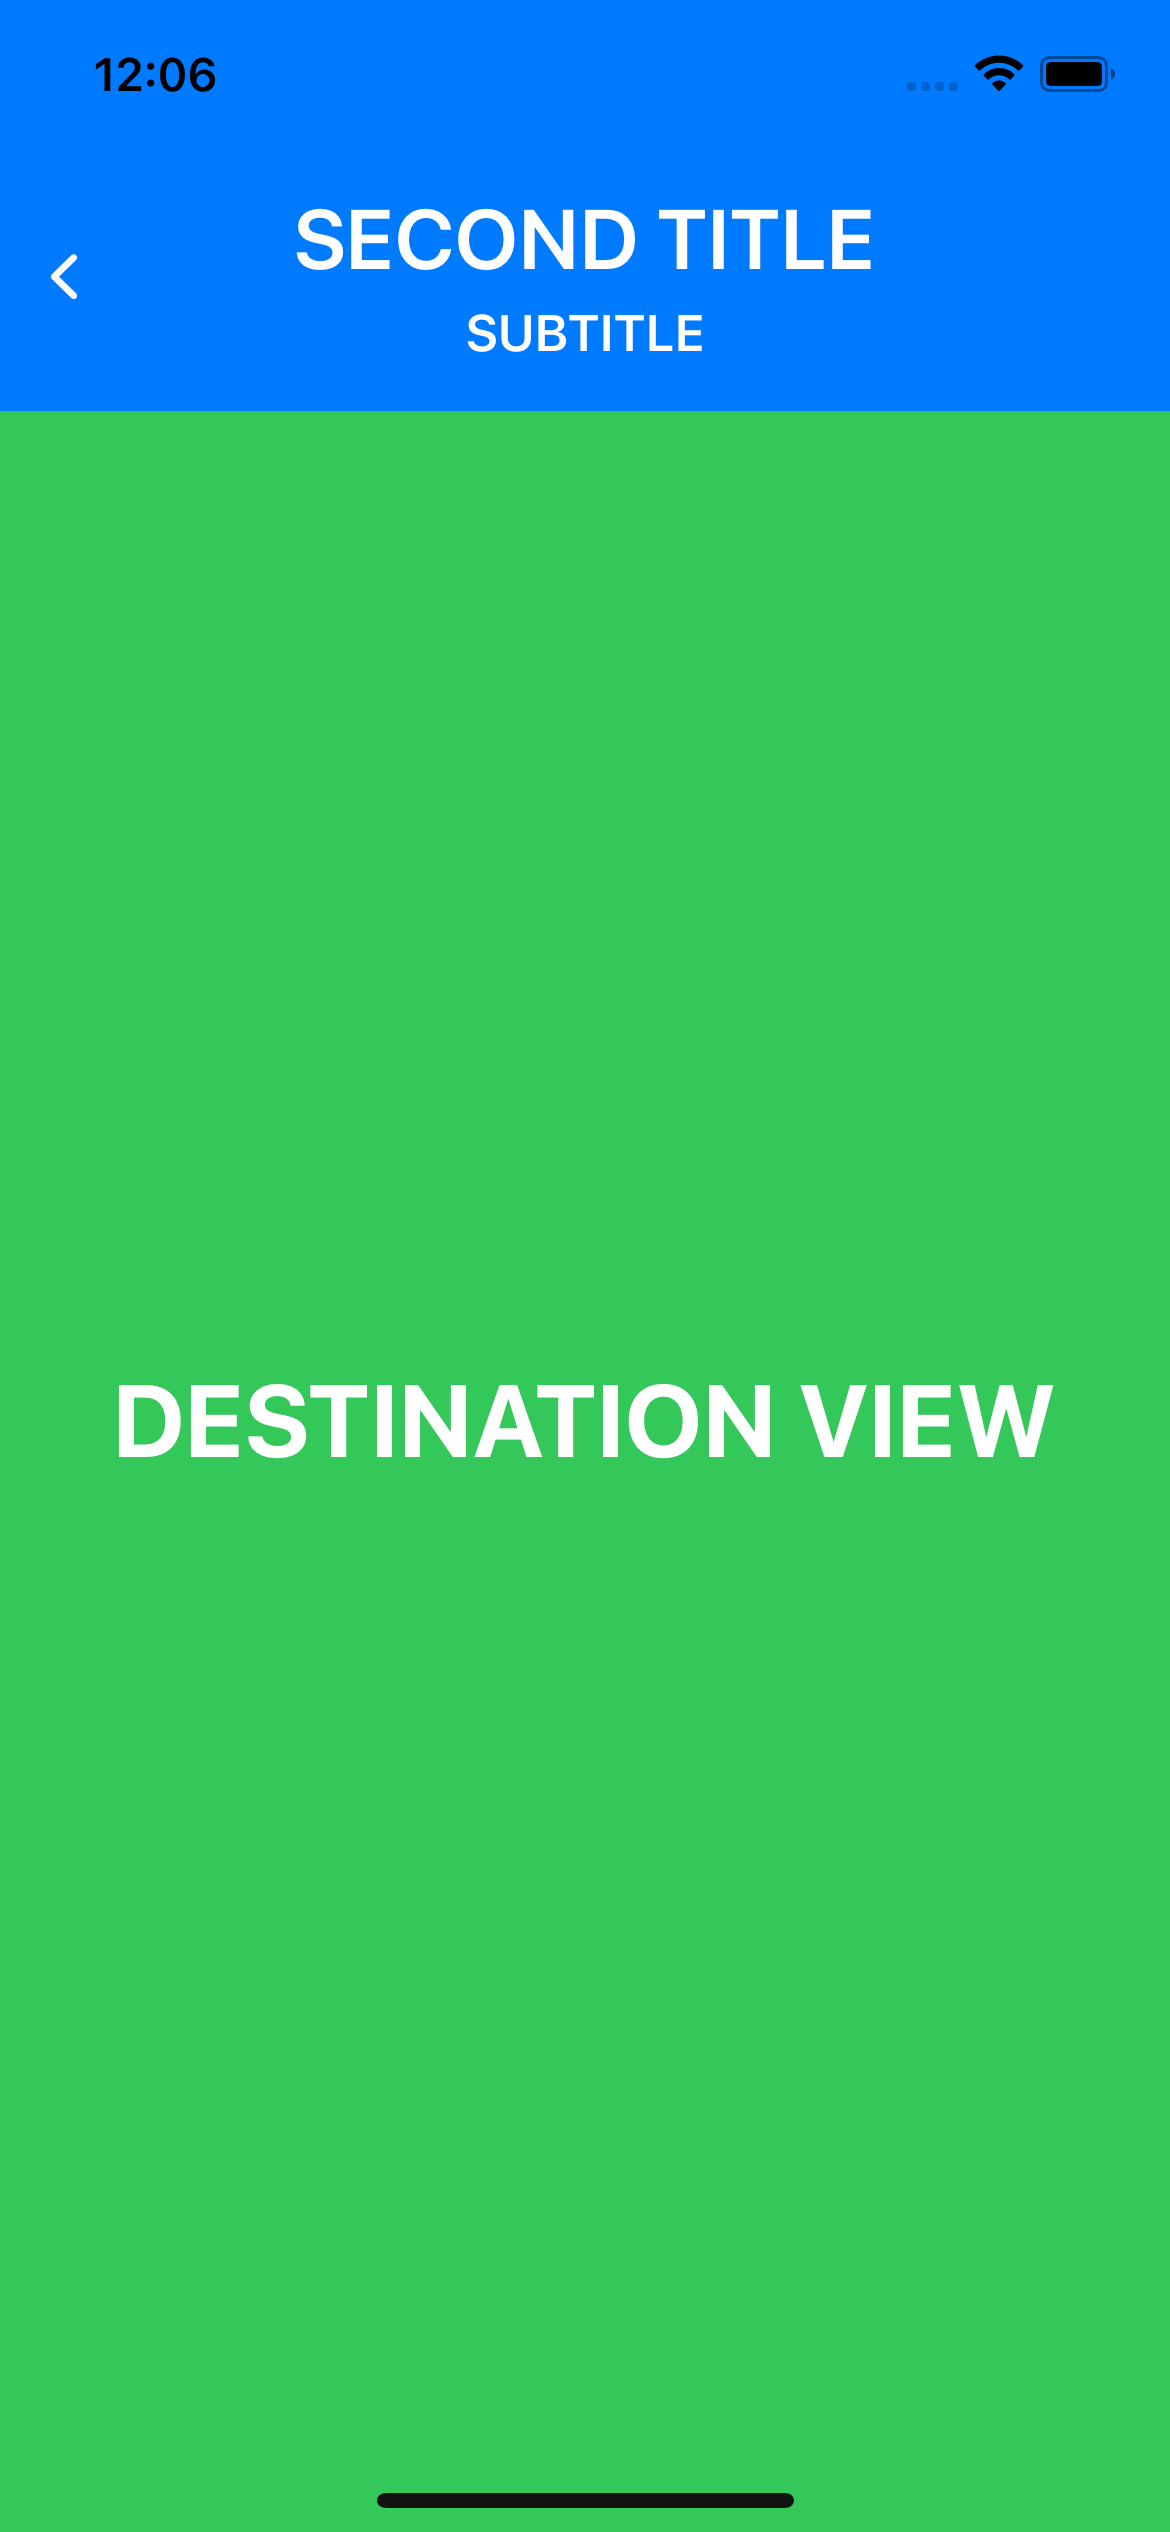
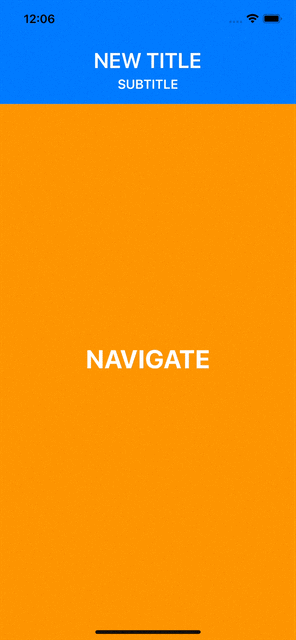
struct AppNavBarView: View {
var body: some View {
CustomNavView {
ZStack {
Color.orange.ignoresSafeArea()
CustomNavLink(destination: customDestinationView
.customNavigationTitle("SECOND TITLE")
.customNavigationSubtitle("SUBTITLE")
.customNavigationBarBackButtonHidden(false)
) {
Text("NAVIGATE")
.font(.largeTitle)
.fontWeight(.bold)
.foregroundColor(.white)
}
}
.customNavBarItems(title: "NEW TITLE", subtitle: "SUBTITLE", hidden: true)
}
}
}
extension AppNavBarView {
private var customDestinationView: some View {
ZStack {
Color.green.ignoresSafeArea()
Text("DESTINATION VIEW")
.font(.largeTitle)
.fontWeight(.bold)
.foregroundColor(.white)
}
}
}- 커스텀 네비게이션 뷰를 사용하는 부모 뷰
- 부모 뷰는 백버튼 비활성화, 자식 뷰는 백버튼 활성화
private var defaultNavView: some View {
        NavigationView {
            ZStack {
                Color.red.ignoresSafeArea()

                NavigationLink {
                    ZStack {
                        Color.green.ignoresSafeArea()
                            .navigationTitle("NAV TITLE2")
                            .navigationBarBackButtonHidden(false)
                        Text("DESTINATION VIEW")
                            .font(.largeTitle)
                            .fontWeight(.bold)
                            .foregroundColor(.white)
                    }
                } label: {
                    Text("NAVIGATE")
                        .font(.largeTitle)
                        .fontWeight(.bold)
                        .foregroundColor(.white)
                }
            }
            .navigationTitle("NAV TITLE")
        }
}- 애플 제공 디폴트 네비게이션 뷰 코드
- 별도의 커스텀 시 스와이프, 백버튼 기능을 새롭게 구현해야 함
구현 화면
탭바를 커스텀해서 구현하는 것보다는 이해하기 쉬웠지만, 전반적으로 쉽지만은 않았다! SwiftUI로 네비게이션 뷰를 사용할 때 발생하는 디스미스 오류 또는 백버튼 스와이프 등 기능 소실이 걱정스러웠는데, 커스텀을 통해 해결할 수 있는 것을 배웠다.

JUST DO IT