Particle System -> 총알 발사
Create Particle Materials
- 메테리얼 만들기 - 인스펙터상 쉐이더 - URP - Particles - Unlit
- 생성된 메테리얼의 인스펙터 Surface Inputs - Base Map - 준비한 이미지 삽입
- 파티클 오브젝트 인스펙터 Renderer - Material에 삽입, Surface Options - Surface Type을 Opaque에서 Transparent로 변경.
- 빛나게 하려면 emission 옵션 켜기
날아가는 파티클이 투사체처럼 보이게 하고 싶다면,
- 파티클 인스펙터 - Simulation Space - Global
Local로 되어 있다면, 파티클이 캐릭터가 움직이면 같이 움직인다.
2D 이미지인 파티클이 3D 처럼 보이는 이유
Render Mode가 Billboard로 되어있기 때문.
빌보드로 되어있다면, 파티클은 항상 카메라를 향해 있다.
Trails
날아가는 파티클에 잔상을 생성.
파티클에 콜라이더를 넣을 수도 있다
Collier 체크, Type -> World 지형지물과 충돌하고 튕겨나오는 모습.
사이버펑크에서 튕기는 총알같다.
Lifetime Loss -> 1 충돌하면 제거.
Dampen -> 1 충돌하고 약간의 지연시간후 삭제되는 현상을 해결
총알 발사를 켜고 끄는 방법
간단히 Emission을 켜고 끄면 됨.
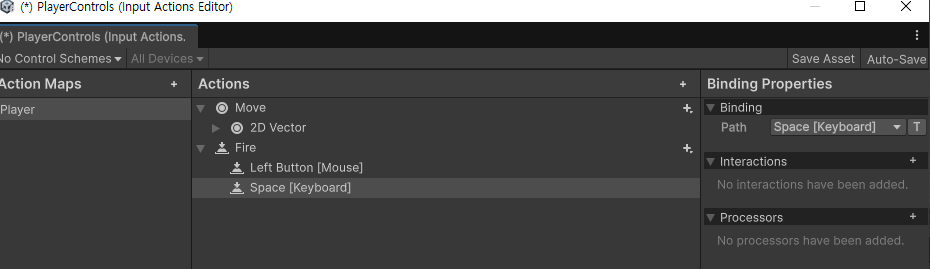
Action Map을 사용해 발사 구현
파티클의 Emission을 온 오프하는 방식으로 원하는 시점에서만 발사를 하도록 구현할것임.
사전에 만들어 놓은 Action Map을 사용할건데 일단 Fire이라는 액션을 생성.
PlayerWeapon 스크립트 생성, 액션맵과 동일한 오브젝트에 추가하고 OnFire()을 사용해 발사 시스템 만든다.
 ParticleSystem weapon;
 bool isFiring = false;

 // Start is called once before the first execution of Update after the MonoBehaviour is created
 void Start()
 {
     weapon = GetComponent<ParticleSystem>();
 }

 private void Update()
 {
     ProcessFiring();
 }

 public void OnFire(InputValue Button)
 {
     isFiring = Button.isPressed;
 }

 void ProcessFiring()
 {
     if (isFiring)
     {
         Debug.Log("FIRE!");
     }
 }
이런식으로 코드를 짜고 발사를 해보면, 로그가 계속 찍히는데, 발사를 중지했을 때(마우스클릭을 뗐을 때) 발사상태가 False가 되지 않기 때문.
스크립트로도 고칠 수 있지만, 액션맵 상에서 수정 가능하다.
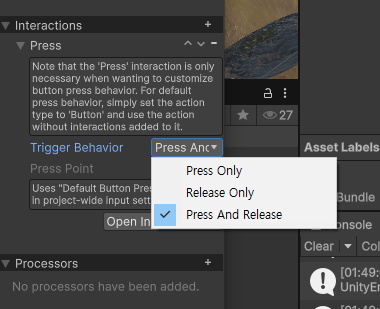
Trigger Behavior - Press and Release
자식 오브젝트의 컴포넌트에 접근할 수 있도록 지정해주면 완성.
...

[SerializeField] GameObject laser;

...

private void Update()
{
    ProcessFiring();
}

public void OnFire(InputValue Button)
{
    isFiring = Button.isPressed;
}

void ProcessFiring()
{
    var emmisionModule = laser.GetComponent<ParticleSystem>().emission;
    emmisionModule.enabled = isFiring;

}
만약 레이저 발사 프리팹이 여러개라면?
[SerializeField] GameObject[] lasers; 로 배열을 만들어주면 된다.
ProcessFiring()도 바꿔줘야 하는데,
var emmisionModule = lasers[0].GetComponent<ParticleSystem>().emission;
emmisionModule.enabled = isFiring;
    ~~~

위 코드처럼 모든 원소에 접근해 일일히 기능을 추가할 수도 있겠지만 훨씬 편한 방법이 있다.

### Foreach Loop

콜렉션을 순회하기 위한 기능이다.

Do this to everything in our collection.

## Crosshair

하이어라키에 캔버스 추가, 자식으로 UI - Image 추가.

미리 준비한 크로스헤어 PNG 추가.

캔버스 - Scaler - UI Scale Mode - Scale With Screen Size 이후 화면 비율 설정.

### 크로스헤어가 마우스를 따라가게 하려면

~~~cs

[SerializeField] RectTransform crosshair;

...

void MoveCrosshair()
{
    crosshair.position = Input.mousePosition;
}
호우 간단하다.
크로스헤어 변수에는 크로스헤어 UI 넣으면 된다.
게임화면에서 커서를 비활성화 하는 방법.
마우스 커서가 거슬린다면, start메서드 안에 Cursor.visible = false; 한 줄 추가해주기만 하면 됨.