CSS module
리액트 프로젝트에서 컴포넌트를 스타일링 할 때 CSS Module 이라는 기술을 사용하면, CSS 클래스가 중첩되는 것을 완벽히 방지할 수 있다.
이럴 때 쓰면 좋다
-
레거시 프로젝트에 리액트를 도입할 때, 기존프로젝트에 있었던 CSS클래스와 이름이 중복되어도 스타일이 꼬이지 않게 해준다.
-
CSS클래스를 중복되지 않게 작성하기 위하여 CSS 클래스 네이밍 규칙을 만들기 귀찮을 때
연습을 위해서 프로젝트를 만들자.
프로젝트 생성후 따로 설치해야하는 라이브러리는 없다. create-react-app 에는 이미 적용이 되어있어서 파일하나를 생성하고 .module을 붙여주면 된다.
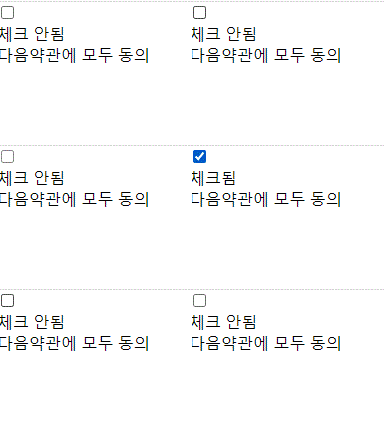
프로젝트에 component 폴더 생성후 그 안에 CheckBox.js를 생성한다.
import React from "react";

function CheckBox({checked,children, ...rest}) {
    return (
        <div>
            <label>
                <input type="checkbox"  checked={checked} {...rest}/>
                <div>{checked ? '체크됨' : '체크 안됨'}</div>
            </label>
            <span>
                {children}
            </span>
        </div>
    );
}

export default CheckBox;App.js에 CheckBox.js를 렌더링 시킨다.
import React ,{useState} from 'react';
import CheckBox from "./components/CheckBox";

function App() {
  const [check, setCheck] = useState(false);
  const onChange = (e) => {
    setCheck(e.target.checked);
  }
  return (
      <div>
        <CheckBox onChange={onChange} checked={check}>다음약관에 모두 동의</CheckBox>
      </div>
    )
}

export default App;

맨 위의 체크박스를 지우고, 체크 안됨이라는 문구 대신에 체크 되었을 경우에는 체크박스로, 체크가 되어있지 않으면 빈박스를 나타내게 할 것이다.
먼저 yarn add react-icons를 입력하여 react-icons를 설치한다. react-icons는 리액트에서 기본적으로 제공하는 이미지들을 사용할 수 있다. 이미지의 목록에 대한 정보는
https://react-icons.github.io/react-icons/ 로 가보면 확인 할 수 있다. 나는 Material Design icons 에서 MdCheckBox, MdCheckBoxOutlineBlank 아이콘을 사용할 것이다.
이전에 체크 유무에 따른 문구로 출력됨, 출력안됨이라고 설정한 것을 아이콘으로 대체한다.
<div>{checked ? <MdCheckBox/> : <MdCheckBoxOutlineBlank/>}</div>다시 렌더링을 돌려보면,

체크박스가 2개가 되었다.
그럼이제 css Module을 만들어보자. components 폴더안에 CheckBox.module.css라는 파일을 생성한다.
.checkbox{
    display: flex;
    align-items: center; //가운데 정렬
}

.checkbox label{
    cursor: pointer; // 커서를 올리면 손가락모양으로 나타난다.
}

.checkbox input {
    width:0;
    height: 0;
    position: absolute;
    opacity: 0; // 보이지않게 지운다.
}

.checkbox span {
    font-size: 1.125rem;
    font-weight: bold;
}

.icon {
    display: flex;
    align-items: center;
    font-size: 2rem;
    margin-right: 0.25ren;
    color: #adb5db //아이콘의 기본 스타일
}

.checked{
    color: #339af0 // 체크 되었을때 색의 변화
}
그럼 이 모듈을 컴포넌트에 사용해보자.
CheckBox 컴퍼넌트에 css모듈파일을 import 하고 console.log로 내용을 출력하면

위와 같이 객체에 우리가 선언했던 클래스들이 고유값을 지닌채로 출력되어있다. 이 고유한 값을 가지는 클래스들을 className으로 지정하여 사용할 것이다.
import React from "react";
import {MdCheckBox, MdCheckBoxOutlineBlank} from 'react-icons/md'
import styles from './CheckBox.module.css';


function CheckBox({checked,children, ...rest}) {
    return (
        <div className={styles.checkbox}>
            <label>
                <input type="checkbox"  checked={checked} {...rest}/>
                <div className={styles.icon}>
                    {checked ?  (
                    <MdCheckBox className={styles.checked}/>
                    ) : (
                    <MdCheckBoxOutlineBlank/>
                    )}
                    </div>
            </label>
            <span>
                {children}
            </span>
        </div>
    );
}

export default CheckBox;
checkbox label에 커서를 올리면 손가락 모양이 나타나고, input엘리먼트는 보이지 않게 숨기고, icon의 크기과 색깔을 조정했다.

만약에 모듈에서 사용해야할 클래스가 여러개일 경우
`${styles.checkbox} ${styles.무슨무슨}`이런식으로 작성해야하는데 매우 번거로움이 있을수 있다. 이럴 때 사용하는것이 classnames인데, classnames에 있는 bind를 사용한다.
우선 calssnames를 설치하고 import로 불러온다.
그다은 bind를 호출하는 변수를 선언한다.const cx = classNames.bind(styles)
이제 여러개의 클래스를 사용해야 할 경우 전의 classnames처럼 간편하게 작성이 가능하다
className = {cx('checkbox', '무슨무슨', '이것저것', )}이런 방식으로 작성이 가능하다.
import React from "react";
import {MdCheckBox, MdCheckBoxOutlineBlank} from 'react-icons/md'
import styles from './CheckBox.module.css';
import classNames from 'classnames/bind';

const cx = classNames.bind(styles);

function CheckBox({checked,children, ...rest}) {
    return (
        <div className={cx('checkbox')}>
            <label>
                <input type="checkbox"  checked={checked} {...rest}/>
                <div className={cx('icon')}>
                    {checked ?  (
                    <MdCheckBox className={cx('checked')}/>
                    ) : (
                    <MdCheckBoxOutlineBlank/>
                    )}
                    </div>
            </label>
            <span>
                {children}
            </span>
        </div>
    );
}

export default CheckBox;
수정후 실행해보면 같은 결과를 볼 수 있다.
