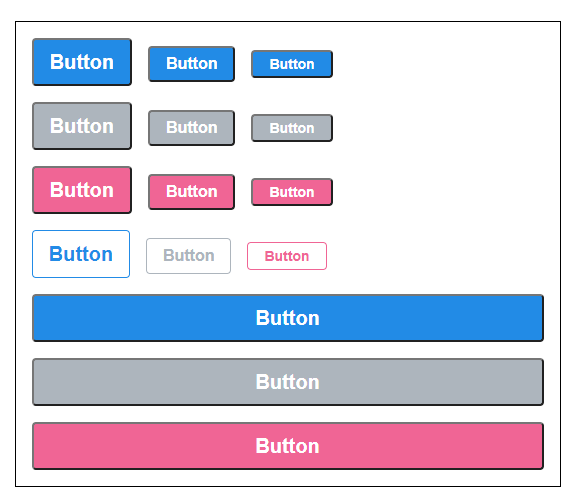
size props 설정
이전에 만든 버튼에 size라는 props를 추가한다.
size는 large,medium,small 로 나누고, 그에 따른 크기가 변형된다.
이때 size props를 추가하는 방법은
className에서 배열을 만들어서 join 형태로 만든다.
function Button({children, size}) {
    return <button className={["Button",size].join(' ')}>{children}</button>;
}- 템플릿 리터럴을 사용해서 나타낸다.
function Button({children, size}) {
    return <button className={`Button ${size}`}>{children}</button>;
}
만약 사용하게될 props 가 많아지면 그만큼의 내용을 하나한 다 추가해야 한다. 그래서 class names라는 라이브러리를 사용하면,
button의 조건부 스타일링, 조건부로 class name을 굉장히 쉽게 적용할 수 있다.
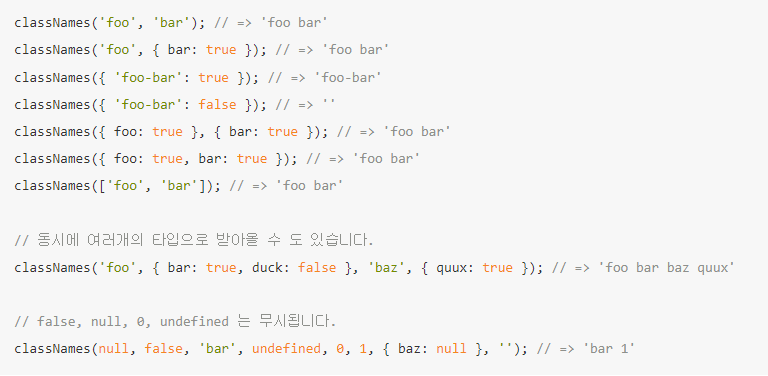
yarn add classnames로 classnames 설치
classnames 라이브러리를 불러오고 나서 코드를 수정한다.
import './Button.scss'
import classNames from 'classnames';
// size: large, medium,small
function Button({children, size}) {
    return <button className={classNames('Button', size)}>{children}</button>;
}
이렇게 하면 props의 size 값이 large 일 경우에는 large가 적용된다.
만약 size를 전달하지 않았을 때 버튼의 기본 사이즈를 지정해놓자.
Button.defaultProps = {
    size: 'medium'
};
이제 기본 사이즈는 medium으로 정의했으니 large, medium, small 의 값을 정해야 한다.
Button.scss에서 Button 클래스 내부에 large,medium,small의 클래스를 추가한다. medium의 경우는 원래 정해진 크기를 사용하면 된다.
$blue: #228be6; // 주석

.Button {
    display: inline-flex;
    align-items: center;
    justify-content: center;
    color: white;
    font-weight: bold;
    outline: none;
    border-radius :4px;
    cursor:pointer;

    padding-right: 1rem;
    padding-left: 1rem;
    &.large{
        height: 3rem;
        font-size: 1.25rem;
    }
    &.medium{
        height: 2.25rem;
        font-size: 1rem;
    }
    &.small {
        height: 1.75rem;
        font-size: 0.875rem;
    }

    background: $blue;
    &:hover{
        background: lighten($blue, 10%)
    }
    &:active {
        background: darken($blue, 10%)
    }

}
&연산자는 자기 자신을 뜻한다.
function App() {
  return (
    <div className='App'>
      <div className='buttons'>
        <Button size='large'>Button</Button>
        <Button>Button</Button>
        <Button size="small">Button</Button>
      </div>
    </div>
  )
}
이제 각각의 size값을 가진 button을 추가로 렌더링해보면

정해진 size 값마다 크기가 달라진 모습을 볼 수 있다.
추가로, 버튼 사이의 간격을 벌려보자.
.Button + .Button {
    margin-left: 1rem;
}
이런 구문은 Button 클래스와 Button 클래스가 같이 있을 경우에, 오른쪽에 해당하는 클래스에 해당 스타일을 적용시킬 것이라는 뜻이다. 따라서 오른쪽의 버튼에 해당하는 클래스의 margin-left가 1rem 만큼 추가되어 벌어지게 되는 것이다.

요렇게.
참고로 다른 방식으로도 작성이 가능하다. 서로 붙어있는 클래스의 속성 내부에 이와 같이 작성해도 첫번째와 같은 결과가 나타난다.
물론 이렇게 할때는 해당 클래스 내부에 작성되어야한다.
& + & {
    margin-left: 1rem;
}
color props 설정
버튼의 색상값을 갖는 props를 설정해서 원하는 색깔의 버튼을 렌더링 하고자 한다. 이때 색깔 코드가 생각나지 않는다면
https://yeun.github.io/open-color/ 이곳을 참조하자. 여러가지의 색깔들이 그에 해당하는 코그값과 함께 표시되어있다.
먼저 Button 컴퍼넌트의 props 값에서 color 를 classNames에 추가한다.
function Button({children, size, color}) {
    return <button className={classNames('Button', size, color)}>{children}</button>;
}

Button.defaultProps = {
    size: 'medium',
    color: 'blue'
};

export default Button;
이 사이트를 참고해서 pink 와 gray 값을 가지는 변수를 추가했다.
$gray: #adb5bd;
$pink: #f06595;
그리고 해당 색상값을 갖는 클래스 마다 background색의 값을 지정해주고, 마우스를 올렸을 때와 클릭했을 때의 속성도 부여해준다.
 &.blue {
    background: $blue;
    &:hover {
      background: lighten($blue, 10%);
    }
    &:active {
      background: darken($blue, 10%);
    }
  }

  &.gray {
    background: $gray;
    &:hover {
      background: lighten($gray, 10%);
    }
    &:active {
      background: darken($gray, 10%);
    }
  }

  &.pink {
    background: $pink;
    &:hover {
      background: lighten($pink, 10%);
    }
    &:active {
      background: darken($pink, 10%);
    }
  }
하지만 이렇게 작성하면 반복되는 구문이 많아서 보기 불편할 수 있는데, 이럴 때 사용하는 것이 바로 mixin기능이다.
형식은 이렇다
@mixin button-color($color) {
  background: $color;
  &:hover {
    background: lighten($color, 10%);
  }
  &:active {
    background: darken($color, 10%);
  }
}
mixin에 이름와 파라미터를 지정하고 적용하고 싶은 css 코드를 작성한다.
아까 blue, gray, pink에 각각 똑같이 작성했던 내용을 전부 지우고, @include button-color($색깔이름)으로 작성해준다.
$blue: #228be6;
$gray: #adb5bd;
$pink: #f06595;
@mixin button-color($color) {
  background: $color;
  &:hover {
    background: lighten($color, 10%);
  }
  &:active {
    background: darken($color, 10%);
  }
}
.Button {
  display: inline-flex;
  align-items: center;
  justify-content: center;
  color: white;
  font-weight: bold;
  outline: none;
  border-radius: 4px;
  cursor: pointer;

  padding-right: 1rem;
  padding-left: 1rem;
  &.large {
    height: 3rem;
    font-size: 1.25rem;
  }
  &.medium {
    height: 2.25rem;
    font-size: 1rem;
  }
  &.small {
    height: 1.75rem;
    font-size: 0.875rem;
  }
  &.blue {
    @include button-color($blue)
  }

  &.gray {
    @include button-color($gray)
  }

  &.pink {
    @include button-color($pink)
  }
}

.Button + .Button {
  margin-left: 1rem;
}
하나하나 똑같은 코드를 써야했던 클래스 내부의 내용이 단 한줄로 줄어들었다.
이제 마지막으로 App.js에 작성된 Button 컴퍼넌트에 각각 color 속성을 부여해주고 렌더링을 실행하면
function App() {
  return (
    <div className='App'>
      <div className='buttons'>
        <Button size='large' color='gray'>Button</Button>
        <Button>Button</Button>
        <Button size="small" color='pink'>Button</Button>
      </div>
    </div>
  )
}
Button 엘리멘트를 더 추가해서 렌더링 해보면
function App() {
  return (
    <div className='App'>
      <div className='buttons'>
        <Button size='large' >Button</Button>
        <Button>Button</Button>
        <Button size="small" >Button</Button>
      </div>
      <div className='buttons'>
        <Button size='large' color='gray'>Button</Button>
        <Button color='gray'>Button</Button>
        <Button size="small" color='gray'>Button</Button>
      </div>
      <div className='buttons'>
        <Button size='large' color='pink'>Button</Button>
        <Button color='pink'>Button</Button>
        <Button size="small" color='pink'>Button</Button>
      </div>
    </div>
  )
}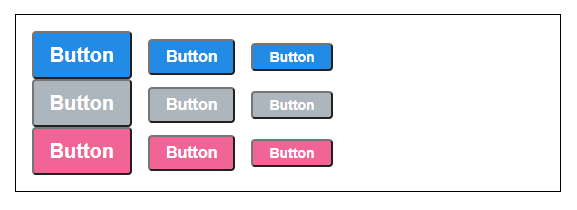
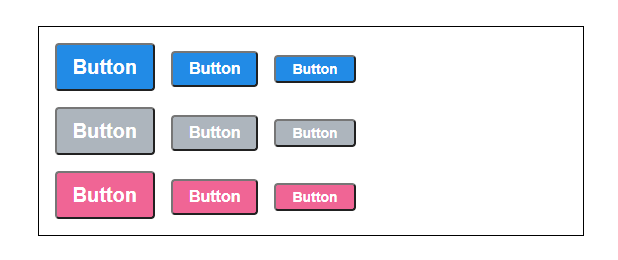
상하의 여백이 없어서 여백을 주고싶을 때는 App.scss로 들어가서 저번에 했었던 클래스 + 클래스 문법을 사용해서 각각의 클래스가 붙어있을때 자신이 지정한 스타일 속성이 적용되게 하자.
   .buttons + .buttons{
        margin-top: 1rem;
    }
buttons 끼리 붙어있다면 아래쪽의 buttons에 margin-top을 1rem만큼 부여하는 것이다.
outline, fullWidth props 설정
-
outline : 배경의 색을 제거하고 테두리색을 정의한다. 이 때, 테두리의 색은 클래스의 이름(색깔)과 동일하며, 텍스트의 색도 동일하게 적용시킨다. 마우스를 올리면 테두리 색과 같은 색으로 배경색이 바뀌고, 클릭시 10%정도 어두운 색으로 변한다.
-
fullWidth : 버튼의 길이를 전체의 너비길이와 같게 적용시킨다.
이 두가지의 props는 true/false 값으로 적용 여부를 따져서 true면 적용되는거고, false면 적용되지 않는 방식으로 사용된다.
이전에 했던 방식과 비슷하지만 defaultprops는 설정안해도 된다.
false면 적용되지 않기 때문.
props 에 outline,fullWith를 객체형태로 추가한다.
function Button({children, size, color, outline, fullWidth}) {
    return <button className={classNames('Button', size, color, {
        outline,
        fullWidth
    } )}>{children}</button>;
}Button.scss에서 outline과 fullWith가 true일 때 적용되는 스타일 내용을 작성한다.
outline의 경우 클래스 이름(색상)의 색으로 테두리 색을 정의하고 싶기 때문에 모든 색상의경우에 작성되어야 한다. 따라서 이전에 작성한 mixin내부에 작성해주면 편하다.
@mixin button-color($color) {
  background: $color;
  &:hover {
    background: lighten($color, 10%);
  }
  &:active {
    background: darken($color, 10%);
  }

  &.outline {
      background: none;
      border: 1px solid $color; //클래스의 색깔에 따라 색이 바뀐다.
      color: $color;
      &:hover{
          background: $color;
      }
      &:active{
          background: darken($color, 10%);
      }
  }
}
maxWidth는 클래스의 이름(색깔)에 구애받지 않으므로 .Button내부에 한번만 작성해주면 된다.
 &.fullWidth{
      width: 100%;
      justify-content: center; //가운데 정렬
      & + & { // 서로 붙어있으면 여백을 생성한다.
          margin-left: 0;
          margin-top: 1rem;
      }
  }
이제 한번 적용시켜보자.
App.js에 Button 컴포넌트를 더 추가하고 속성을 부여한다.
function App() {
  return (
    <div className='App'>
      <div className='buttons'>
        <Button size='large' >Button</Button>
        <Button>Button</Button>
        <Button size="small" >Button</Button>
      </div>
      <div className='buttons'>
        <Button size='large' color='gray'>Button</Button>
        <Button color='gray'>Button</Button>
        <Button size="small" color='gray'>Button</Button>
      </div>
      <div className='buttons'>
        <Button size='large' color='pink'>Button</Button>
        <Button color='pink'>Button</Button>
        <Button size="small" color='pink'>Button</Button>
      </div>
      <div className='buttons'>
        <Button size='large' outline>Button</Button>
        <Button color='gray' outline>Button</Button>
        <Button size="small" color='pink'outline> Button</Button>
      </div>
      <div className='buttons'>
        <Button size='large' fullWidth>Button</Button>
        <Button size='large' color='gray' fullWidth>Button</Button>
        <Button size="large" color='pink'fullWidth> Button</Button>
      </div>
    </div>
  )
}
outline 과 fullWidth에 아무것도 적혀있지 않는데, 이는 True값을 지정해준것과 동일하다.
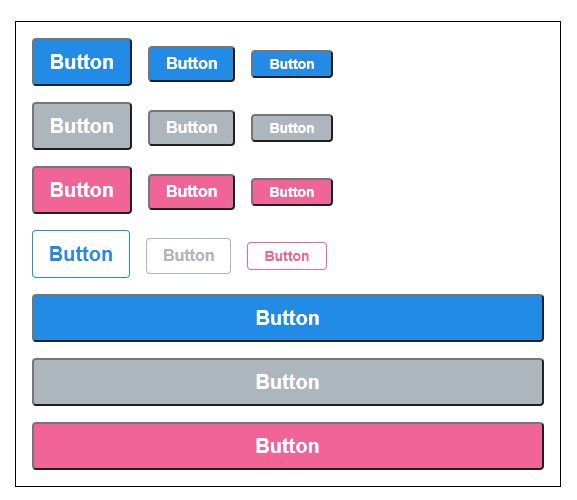
outline이 적용된 컴포넌트는 배경색이 사라지고 텍스트의 색이 변경되었고, fullWidth가 적용된 컴포넌트는 최대 너비까지 확장되어 렌더링 된것을 확인 할 수 있다.
버튼에 __rest props 전달하기
버튼을 클릭할 때 이벤트가 발생하게 하려면 onClick을 추가하고
버튼에 마우스 커서를 올릴 때 이벤트가 발생하게 하려면 onMousemove를 추가해야한다.
App.js
onClick={() => {
          console.log('클릭!')
        }}
Button.js
function Button({children, size, color, outline, fullWidth, onClick}) {
    return <button className={classNames('Button', size, color, {
        outline,
        fullWidth,
    } )}
    onClick={onClick}
    >{children}</button>;
}
props가 추가 될수록 props 에 작성해야될 내용이 점저 길어지게 되는데, 좀더 간단히 작성하고 싶을 때 사용하는 것이 다로 ...rest이다.
onClick을 제외한 나머지는 나두고 새로들어오는 props를 wjsqn ...rest에 집어넣는 것이다.
Button 컴포넌트의 props 파라미터에 onClick대신 ...rest로 수정하고 console.log(rest)를 작성해서 rest에 무슨값이 들어오는지 확인해보자.
function Button({children, size, color, outline, fullWidth, ...rest}) {
    console.log(rest)
    return <button className={classNames('Button', size, color, {
        outline,
        fullWidth,
    } )}
    >{children}</button>;
}

이렇게 onClick이 나타난다.
그럼 만약 onClick을 사용하고 싶다면? rest객체에서 onClick을 사용하면 되니까 rest.onClick이라고 작성하면 된다.
혹은 {...rest}라고 작성해도 되는데 이 뜻은 rest객체 안에 있는것들 모든 props를 해당 컴포넌트에 설정하겠다는 뜻이다.
다양한 props가 존재할 경우는 이렇게 ...rest를 사용하는것이 편리하다.
props에 className도 추가해놓으면 className에 다른 클래스를 추가시켜서 다른 스타일을 적용할 수 도 있기 때문에, 이런 재사용을 많이 하는 클래스의 경우 ...rest와 className도 넣어주는 것이 좋다.
※className이 겹치지 않게 작성하는 팁(정답은 아님)
- 컴퍼넌트의 이름을 고유하게 지정
- 최상위 엘리먼트의 클래스이름을 컴포넌트 이름과 똑같게
- 그 내부에서 셀렉터를 사용한다.
