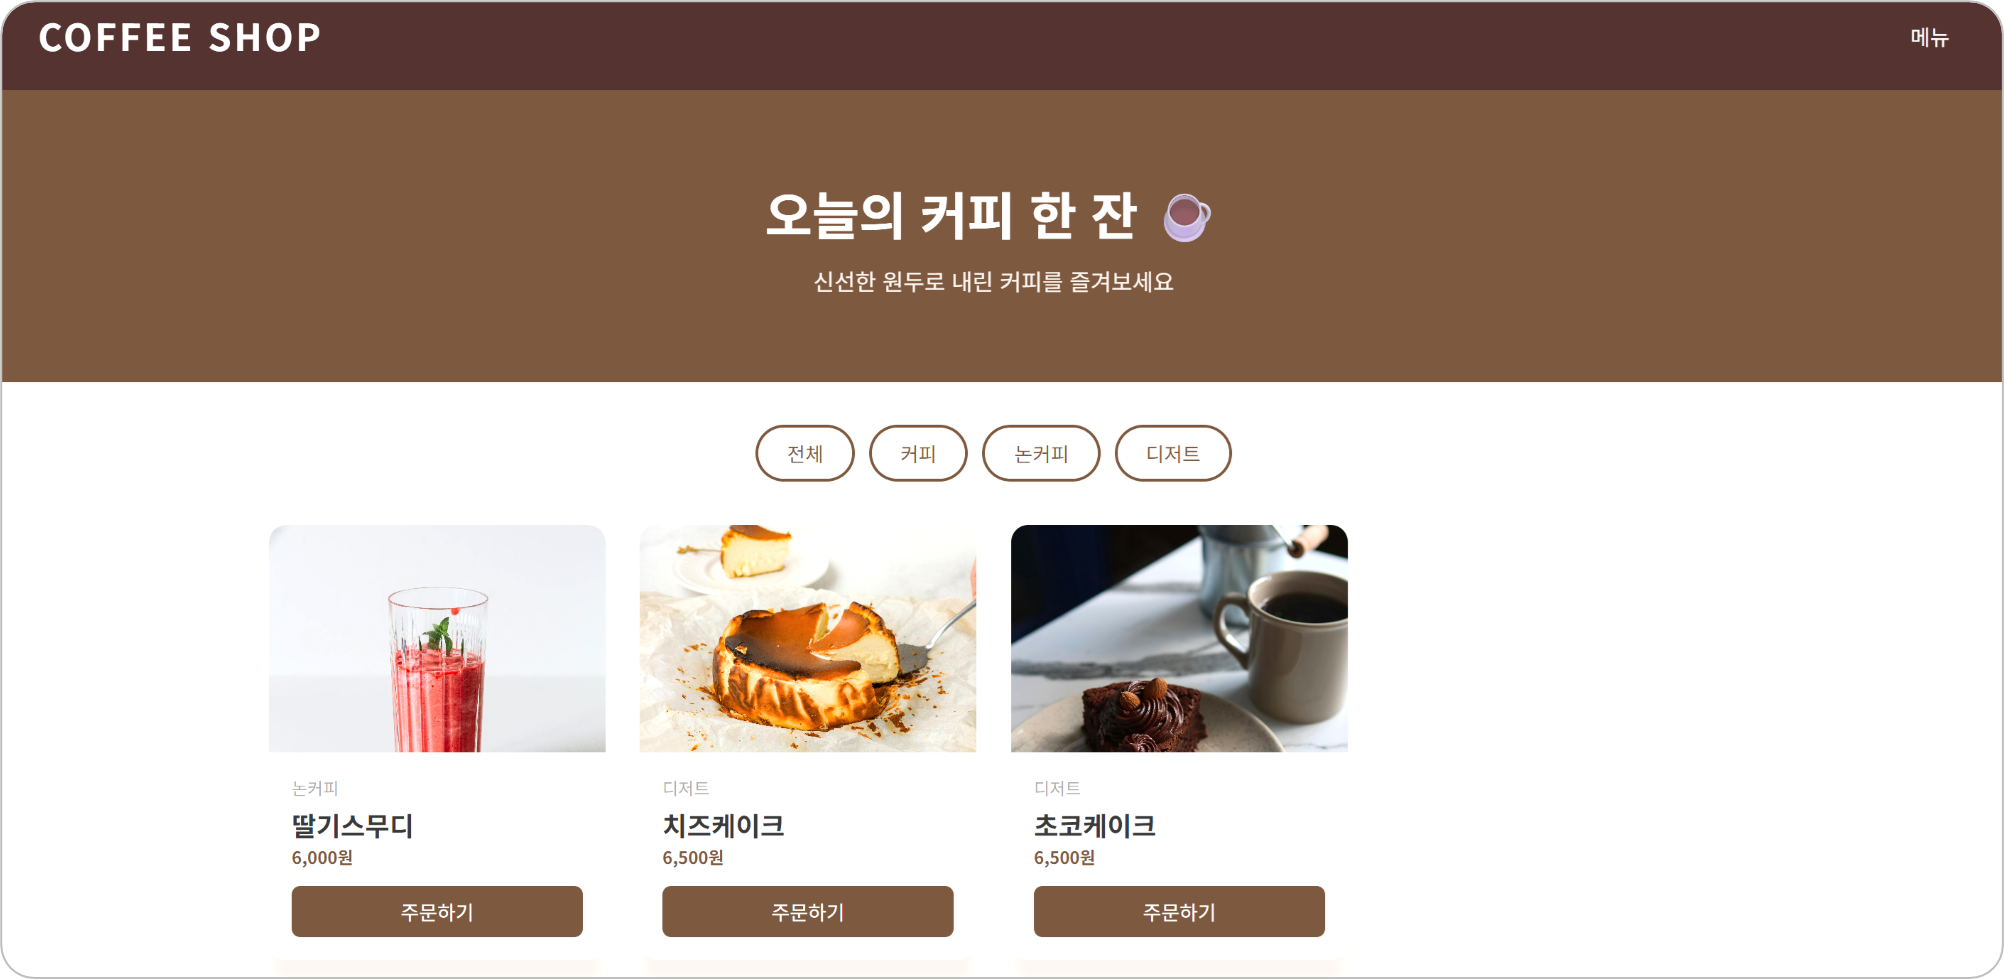
학원에서 위 이미지와 같이 Spring Boot로 coffee shop 페이지를 만들어 보았다.
배운 내용을 제대로 익히기 위해 복습 겸 피자 가게 페이지를 직접 만들어보려 한다.
이 글에서 다룰 내용
- 피자 메뉴 전체 조회
- 메뉴 단건 조회
- 메뉴 등록
- 메뉴 수정
- 메뉴 삭제
사용 기술 스택
- Spring Boot
- MySQL
- Lombok
- Postman
- MyBatis
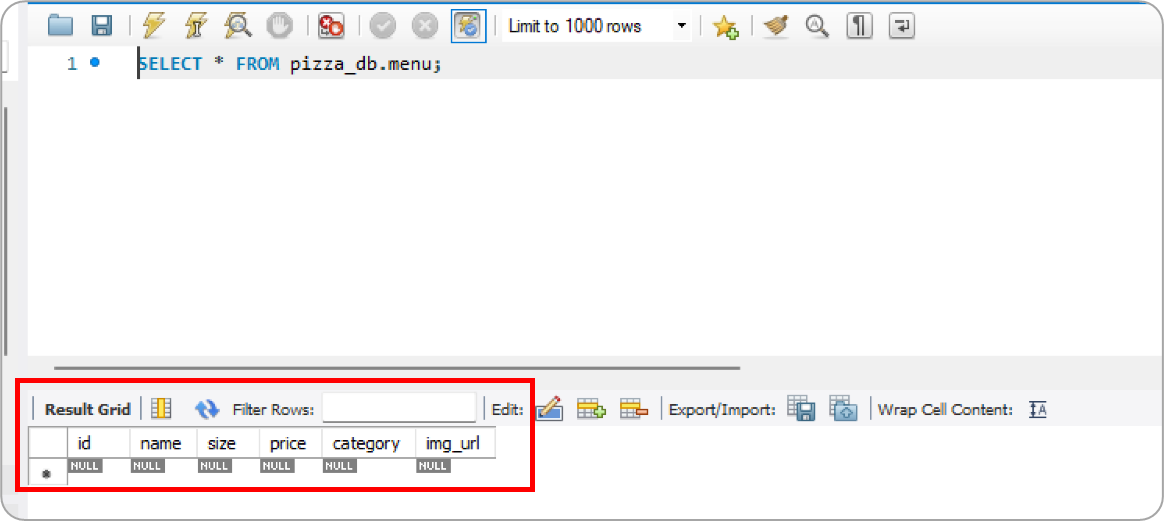
1. MySQL 에서 DB 생성 및 테이블 생성
1. 쿼리 작성 및 실행
-- pizza_db 생성
create database if not exists pizza_db default character set utf8mb4;

-- pizza_db 사용
use pizza_db;

-- menu 테이블 생성
create table menu(
	id int auto_increment primary key,
    name varchar(100) not null,
    size varchar(10) not null,
    price int not null,
    category varchar(50) not null,
    img_url varchar(255)
)
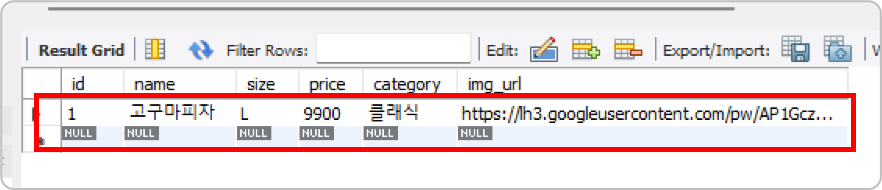
2. pizza_db의 menu 테이블 생성 완료
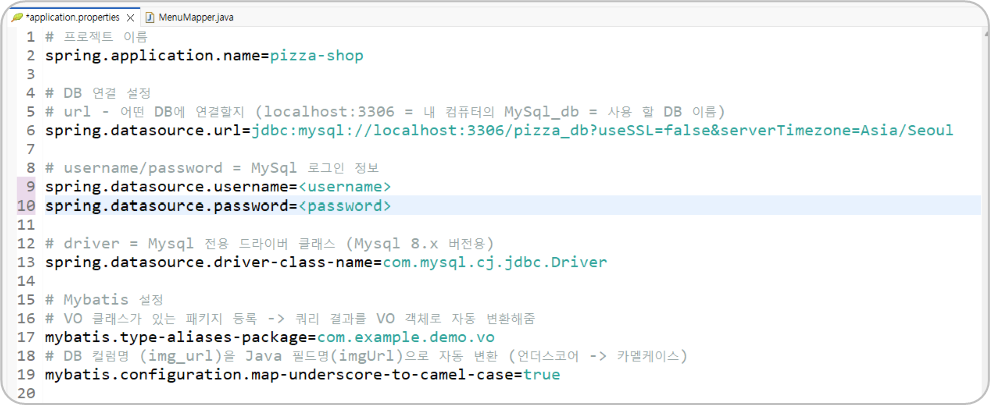
2. application.properties 설정 (DB 연결, MyBatis)
# 프로젝트 이름
spring.application.name=pizza-shop

# DB 연결 설정
# url - 어떤 DB에 연결할지 (localhost:3306 = 내 컴퓨터의 MySql_db = 사용 할 DB 이름)
spring.datasource.url=jdbc:mysql://localhost:3306/pizza_db?useSSL=false&serverTimezone=Asia/Seoul

# username/password = MySql 로그인 정보
spring.datasource.username=<username>
spring.datasource.password=<password>

# driver = Mysql 전용 드라이버 클래스 (Mysql 8.x 버전용)
spring.datasource.driver-class-name=com.mysql.cj.jdbc.Driver

# Mybatis 설정
# VO 클래스가 있는 패키지 등록 -> 쿼리 결과를 VO 객체로 자동 변환해줌
mybatis.type-aliases-package=com.example.demo.vo
# DB 컬럼명 (img_url)을 Java 필드명(imgUrl)으로 자동 변환 (언더스코어 -> 카멜케이스)
mybatis.configuration.map-underscore-to-camel-case=true
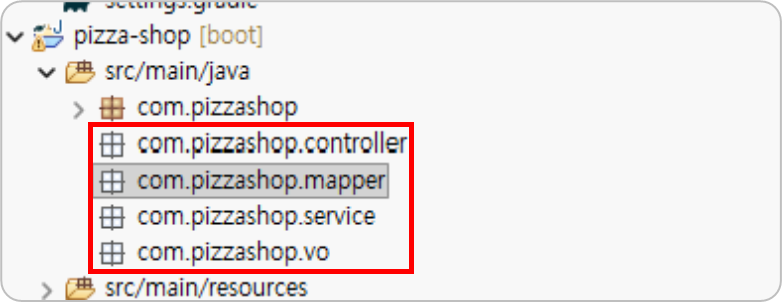
3. 프로젝트 생성 및 패키지 생성
- controller - 클라이언트 요청을 받고 응답을 반환
- service - 비즈니스 로직 담당
- vo - 데이터를 담는 객체 (DB 테이블과 매핑)
- mapper - DB에 접근해서 쿼리 실행
4. MenuVO 클래스 생성
- DB 테이블과 매핑되는 데이터 객체
package com.pizzashop.vo;

import lombok.AllArgsConstructor;
import lombok.Data;
import lombok.NoArgsConstructor;

@Data
@NoArgsConstructor
@AllArgsConstructor
public class MenuVO {

	private int id; // 고유 아이디
	private String name; // 메뉴명
	private String size; // 피자 사이즈
	private int price; // 가격
	private String category; // 카테고리
	private String imgUrl; // 이미지 URL
}
| 어노테이션 | 기능 |
|---|---|
@Data | getter, setter, toString 등을 자동 생성 |
@NoArgsConstructor | 기본 생성자 자동 생성 (매개변수 없음) |
@AllArgsConstructor | 전체 필드 생성자 자동 생성 (모든 필드 포함) |
@Data
// 이걸 직접 안 써도 됨
public String getName() { return name; }
public void setName(String name) { this.name = name; }
@NoArgsConstructor
// 이걸 자동 생성
public MenuVO() {}
@AllArgsConstructor
// 이걸 자동 생성
public MenuVO(int id, String name, String size, int price, String category, String imgUrl) {}
5. MenuMapper 인터페이스 생성
Mapper를 인터페이스로 생성하는 이유
직접 구현 코드를 작성하지 않아도 MyBatis가 자동으로 구현체를 만들어주기 때문이다.
개발자는 어떤 쿼리를 실행할지만 정의하면 된다.
@Mapper
MyBatis에게 "이 인터페이스가 Mapper입니다" 라고 알려주는 어노테이션이다.
Spring이 자동으로 구현체를 생성하고 Bean으로 등록해준다.
@Options(useGeneratedKeys = true, keyProperty = "id")
INSERT 후 DB에서 자동 생성된 id 값을 MenuVO 객체에 자동으로 담아주는 옵션이다.
| 옵션 | 설명 |
|---|---|
useGeneratedKeys = true | DB에서 자동 생성된 키(id)를 가져올지 여부 |
keyProperty = "id" | 가져온 키를 어느 필드에 담을지 지정 |
package com.pizzashop.mapper;

import java.util.List;

import org.apache.ibatis.annotations.Delete;
import org.apache.ibatis.annotations.Insert;
import org.apache.ibatis.annotations.Mapper;
import org.apache.ibatis.annotations.Options;
import org.apache.ibatis.annotations.Select;
import org.apache.ibatis.annotations.Update;

import com.pizzashop.vo.MenuVO;

@Mapper
public interface MenuMapper {

//	메뉴 전체 조회
	@Select("SELECT * FROM menu ORDER BY id ASC")
	List<MenuVO> findAll();

//	메뉴 단건 조회
	@Select("SELECT * FROM menu WHERE id = #{id}")
	MenuVO findById(int id);

//	메뉴 등록
	@Insert("INSERT INTO menu (name, size, price, category, img_url) VALUES (#{name}, #{size}, #{price}, #{category}, #{imgUrl})")
	@Options(useGeneratedKeys = true, keyProperty = "id")
	boolean insert(MenuVO menu);

//	메뉴 수정
	@Update("UPDATE menu SET name=#{name}, size=#{size}, price=#{price}, category=#{category}, img_url=#{imgUrl} WHERE id=#{id}")
	boolean update(MenuVO menu);

//	메뉴 삭제
	@Delete("DELETE FROM menu WHERE id=#{id}")
	boolean delete(int id);

}
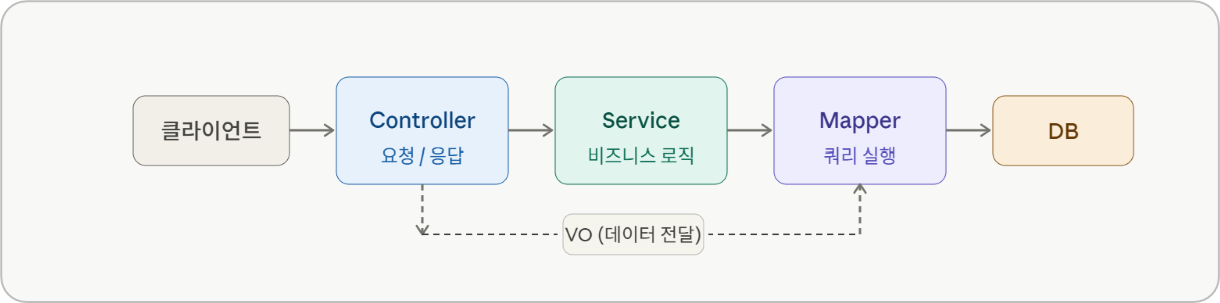
6. MenuService 클래스 생성
Service 클래스란?
Controller와 Mapper 사이에서 비즈니스 로직을 처리하는 계층이다.
Controller는 요청/응답만 담당하고, 실제 처리 로직은 Service에서 담당한다.
클라이언트 → Controller → Service → Mapper → DB@Autowired
Spring이 자동으로 객체(Bean)를 찾아서 주입해주는 어노테이션이다.
직접 new로 객체를 생성할 필요 없이 Spring이 알아서 넣어준다.
// @Autowired 없으면 직접 생성해야 함
MenuMapper menuMapper = new MenuMapper();

// @Autowired 있으면 Spring이 알아서 주입
@Autowired
private MenuMapper menuMapper;
@Service
Spring에게 "이 클래스가 Service입니다" 라고 알려주는 어노테이션이다.
자동으로 Bean으로 등록되어 @Autowired로 주입받을 수 있다.
package com.pizzashop.service;

import java.util.List;

import org.springframework.beans.factory.annotation.Autowired;
import org.springframework.stereotype.Service;

import com.pizzashop.mapper.MenuMapper;
import com.pizzashop.vo.MenuVO;

@Service
public class MenuService {
// @Autowired = Spring이 알아서 MenuMapper 객체를 여기에 주입해줌(직접 new를 할 필요 없음)
		@Autowired
		private MenuMapper menuMapper;

//		전체 메뉴 조회
		public List<MenuVO> getAll() {return menuMapper.findAll();}

//		단건 메뉴 조회
		public MenuVO getById(int id) {return menuMapper.findById(id);}

//		메뉴 등록 / 수정 / 삭제
//		insert 결과가 1이상이면 true(성공), 0이면 false(실패)
		public boolean add(MenuVO menu) {return menuMapper.insert(menu);}
		public boolean update(MenuVO menu) {return menuMapper.update(menu);}
		public boolean delete(int id) {return menuMapper.delete(id);}

}
7. MenuConroller 클래스 생성
package com.pizzashop.controller;
import java.util.List;
import java.util.Map;
import org.springframework.beans.factory.annotation.Autowired;
import org.springframework.web.bind.annotation.CrossOrigin;
import org.springframework.web.bind.annotation.DeleteMapping;
import org.springframework.web.bind.annotation.GetMapping;
import org.springframework.web.bind.annotation.PathVariable;
import org.springframework.web.bind.annotation.PostMapping;
import org.springframework.web.bind.annotation.PutMapping;
import org.springframework.web.bind.annotation.RequestBody;
import org.springframework.web.bind.annotation.RequestMapping;
import org.springframework.web.bind.annotation.RestController;
import com.pizzashop.service.MenuService;
import com.pizzashop.vo.MenuVO;
@RestController
@RequestMapping("/api/menu")
@CrossOrigin(origins="*")
public class MenuController {
@Autowired
private MenuService menuService;
// 메뉴 조회
@GetMapping
public List<MenuVO> getAll() {
return menuService.getAll();
}
// 단건 조회
@GetMapping("/{id}")
public MenuVO getById(@PathVariable("id") int id) {
return menuService.getById(id);
}
// 메뉴 등록
@PostMapping
public Map<String, Object> add(@RequestBody MenuVO menu) {
boolean success = menuService.add(menu);
if(success) return Map.of("result", "ok", "message", "등록 완료");
return Map.of("result", "fail", "message", "등록 실패");
}
// 메뉴 수정
@PutMapping("/{id}")
public Map<String, Object> update(@PathVariable("id") int id, @RequestBody MenuVO menu) {
menu.setId(id);
boolean success = menuService.update(menu);
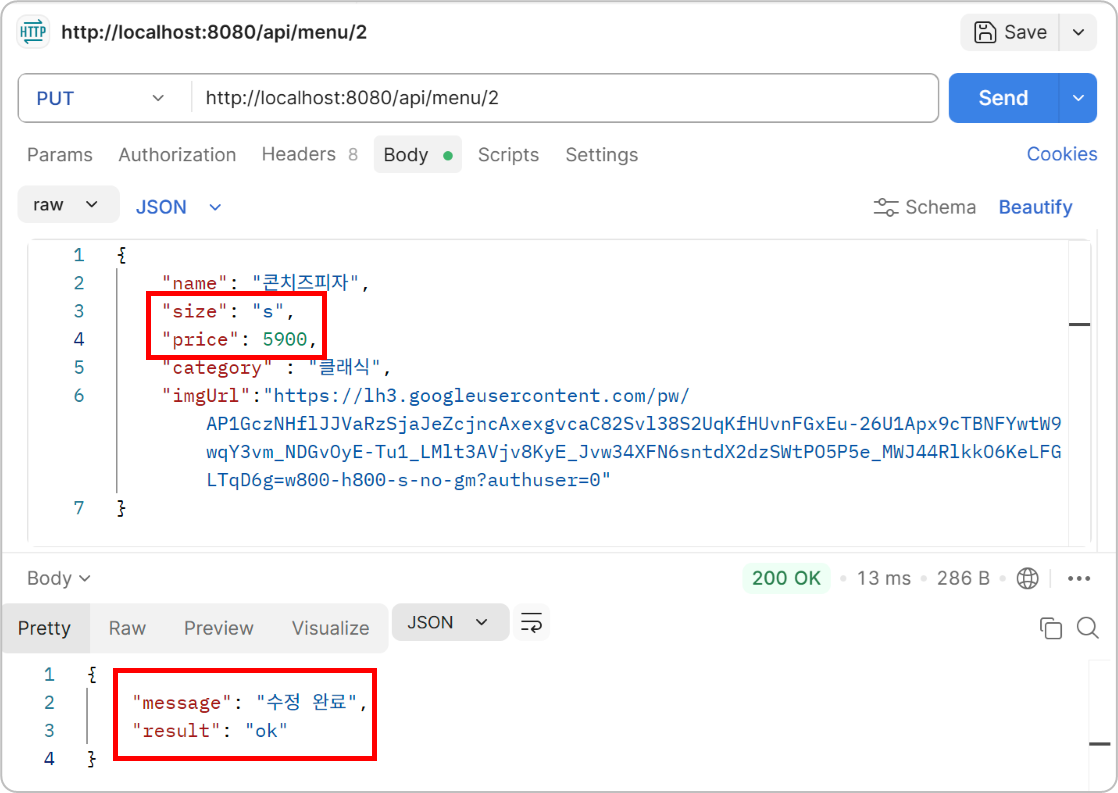
if(success) return Map.of("result", "ok", "message", "수정 완료");
return Map.of("result", "fail", "message", "수정 실패");
}
// 메뉴 삭제
@DeleteMapping("/{id}")
public Map<String, Object> delete(@PathVariable("id") int id) {
boolean success = menuService.delete(id);
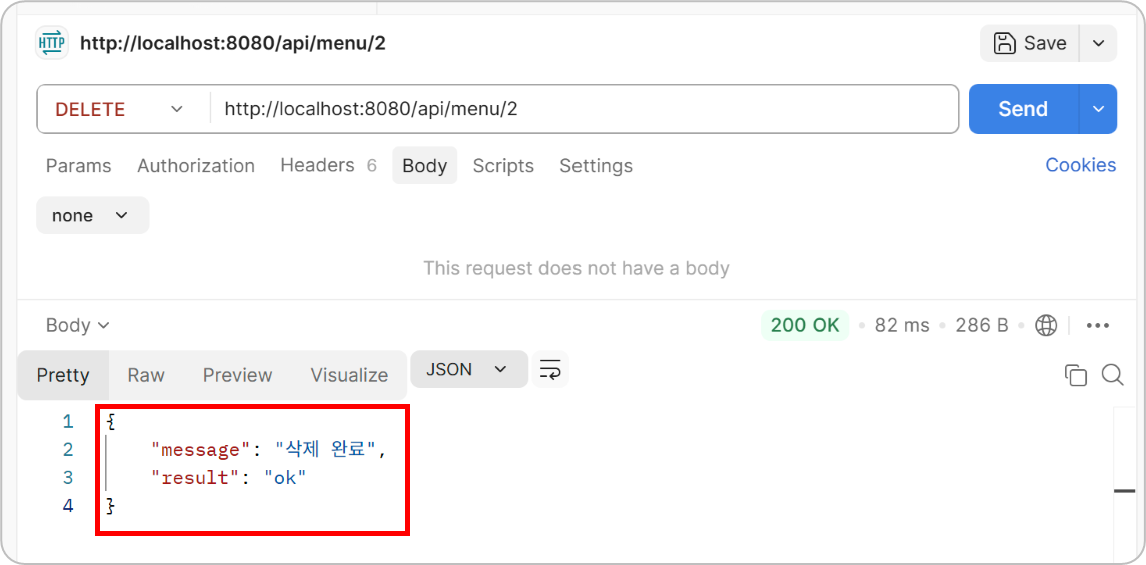
if(success) return Map.of("result", "ok", "message", "삭제 완료");
return Map.of("result", "fail", "message", "삭제 실패");
}
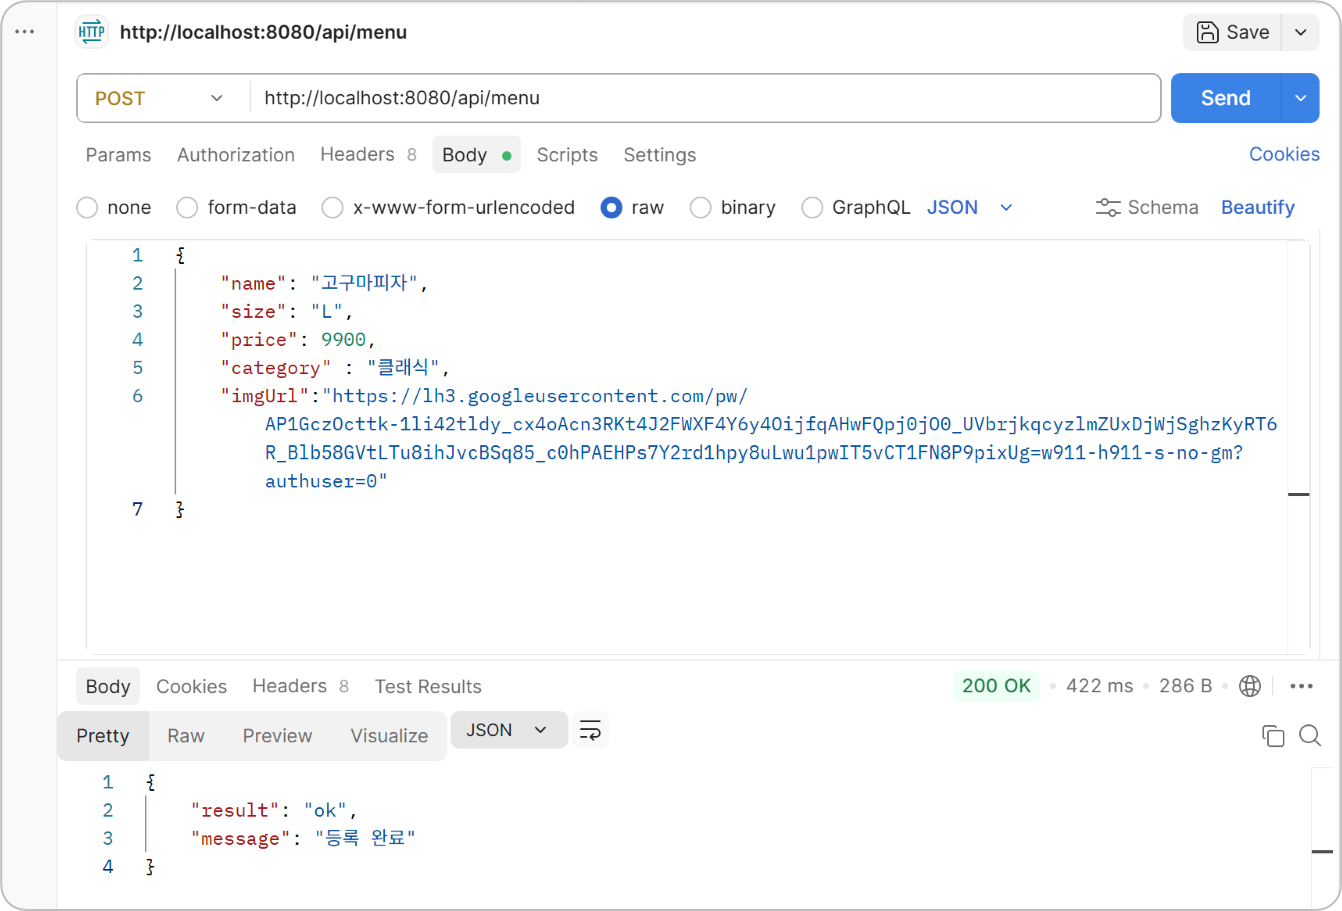
}8. Postman으로 API 실행해보기
- 메뉴 등록
(이미지 URL은 피자스쿨의 이미지 URL 사용)

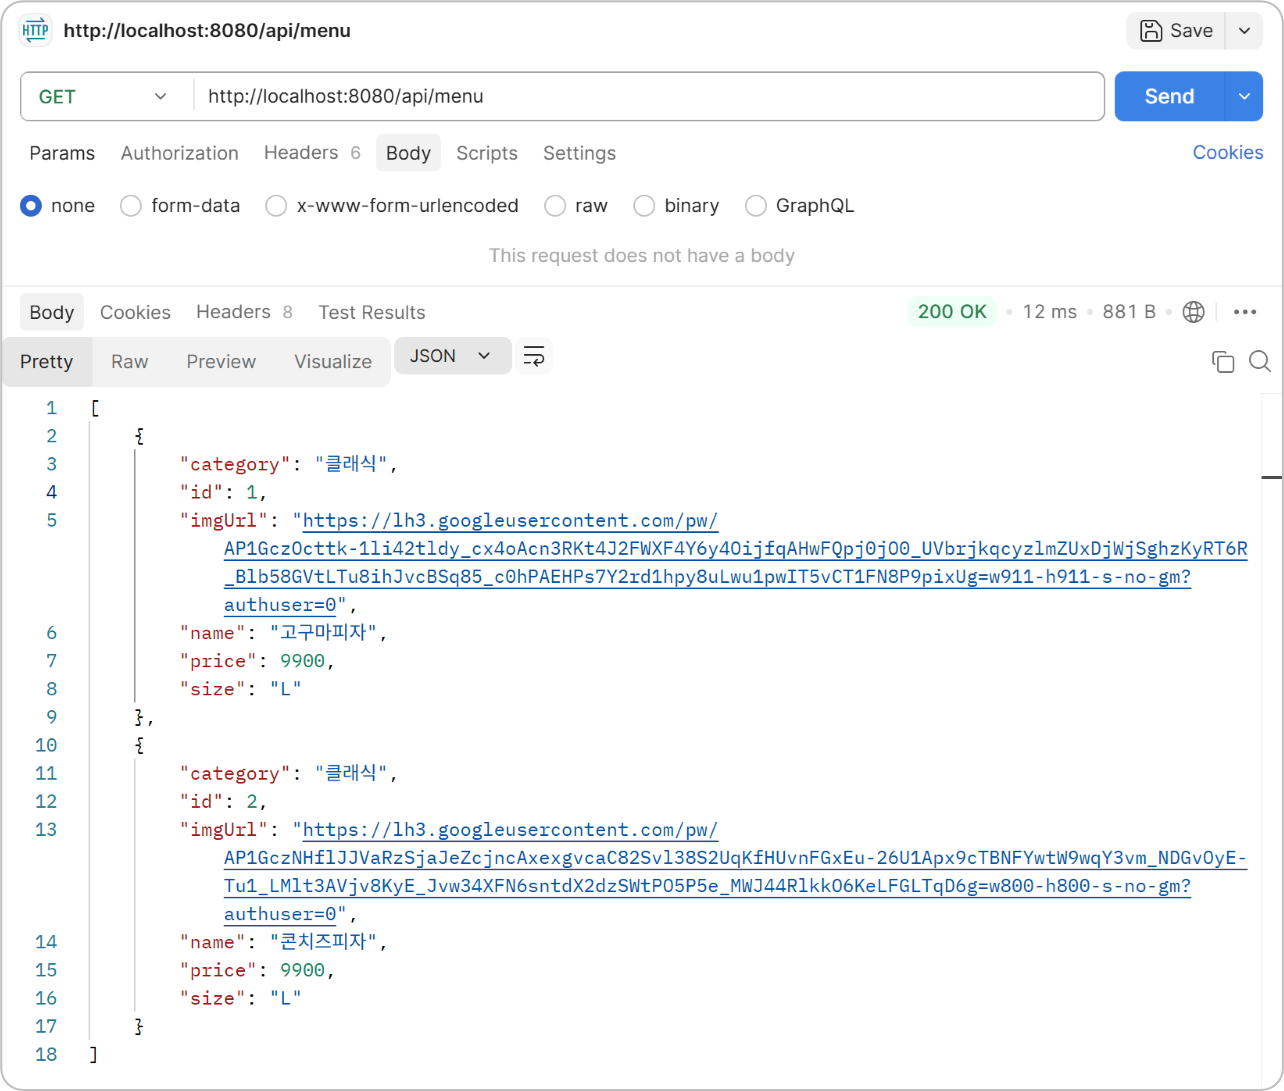
2. 전체 메뉴 조회
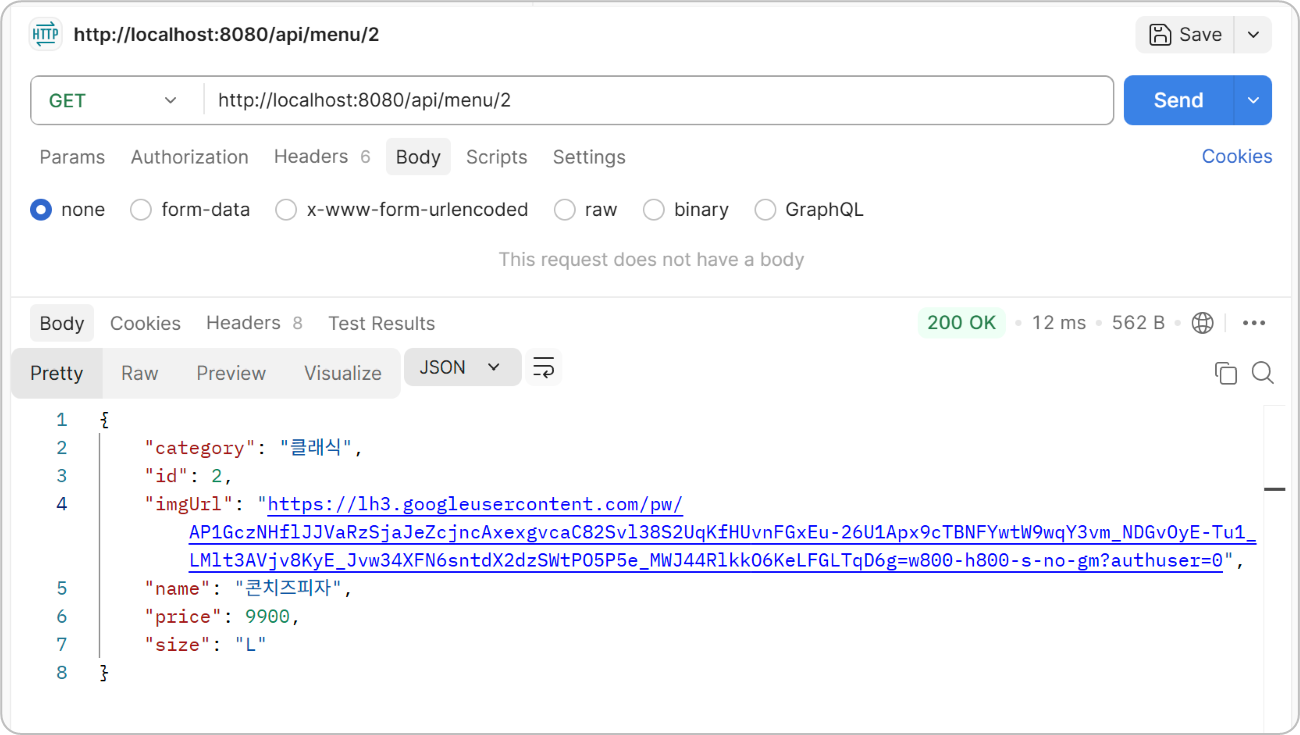
3. 단건 메뉴 조회
4. 메뉴 수정

5. 메뉴 삭제
마무리
이번 글에서는 피자 가게 메뉴 CRUD를 직접 구현해봤다.
학원에서 배운 내용을 다시 만들어보니 전체적인 흐름이 더 명확하게 이해됐다.
클라이언트 → Controller → Service → Mapper → DBVO, Mapper, Service, Controller 각각의 역할을 이해하고 나니 Spring Boot의 구조가 훨씬 익숙하게 느껴졌다.
다음 글에서는 피자 가게 프론트 연동을 해볼 예정이다.