라우팅 ? 다른 주소에 따라 다른 뷰를 보여주는 것
리액트 자체에는 라우팅 기능이 내장되어 있지 않기 때문에 react-router 라이브러리를 이용한다.
react-router는 써드파티 라이브러리로서 클라이언트 사이드에서 이뤄지는 라우팅을 간단하게 해주는 라이브러리
기본
<Route path="/" component={} />path: 경로
component: 보여줄 컴포넌트
만약 exact path라면 주어진 경로와 정확히 맞아떨어져야만 설정한 컴포넌트를 보여줌
라우트 파라미터 읽기
- 라우트 경로에 특정값을 넣는 방법은 params와 query를 이용하는 방법. 두 가지가 있다.
- 라우트로 설정한 컴포넌트는 3가지 Props를 받음
- history: 이 객체를 통해 push, replace를 통해 다른 경로로 이동하거나 앞 뒤 페이지로 전환할 수 있다.
- location: 이 객체는 현재 경로에 대한 정보를 지니고 있고 URL쿼리 정보도 가지고 있다.
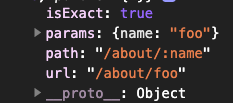
- match: 이 객체에는 어떤 라우트에 매칭이 되었는지에 대한 정보가 있고 params 정보를 가지고 있다.
params 이용하기
- params를 이용할 땐 이용전에 라우트 지정을 해줘야한다.
// App.js
<Route path="/about/:name" component={About} />

// About.js
const About = ({ match }) => {
  return (
    <div>
      <h2>About {match}</h2>
    </div>
  )
}

console.log(match); // params가 넘어오는걸 확인할 수 있다.
query 이용하기
- query를 이용하기 위해선 쿼리를 해석해야 하므로
query-string모듈 설치 - 넘어온 쿼리들을
location객체를 이용하여 확인
onst About = ({ location, match }) => {
  console.log(location);
  const query = queryString.parse(location.search)
  const detail = query.detail === 'true';
  console.log(query)

  return (
    <div>
      <h2>About {match.params.name}</h2>
      {detail && 'detail : blahblah'}
    </div>
  )
}
Switch
라우트들을 Switch 컴포넌트에 감싸면 매칭되는 첫 번째 라우트만 보여주고 나머지는 보여주지 않는다.
<Switch>
  <Route path="/about/:name" component={About} />
  <Route path="/about" component={About} />
</Switch>
query-string module
- queryString 모듈은 query와 관련된 모듈
method
import queryString from 'query-string';- queryString.parse(str): 쿼리 문자열을 쿼리 객체로 바꿔주는 역할
- queryString.stringify(obj): 쿼리 객체를 쿼리 문자열로 바꿔주는 역할
라우트 이동하기
Link 컴포넌트
- 다른 라우트로 이동할 때
<a href...></a>방식은 페이지를 새로고침 하는 방식 <Link>컴포넌트는 새로고침을 하지않고 원하는 라우트로 화면 전환을 해줌
const Menu = () => {
  return (
    <div>
      <ul>
        <li><Link to="/">Home</Link></li>
        <li><Link to="/about">About</Link></li>
        <li><Link to="/about/foo">About Foo</Link></li>
      </ul>
    </div>
  )
}
Route와 Link의 차이를 생각해보자.
Route는 path에 적힌 경로로 요청이 들어왔을 때 component를 보여준다.
반면, Link는 a 태그와 같이 to에 적힌 경로로 페이지 요청을 하는 것이다. Link 컴포넌트에서 to="/about" 으로 요청을 하면 Route에 적힌 path="/about"이 요청을 받고 component={About}을 보여주는 것.
NavLink 컴포넌트
- Link 컴포넌트와 비슷하지만, 설정한 URL이 활성화되면, 특정 스타일이나 클래스를 지정할 수 있다.
 const activeStyle = {
    color: 'green',
    fontSize: '2rem'
  }

<li><NavLink exact to="/" activeStyle={activeStyle}>Home</NavLink></li>
<li><NavLink exact to="/about" activeStyle={activeStyle}>About</NavLink></li>
<li><NavLink exact to="/about/foo" activeStyle={activeStyle}>About Foo</NavLink></li>