🚩 Retrofit 이란?
http 통신을 간편하게 만들어주는 라이브러리이다.
안드로이드에서 서버와의 통신을 위한 라이브러리다.
다른 라이브러리인 Volley나 Asynctask보다 성능(응답효율)이 좋습니다.
🚩 Retrofit 추가하기
- buil.gradle(app단)에 라이브러리 추가
//retrofit2
implementation 'com.squareup.retrofit2:retrofit2:2.6.1'
//GSON
implementation 'com.squareup.retrofit2:converter-gson:2.6.1'- Manifest에 인터넷 권한 추가
<uses-permission android:name="android.permission.INTERNET"/>🚩 Retrofit을 이용해서 영화 정보 받아오기
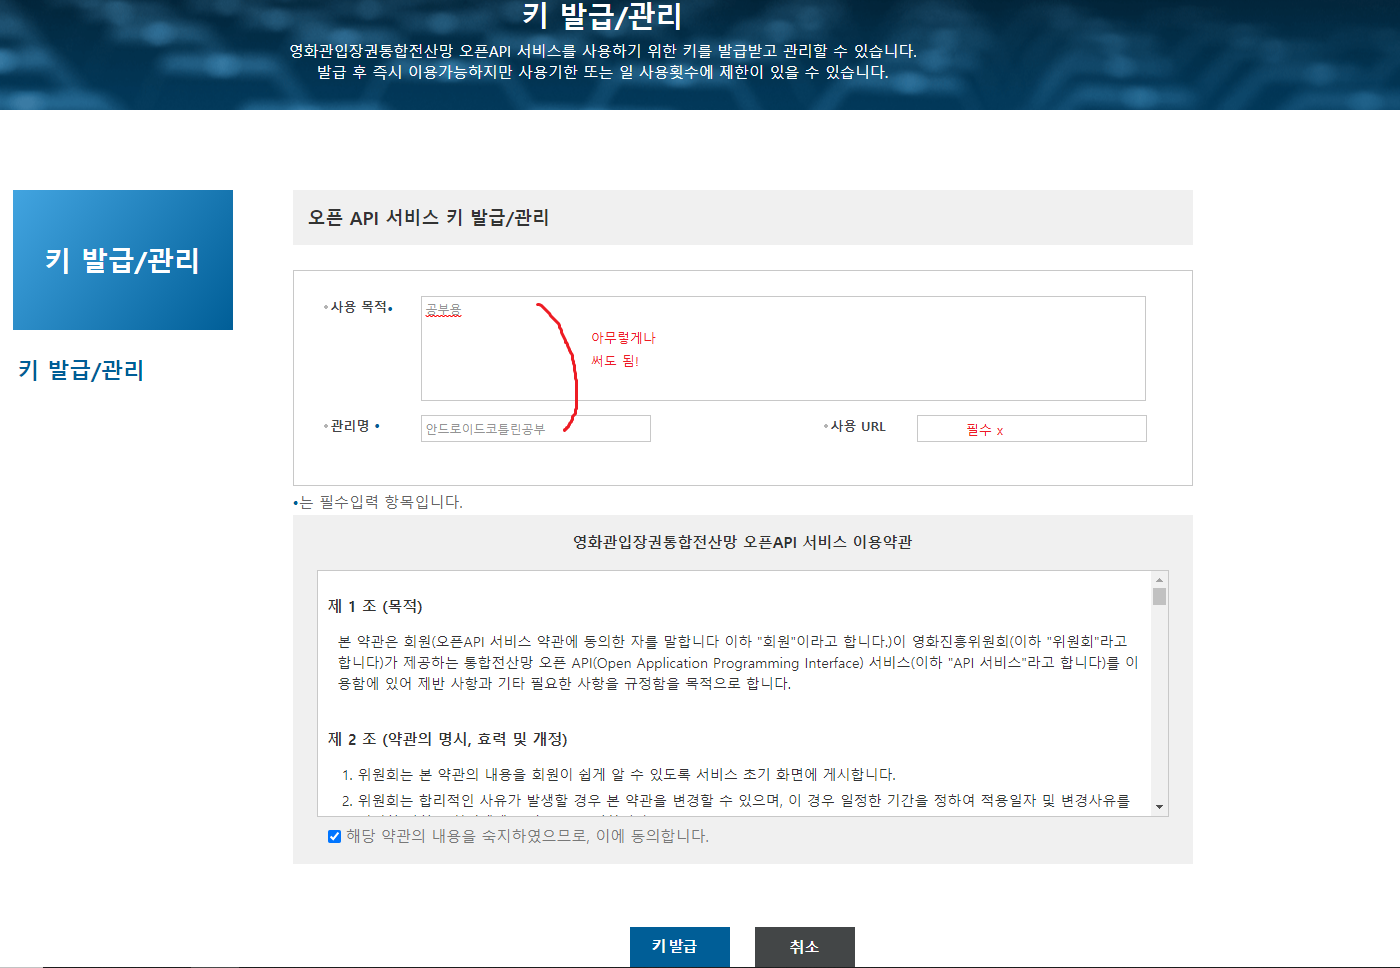
- 먼저영화진흥위원회의 api 키값을 받기 위해 회원가입/로그인 한다.
- 키 발급 받기
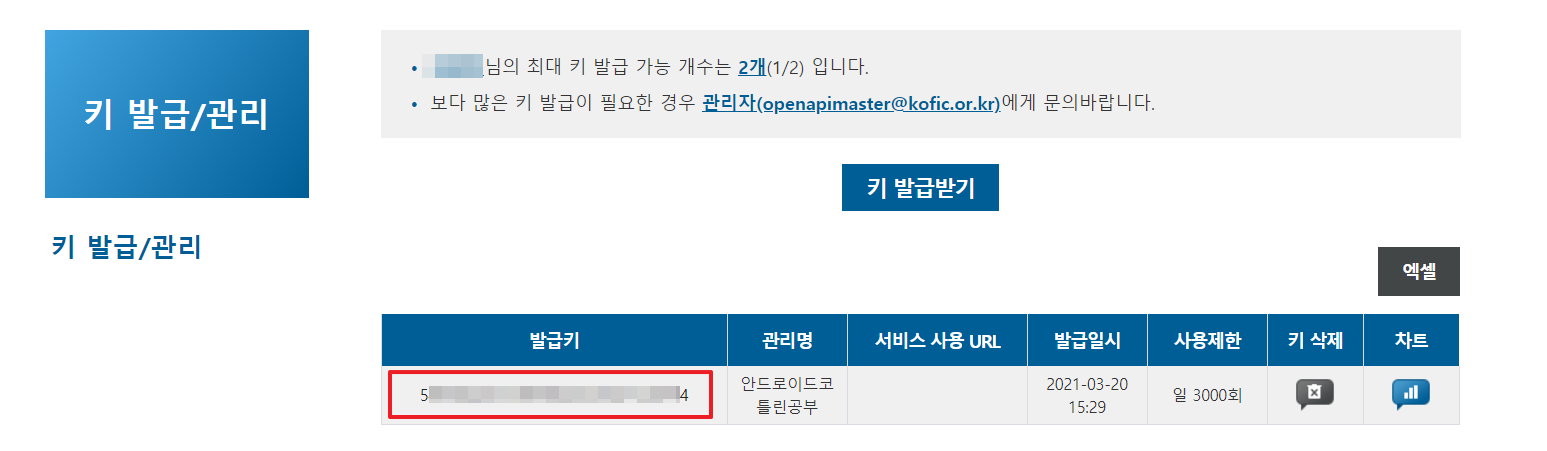
- 발급이 완료 된 모습
- 요청 URL 살펴보기
우리가 가져올 정보는 일별 박스오피스 정보!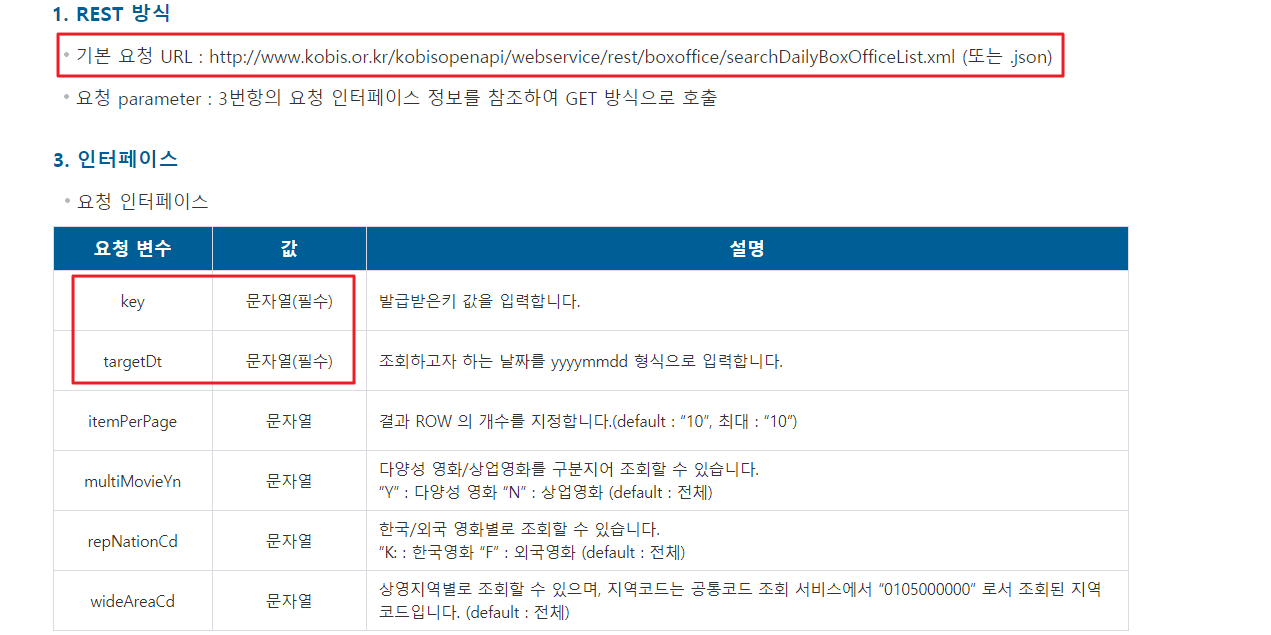
ex) json형태로 2021년1월2일의 데이터를 받아오는 url
=http://www.kobis.or.kr/kobisopenapi/webservice/rest/boxoffice/searchDailyBoxOfficeList.json?key=발급받은발급키&targetDt=20210102
위 링크로 받아오는 json을 살펴보면 다음과 같다.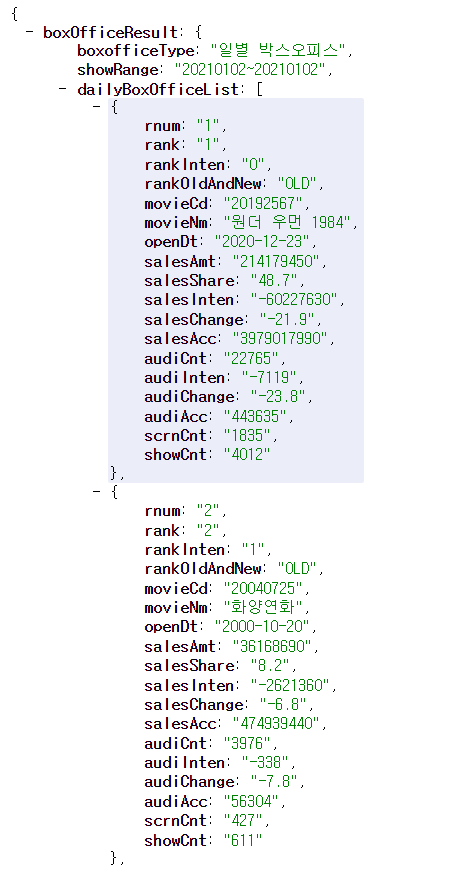
- 데이터를 보여줄 RecyclerView를 만들어준다.
<?xml version="1.0" encoding="utf-8"?>
<androidx.constraintlayout.widget.ConstraintLayout xmlns:android="http://schemas.android.com/apk/res/android"
    xmlns:app="http://schemas.android.com/apk/res-auto"
    xmlns:tools="http://schemas.android.com/tools"
    android:layout_width="match_parent"
    android:layout_height="match_parent"
    tools:context=".RankActivity">

    <TextView
        android:id="@+id/textView"
        android:layout_width="match_parent"
        android:layout_height="wrap_content"
        android:gravity="center"
        android:text="결과"
        app:layout_constraintEnd_toEndOf="parent"
        app:layout_constraintStart_toStartOf="parent"
        app:layout_constraintTop_toTopOf="parent" />

    <androidx.recyclerview.widget.RecyclerView
        android:layout_width="match_parent"
        android:layout_height="0dp"
        app:layout_constraintBottom_toBottomOf="parent"
        app:layout_constraintTop_toBottomOf="@+id/textView" />
</androidx.constraintlayout.widget.ConstraintLayout>- 위에서 만든 데이터를 표현해줄 xml을 만들어 준다.
<movie_item.xml>
<?xml version="1.0" encoding="utf-8"?>
<LinearLayout
    xmlns:android="http://schemas.android.com/apk/res/android"
    android:layout_width="match_parent"
    android:layout_height="56dp"
    android:gravity="center_vertical"
    android:padding="8dp"
    android:orientation="horizontal">

    <TextView
        android:id="@+id/rank"
        android:layout_width="25dp"
        android:background="#544B4B"
        android:text="1"
        android:textColor="#FFFFFF"
        android:gravity="center"
        android:layout_height="wrap_content" />

    <TextView
        android:id="@+id/movie_name"
        android:layout_width="wrap_content"
        android:layout_height="wrap_content"
        android:layout_weight="1"
        android:layout_marginLeft="8dp"
        android:layout_marginRight="8dp"
        android:text="어벤저스"/>

    <LinearLayout
        android:layout_width="wrap_content"
        android:layout_height= "match_parent"
        android:orientation="vertical">
        <TextView
            android:id="@+id/count1"
            android:layout_width="wrap_content"
            android:layout_height="wrap_content" />

        <TextView
            android:id="@+id/count2"
            android:layout_width="wrap_content"
            android:layout_height="wrap_content" />
    </LinearLayout>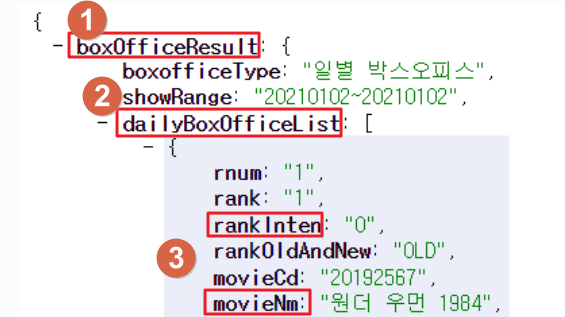
</LinearLayout>- 위에서 확인한 json 결과를 보면 우리가 가져올 정보는
BoxOfficeResult - dailyBoxOfficeList - {rankInten, movieNm}
으로 총 3개의 클래스를 만들어줘야한다.
- (1) boxOfficeResult <MovieResponse.kt>
data class MovieResponse(
    @SerializedName("boxOfficeResult")
    var boxofficeResult: BoxOfficeResult?
)- (2) dailyBoxOfficeList <BoxOfficeResult.kt>
data class BoxOfficeResult(
    @SerializedName("dailyBoxOfficeList")
    var dailyBoxOfficeList: List<MovieDto> = arrayListOf()
    //받아온 결과를 MovieDto list 형태로 만든다.
)- (3) movieNm & rankInten <MovieDto.kt>
data class MovieDto(
    //@SerialzedName : JSON에서 데이터에 매칭되는 이름 명시
    //@Expose : 해당값이 null일경우 json으로 만들 필드를 자동 생략하겠다! 는 명령어
    @SerializedName("movieNm")
    var movieNm: String?,
    @SerializedName("rankInten")
    var rankInten: String?,
    @SerializedName("rank")
    var rank: String?
) : Serializable {

}- json 결과를 받아올 retrofit 통신 인터페이스를 생성한다.
<RetrofitMovieAPI.kt>
interface RetrofitMovieAPI {
    @GET("/kobisopenapi/webservice/rest/boxoffice/searchDailyBoxOfficeList.json")
    fun getMovieList(
        @Query("targetDt") targetDt: String?,
        @Query("key") key: String?
    ): Call<MovieResponse>
}
// annotation : Get/Post/Delete/Put 중 하려는 작업을 선택하여 작업을 수행할 주소를 () 안에 적는다.
// Call<데이터 객체 타입> @Query("요청 매개변수") 변수
// 여기선 MovieResponse 타입으로 받아옴- retorofit client 파일을 만들어준다.
object RetrofitBuilder {
	//baseUrl은 오픈 api의 서버 url을 넣는다.
    var baseUrl: String = "http://www.kobis.or.kr"
    var api: RetrofitMovieAPI

    init {
        val retrofit = Retrofit.Builder()
            .baseUrl(baseUrl)
	    //json을 gson으로 파싱할거니까 GsonConverterFactory.create()로 gsonconverter를 가져온다.
            .addConverterFactory(GsonConverterFactory.create())
            .build() //Retrofit 객체 생성

        api = retrofit.create(RetrofitMovieAPI::class.java)
    }
}- 이제 모든 준비는 끝났다!!
MainActivity에서 정보가 제대로 넘어오는지 Log를 찍어본다.
RetrofitBuilder.api
		.getMovieList(targetDt, "발급받은키넣으세요")
           	.enqueue(object : Callback<MovieResponse> {
                        override fun onFailure(call: Call<MovieResponse>, t: Throwable) {
				//통신 실패한 경우
				Toast.makeText(this@MainActivity, "${t.message}", Toast.LENGTH_SHORT).show()
                        }

                        override fun onResponse(call: Call<MovieResponse>, response: Response<MovieResponse>) {
                            val movieResponse = response.body()
                            val list : List<MovieDto> = movieResponse!!.boxofficeResult!!.dailyBoxOfficeList
                            Log.d("MY", "$list")
                      	}
}
MovieDto에 List 형태로 담겨서 잘 출력된다.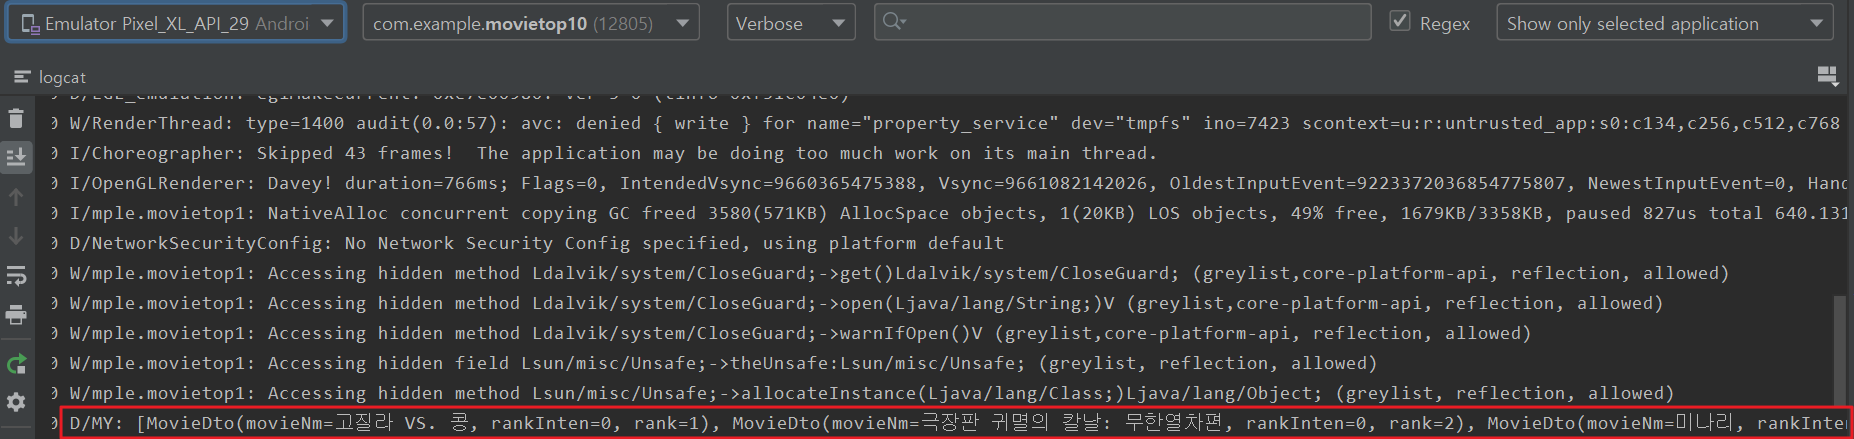
- 이제 이 결과를 Bundle에 담아 RecyclerView가 있는 RankActivity로 전달/이동한다.
val intent: Intent = Intent(this@MainActivity, RankActivity::class.java)

//bundle -> 보따리 느낌
val bundle = Bundle()
bundle.putSerializable("movieList",(list as Serializable)) //list를 강제 형변환
//bundle.putString("name","홍길동")
//bundle.putInt("age",10)  이 두줄과 같이 put 뒤에 전달하려는 값의 자료형을 쓰면된다.

intent.putExtras(bundle)

startActivity(intent)- RankActivity에서 9번에서 보낸 데이터를 받아온다.
val bundle = intent.extras
val list : List<MovieDto> = bundle?.getSerializable("movieList") as List<MovieDto>
Log.d("My","RankActivity의 MovieList : $list")

// val name = bundle.getString("name")
// val age = bundle.getInt("age")
// 이런 방식으로 받아오려는 자료형과 키 값을 통해 data를 받아온다.
Log에 잘 찍힌다!
11. 이제 받은 데이터를 RecyclerView에 연결해주면 끝이다.
recyclerView = findViewById(R.id.rv_result)
recyclerView.adapter = ResultRecyclerViewAdpater()
recyclerView.layoutManager = LinearLayoutManager(applicationContext)
ResultRecyclerViewAdpater를 inner class로 생성해준다.
inner class ResultRecyclerViewAdpater :
        RecyclerView.Adapter<ResultRecyclerViewAdpater.ResultViewHolder>() {
        override fun onCreateViewHolder(
            parent: ViewGroup,
            viewType: Int
        ): ResultRecyclerViewAdpater.ResultViewHolder {
            val view = LayoutInflater.from(parent.context).inflate(R.layout.movie_item, parent, false)
            return ResultViewHolder(view)
        }

        override fun getItemCount(): Int {
            return list.size
        }

        override fun onBindViewHolder(
            holder: ResultRecyclerViewAdpater.ResultViewHolder,
            position: Int
        ) {
           holder.apply {
               rankTextView.text = list[position].rank
               rankIntenTextView.text = list[position].rankInten
               movieNameTextView.text = list[position].movieNm
           }
        }

        inner class ResultViewHolder(val view: View) : RecyclerView.ViewHolder(view) {
            //위의 onCreateViewHolder에서 생성된 view를 가지고 실행함
            val rankTextView: TextView = view.findViewById(R.id.rank)
            val movieNameTextView: TextView = view.findViewById(R.id.movie_name)
            val rankIntenTextView: TextView = view.findViewById(R.id.tv_rankInten)
        }
    }
🚩 결과
Git 바로가기 & 썸네일 이미지 출처

신입 개발자👩💻
좋은 자료 감사합니다 덕분에 retrofit 공부하는데 도움이 되었어요!
혹시 저처럼 프래그먼트 쓰시는 분들은 마지막 부분에서 recyclerView.layoutManager = LinearLayoutManager(activity?.applicationContext) 를 사용하시면 됩니다. 몰라서 한참 둘러왔네여ㅛㅇ...