
다른 사람들보다 뒤처짐을 느낌
그래서 내일 배움 캠프의 시간은 15시 부터 21시 이지만 ADsP가 겹치니 스스로 노력이 더 필요하다고 느낌
9~21시 까지로 학습 시간 변경

ADsP
3과목 1장 3절 결측값 처리와 이상값 검색
✅ 산포도 척도- 변동계수는 분포가 퍼져있는 정도를 비교하게 해준다.
- 사분위수는 데이터 표본을 4개의 동일한 부분으로 나눈 값이다.
- 평균절대편차는 각 측정값과 평균 사이의 거리의 평균이다.
- 히스토그램은 분포의 봉우리와 산포를 확인할 수 있다.
- 히스토그램에서 양쪽 끝의 고립된 막대가 특이값을 의미한다.
- 연속형 자료에 적합하며, 범주형 자료는 막대 그래프를 사용한다.
- 히스토그램은 표본 크기가 20 전후일 때 사용한다. 표본 크기가 너무 작으면 각 막대에 데이터 분포를 정확하게 표시하기에 충분한 데이터 점이 포함되지 않을 수 있다.
- 사분위 간 범위 상자는 데이터의 중간 50%를 나타내며, 제1사분위수와 제3사분위수 값의 거리를 보여준다.
- 중위수는 상자의 선으로 표시되며 데이터 중심의 일반적인 측도로, 관측치의 절반은 이 값보다 작거나 같고 절반은 이 값보다 크거나 같다.
- 상자그림에서 IQR은 (제3사분위수) - (제1사분위수)를 의미한다.
- 확률분포 또는 자료의 가운데 50% 값이 포함되는 범위를 "사분위수 범위"라고 한다.
- IQR(InterQuartile Range)로 표시하며 확률분포 또는 자료값의 산포도를 나타내는 척도 중 하나이다.
- 이상치 판단에 적합하다.
- Q3+1.5*IQR 보다 큰 것
- Q1-1.5*IQR 보다 작은 것
- 평균으로부터 3*(표준편차) 밖의 값들 → ESD 알고리즘
- 이상치로 판단되는 경우 제거 여부는 해당 분야의 전문가와 상의하여 판별해야 한다.
- 상자박스는 그룹 간 분포 차이를 비교할 수 있으며, 그 차이가 통계적으로 유의미함을 보일 수는 없다.
3과목 2장(통계분석) 1절 통계학 계론
1)통계분석 개요~5)확율변수와 확율분포
✅ **통계 기본 용어**-
모집단에 대해 알고자 하는 값을 모수라 하고, 모수를 추론하기 위해 구하는 표본의 값들을 '통계량' 이라 한다.
-
모수 : 모집단의 특성을 나타내는 수치들
- e.g. 모집단의 평균(𝝁), 분산(𝝈2) 등
-
표본 : 모집단의 개체 수가 많아 전부 조사하기 힘들 때 모집단에서 추출(sampling)한 것
- 모집단의 특성을 알기 위해 표본 추출 (오차 발생) → 추론(inference)
-
통계량 : 표본의 특성을 나타내는 수치들
- e.g. 표본의 평균, 분산() 등

단순 무작위 추출(simple random sampling)
- 모집단의 각 개체가 표본으로 선택될 확률이 동일하게 추출되는 경우
- 모집단의 개체 수 N, 표본 수 n일 때 개별 개체가 선택될 확률은 n/N으로 일정
계통 추출(Systematic sampling)
- 모집단 개체에 1, 2, …, N 이라는 일련번호를 부여한 후, 첫 번째 표본을 임의로 선택하고 일정 간격으로 다음 표본 선택
층화 추출법(stratified sampling)
- 모집단을 먼저 서로 겹치지 않는 여러 개의 층으로 분할한 후, 각 층에서 단순 임의 추출법에 따라 배정된 표본을 추출하는 방법
군집추출(Cluster sampling)
- 모집단을 특성에 따라 여러 개의 집단(cluster)로 나눈다. 이들 집단 중 몇 개를 선택한 후, 선택된 집단 내에서 필요한 만큼의 표본을 임으로 선택한다.
명목형 자료를 나타내는 척도
- 명목 척도 : 단순히 측정 대상의 특성을 분류하거나 확인하기 위한 목적
- e.g. 남녀, 혈액형, 출생지 등
- 서열(순위) 척도 : 항목들 간에 서열이나 순위가 존재하는 척도
- 서열척도는 대소 또는 높고 낮음 등의 순위만 제공할 뿐 양적인 비교는 할 수 없다.
- e.g. 메달(금-은-동), 매우불만족-불만족-보통-만족-매우만족 등
연속형 자료를 나타내는 척도
- 등간 척도 : 순위를 부여하되 순위 사이의 간격이 동일하여 양적인 비교 가능
- 절대 0점이 존재하지 않는다.
- e.g. 온도계 수치, 물가 지수 등
- 비율 척도 : 절대 0점이 존재하여 측정값 사이의 비율 계산이 가능한 척도
- e.g. 몸무게, 나이, 형제의 수, 직장까지의 거리 등
평균(Mean) : 값 들의 무게 중심이 어디인지를 나타내는 값, 산술 평균
중앙값(Median) : 자료를 크기 순서대로 배열했을 때, 중앙에 위치하는 값
최빈값(Mode) : 어떤 값이 가장 많이 관찰되는지 나타낸 값
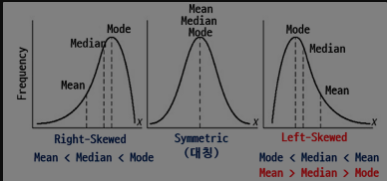
평균은 양 꼬리 값의 크기가 변할 때 영향을 크게 받지만 중앙값은 그러한 변화에 영향을 거의 받지 않는다.
확률
- P(A) : 어떤 사건(A)이 발생할 확률
- 0 ≤ P(A) ≤ 1
표본공간 : 실험에서 발생할 수 있는 모든 결과의 집합
- e.g. 주사위를 던지는 실험에서의 표본공간 S = {1,2,3,4,5,6}
사상(사건) : 표본공간 내에 정의된 실험 결과의 부분집합
- e.g. 주사위를 한 번 굴렸을 때 홀수가 나오는 사건을 A라고 하면 A = {1, 3, 5}
조건부 확률 : 사건 B가 발생했다는 조건 아래서 사건 A가 발생할 확률
- P(A|B) = P(A∩B) / P(B) (P(B) > 0)
독립사건 : A의 발생이 B가 발생할 확률을 바꾸지 않는 사건
- 두 사건 A, B가 독립사건인 경우 P(A|B) = P(A), P(B|A) = P(B)
배반사건 : 교집합이 공집합인 사건
- 분포 : 일정한 범위 안에 흩어져 퍼져 있는 정도
- 확률분포
- 확률의 흩어짐을 표현하기 위한 함수
- 확률변수에 따라 확률이 흩어져 있는 것을 표현
- 이산형 확률분포(Discrete)
- 확률변수가 몇 개의 한정된 가능한 값을 가지는 분포
- 각 사건은 서로 독립이어야 한다. (한 사건의 발생이 다른 사건 발생 확률에 영향을 주지 않아야 한다.)
- 베르누이분포, 이항분포, 포아송분포, 기하분포 등이 있다.
- 연속형 확률분포(Continuous)
- 확률변수의 가능한 값이 무한 개이며 사실상 셀 수 없을 때
- 이항분포
- 연속된 n번의 독립적 시행에서 각 시행이 확률 p를 가질 때의 이산 확률 분포
- n=1일 때 이항 분포가 베르누이분포이다.
- 베르누이분포
- 실험 결과 두 가지 중의 하나로 나오는 시행의 결과를 0 또는 1 값으로 대응시키는 확률변수 X에 대해 아래 식을 만족하는 확률분포 P(X=0)=p, p(X=1)=q (0 ≤ p ≤ 1 , q = 1-p)
- 모수(=확률변수)가 하나이며 서로 반복되는 사건이 일어나는 실험에 대해 반복적 실행을 확률분포로 나타낸 것
- 포아송분포
- 단위시간이나 단위공간에서 어떤 사건의 출현횟수가 갖는 분포
- 특정 기간 동안 사건(events) 발생의 확률을 구할 때 사용된다.
- e.g. 일주일 간 특정 지역 내에서 일어나는 교통사고의 횟수
- e.g. 보험회사에 가입된 20만명 가운데 심장병으로 1년 동안 5명 이상 사망확률-
- 기하분포
- 베르누이 시행에서 처음 성공까지 시도한 횟수 X의 분포
- 베르누이 시행에서 처음 성공할 때까지 실패한 횟수 Y=X-1의 분포
회고
많은 범위가 생기며 이해를 하며 넘어가야 할 것들이 많아져서 복습과 녹화강의가 필요할듯하지만 강의는 제공되지 않으니 다시금 요점과 정리해둔 내용을 정독하며 외워야겠다.
시험 출제 범위가 넒어지니 꾸준하게 읽고 암기하고 공부해야한다.

내일 배움 캠프
개발 내용(학습)
1주차 HTML 기초 수업
1.자주 쓰는 CSS를 이용하여 픽셀 구분, 배경사진 넣기 등의 기초 HTML
중간중간 주석을 활용으로 팁 넣기(주석 설정 단축키 command+K+C//해제 단축키 command+K+U//다른 주석 달기 단축키 commend+/)
<!DOCTYPE html>
<html lang="en">
<head>
    <meta charset="UTF-8">
    <meta name="viewport" content="width=device-width, initial-scale=1.0">
    <title>Document</title>
    <style>
        .mytitle{
            width:300px;
            /* 웹의 크기 단위 px */
            height: 200px;
            background-color: green;

            color: white;
            text-align: center;
            /* 글자를 가운대로 맞춰주기 */

            padding-top: 30px;
            border-radius: 8px;

            /* 스스로 모든걸 적으려 하지말고 자동완성을 이용하자 그래야 오타가 적다 */

            background-image: url('https://www.ancient-origins.net/sites/default/files/field/image/Agesilaus-II-cover.jpg');
            background-position: center;
            background-size:  cover;
            /* 위 세가지는 이미지를 넣어주는데 세트이다 */
        }

    </style>
</head>
<body>
    <div class="mytitle">
        <h1>로그인 페이지</h1>
        <h5>아이디, 비밀번호를 입력해 주세요</h5>
    </div>
    <p>ID: <input type="text" /></p>
    <p>PW <input type="text" /></p>
    <button>로그인하기</button>
</body>
</html>
margin, padding 의 개념이해를 위한 사진
2.가운데로 오게 하기 위해서 코드를 수정
- 가운데라는것은 양쪽 여백을 동등하게 나누는것 (margin)
- HTML은 줄마춤이 생명....(전체선택 command+A 후 정렬 command+K+F)
위 코드에
    .wrap{

           /* 처음은 내가 어디에 여백을 주는지 알아야 하기에
           배경 색상을 입혀서 본다.background-color: aqua; */

            width: 300px;

            margin:50px auto 0px auto ;
            /* 순서는 위 오른쪽 밑 왼쪽 순서이다!!!!!! */
            /* 가운대로 간다는 것은 내 양쪽 여백이 끝까지 밀어진것이다. */
        }
    </style>
</head>

<body>
    <div class="wrap">
를 입력하여 양옆의 여백을 최대로 주면 가운데로 맞아진다.
3.폰트를 꾸미기
        @import url('https://fonts.googleapis.com/css2?family=Black+Han+Sans&display=swap');
        /폰트를 가져오겠다
        *{
            font-family: 'Black Han Sans', sans-serif;
        }
        /이 폰트를 쓰겠다.
        /* *이란 표현은 모든것 모든테그라는 뜻 */
구글 등 여러 폰트 사이트에서 적용가능한 폰트 코드를 들고와 적용한다.
4.부트스트랩 사용
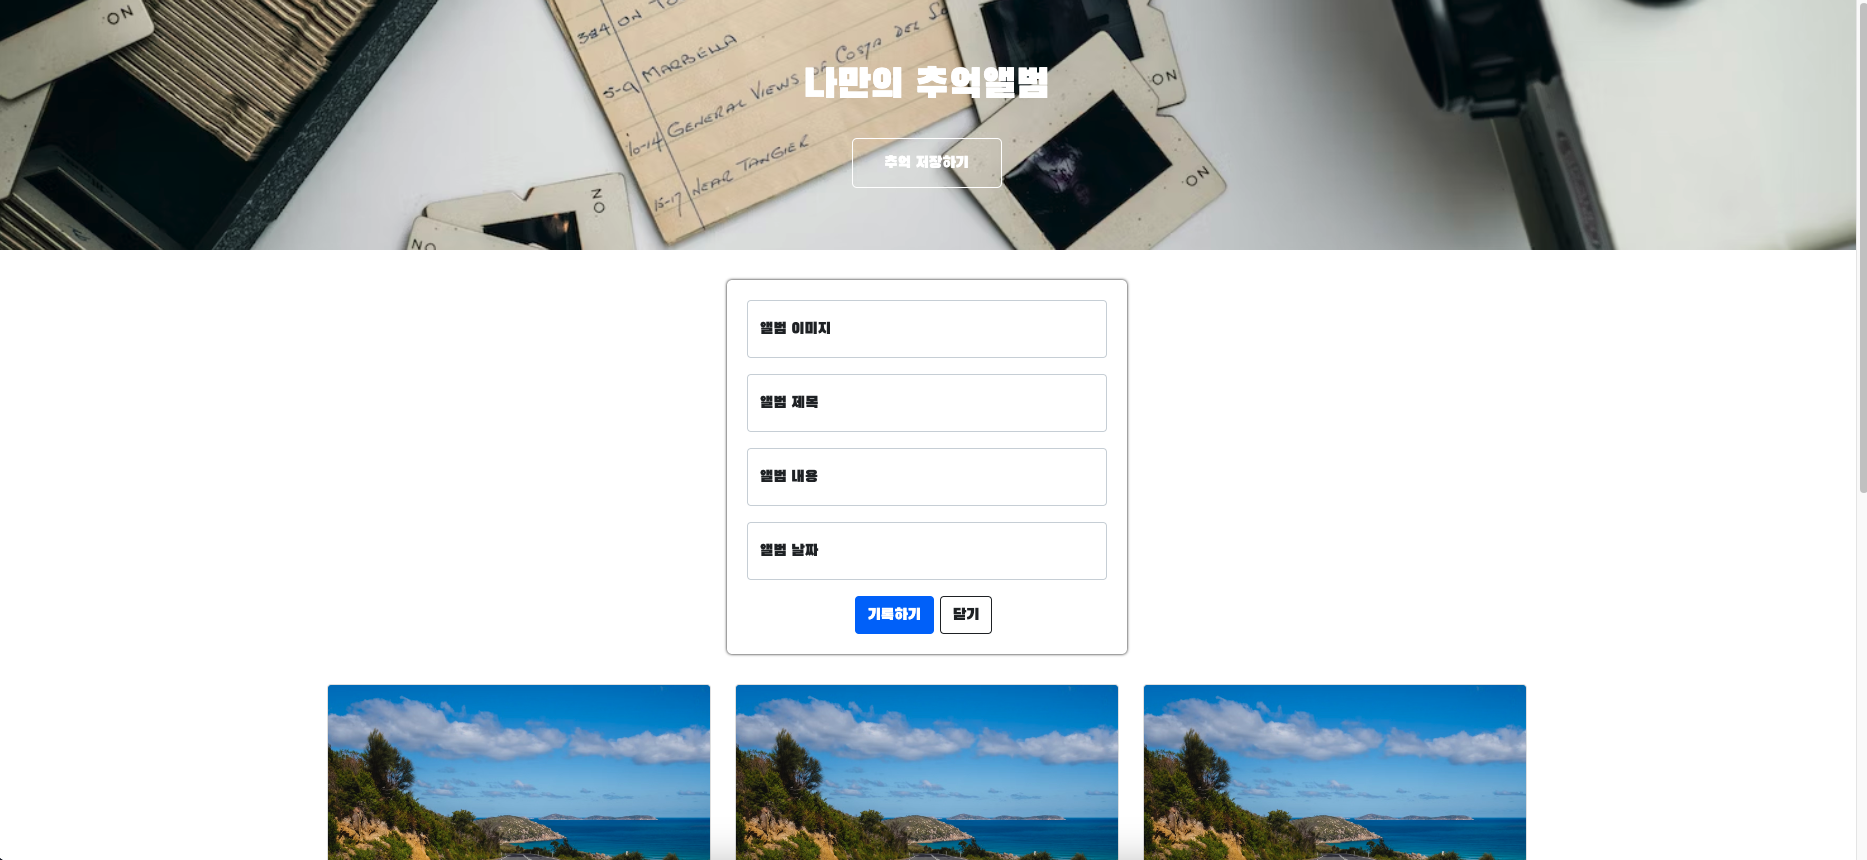
5.웹페이지 만들기(나만의 추억앨범)
<!DOCTYPE html>
<html lang="en">

<head>
    <meta charset="UTF-8">
    <meta name="viewport" content="width=device-width, initial-scale=1.0">
    <title>나만의 추억 앨범</title>
    <link href="https://cdn.jsdelivr.net/npm/bootstrap@5.0.2/dist/css/bootstrap.min.css" rel="stylesheet"
        integrity="sha384-EVSTQN3/azprG1Anm3QDgpJLIm9Nao0Yz1ztcQTwFspd3yD65VohhpuuCOmLASjC" crossorigin="anonymous">

    <style>
        @import url('https://fonts.googleapis.com/css2?family=Black+Han+Sans&display=swap');

        * {
            font-family: 'Black Han Sans', sans-serif;
        }

        .mytitle {
            height: 250px;
            color: white;

            display: flex;
            flex-direction: column;
            align-items: center;
            justify-content: center;
            /* 위 4개의 코드는 거의 상시 사용 다만 flex-direction에서 column인지 row인지 차별 */

            background-image: url('https://images.unsplash.com/photo-1511992243105-2992b3fd0410?ixlib=rb-4.0.3&ixid=M3wxMjA3fDB8MHxwaG90by1wYWdlfHx8fGVufDB8fHx8fA%3D%3D&auto=format&fit=crop&w=1470&q=80');
            background-position: center;
            background-size: cover;

        }

        .mytitle>button {
            /* 이런식으로 하면 모든 것을 클래스 지정할 필요가 없음 */
            width: 150px;
            height: 50px;
            background-color: transparent;
            color: white;
            border: 1px solid white;
            /* 테두리 1픽셀 직선 색깔 */
            border-radius: 5px;
            margin-top: 20px;
        }

        .mycards {
            width: 1200px;
            margin: 30px auto 0px auto;

        }
        .mypostingbox{

            width: 400px;
            margin: 30px auto 0px auto;
            padding: 20px;
            box-shadow: 0px 0px 3px 0px black;
            /* 박스에 그림자  앞 두개는 그림자의 위치 3번째는 그림자의 길이*/
            border-radius: 5px;
        }
        .mybtn{
            display: flex;
            flex-direction: row;
            align-items: center;
            justify-content: center;
        }
        .mybtn > button{
            margin-right: 6px;
        }

    </style>

</head>

<body>
    <div class="mytitle">
        <h1>나만의 추억앨범</h1>
        <button>추억 저장하기</button>

    </div>

    <div class="mypostingbox">
        <div class="form-floating mb-3">
            <input type="email" class="form-control" id="floatingInput" placeholder="앨범 이미지">
            <label for="floatingInput">앨범 이미지</label>
        </div>
        <div class="form-floating mb-3">
            <input type="email" class="form-control" id="floatingInput" placeholder="앨범 제목">
            <label for="floatingInput">앨범 제목</label>
        </div>
        <div class="form-floating mb-3">
            <input type="email" class="form-control" id="floatingInput" placeholder="앨범 내용">
            <label for="floatingInput">앨범 내용</label>
        </div>
        <div class="form-floating mb-3">
            <input type="email" class="form-control" id="floatingInput" placeholder="앨범 날짜">
            <label for="floatingInput">앨범 날짜</label>
        </div>
        <div class="mybtn">
            <button type="button" class="btn btn-dark">기록하기</button>
            <button type="button" class="btn btn-outline-dark">닫기</button>
        </div>
    </div>


    <div class="mycards">
        <div class="row row-cols-1 row-cols-md-3 g-4">
            <div class="col">
                <div class="card h-100">
                    <img src="https://images.unsplash.com/photo-1446768500601-ac47e5ec3719?ixlib=rb-4.0.3&ixid=M3wxMjA3fDB8MHxwaG90by1wYWdlfHx8fGVufDB8fHx8fA%3D%3D&auto=format&fit=crop&w=1446&q=80"
                        class="card-img-top" alt="...">
                    <div class="card-body">
                        <h5 class="card-title">앨범 제목</h5>
                        <p class="card-text">앨범 내용</p>
                    </div>
                    <div class="card-footer">
                        <small class="text-body-secondary">앨범 날짜</small>
                    </div>
                </div>
            </div>

        </div>

    </div>

</body>

</html>
1주차 완성본
기본 웹페이지 만들기(1주차 완료)
바로 이어서 2주차 시작
1주차의 복습과 Javascript
1주차 복습용 웹페이지 만들기
(중간중간 검사후 CSS에서 수정하기)
<html lang="en">

<head>
    <meta charset="UTF-8">
    <meta name="viewport" content="width=device-width, initial-scale=1.0">
    <title>Yull's Cinema</title>
    <link href="https://cdn.jsdelivr.net/npm/bootstrap@5.0.2/dist/css/bootstrap.min.css" rel="stylesheet"
        integrity="sha384-EVSTQN3/azprG1Anm3QDgpJLIm9Nao0Yz1ztcQTwFspd3yD65VohhpuuCOmLASjC" crossorigin="anonymous">

    <style>
        @import url('https://fonts.googleapis.com/css2?family=Black+Han+Sans&display=swap');

        * {
            font-family: 'Black Han Sans', sans-serif;
        }

        .main {

            color: white;

            background-image: url('https://occ-0-1123-1217.1.nflxso.net/dnm/api/v6/6AYY37jfdO6hpXcMjf9Yu5cnmO0/AAAABeIfo7VL_VDyKnljV66IkR-4XLb6xpZqhpLSo3JUtbivnEW4s60PD27muH1mdaANM_8rGpgbm6L2oDgA_iELHZLZ2IQjG5lvp5d2.jpg?r=e6e.jpg');
            background-position: center;
            background-size: cover;
        }

        .mycards {
            width: 1200px;

            margin: 20px auto 20px auto;

        }

        .mypostingbox {
            width: 500px;
            margin: 20px auto 20px auto;
            border: 1px solid white;
            padding: 20px;
            border-radius: 5px;
        }

        .form-floating>input {
            background-color: transparent;
            color: withe;
        }

        .form-floating>label {
            color: white;
        }

        .input-group>label {
            background-color: transparent;
            color: white;
        }

        .input-group>select {
            background-color: transparent;
            color: white;
        }

        .mypostingbox>button {
            width: 100%;
        }

        body {
            background-color: black;
        }
    </style>
    <script>
            // 조건문
            let age = 15;

            if (age >= 18) {
                console.log("성인입니다");
            } else {
                console.log("청소년입니다");
            }
            //직관적이게 만약,만약이 아니면 이라는 두가지의 조건

            //반복문(어떤 꾸러미(list) 만큼 반복해라)
            let ages = [15, 30, 28, 7, 40, 13];
            ages.forEach(a => {
                if (age >= 18) {
                    console.log("성인입니다");
                } else {
                    console.log("청소년입니다");
                }
            });
     </script>
</head>

<body>
    <header class="p-3 text-bg-dark">
        <div class="container">
            <div class="d-flex flex-wrap align-items-center justify-content-center justify-content-lg-start">
                <a href="/" class="d-flex align-items-center mb-2 mb-lg-0 text-white text-decoration-none">
                    <svg class="bi me-2" width="40" height="32" role="img" aria-label="Bootstrap">
                        <use xlink:href="#bootstrap"></use>
                    </svg>
                </a>

                <ul class="nav col-12 col-lg-auto me-lg-auto mb-2 justify-content-center mb-md-0">
                    <li><a href="#" class="nav-link px-2 text-danger">Yull's Cinema</a></li>
                    <li><a href="#" class="nav-link px-2 text-white">홈</a></li>
                    <li><a href="#" class="nav-link px-2 text-white">영화</a></li>
                    <li><a href="#" class="nav-link px-2 text-white">시리즈</a></li>
                    <li><a href="#" class="nav-link px-2 text-white">내가찜한 컨탠츠</a></li>
                </ul>

                <form class="col-12 col-lg-auto mb-3 mb-lg-0 me-lg-3" role="search">
                    <input type="search" class="form-control form-control-dark text-bg-dark" placeholder="Search..."
                        aria-label="Search">
                </form>

                <div class="text-end">
                    <button type="button" class="btn btn-outline-light me-2">Login</button>
                    <button type="button" class="btn btn-danger">Sign-up</button>
                </div>
            </div>
        </div>
    </header>
    <div class="main">

        <div class="p-5 mb-4 bg-body-tertiary rounded-3">
            <div class="container-fluid py-5">
                <h1 class="display-5 fw-bold">킹덤</h1>
                <p class="col-md-8 fs-4">병든 왕을 둘러싸고 흉흉한 소문이 떠돈다. 어둠에 뒤덮인 조선, 기이한 역병에 신음하는 산하. 정체 모를 악에 맞서 백성을 구원할 희망은 오직
                    세자뿐이다.</p>
                <button type="button" class="btn btn-outline-light">영화기록하기</button>
                <button type="button" class="btn btn-outline-light">상세정보</button>
            </div>
        </div>
    </div>

    <div class="mypostingbox">
        <div class="form-floating mb-3">
            <input type="email" class="form-control" id="floatingInput" placeholder="영화 이미지 주소">
            <label for="floatingInput">영화 이미지 주소</label>
        </div>
        <div class="form-floating mb-3">
            <input type="email" class="form-control" id="floatingInput" placeholder="영화제목">
            <label for="floatingInput">영화제목</label>
        </div>
        <div class="input-group mb-3">
            <label class="input-group-text" for="inputGroupSelect01">별점</label>
            <select class="form-select" id="inputGroupSelect01">
                <option selected>별점선택</option>
                <option value="1">⭐</option>
                <option value="2">⭐⭐</option>
                <option value="3">⭐⭐⭐</option>
                <option value="3">⭐⭐⭐⭐</option>
                <option value="3">⭐⭐⭐⭐⭐</option>
            </select>
        </div>
        <div class="form-floating mb-3">
            <input type="email" class="form-control" id="floatingInput" placeholder="추천이유">
            <label for="floatingInput">추천이유</label>
        </div>
        <button type="button" class="btn btn-danger">기록하기</button>
    </div>

    <div class="mycards">
        <div class="row row-cols-1 row-cols-md-4 g-4">
            <div class="col">
                <div class="card">
                    <img src="https://movie-phinf.pstatic.net/20210728_221/1627440327667GyoYj_JPEG/movie_image.jpg"
                        class="card-img-top" alt="...">
                    <div class="card-body">
                        <h5 class="card-title">영화제목</h5>
                        <p class="card-text">⭐⭐⭐</p>
                        <p class="card-text">영화코멘트</p>
                    </div>
                </div>
            </div>
        </div>
    </div>
</body>

</html>
복습내용 완성본
Javascript 배우기
HTML(뼈대) + CSS(꾸미기) + Javasvript(움직임) 웹페이지 개발에 표준...
서버 구축에도 사용됨 (광범위함)
기초 변수와 자료형
    <script>
        //  변수
        let a = 'hello';
        let b = 'heeeelllllooo';
        console.log(a+b);
        // 변수를 담는 함수 그리고 콘솔에 띄워주는 함수
        // 변수를 쓰는 이유:전체를 바꿀 필요없이 값을 담아서 한번에 관리
        // 변수의 이름은 내가 알아보기 쉬운 직관적인 이름

        //자료형(list)
        let f =['사과' , '배' , '수박']
        console.log(f[1])
        //프로그래밍은 무조건 0부터 카운팅 함으로 결과값은 '배'가 나온다.
        let person={'name':'bob', 'age':30, 'gender':'male','height':180}
        console.log(person['name'])
        //접근하고 싶은 문자를 []안에 넣으면 접근가능
     </script>
조건문과 반복문
    <script>
            // 조건문
            let age = 15;

            if (age >= 18) {
                console.log("성인입니다");
            } else {
                console.log("청소년입니다");
            }
            //직관적이게 만약,만약이 아니면 이라는 두가지의 조건

            //반복문(어떤 꾸러미(list) 만큼 반복해라)
            let ages = [15, 30, 28, 7, 40, 13];
            ages.forEach(a => {
                if (age >= 18) {
                    console.log("성인입니다");
                } else {
                    console.log("청소년입니다");
                }
            });
     </script>
Java 학습
복습 단축키 (psvm=public static void main//sout=System.out.println)
연산자 공부
산술 연산자
//연산자 1
public class _01_Operator01 {
    public static void main(String[] args) {
      //산술 연산자


      //일반 연산
        System.out.println(4 +2); //6
        System.out.println(4 -2); //2
        System.out.println(4 * 2);//8
        System.out.println(4 / 2);//2
        System.out.println(5/2); //2.5가 나와야하지만 정수만 연산하기에 소수점이 버려지고 2만 남음
        System.out.println(2/4); //0
        System.out.println(4 % 2); //나머지 연산 4를 2로 나눴을때 나머지 0
        System.out.println(5 % 2); //1

        //우선순위 연산
        System.out.println(2 + 2 * 2); //6
        System.out.println((2 + 2) * 2); //8 소괄호부터 계산
        System.out.println(2 + (2 * 2)); //6


        //변수를 이용한 연산
        int a = 20;
        int b =10;
        int c;

        c = a + b;
        System.out.println(c); //30

        c = a - b;
        System.out.println(c); //10

        c = a * b;
        System.out.println(c); //200

        c = a / b;
        System.out.println(c); //2

        //증감 연산 ++. --
        int val;
        //val = val +1;
        //++val; // 연산을 먼저하고 문장 실행
        val =10;
        System.out.println(val); //10
        System.out.println(++val); //11
        System.out.println(val); //11

        //val++; // 문장 먼저 실행하고 연산
        val =10;
        System.out.println((val));//10
        System.out.println(val++);//10
        System.out.println(val);//11

        val =10;
        System.out.println(val); //10
        System.out.println(--val); //9
        System.out.println(val); //9

        val =10;
        System.out.println((val));//10
        System.out.println(val--);//10
        System.out.println(val);//9

        //예제 은행 대기번호 표
        int waiting = 0;
        System.out.println("대기인원 :" + waiting++);// 대기인원 : 0
        System.out.println("대기인원 :" + waiting++);// 대기인원 : 1
        System.out.println("대기인원 :" + waiting++);// 대기인원 : 2
        System.out.println("총 대기 인원 :"+ waiting);//총 대기인원 :3

    }
}
대입 연산자
public class _02_Operator2 {
    public static void main(String[] args) {
        //대입 연산자
        int num = 10;
        num = num +2;
        System.out.println(num); //12

        num = num -2;
        System.out.println(num); //10

        num = num *2;
        System.out.println(num); //20

        num = num /2;
        System.out.println(num); //10

        num = num % 2;
        System.out.println(num); //0(나머지가 0이기때문)

        // 복합 대입 연산자
        num = 10;
        // num = num + 2;
        num += 2;
        System.out.println(num); // 12

        num -= 2;
        System.out.println(num); //10

        num *= 2;
        System.out.println(num); //20

        num /= 2;
        System.out.println(num); //10

        num %= 2;
        System.out.println(num); //0


    }
}
비교 연산자
package chap02;

public class _03_Operator3 {
    public static void main(String[] args) {
        // 비교 연산자(< , > , =)
        // 참이면 true, 거짓이면 false
        System.out.println(5 > 3); //5는 3보다 크다
        System.out.println(5 >= 3); //5는 3보다 크거나 같다 (true)
        System.out.println(5 >= 5); //(true)
        System.out.println(5 >= 7); // (false)
        //같은지 비교하기 위해서는 == 두번 입력
        System.out.println(5 == 5); // (true)
        System.out.println(5 != 5);//5 는 5 와 같지 않다(false) (기호 !=)
        System.out.println(5 != 3);// (ture)
    }
}
논리 연산자
package chap02;

public class _04_Operator4 {
    public static void main(String[] args) {
        //논리 연산자
        boolean soup = true;
        boolean pork = true;
        boolean egg = true;
        //|| 이 기호는 or 과 같은 뜻이다
        System.out.println(soup || pork || egg); // 하나라도 true 라면 true
        //&& 이 기호는 and 와 같은 뜻이다
        System.out.println(soup && pork && egg); // 모두 true 이면 true (하나라도 false 이면 false)

        // And 연산
        System.out.println((5 > 3) && (3 > 1)); // 5는 3 보다 크고, 3은 1보다 크다 (true)
        System.out.println((5 > 3) && (3 < 1)); // 5는 3 보다 크고, 3은 1보다 작다 (false)

        // Or 연산
        System.out.println((5 > 3) || (3 > 1)); //5 는 3 보다 크거나, 3 은 1 보다 크다 (true)
        System.out.println((5 > 3) || (3 < 1)); //5 는 3 보다 크거나, 3 은 1 보다 작다 (true)
        System.out.println((5 < 3) || (3 < 1)); //5 는 3 보다 작거나, 3 은 1 보다 작다 (false)

        //System.out.println(1 < 3 <5);//불가능한 코드 괄호 필수!

        //논리 부정 연산자
        System.out.println(!true); // false
        System.out.println(!false); // true
        System.out.println(!(5 == 5)); // false
        System.out.println(!(5 == 3)); // ture
    }
}
삼항 연산자
package chap02;

public class _05_Operator5 {
    public static void main(String[] args) {
        // 삼항 연산자 (조건연산자)
        // 결과 = (조건) ? (참의 경우 결과갑) : (거짓의 경우 결과값)
        int x = 5;
        int y = 3;
        int max = (x > y) ? x : y ;
        System.out.println(max);//5

        int min = (x < y) ? x : y;
        System.out.println(min);//3

        boolean b = (x == y) ? true : false ; //x 와 y 가 같나요?
        System.out.println(b); // false

        String s = (x != y) ? "달라요" : "같아요"; // x 와 y 가 다른가요? 문자로 출력(String)
        System.out.println(s); //달라요

    }
}
연산자 예제 문제
package chap02;
//예제 문제
// 어린이 키에 따른 놀이 기구 탑승 가능 여부를 확인하는 프로그램을 작성하시오

//조건 키가 120 cm 이상인 경우에만 탑승 가능
//삼항 연산자 이용
public class _06_Quiz {
    public static void main(String[] args) {
        int height1 = 115;
        int height2 = 125;
        String result = (height1 >= 120) ? "탑승 가능합니다" : "탑승 불가능 합니다";
        String result2 = (height2 >= 120) ? "탑승 가능합니다" : "탑승 불가능 합니다";
        System.out.println("키가 "+ height1 + "cm 이므로 " + result);
        System.out.println("키가 "+ height2 + "cm 이므로 " + result2);
    }
}
회고
일찍 시작한 만큼 많은 활동을 했지만 복습의 중요성을 느끼게 되었다. 너무 쉬지않고 끊임없이 나아가기만 해서는 내것이 되는것이 아니라 반복에 중요성도 느꼇으니 주말이나 목요일 금요일을 이용해서는 복습을 좀 해야겠다. 그리고 적절한 휴식은 일의 능률을 올려줌도 명심하자....손목 부셔지겠다...