Day 1
Artificial Neural Network
퍼셉트론이란 무엇일까?
-
신경망을 이루는 가장 기본 단위
-
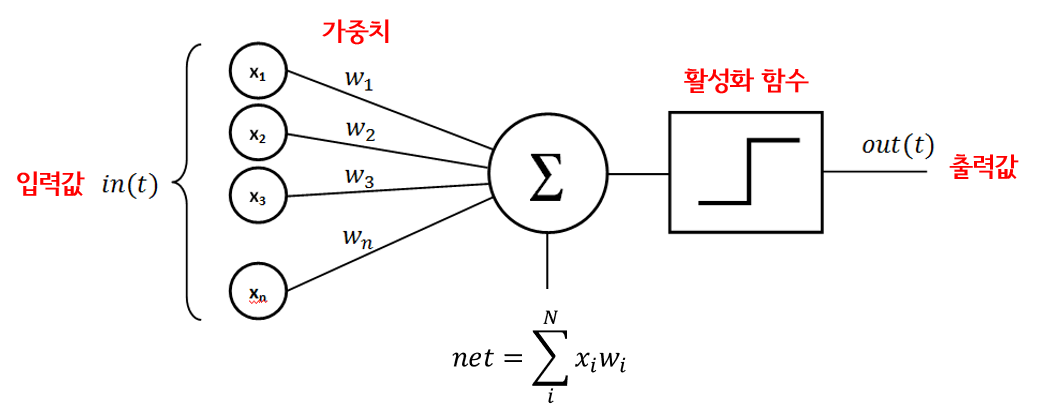
다수의 신호를 입력받아 하나의 신호를 출력하는 구조
-
가중치 = 가중합
-
활성화 함수 = 가중합을 얼마만큼의 신호로 출력할 지 결정
활성화 함수
-
계단 함수(Step Function)
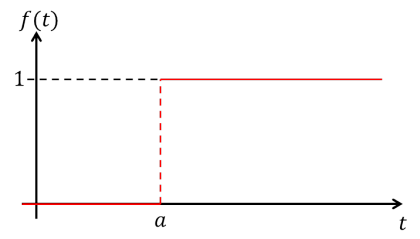
- 입력값이 임계값(0)을 넘기면 1, 아니면 0을 출력
- 임계값 지점에서 미분이 불가능하고 나머지 지점에서는 미분값이 0
-
시그모이드 함수
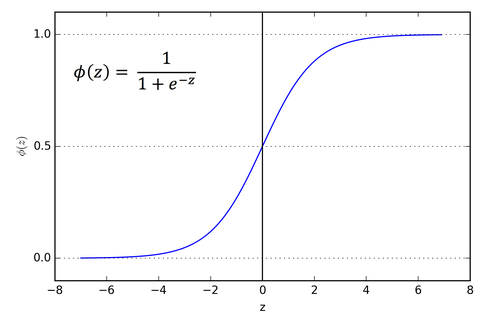
- 계단함수를 활성화 함수로 사용했을 때 학습이 잘 이루어지지 않는 단점을 해결
- 임계값보다 작은 부분은 0에 가까워지고 큰 부분은 1에 가까워짐
- 모든 지점에서 미분이 가능하고 미분값은 0이 아님
- 이진분류일 때 주로 사용
- 기울기 소실 문제 O --> sprint2
-
ReLU함수
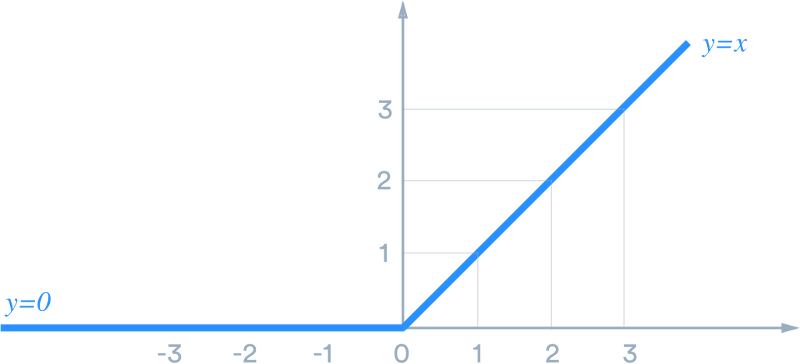
- 신경망 발전에 큰 영향을 미친 활성화 함수
- 시그모이드 함수를 중복 사용했을 때 발생하는 기울기 소실문제를 해결하기 위해 등장
- 양의 값을 입력하면 그 값이 그대로 출력되고 음의 값을 입력하면 0을 반환
-
소프트맥스 함수
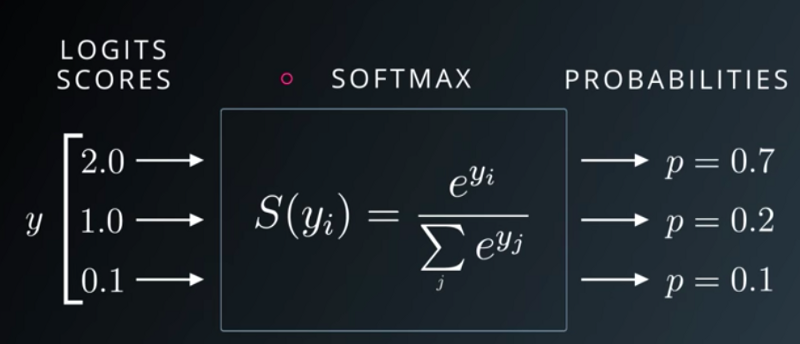
- 다중분류 문제에 적용할 수 있도록 시그모이드 함수를 일반화한 활성화 함수
- 가중합 값을 소프트맥스 함수에 통과시키면 모든 클래스의 값의 합이 1이 되는 확률값으로 변환
-
모든 활성화 함수의 공통점을 비선형이라는 점
논리 게이트와 퍼셉트론
- 논리 게이트
- 퍼셉트론의 가장 단순한 형태
- AND GATE
- 입력신호가 모두 1(True)일때 1(True)을 출력
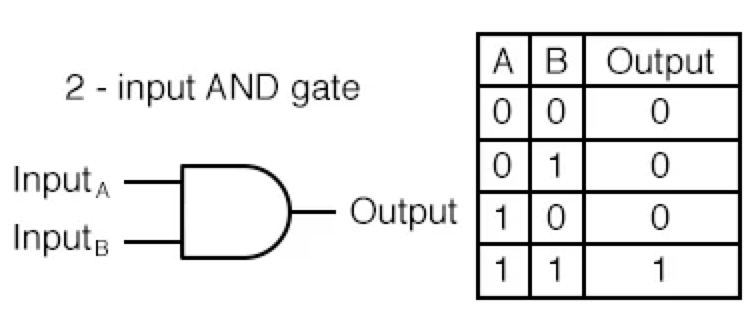
- 입력신호가 모두 1(True)일때 1(True)을 출력
- NAND GATE
- Not AND의 줄임말, AND GATE 결과의 반대를 출력
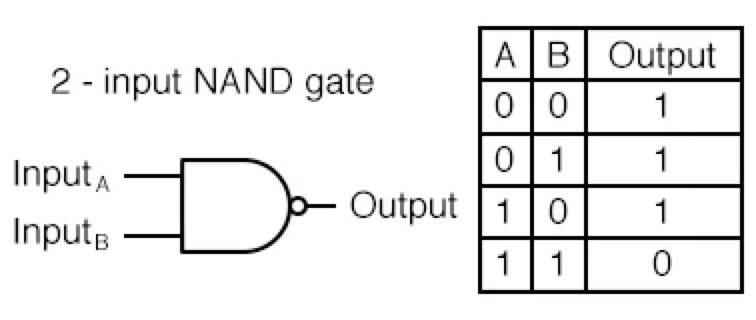
- Not AND의 줄임말, AND GATE 결과의 반대를 출력
- OR GATE
- 입력 신호 중 하나만 1(True) 이라도 1(True)을 출력
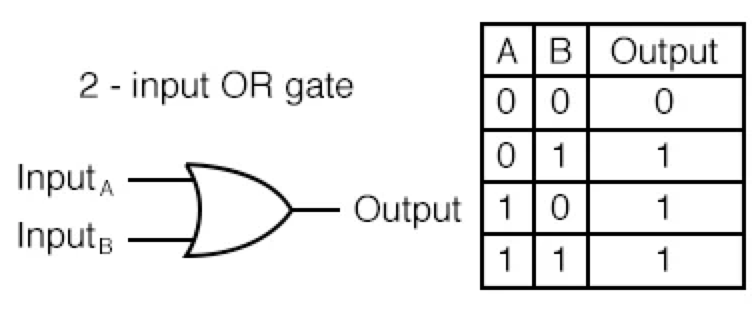
- 입력 신호 중 하나만 1(True) 이라도 1(True)을 출력
- XOR Gate
- 배타적 논리합(Exclusive-OR)
- 입력신호가 다를 경우 1(True) 출력
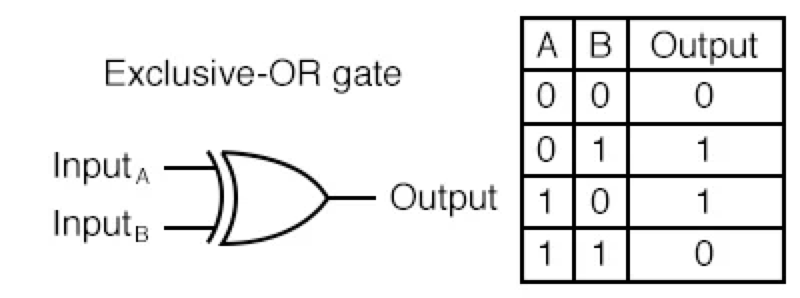
진리표
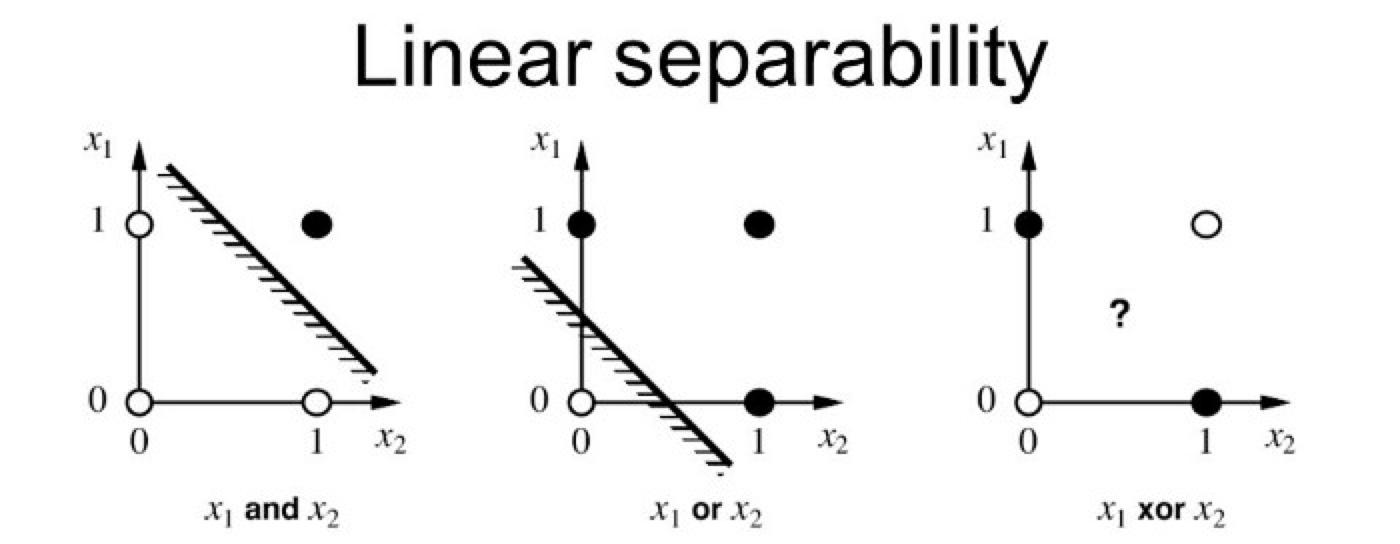
XOR에서 선형 경계로 두 클래스를 제대로 분류하기 어려움- XOR Classification
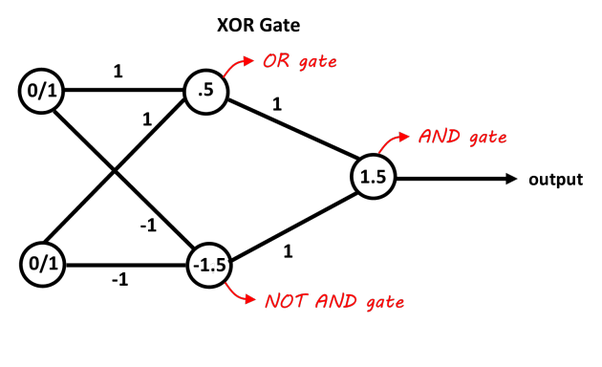
- XOR Classification
인공신경망의 구조
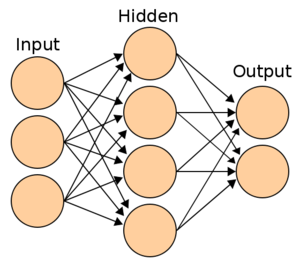
- ANN(Artificial Neural Networks)
- 실제 신경계를 모사하여 만들어진 계산 모델
-
신경망은 퍼셉트론을 여러 층으로 쌓아서 만드는데 왜 다층으로 쌓을까?
- MLP(다층 퍼셉트론 신경망)
- XOR문제를 해결하기 위해
- 1개의 층으로 해결할 수 없는 문제를 2개 이상의 층으로 구성하면 해결 가능
- MLP(다층 퍼셉트론 신경망)
-
신경망의 층
- 입력층(Input layer)
- 데이터셋이 입력되는 층
- 데이터셋의 특성(Feature)에 따라 입력층의 노드 수 결정
- 신경망의 층수(깊이)를 셀 때 포함하지 않음
- 은닉층(Hidden layer)
- 입력층과 출력층 사이의 층
- 사용자가 계산 과정을 볼 수 없음
- 입력층으로부터 입력된 신호가 가중치, 편향과 연산되는 층
- 입력 데이터셋의 특성 수와 상관없이 노드 수를 구성할 수 있음 -> 사용자가 정하는 것이지만 주로 2배수를 많이 씀
- 일반적으로 딥러닝은 2개 이상의 은닉층을 가짐
- 출력층(Output layer)
- 풀어야 할 문제의 종류에 따라서 출력층을 잘 설계하는 것이 중요
- 이진 분류 : 시그모이드 함수, 출력층의 노드 수는 1
- 다중 분류 : 소프트맥스 함수, 출력층의 노드수는 레이블의 클래스 수와 동일하게 설정
- 회귀 : 활성화 함수를 사용하지 않고 노드 수는 출력값의 특성 수와 동일하게 설정
- 하나만 예측하는 경우에는 노드가 1
- 입력층(Input layer)
Tensorflow, Keras
신경망의 학습은 적절한 가중치를 찾는 과정
- 신경망 모델 구축
import tensorflow as tf

model = tf.keras.models.Sequential([
			tf.keras.layers.Dense(1,activation='sigmoid')
            ]) # 이진분류 (은닉층 없음)

# 동일한 역할 수행 다른 코드
model = tf.keras.models.Sequential()
model.add(tf.keras.layers.Dense(1, activation='sigmoid'))- 컴파일
.compile
model.compile(optimizer='sgd',
				loss='binary_crossentropy',
metrics=['accuracy'])- 모델 학습
.fit
model.fit(X_train, y_train, epochs=30)
# epochs 를 조정하면 학습 횟수 조정가능
이미지 분류에서는 정규화가 중요
정규화할 때 각 데이터를 255로 나눠줌# 이미지 데이터를 하나로 펴주는 작업 필요 model = tf.keras.models.Sequential([ tf.keras.layers.Flatten(input_shape=(28,28)), tf.keras.layers.Dense(100,activation='relu'), tf.keras.layers.Dense(10,activation='softmax') ]) # input_shape 의 숫자는 이미지 데이터의 크기(가로,세로 픽셀)
np.append, np.vstack, np.hstack
np.append(arr,values,axis=None)np.append([1, 2, 3], [[4, 5, 6], [7, 8, 9]]) array([1, 2, 3, ..., 7, 8, 9]) np.append([[1, 2, 3], [4, 5, 6]], [[7, 8, 9]], axis=0) array([[1, 2, 3], [4, 5, 6], [7, 8, 9]])
np.stack(arrays, axis=0)
- 합치려는 배열들의 shape이 전부 동일해야 함
- axis 설정으로 붙이는 방향 설정
np.hstack(tup)
- 두 배열을 가로로 이어 붙이는 함수
np.vstack(tup)
- 두 배열을 axis=0 로 고정하여 붙이는 것
np.concatenate((a,b), axis=0)와 같음
비선형성이 추가되지 않은 단일 퍼셉트론은 직선 결정 경계를 만듦
tf.keras.layers.Flatten(input_shape=(28,28))
-> 데이터 노드 수는 28*28 개(=입력 노드 수)
softmax 는 은닉층에 사용하는 경우는 없음
softmax는 확률과 관련된 활성화 함수
은닉층 : 선형을 비선형으로 바꿔주는 것이기 때문에 확률과는 상관 없음
은닉층에서 활성화함수로 주로 ReLU를 사용함
꼭 좋다고는 할 수는 없고 어떤 함수를 사용할지는 사용자 마음
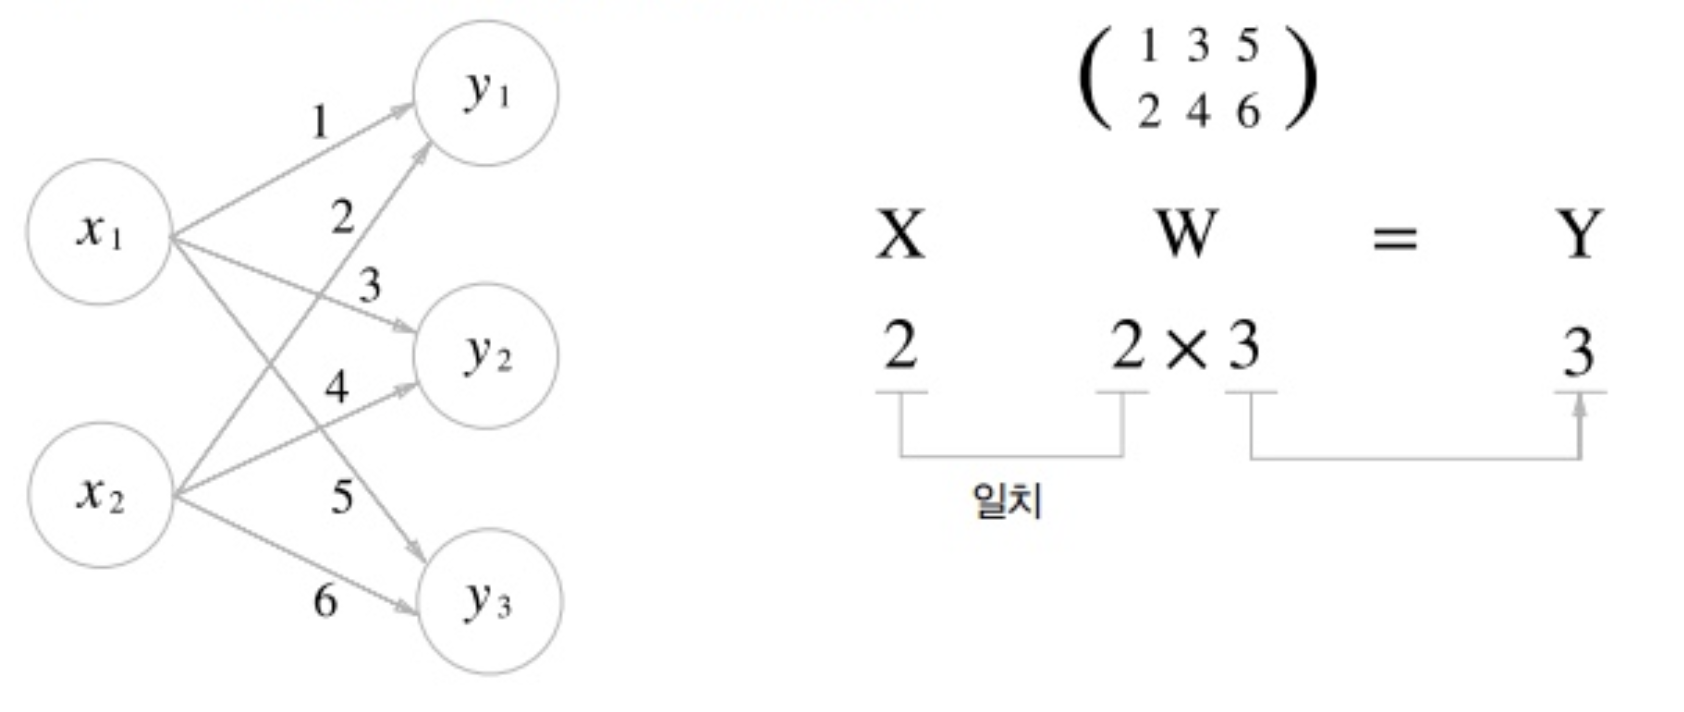
가중치 행렬의 shape
퍼셉트론에 있는 가중치-편향 연산은 행렬의 곱으로 연산
가중치 행렬: W, 입력 벡터: x, 연산결과 출력 벡터: y
*파라미터 수
Input : 4
Hidden : 8
Output : 3
(Input, Hidden) → (4,8) 행렬 → 파라미터 수: (bias)
(Hidden, Output) → (8, 3) 행렬 → 파라미터 수:
Day 2
Training Neural Network
신경망 학습
-
학습 과정
-
데이터가 입력되면 신경망 각 층에서 가중치 및 활성화 함수 연산을 반복 수행
-
1의 과정을 모든 층에서 반복한 후 출력층에서 계산된 값을 출력
-
손실함수를 사용하여 예측값과 실제값의 차이를 계산
-
경사하강법과 역전파를 통해 각 가중치를 갱신
-
학습 중지 기준을 만족할 때까지 1-4 과정 반복
- 1-4과정을 iteration이라고 하며 매 iteration 마다 가중치가 갱신
-
-
순전파
- 1-2 의 과정
- 입력층에서 입력된 신호가 은닉층의 연산을 거쳐 출력층에서 값을 내보내는 과정
-
손실 계산
- 3의 과정
- 신경망은 손실 함수를 최소화하는 방향으로 가중치 갱신
- 대표적으로 MSE, CEE(Cross-Entropy Error)
-
역전파
- 4의 과정
- 순전파와는 반대 방향으로 손실 정보를 전달해주는 과정
- 손실 정보를 출력층부터 입력층까지 전달하여 각 가중치를 얼마나 업데이트 해야할 지를 구하는 알고리즘
경사 하강법(Gradient Descent, GD)
- 가중치 수정 방향을 결정하는 것
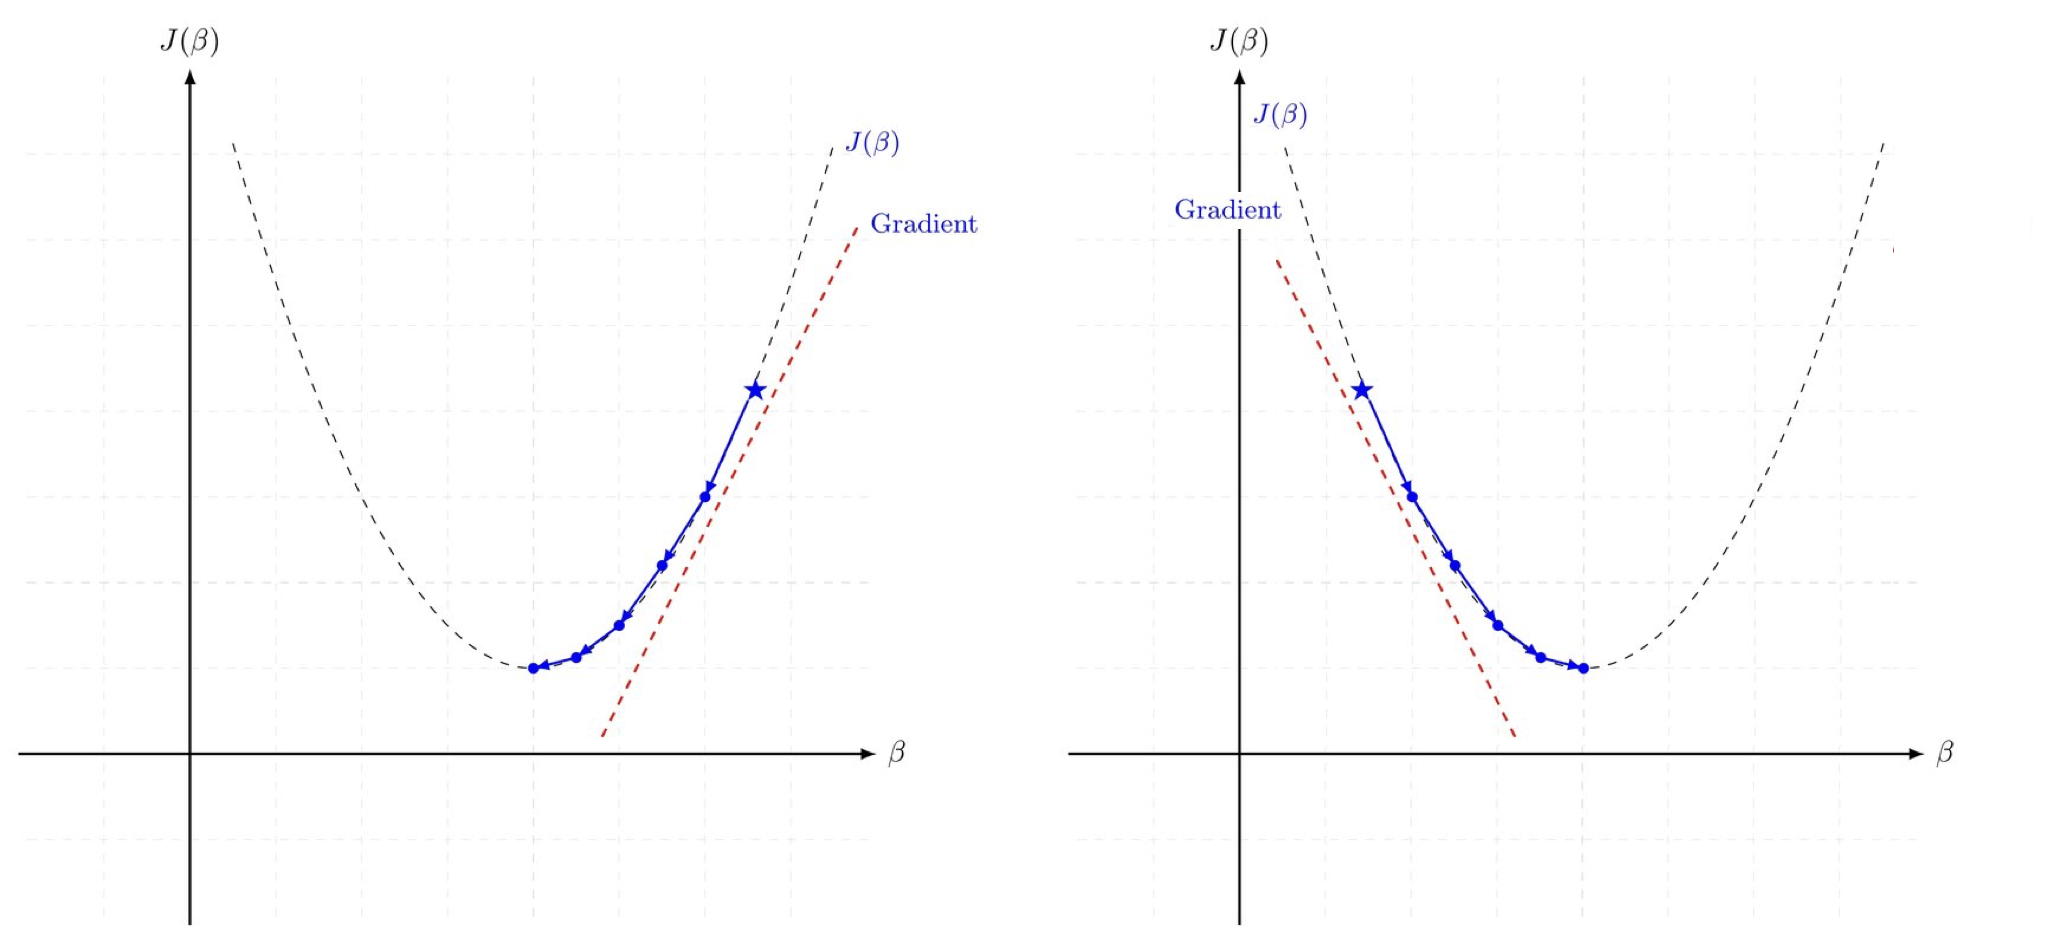
- 손실함수 J의 경사가 작아지는 방향으로 업데이트하면 손실함수 값 감소 가능
- 매 Iteration 마다 해당 가중치에서의 비용함수의 도함수를 계산하여 경사가 작아질 수 있도록 가중치를 변경
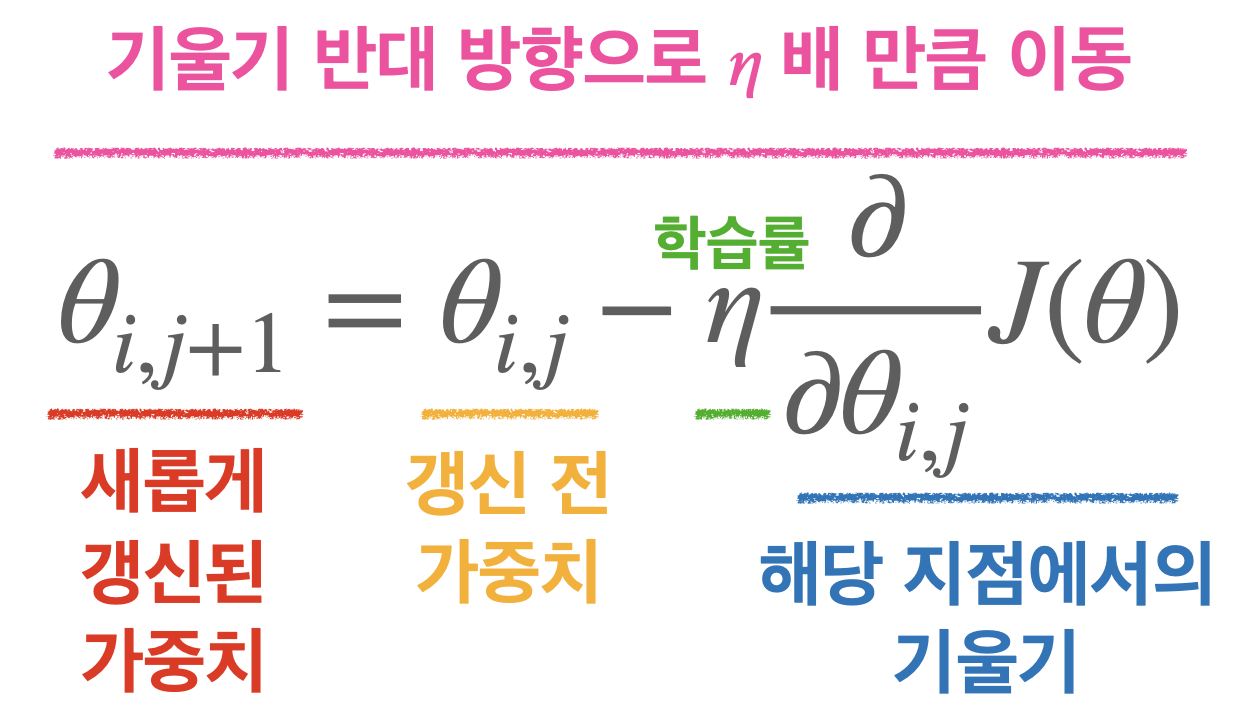
- 가중치는 연쇄법칙(chain rule)을 통해 구할 수 있음
옵티마이저(optimizer)
-
경사를 내려가는 방법을 결정
-
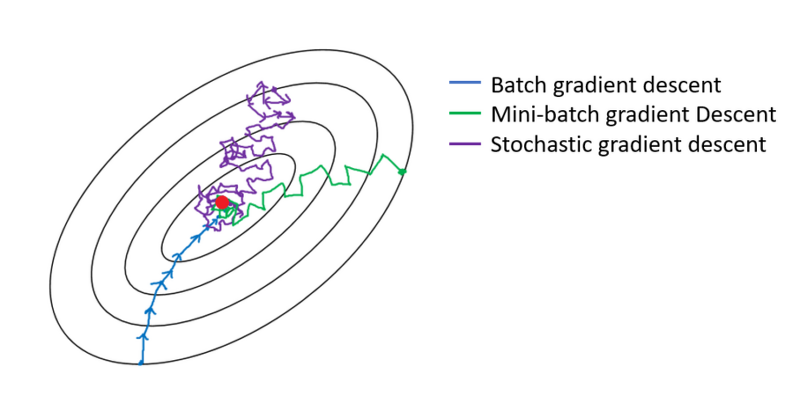
일반적인 경사하강법은 매 iteration 마다 모든 데이터를 사용하기 때문에 큰 데이터를 다룰 때는 시간이 多
↓ -
확률적 경사 하강법(Stochastic Gradient Descent, SGD)
- 전체 데이터에서 하나의 데이터를 뽑아 신경망에 입력한 후 손실 계산
- iteration 마다 1개의 데이터만을 사용
- 가중치를 빠르게 업데이트 가능
- 1개의 데이터만 보기 때문에 학습 과정에서 불안정한 경사 하강 나타남
-
미니 배치 경사 하강법(Mini-Batch Gradient Descent)
- 경사 하강법과 확률적 경사 하강법을 적절히 융화한 방법
- N개의 데이터로 미니 배치를 구성하여 해당 미니 배치를 신경망에 입력한 후 이 결과를 바탕으로 가중치 업데이터
- iteration 마다 N개(=배치 사이즈)의 데이터 사용
- 배치 사이즈 : 미니 배치 경사 하강법에서 사용하는 미니 배치의 크기
- 일반적으로 2의 배수로 설정, 큰 배치 사이즈를 쓰는 것이 학습을 안정적으로 진행하게 함
- Data size = Batch size * Iteration -> 1 epoch(전체 데이터를 1번 학습)
- 순전파-역전파 1회 = 1 iteration
- 계산에서 딱 떨어지지 않으면 반올림해서 나머지 버림
Keras 실습
model = tensorflow.keras.models.Sequential([
			Dense(숫자, activation='relu', input_dim=데이터 특성 수),
Dense(숫자, activation='softmax')])- sdg => mini batch 랑 시그모이드랑 혼용하기도 함
.summary모델의 구조 빠르게 파악 가능- Loss function
categorical_crossentropy: 데이터 label 이 one-hot 인코딩 방식일 때 사용sparse_categorical_crossentropy: label 이 정수일 때 사용
손실함수(Keras 기준)
- 회귀 : mse
- 이진 분류 : binary_crossentropy
- 다중 분류 : categorical_crossentropy, sparse_categorical_crossentropy
batch size 만큼 데이터를 보고 loss 평균으로 loss 최소화
Day 3
더 나은 신경망 학습을 위한 방법들
학습률(Learning rate)과 학습률 계획법
- 학습률(Learning rate, 'lr') : 매 가중치에 대해 구해진 기울기 값을 얼마나 경사 하강법에 적용할 지를 결정하는 하이퍼파라미터
- 학습률이 너무 낮으면 최적점에 이르기까지 너무 오래걸리거나, 주어진 iteration내에서 최적점에 도달하는 데 실패
- 학습률이 너무 높으면 경사 하강 과정에서 발산하면서 모델이 최적값을 찾을 수 없게 됨
↓
이런 문제를 해결하기 위한 방법
- 학습률 감소/계획법
-
학습률 감소(Learning rate Decay) :
Adagrad,RMSprop,Adam과 같은 주요 옵티마이저에 이미 구현되어 있고 해당 옵티마이저의 하이퍼파라미터를 조정하면 감소 정도 변화 가능model.compile(optimizer=tf.keras.optimizers.Adam(lr=0.001, beta_1 = 0.89) , loss='sparse_categorical_crossentropy' , metrics=['accuracy']) -
학습률 계획법(Learning rate Scheduling)
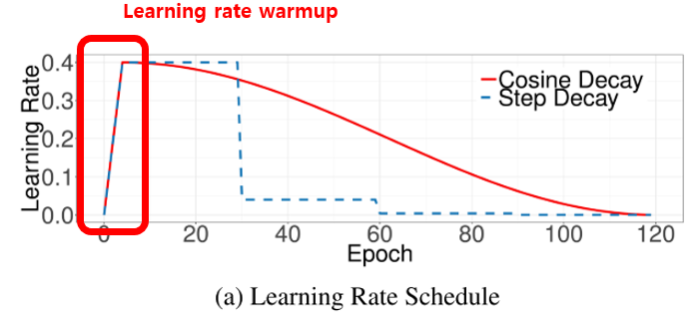
처음부터 큰 학습률 -> 학습 불안정 -> 초기 기간동안 웜업 -> 학습률 감소# .experimental 내부의 함수를 사용하여 설계 가능 first_decay_steps = 1000 initial_learning_rate = 0.01 lr_decayed_fn = ( tf.keras.experimental.CosineDecayRestarts( initial_learning_rate, first_decay_steps)) model.compile(optimizer=tf.keras.optimizers.Adam(learning_rate=lr_decayed_fn) , loss='sparse_categorical_crossentropy' , metrics=['accuracy'])
-
가중치 초기화(Weight Initialization) → 신경망에서 매우 중요한 요소
-
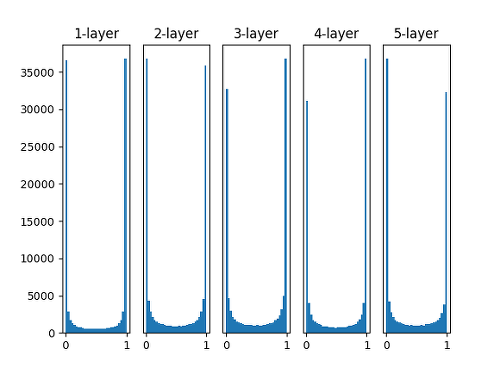
표준편차를 1(고정값)인 정규분포로 가중치를 초기화할 때 각 층의 활성화 값 분포
→ 대부분 활성화 값이 0과 1에 위치(분포가 고르지 못함)
→ 활성값이 고르지 못할 경우 학습이 제대로 이루어 지지 않아 잘 사용 X
-
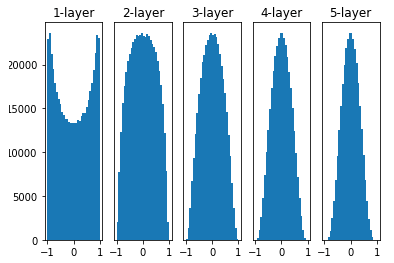
Xavier 초기화를 해주었을 때의 활성화 값의 분포
가중치를 표준편차가 고정값인 정규분포로 초기화 했을 때의 문제점을 해결하기 위해 등장한 방법
→ Xavier 초기화는 이전 층의 노드가 n개일 때, 현재 층의 가중치를 표준편차가 인 정규분포로 초기화
- 케라스에서 Xavier 초기화는 이전 층의 노드가 개이고 현재 층의 노드가 개일 때, 현재 층의 가중치를 표준편차가 인 정규분포로 초기화
-
He 초기화를 해주었을 때의 활성화 값의 분포
→ 활성화 함수가 시그모이드(Sigmoid)인 신경망에서는 잘 동작But 활성화 함수가 ReLU 일 경우 → 층이 지날수록 활성값이 고르지 못하게 되는 문제
↓ 해결하기 위해
He 초기화(He initialization)
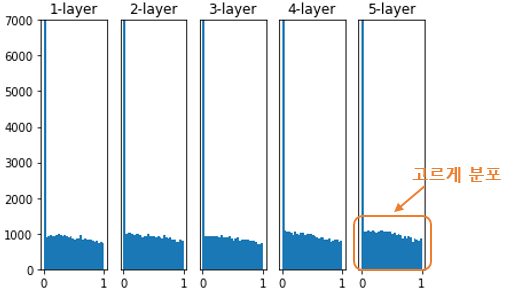
→ 이전 층의 노드가 n 개일 때, 현재 층의 가중치를 표준편차가 인 정규분포로 초기화
→ He 초기화를 적용하면 아래 그림처럼 층이 지나도 활성값이 고르게 유지
즉
sigmoid → Xavier 초기화 유리, relu → He 초기화 유리
(꼭 사용해야만 하는 것은 아님)
Keras 제공 가중치 초기화 방법
init_mode = ['uniform', 'lecun_uniform', 'normal', 'zero', 'glorot_normal', 'glorot_uniform', 'he_normal', 'he_uniform']
Regularization
과적합
↓ 방지하기 위한 방법
- Weight Decay(가중치 감소)
- 가중치 값이 너무 커지지 않도록 조건 추가
- 손실함수에 가중치와 관련된 항을 추가
- L1 Regularization(LASSO), L2 Regularization(Ridge) 로 나뉨
Dense(64,
      kernel_regularizer=regularizers.l2(0.01),
      activity_regularizer=regularizers.l1(0.01))
# 두개의 순서가 바껴도 되고 하나만 해도 됨
L1 : 가중치를 전체적으로 낮춰줌 -- 엄청 작은 값은 없어짐
L2 : 큰 가중치는 크게, 작은 가중치는 작게 낮춰줌 -- 균등
kernel : 레이어 가중치에 패널티 -- L2 과 적합
activity : 레이어 출력에 패널티, 레이어 전체를 낮춰주는 것 -- L1 과 적합
- Dropout(드롭아웃)
- iteration 마다 레이어 노드 중 일부를 사용하지 않으면서 학습을 진행하는 방법
- 0~1 사이의 실수를 입력, 모델 내에 있는 특정 레이어의 노드 연결을 지정해 준 비율만큼 강제로 끊음
- iteration 마다 다른 노드를 사용
Dense(64,
      kernel_regularizer=regularizers.l2(0.01),
      activity_regularizer=regularizers.l1(0.01))
Dropout(0.5) # 32개 노드 사용 - Early Stopping(조기 종료)
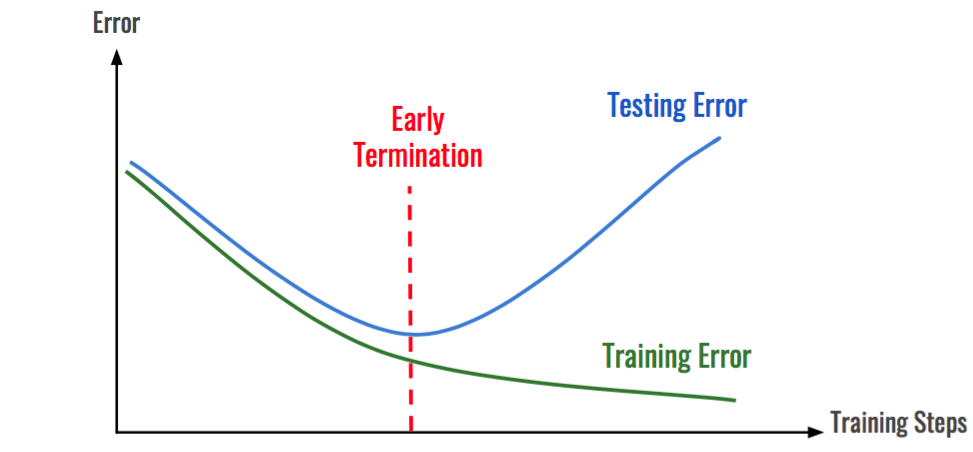
- 학습 에러는 감소하는 데 검증에러가 증가하면 종료
- 학습 에러와 검증 에러가 둘다 증가하는 경우에는 조기종료를 하기 전에 모델에 이상이 없는 지 확인해 봐야 함
from tensorflow.keras.datasets import fashion_mnist
from tensorflow.keras.models import Sequential
from tensorflow.keras.layers import Dense, Flatten, Dropout
from tensorflow.keras import regularizers

import os
import numpy as np
import tensorflow as tf
import keras

# 파라미터 저장 경로를 설정하는 코드
checkpoint_filepath = "FMbest.hdf5"

early_stop = keras.callbacks.EarlyStopping(monitor='val_loss', min_delta=0, patience=10, verbose=1)

save_best = tf.keras.callbacks.ModelCheckpoint(
    filepath=checkpoint_filepath, monitor='val_loss', verbose=1, save_best_only=True,
    save_weights_only=True, mode='auto', save_freq='epoch', options=None)
# save_vest_only : 모델이 가장 좋은 경우

model.fit(X_train, y_train, batch_size=32, epochs=30, verbose=1,
          validation_data=(X_test,y_test),
          callbacks=[early_stop, save_best])
kernel vs activity regularizer
the regression equation y=Wx+b, where x is the input, W the weights matrix and b the bias.
- Kernel Regularizer: Tries to reduce the weights W (excluding bias)
- Bias Regularizer: Tries to reduce the bias b
- Activity Regularizer: Tries to reduce the layer's output y, thus will reduce the weights and adjust bias so Wx+b is smallest
When to use which?
Usually, if you have no prior on the distribution that you wish to model, you would only use the kernel regularizer, since a large enough network can still model your function even if the regularization on the weights are bigIf you want the output function to pass through (or have an intercept closer to) the origin, you can use the bias regularizer
If you want the output to be smaller (or closer to 0), you can use the activity regularizer
여러가지 옵티마이저

- Momentum(모멘텀) : 기울기 변화가 심한 방향으로는 값을 더 많이 개선하게 되고, 기울기 변화가 완만한 방향으로는 값을 덜 개선하게 됨
- 지역 최적점(local minima)에서 빠져 나올 수 있도록 함
- Adagrad(아다그라드) : 학습률을 조정하여 성능을 개선
- 자주 등장하는 특성의 파라미터에 대해서는 낮은 학습률을
- 가끔 등장하는 특성의 파라미터에 대해서는 높은 학습률 적용
- 장점
- 희소한 데이터에 적용할 경우 훨씬 더 강건함(Robust)
- 학습률을 조정해주지 않아도 알아서 적절한 학습률을 적용함
- 단점
- 학습이 진행될수록 G(t)값이 커지고 학습률이 점점 줄어들게 되어 많은 학습 이후에는 파라미터가 거의 갱신되지 않음
- Adam(아담)
- 모멘텀에 적용된 그래디언트 조정법과 아다그라드에 적용된 학습률 조정법의 장점을 융합
배치 정규화(Batch Normalization)
- 장점
- 학습 속도 빠르게 → 학습률을 높게 설정해도 최적화 잘됨
- 신경망의 가중치 초기화나 하이퍼파라미터 설정에 대해 강건하게 만듦 → 자유롭게 값을 설정해도 수렴이 잘됨
- 오버피팅을 막아줌 → 드롭아웃과 같은 스킬이 없어도 모델 일반화
Day 4
Hyperparameter Tuning
교차 검증(Cross-Validation)
# KFold를 통해 학습 데이터셋 몇 개로 나눌 지 결정
from sklearn.model_selection import KFold, StratifiedKFold

kf = KFold(n_splits = 5)
skf = StratifiedKFold(n_splits = 5, random_state = 42, shuffle = True)
KFold vs StratifiedKFold
Hyperparameter Tuning
-
Gride Search
- 범위 지정 -> 모든 지점 탐색
- 범위 넓어질수록 굉장히 오래걸림
- 1~2개 최적값 찾는데 용이
-
Random Search
- 그리드 서치 문제 해결
- 범위 지정 -> 무작위로 탐색
- 더 중요 -> 더 학습, 덜 중요 -> 덜 학습
- 절대적으로 완벽한 하이퍼파라미터 찾지 못함
-
Bayesian Methods : 이전 탐색 결과 정보를 새로운 탐색에 활용,
bayes_opt,hyperopt -
신경망에서 탐색할 수 있는 하이퍼파라미터
batch_sizeepochsoptimizerslearning rateactivation- Regularization(
weight decay,Dropout등) - 은닉층의 노드 수
-
Grid Search 예시
# model_builder 하고

# Keras.wrapper를 활용해 분류기 만들기 (KerasClassifier, KerasRegressor)
from tensorflow.keras.wrappers.scikit_learn import KerasClassifier

model = KerasClassifier(build_fn=model_builder, verbose=0)

# GridSearch
batch_size = [64, 128, 256]
epochs = [10, 20, 30]
nodes = [64, 128, 256]
activation = ['relu', 'sigmoid']
param_grid = dict(batch_size=batch_size, epochs=epochs, nodes=nodes, activation=activation)


# GridSearch CV를 만들기
grid = GridSearchCV(estimator=model, param_grid=param_grid, cv=3, verbose=1, n_jobs=-1)
grid_result = grid.fit(X_train_scaled, y_train)

# 결과 확인
print(f"Best: {grid_result.best_score_} using {grid_result.best_params_}")
https://machinelearningmastery.com/grid-search-hyperparameters-deep-learning-models-python-keras/
Keras Tuner
- Keras 프레임워크에서 하이퍼파라미터를 튜닝하는 데 도움이 되는 라이브러리
- 모델 제작과정에서 Model builder 함수
model_builder를 지정해야 함
def model_builder(hp):
  model = keras.Sequential()
  model.add(Flatten(input_shape=(28, 28)))

  hp_units = hp.Int('units', min_value = 32, max_value = 512, step = 32) #은닉층 노드 수 : 32부터 512까지 32개씩 증가시키며 탐색
  model.add(Dense(units = hp_units, activation = 'relu'))
  model.add(Dense(10, activation='softmax'))

  hp_learning_rate = hp.Choice('learning_rate', values = [1e-2, 1e-3, 1e-4]) # 학습률 : 0.01, 0.001, 0.0001 의 3개 지점 탐색

  model.compile(optimizer = keras.optimizers.Adam(learning_rate = hp_learning_rate),
                loss = keras.losses.SparseCategoricalCrossentropy(from_logits = True),
                metrics = ['accuracy'])

return model- Random Search, Grid Search, Bayesian Optimization, Hyperband 등의 최적화 방법 수행 가능
- Hyperband 예시
model_builder,max_epochs등 지정 필요- 리소스를 알아서 조절하고 조기 종료 기능을 사용하여 높은 성능을 보이는 조합을 신속하게 통합
tuner = kt.Hyperband(model_builder,
                     objective = 'val_accuracy',
                     max_epochs = 10,
                     factor = 3,
                     directory = 'my_dir',
                     project_name = 'intro_to_kt')
class ClearTrainingOutput(tf.keras.callbacks.Callback):
def on_train_end(*args, **kwargs):
IPython.display.clear_output(wait = True)
# 하이퍼파라미터 탐색을 실행하기 전에 학습이 끝날때마다 이전 출력이 지워지도록 콜백 함수 정의
tuner.search(X_train, y_train, epochs = 10, validation_data = (X_test, y_test), callbacks = [ClearTrainingOutput()])
best_hps = tuner.get_best_hyperparameters(num_trials = 1)[0]파라미터
데이터를 통해서 머신이 학습되는 값
ex. 가중치, 편향 등
데이터가 많고 신경망 모델이 좋음 -> 머신이 스스로 최적값 찾음
데이터 전처리 순서
데이터 불러오기 -> 결측치, 이상치 체크/처리 -> 데이터 나누기 -> 데이터 표준화/정규화(데이터 누수 방지, train set 기준으로 fit 해야하기 때문)
fit_transform -- train -> 평균, 분산을 구함
transform -- test -> 데이터 센터링, 스케일링만 조정
--> test data 에도 fit하면 학습이 되기 때문에 데이터 누수 발생
val_loss 가 실수값인 이유
손실함수를 measn squared logarithmic error 라서
이 손실함수는 이상치의 값이 있을 때 더 효율적임
Grid Search, Random Search, Bayesian Methods
그리드는 값을 지정
랜덤은 범위/값을 지정
이 둘의 공통적인 단점 : 최고 성능을 출력하지 못할 수 있음베이지안 : 범위를 지정 -> best 값 -> 여기서 다시 범위 / 값 지정 -- 반복
bayes_opt, hyeropt -- 자동으로 실행될 때 과정 값을 볼 수 있는 것이 전자, 후자는 과정 값 없이 결과 값만 출력
