Building a Smarter Audio Detection System: Continuous Monitoring with Audio Level Checks
VisualVroom
I'm going to share a recent improvement made to the VisualVroom app, where I enhanced our audio detection system to provide continuous monitoring with smart audio level filtering.
The Problem: Balancing Real-Time Alerts and Efficiency
Our VisualVroom app helps drivers with hearing impairments detect important sounds like sirens, horns, and motorcycles. Initially, our system required users to manually press a "record" button, wait for the recording to complete, and then receive results. This approach had two major limitations:
- Delayed Feedback: Users had to wait for the entire recording to complete before getting any results.
- All-or-Nothing Experience: If nothing was detected during the recording period, the user would have to manually press the record button to start again.
We needed a way to continuously monitor audio and provide instant feedback when a significant sound is detected, all while ensuring the system didn't waste resources processing silence or background noise.
Solution: Continuous Recording with Smart Audio Level Checks
We redesigned the system with three key improvements:
- Continuous Recording with 3-Second Intervals - Process audio continuously while recording until the user manually stops
- Audio Level Threshold Filtering - Skip processing when audio is too quiet -> I choosed 0.15 as the max_amplitude threshold for model prediction.
- User-Friendly Feedback - Provide clear status updates without overwhelming notifications -> We only alert the driver if the max_amplitude is over 0.15 and the confidence score of the prediciton is over 0.97.
This approach balances responsiveness (checking the audio automatically with a 3 second buffer) with efficiency (not wasting processing power on silence), while also maintaining a smooth user experience.
Technical Implementation
Backend: Audio Processor
On our FastAPI backend, we added an audio level check before performing any intensive processing:
# Define threshold for audio processing
AMPLITUDE_THRESHOLD = 0.15
def process_audio(wav_file):
# Load and analyze audio file
y, sr = sf.read(wav_file)
# Calculate maximum amplitude across both channels
top_max = float(abs(y[:, 0]).max())
bottom_max = float(abs(y[:, 1]).max())
overall_max_amplitude = max(top_max, bottom_max)
# Skip processing if audio is too quiet
if overall_max_amplitude < AMPLITUDE_THRESHOLD:
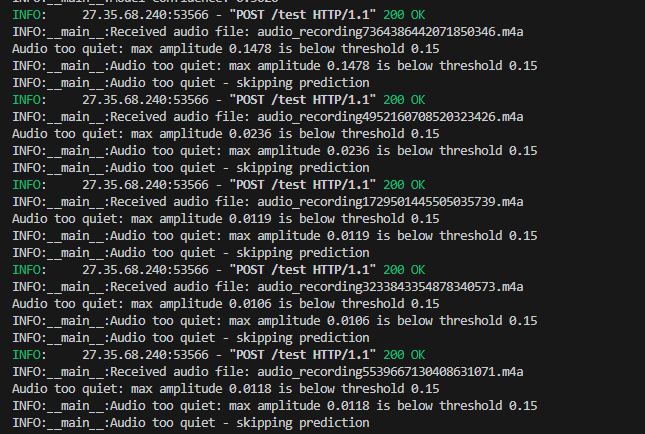
log_with_print(f"Audio too quiet: max amplitude {overall_max_amplitude:.4f}")
return None, "N", 0.0
# Continue with regular processing for audio above the threshold
# ...By checking the amplitude early in the process, we avoid running expensive operations like spectrograms and neural network inference when the audio doesn't contain any significant sounds.
With this, we no longer get the backend log as shown below. The image shows the backend log processing silence or background noise. The max_amplitude in this case is really low at aroun 0.0696. Even though there is nothing but background noise, the model is still processing the audio and making a prediction and giving out incorrect results. We can see it is predicting the background noise as a Car horn from the Left direction with a low confidence score at around 0.64.
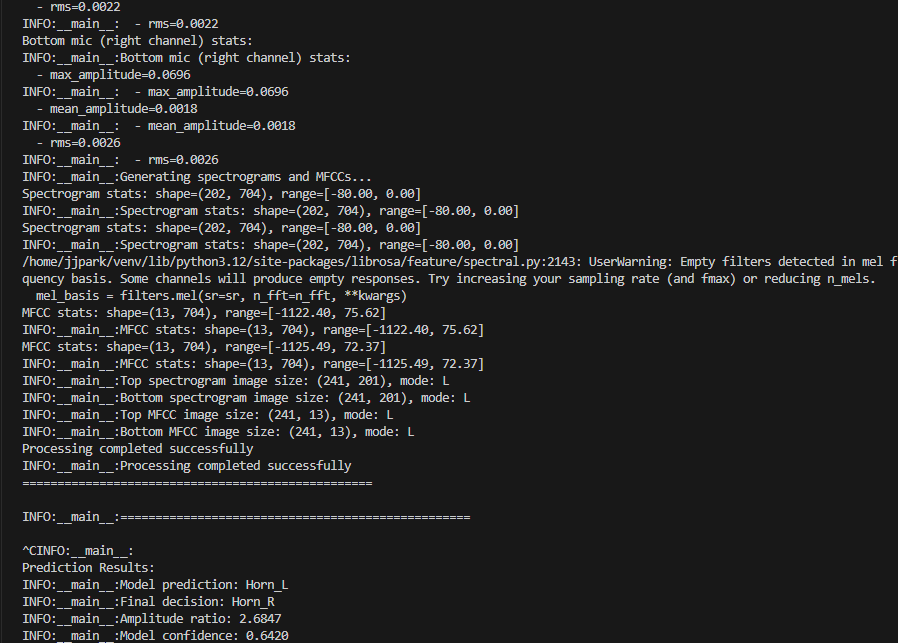
However, with our new threshold, we can skip processing unnecssary noises.
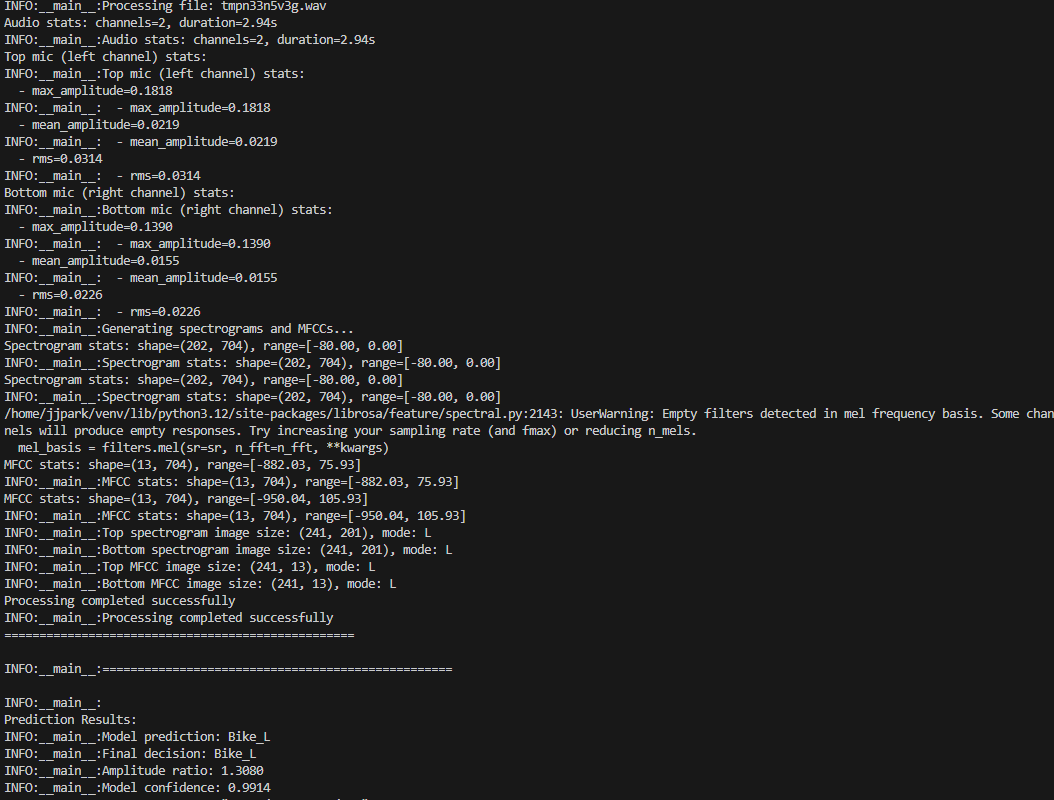
And only process noises that are over this threshold. As seen in the image below, both mics don't have to be over 0.15, only 1 of them is enough to process and predict. Here, the model correctly predicted a Motorcycle audio sound coming from the left side with a confidence score of 0.9914.
Android Client: Continuous Recording with Snapshots
On the Android side, we implemented a clever approach to continuous recording:
-
Creating Audio Snapshots:
We couldn't simply read data from an active recording, so we implemented a system that briefly stops the recorder, saves the file, starts a new recorder immediately, and then processes the saved file in the background:public void createSnapshot(final AudioRecorderCallback callback) { // Stop current recording to save the file mediaRecorder.stop(); // Make a copy of the current output file File snapshotFile = new File(outputFile.getAbsolutePath()); // Start a new recording immediately MediaRecorder newRecorder = createMediaRecorder(); // ... configure and start the new recorder ... // Process the snapshot file in the background processSnapshotFile(snapshotFile, callback); } -
Handling Quiet Audio:
We extended our callback interface to handle the case where audio is too quiet:public interface AudioRecorderCallback { void onSuccess(InferenceResult result); void onError(String error); void onQuietAudio(); // New method for quiet audio } -
Interval Processing:
We set up a periodic task to process audio every 3 seconds:private Runnable processingIntervalRunnable = new Runnable() { @Override public void run() { if (isRecording) { processCurrentRecording(); // Schedule next processing mainHandler.postDelayed(this, 3000); // 3 seconds } } };
The Results: A Smoother, More Efficient Experience
-
Continuous Awareness: Drivers now receive updates every 3 seconds without interrupting their recording session.
-
Data Efficiency: By skipping processing for quiet audio, we reduce unnecessary computation and network requests.
-
Reduced False Positives: The amplitude threshold helps filter out background noise that might otherwise trigger false detections.
-
Better User Experience: Users get feedback in real-time and can record for as long as they need without manual restarts.
Technical Challenges Takeaways
-
Seamless Recording Transitions: Creating snapshots without noticeable gaps in the recording required careful timing and buffer management.
-
Finding the Right Threshold: We needed to find an amplitude threshold (0.15) that would filter out background noise without missing important sounds. I choosed the threshold at 0.15 due to heuristic tests that showed that our model had accurate results when the max_amplitude was above 0.15.
-
Cross-Platform Consistency: Ensuring consistent behavior between the Python backend and Java Android client required careful API design and error handling.
