
When developing mobile applications that process audio for deep learning inference, small implementation details can make a huge difference in accuracy.
Problem:
1. Inaccurate inference results when sending audio to backend via Android App
The problem that we encountered was that we get accurate results when testing with audio files that we recorded with our default Voice Recorder App on our Samsung phone. However, when we tested the audio of the same source from the same position, we get inaccurate results.
From Voice Recorder:

From Android App:

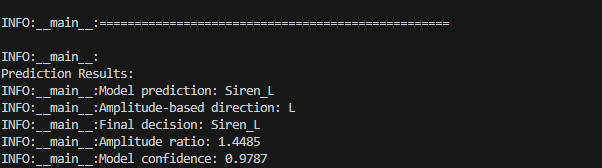
When we look at the results, the sound that we recorded was a Siren sound that came from the Left of us. However, when we record the audio and send it to the backend for inference, it gives us the incorrect answer, failing to classify the class AND the direction as well.
If we look closely at the results, we can see that the max_amplitude of the Voice Recorder is around 0.38. However, the max_amplitude of the sound recorded from our app is 0.02. Thus, we can infer that the main cause of the inaccurate results was due to the amplitude being low in our app.
Solution
1. Increase Sampling & Encoding Bit Rate
private static final int SAMPLE_RATE = 16000;
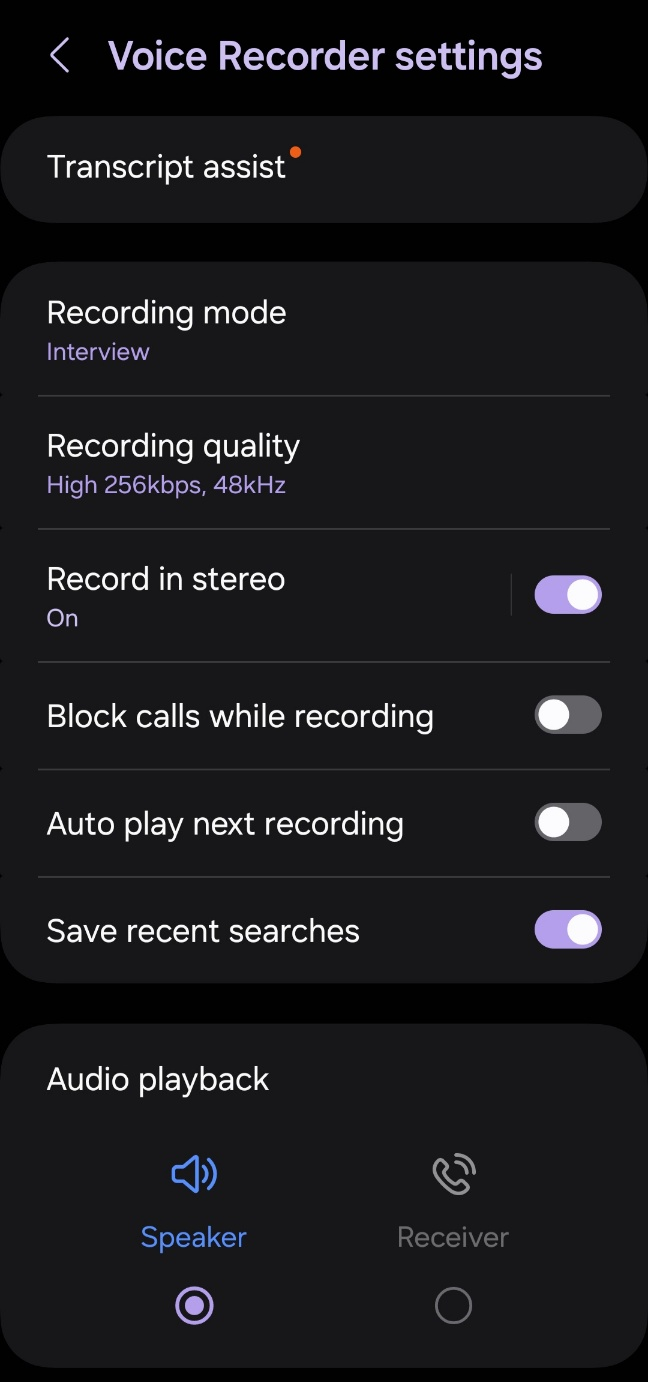
private static final int ENCODING_BIT_RATE = 128000;Our original code had a sample rate = 16000 and encoding bit rate = 128000. We increased the sample rate to 48000 and the encoding reate to 256000. This is the same rate of our default Voice Recorder App in Samsung when we put our settings 'Recording Quality' settings to 'High'.
Why do higher sample rates and bit rates help capture better amplitude measurements?
Think of it like taking a photo of a fast-moving car. The better our camera settings are, the clearer and more detailed the image will be.
When we increase the sample rate form 16kHz to 48kHz, we're essentially taking more 'snapshots' of the sound wave per second. Thus, with 48kHz sampling, we capture 48,000 points per second instead of 16,000. This means we're 3 times more likely to catch the true peak of a sound wave. Think about a car horn or siren. These sounds have very sharp, sudden peaks. At 16kHz, we might miss the exact moment of maximum amplitude, but at 48kHz, we have a much better chance of capturing it.
Bit Rate's Impact on Amplitude Resolution
The increase in encoding bit rate from 128kbps to 256kbps is even more important for amplitude accuracy. Here's why:
// In the original code:
private static final int ENCODING_BIT_RATE = 128000;

// In the improved code:
private static final int ENCODING_BIT_RATE = 256000;
The higher the bit rate means each sample has more bits to represent its value. This is like having a more precise ruler for measuring. With 256kbps, we can represent amplitude values with greater precision, which is crucial when we're trying to determine which microphone (top/ bottom) received the stronger signal.
Audio Source Selection
Original Code:
mediaRecorder.setAudioSource(MediaRecorder.AudioSource.UNPROCESSED);
mediaRecorder.setAudioEncoder(MediaRecorder.AudioEncoder.AAC);
Improved Code:
mediaRecorder.setAudioSource(MediaRecorder.AudioSource.MIC);
mediaRecorder.setAudioEncoder(MediaRecorder.AudioEncoder.HE_AAC);
When we use AudioSource.MIC, Android gives us several automatic processing features:
- Automatic Gain Control (AGC)
- Noise Suppression
- Echo Cancellation
- Audio Preprocessing Optimizations
The most significant benefit comes from Automatic Gain Control (AGC). AGC helps us by normalizing the quiet sounds to be more audible, prevents loud sounds from clipping and maintains consistent audio levels across device models. Easily put, it's like having a professional sound engineer automatically audjusting levels in real-time. This is important because vehicles can produce sounds at different volumes depending on their distance, speed and environmental conditions.
When we combine this with our higher sample rates, the AudioSource.MIC becomes even more efficient because the AGC has more data points to work with and the higher bit rate allows for more precise gain adjustments. Moreover, the nosie suppression can better distinguish between vehicle sounds and background noise.
Why not AudioSource.UNPROCESSED?
While it may seem better because it's "Raw". It actually gives us several challenges.
1. Raw audio can have huge variations in volume levels, making amplitude based detection less reliable.
2. Background noise becomes more prominent, which can potentially mask vehicle sounds.
Understanding HE-AAC
what HE-AAC brings to the table.
- Spectral Band Replication (SBR)
HE-AAC's most powerful feature is Spectral Band Replication. Think of it like this: when a fire truck's siren wails, it produces not just the main tone but also lots of higher-frequency harmonics. These harmonics are crucial for our backend processing:
def convert_to_spectrogram(audio, sr, n_fft=402, hop_length=201):
    D = librosa.stft(audio, n_fft=n_fft, hop_length=hop_length)
    spec_db = librosa.amplitude_to_db(np.abs(D), ref=np.max)
HE-AAC preserves these higher frequencies much more efficiently than standard AAC. When our backend analyzes the spectrogram, it has a more complete picture of the sound, including those crucial high-frequency components that help distinguish different types of vehicles and sirens.
- Bandwidth Extension
Consider what happens when a vehicle approaches from a distance. The sound starts very faint and grows stronger. HE-AAC uses a technique called bandwidth extension that's particularly good at handling this dynamic range.
# Backend processing
top_max = float(abs(top_mic).max())
bottom_max = float(abs(bottom_mic).max())
amplitude_ratio = top_max / bottom_max if top_max > bottom_max else bottom_max / top_max
This bandwidth extension helps maintain accurate amplitude relationships even when the sounds are faint, which is crucial for early detection of approaching vehicles.
- Perceptual Audio Coding
HE-AAC employs sophisticated perceptual audio coding that's particularly relevant for vehicle sounds.
def convert_to_mfcc(audio, sr, n_mfcc=13, n_fft=402, hop_length=201):
    mfcc = librosa.feature.mfcc(y=audio, sr=sr, n_mfcc=n_mfcc, n_fft=n_fft,
                              hop_length=hop_length, fmax=sr/2)
HE-AAC's perceptual coding preserves the frequency components that are most important for vehicle identification, even at our higher bit rate of 256kbps.
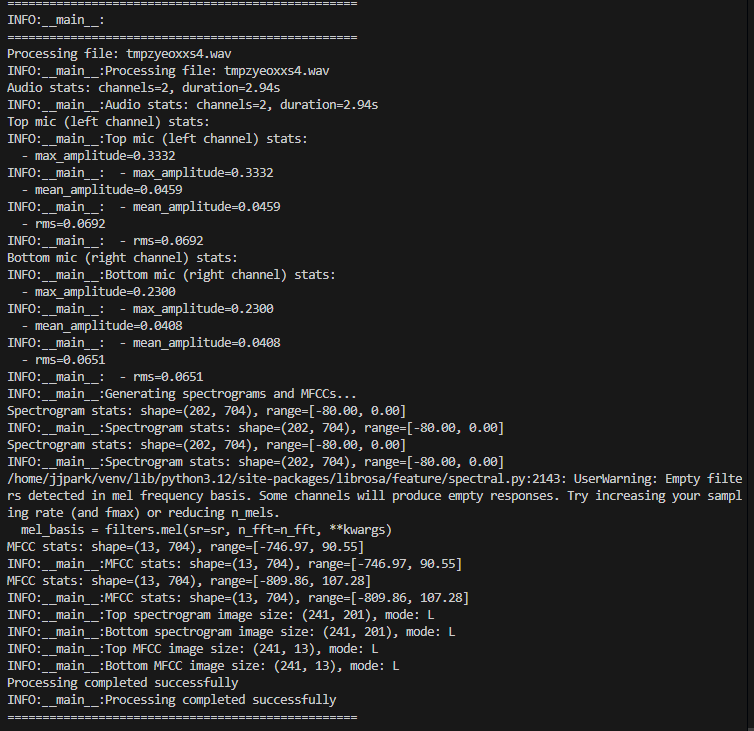
Results
With our updated code, we were able to better capture the amplitude of the sound source. As shown in the logs below, the max_amplitude for our top mic (left channel) is 0.3332 and our bottom mic (right channel) is 0.23. This is a huge improvement from our 0.02 amplitude prior. Due to the higher amplitude we were able to capture the sound more clearly and get more accurate results as shown correctly detecting the class as Siren and coming from the left direction with a confdience score of 0.9787.