6. 컨투어 (Contour)
컨투어
import cv2 as cv
img_color = cv.imread('test.png')
img_gray = cv.cvtColor(img_color, cv.COLOR_BGR2GRAY)
ret, img_binary =cv.threshold(img_gray,127, 255, 0)
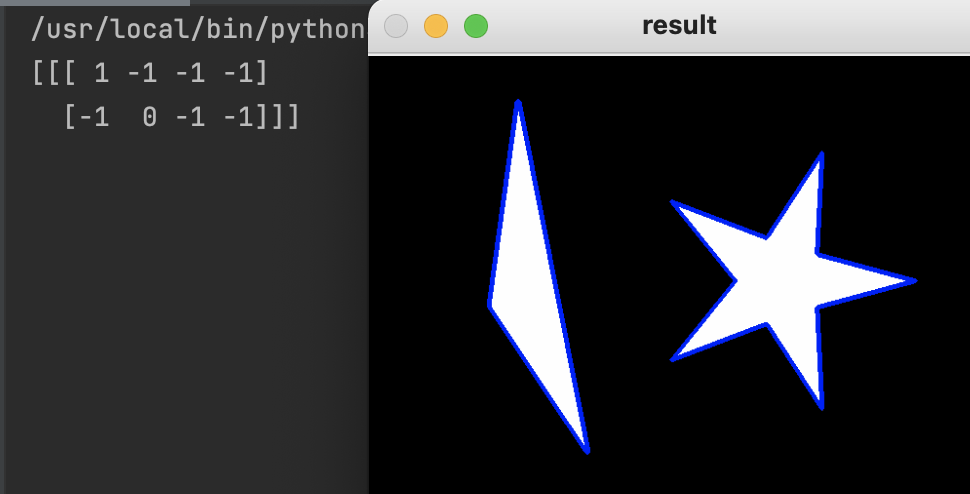
contours, hierarchy =cv.findContours(img_binary, cv.RETR_LIST, cv.CHAIN_APPROX_SIMPLE)
cv.imshow('result',img_color)
cv.waitKey(0)실행 결과
contours, hierarchy =cv.findContours(img_binary, cv.RETR_LIST, cv.CHAIN_APPROX_SIMPLE)
contours, hierarchy =cv.findContours(image, mode, method[, contours[, hierarchy[, offset]]])
- image
입력 이미지이다.
검은색과 흰색만으로 구성되는 Binary 이미지이어야 한다.- contours
각각의 컨투어에는 오브젝트 외각선을 구성하는 점들의 x,y 좌표를 저장하고있다. 리스트로 저장된다.- hierarchy
검출된 컨투어의 정보를 구조적으로 저장하고있다.
리스트로 저장된다.- mode
Contour Retrieval Mode.- method
Contour Approximation Method.- offset
지정한 크기만큼 컨투어를 구성하는 포인티 좌표를 이동한다.
컨투어 그리기
import cv2 as cv

img_color = cv.imread('test.png')
img_gray = cv.cvtColor(img_color,  cv.COLOR_BGR2GRAY)
ret, img_binary =cv.threshold(img_gray,127, 255, 0)
contours, hierarchy =cv.findContours(img_binary, cv.RETR_LIST, cv.CHAIN_APPROX_SIMPLE)

image = cv.drawContours(img_color, contours, -1, (0, 255 ,0), 3)

cv.imshow('result',img_color)
cv.waitKey(0)
실행 결과
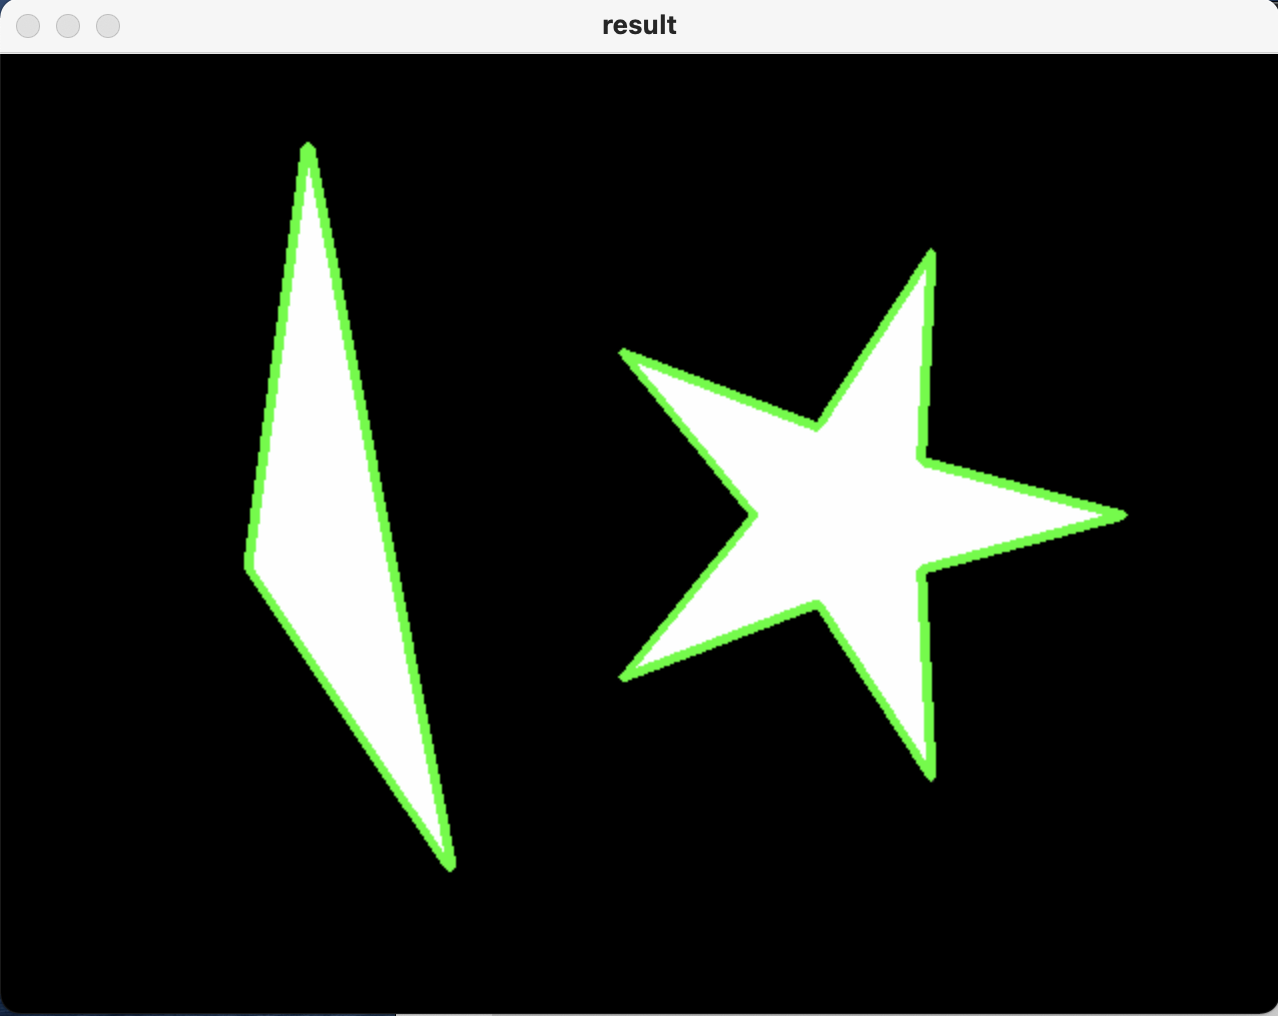
image = cv.drawContours(img_color, contours, -1, (0, 255 ,0), 3)
image = cv.drawContours( image, contours, contourldx, color[, thickness[,lineType[, hierarchy[, maxLevel[, offset]]]]])
- image
컨투어를 그릴 대상 이미지이다.
컬러 이미지를 선택해야한다.- contours
이미지 위에 그릴 컨투어가 저장된 리스트이다.- contourldx
이미지에 그릴 특정 컨투어의 인덱스이다.
음수로 지정하면 모든 컨투어를 그리게 된다.image = cv.drawContours(img_color, contours, 0, (0, 255 ,0), 3)
image = cv.drawContours(img_color, contours, 1, (255,0,0), 3)
- color
컨투어를 그릴 때 사용 할 색상 지정한다.
B,G,R 순서이다.- thickness
컨투어를 그릴 때 선의 굵기이다.
음수이면 내부를 채운다.
Contour Approximation Method
contours, hierarchy =cv.findContours(img_binary, cv.RETR_LIST, cv.CHAIN_APPROX_SIMPLE)
컨투어를 구성하는 포인트를 저장하는 방법을 결정한다.

Contour Retrieval Mode
contours, hierarchy =cv.findContours(img_binary, cv.RETR_LIST, cv.CHAIN_APPROX_SIMPLE)
import cv2 as cv
img_color = cv.imread('test.png')
img_gray = cv.cvtColor(img_color, cv.COLOR_BGR2GRAY)
ret, img_binary =cv.threshold(img_gray,127, 255, 0)
contours, hierarchy =cv.findContours(img_binary, cv.RETR_LIST, cv.CHAIN_APPROX_SIMPLE)
for cnt in contours:
cv.drawContours(img_color,[cnt],0,(255,0,0),3)
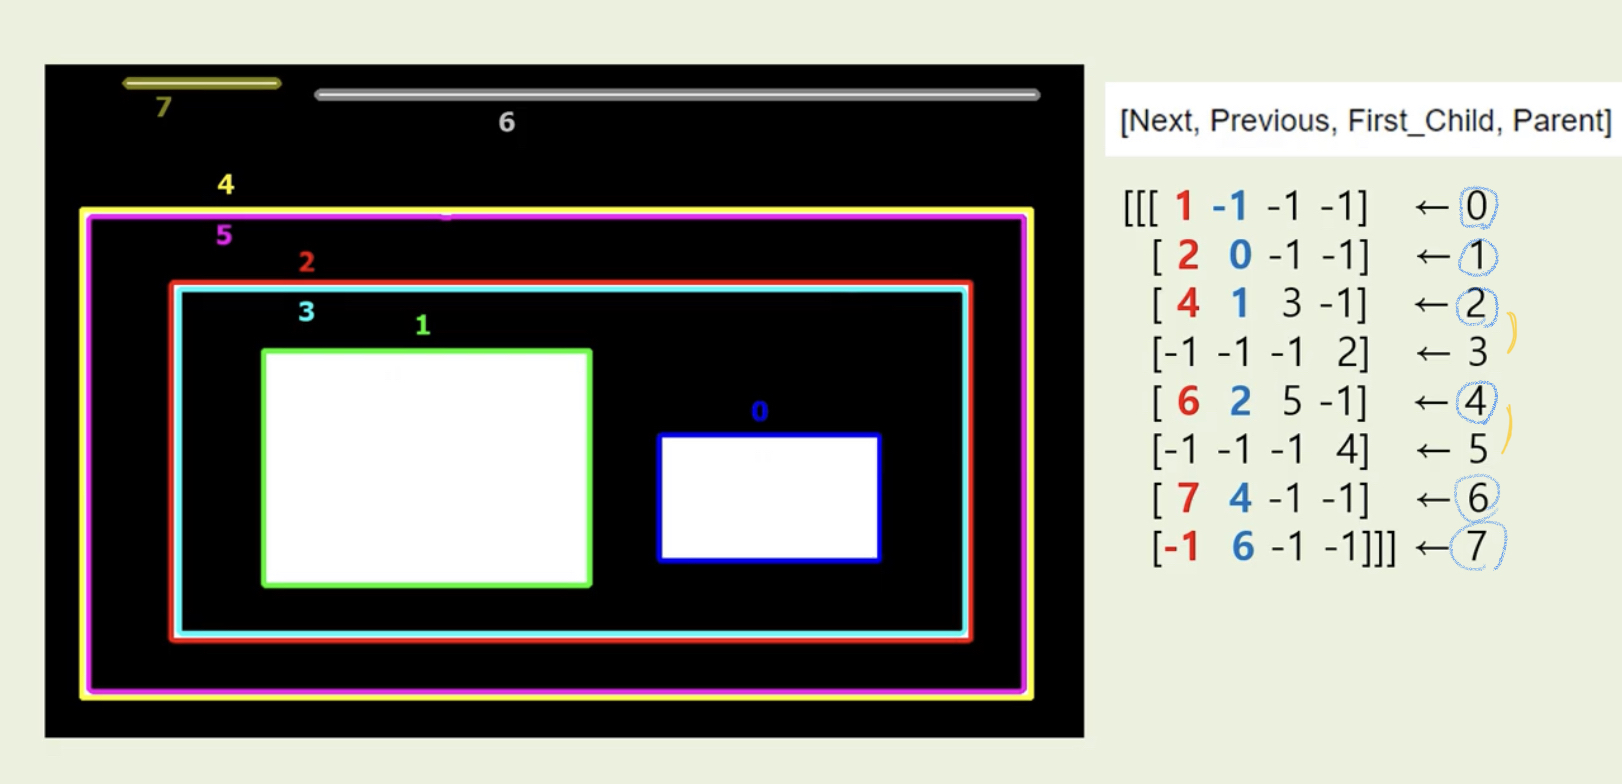
print(hierarchy)
cv.imshow('result',img_color)
cv.waitKey(0)실행 결과
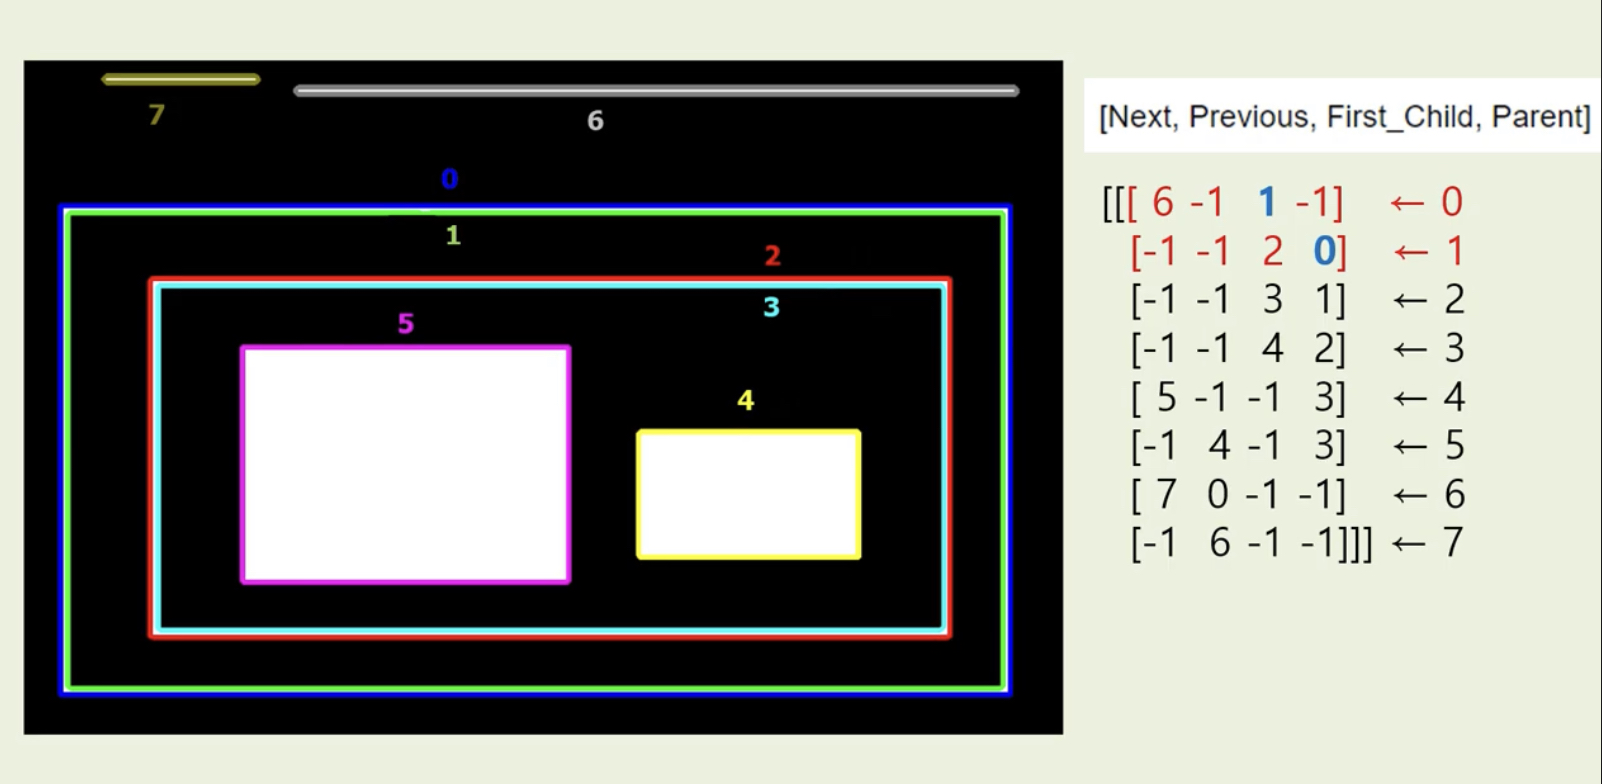
hierarchy 값 = [Next, Previous, First_child, Parent]
- RETR_TREE
컨투어 내부에 다른 커투어가 있을 경우, 계층 구조로 만들어준다.
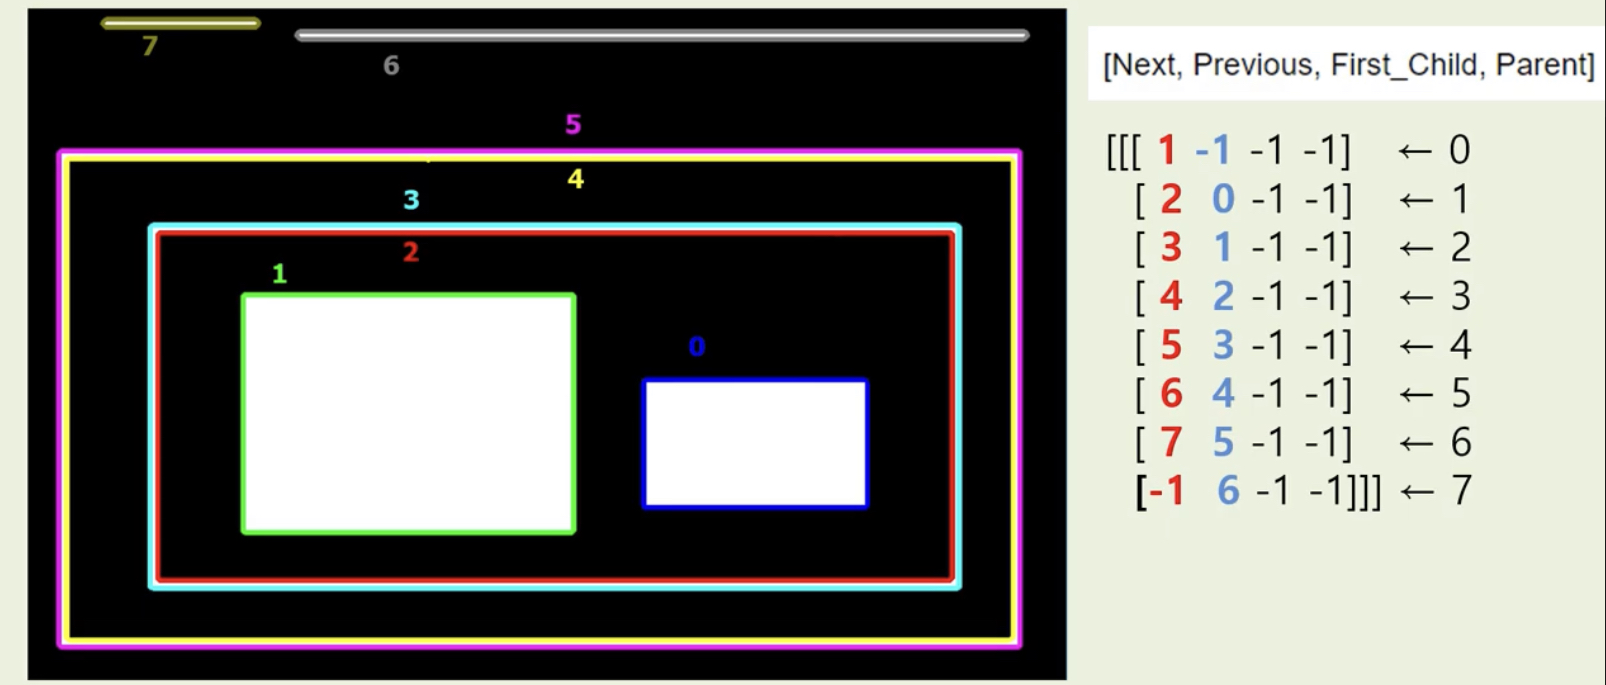
- RETR_LIST
모든 컨투어가 같은 계층 레벨을 갖는다.(계층적인 특성이 필요없는 경우 사용)
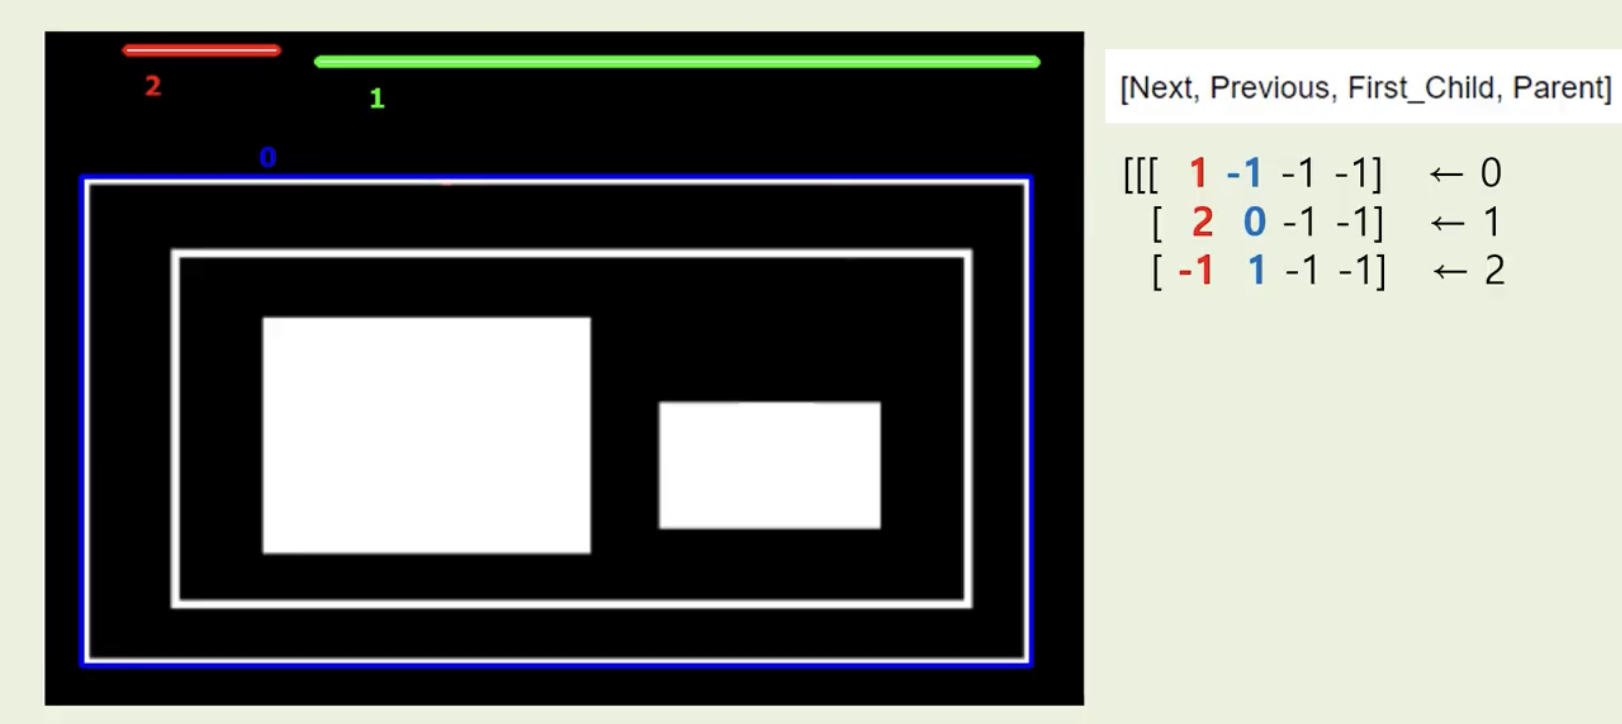
- RETR_EXTERNAL
가장 외각에 있는 컨투어만 리턴한다. 컨투어 내부에 있는 자식 컨투어는 무시된다.
- RETR_CCOMP
모든 컨투어를 두 개의 레벨 계층으로 재구성한다. 외부에 있는 컨투어 레벨 1, 오브젝트 내부에 있는 컨투어 레벨 2가 된다.
컨투어 특징 사용하기
영역 크기
컨투어 영역 크기 출력한다.
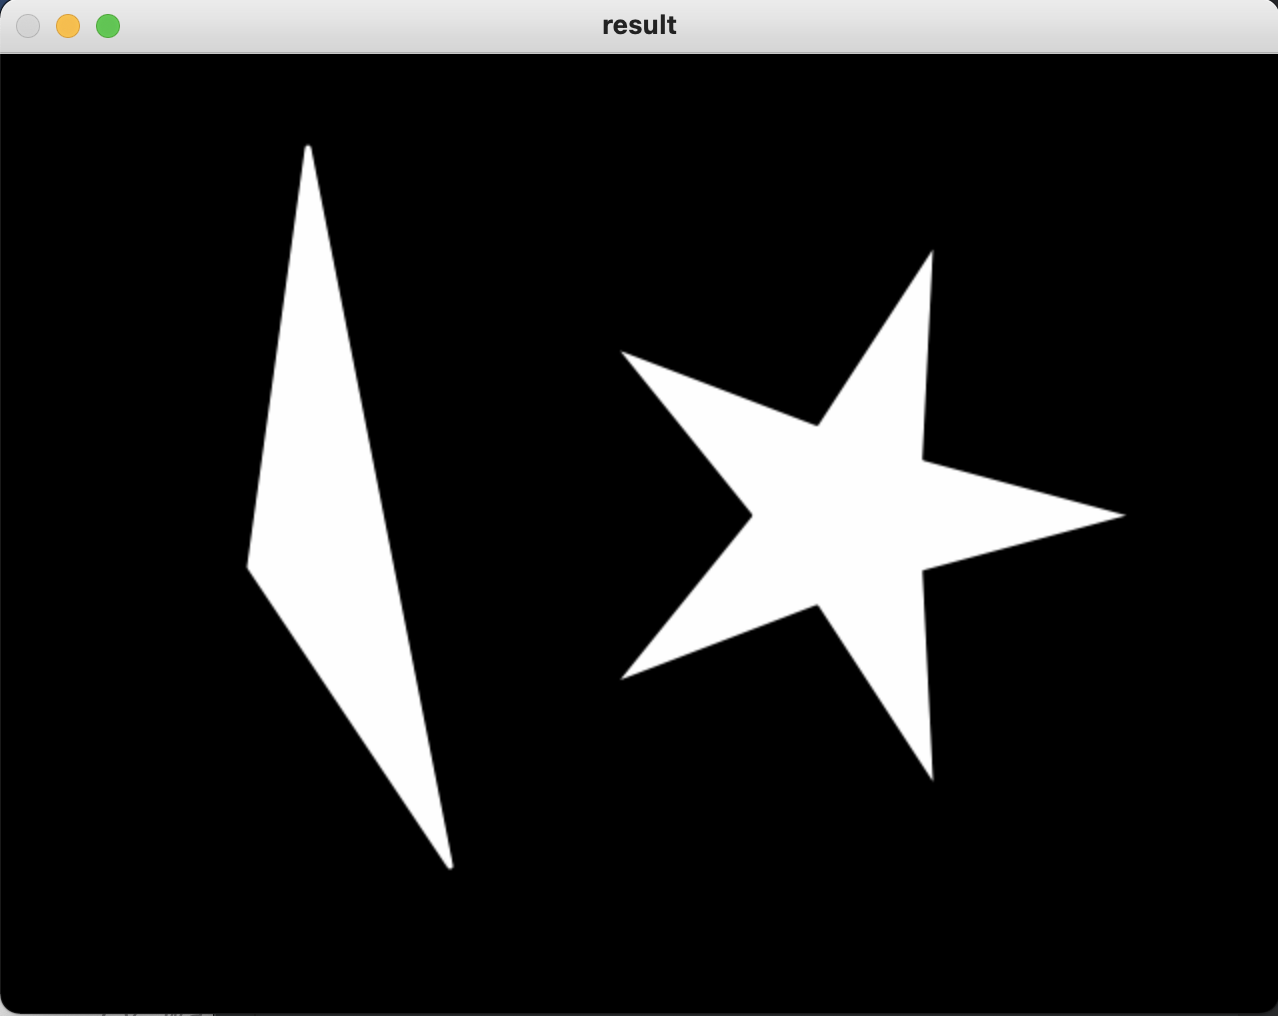
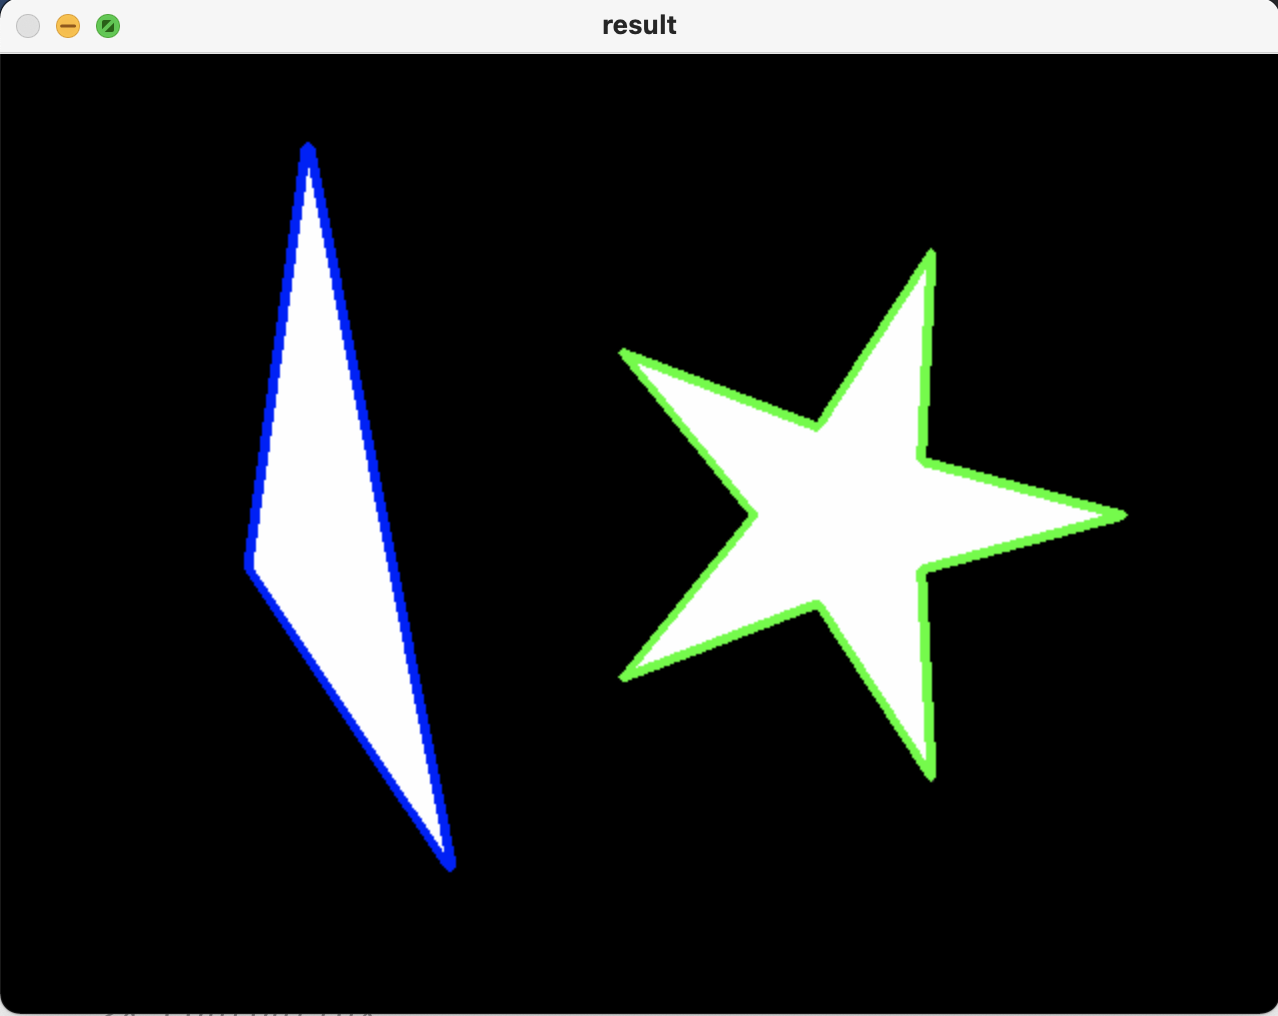
import cv2 as cv

img_color = cv.imread('test.png')
img_gray = cv.cvtColor(img_color, cv.COLOR_BGR2GRAY)
ret, img_binary = cv.threshold(img_gray, 127, 255, 0)
contours, hierarchy = cv.findContours(img_binary, cv.RETR_LIST, cv.CHAIN_APPROX_SIMPLE)

for cnt in contours:
    cv.drawContours(img_color, [cnt], 0, (255, 0, 0), 3)  # blue

cv.imshow("result", img_color)
cv.waitKey(0)

for cnt in contours:
    area = cv.contourArea(cnt)
    print(area)

cv.imshow("result", img_color)
cv.waitKey(0)
실행 결과

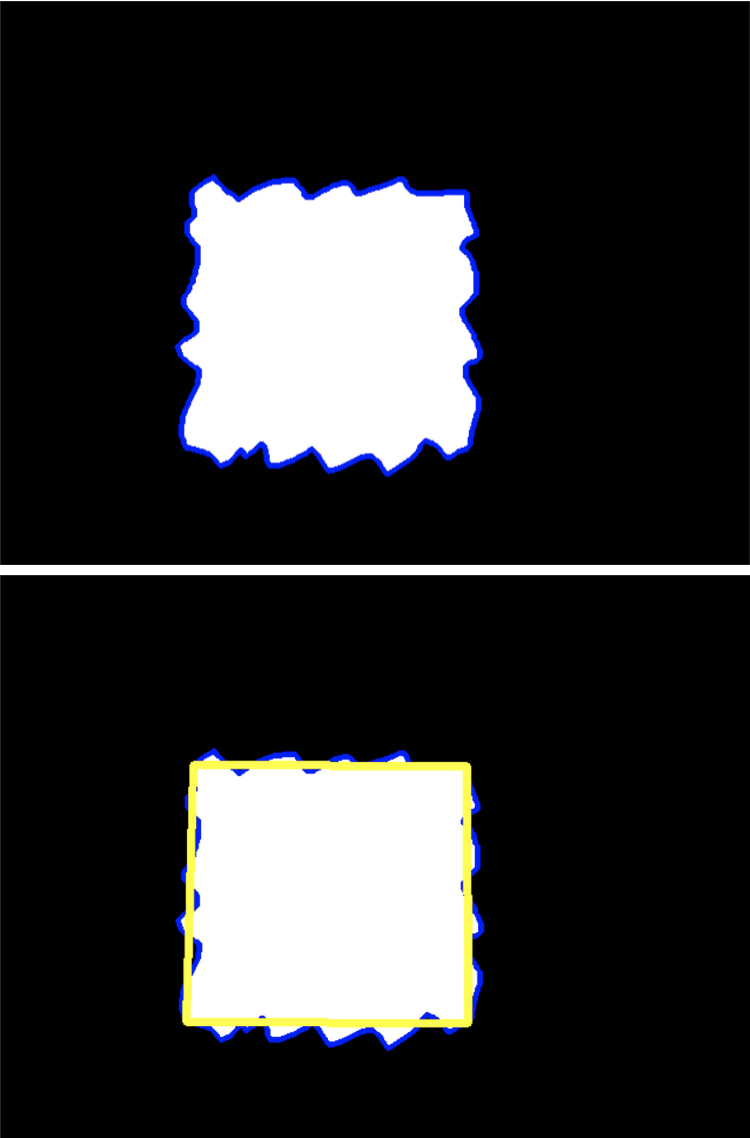
근사화
곡선을 1차함수, 즉 직선으로 바꿔준다.
import cv2 as cv
import numpy as np

img_color = cv.imread('square.png')
img_gray = cv.cvtColor(img_color, cv.COLOR_BGR2GRAY)
ret, img_binary = cv.threshold(img_gray, 127, 255, 0)
contours, hierarchy = cv.findContours(img_binary, cv.RETR_LIST, cv.CHAIN_APPROX_SIMPLE)

for cnt in contours:
    cv.drawContours(img_color, [cnt], 0, (255, 0, 0), 3)  # blue

cv.imshow("result", img_color)
cv.waitKey(0)

for cnt in contours:
    epsilon = 0.02 * cv.arcLength(cnt, True)
    approx = cv.approxPolyDP(cnt, epsilon, True)
    print( len(approx))

    cv.drawContours(img_color,[approx],0,(0,255,255),5)

cv.imshow("result", img_color)
cv.waitKey(0)
실행 결과
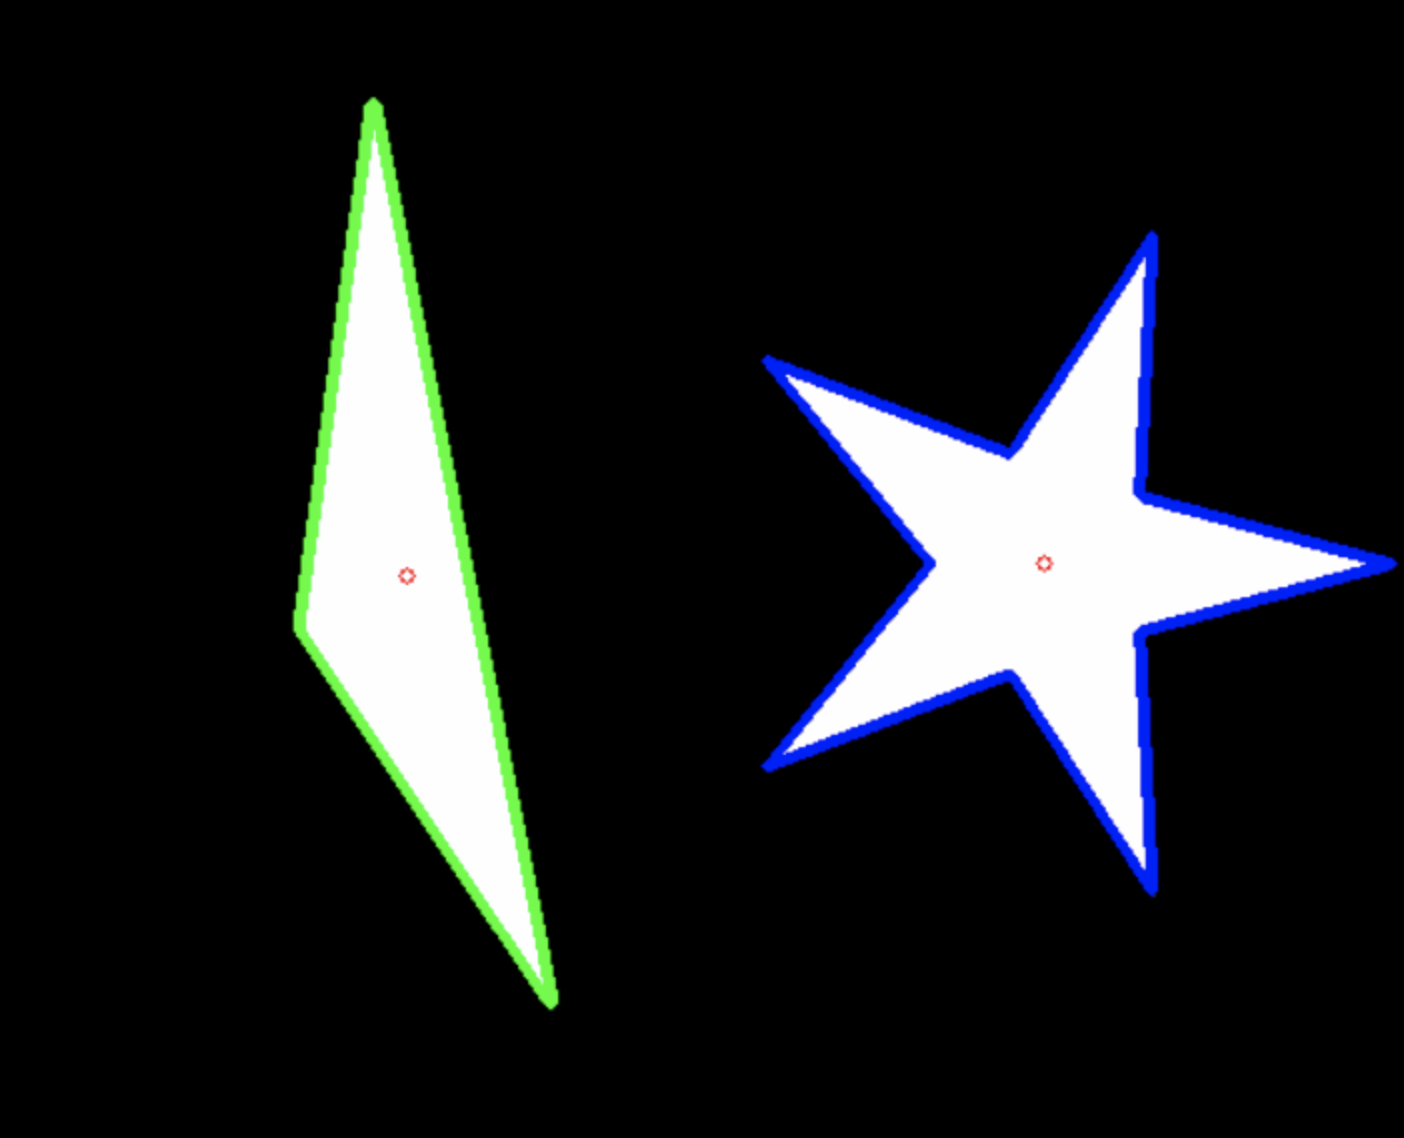
무게중심
모멘트를 사용하여, 영역의 무게중심을 그려준다.
import cv2 as cv

img_color = cv.imread('test.png')
img_gray = cv.cvtColor(img_color, cv.COLOR_BGR2GRAY)
ret, img_binary = cv.threshold(img_gray, 127, 255, 0)
contours, hierarchy = cv.findContours(img_binary, cv.RETR_LIST, cv.CHAIN_APPROX_SIMPLE)

for cnt in contours:
    cv.drawContours(img_color, [cnt], 0, (255, 0, 0), 3)  # blue

cv.imshow("result", img_color)
cv.waitKey(0)

for cnt in contours:
    M = cv.moments(cnt)
    cx = int(M['m10']/M['m00'])
    cy = int(M['m01']/M['m00'])

    cv.circle(img_color, (cx, cy), 10, (0,0,255), -1)

cv.imshow("result", img_color)
cv.waitKey(0)
실행 결과
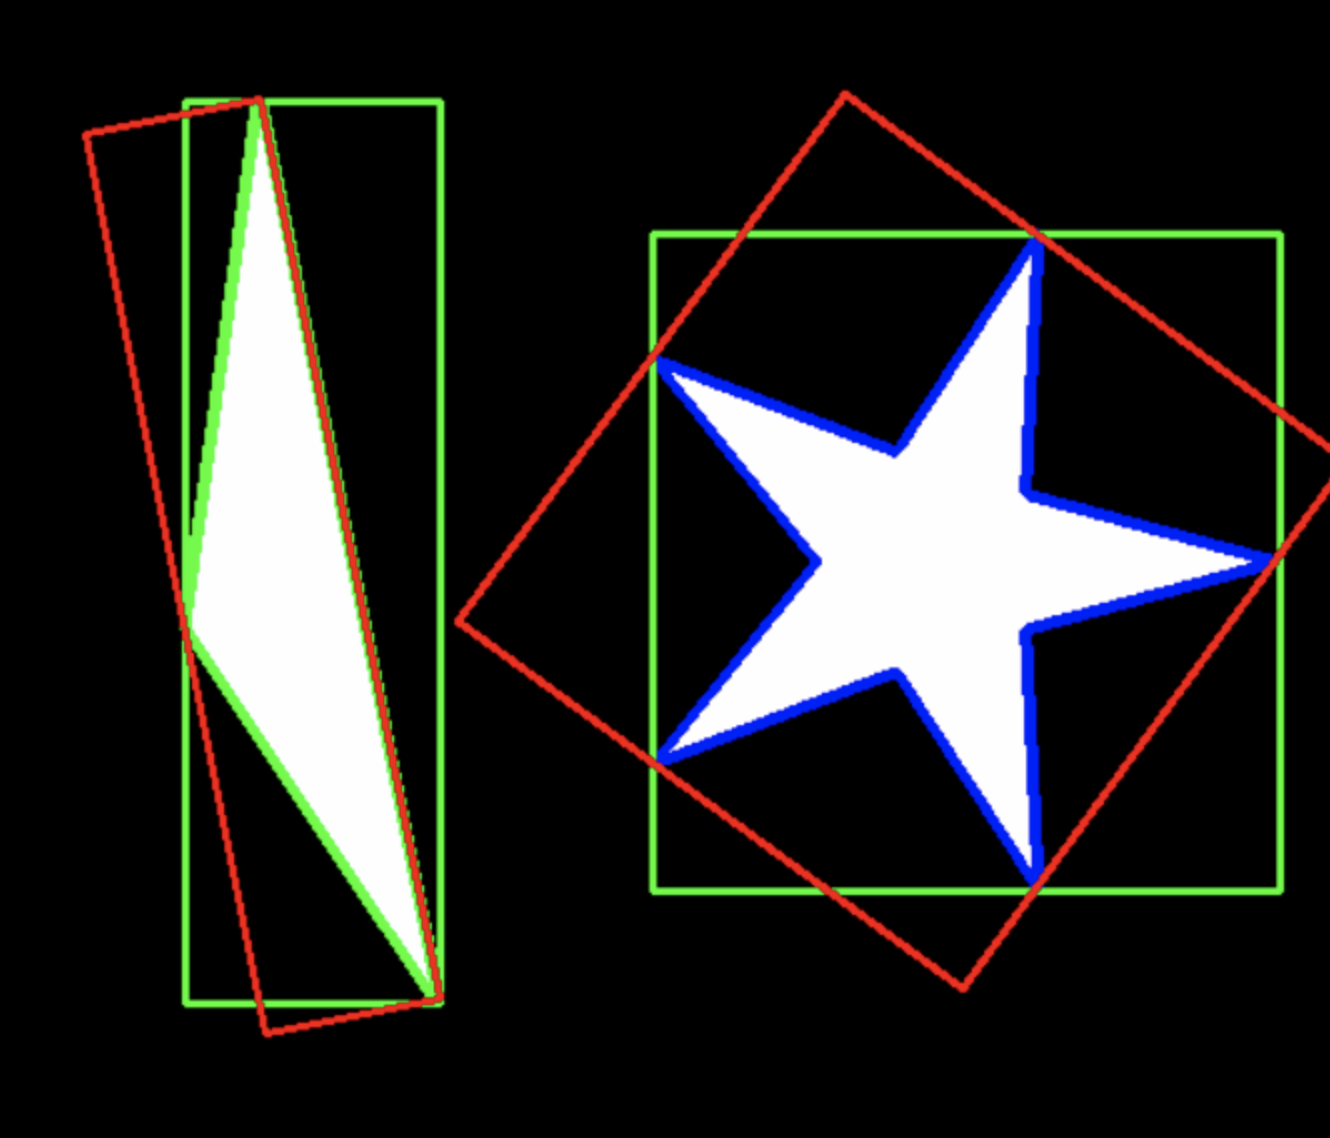
경계 사각형 (Bounding Rectangle)
오브젝트를 둘러 싸는 최소 직사각형이다.
import cv2 as cv
import numpy as np

img_color = cv.imread('test.png')
img_gray = cv.cvtColor(img_color, cv.COLOR_BGR2GRAY)
ret, img_binary = cv.threshold(img_gray, 127, 255, 0)
contours, hierarchy = cv.findContours(img_binary, cv.RETR_LIST, cv.CHAIN_APPROX_SIMPLE)

for cnt in contours:
    cv.drawContours(img_color, [cnt], 0, (255, 0, 0), 3)  # blue

cv.imshow("result", img_color)
cv.waitKey(0)

for cnt in contours:
    x, y, w, h = cv.boundingRect(cnt)
    cv.rectangle(img_color, (x, y), (x + w, y + h), (0, 255, 0), 2)

cv.imshow("result", img_color)
cv.waitKey(0)

for cnt in contours:
    rect = cv.minAreaRect(cnt) #도형의 방향 고려->경계 사각형 그려줌.
    box = cv.boxPoints(rect)
    box = np.int0(box)
    cv.drawContours(img_color,[box],0,(0,0,255),2)

cv.imshow("result", img_color)
cv.waitKey(0)
실행 결과
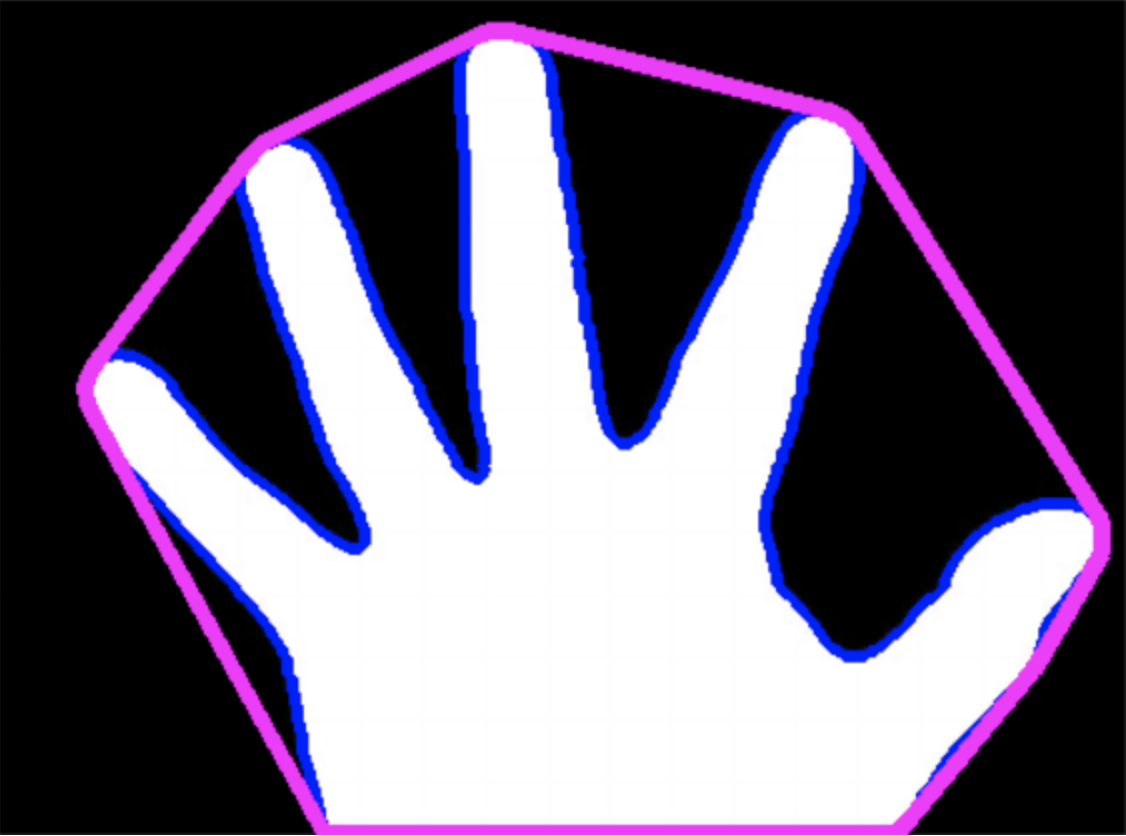
Convex Hull
컨투어를 모두 포함하는 볼록 사각형 그려준다.
import cv2 as cv
import numpy as np

img_color = cv.imread('hand.png')
img_gray = cv.cvtColor(img_color, cv.COLOR_BGR2GRAY)
ret, img_binary = cv.threshold(img_gray, 127, 255, 0)
contours, hierarchy = cv.findContours(img_binary, cv.RETR_LIST, cv.CHAIN_APPROX_SIMPLE)

for cnt in contours:
    cv.drawContours(img_color, [cnt], 0, (255, 0, 0), 3)  # blue

cv.imshow("result", img_color)
cv.waitKey(0)

for cnt in contours:
    hull = cv.convexHull(cnt)
    cv.drawContours(img_color, [hull], 0, (255, 0, 255), 5)

cv.imshow("result", img_color)
cv.waitKey(0)
실행 결과
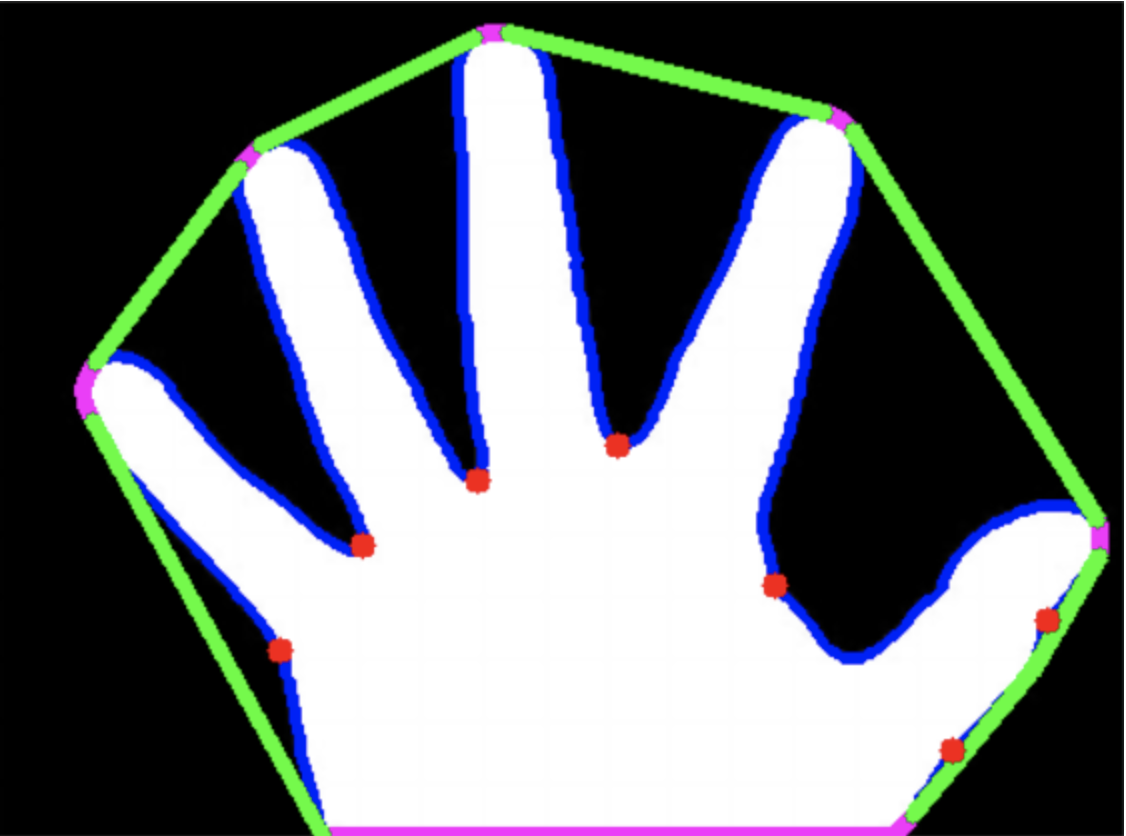
Convexity Defects
볼록 다각형 내부에 오목하게 들어간 부분이다.
import cv2 as cv
import numpy as np

img_color = cv.imread('hand.png')
img_gray = cv.cvtColor(img_color, cv.COLOR_BGR2GRAY)
ret, img_binary = cv.threshold(img_gray, 127, 255, 0)
contours, hierarchy = cv.findContours(img_binary, cv.RETR_LIST, cv.CHAIN_APPROX_SIMPLE)

for cnt in contours:
    cv.drawContours(img_color, [cnt], 0, (255, 0, 0), 3)  # blue

cv.imshow("result", img_color)
cv.waitKey(0)

for cnt in contours:
    hull = cv.convexHull(cnt)
    cv.drawContours(img_color, [hull], 0, (255, 0, 255), 5)

cv.imshow("result", img_color)
cv.waitKey(0)

for cnt in contours:
    hull = cv.convexHull(cnt, returnPoints = False)
    defects = cv.convexityDefects(cnt, hull)

    for i in range(defects.shape[0]):
        s,e,f,d = defects[i,0]
        start = tuple(cnt[s][0])
        end = tuple(cnt[e][0])
        far = tuple(cnt[f][0])

        print(d)

        if d > 500:
            cv.line(img_color, start, end, [0, 255, 0], 5)
            cv.circle(img_color, far, 5, [0,0,255], -1)

        cv.imshow("result", img_color)
        cv.waitKey(0)
실행 결과