5. 웹캠에서 실시간으로 특정색 물체 추적하기
import cv2 as cv
import numpy as np

hsv = 0
lower_blue1 = 0
upper_blue1 = 0
lower_blue2 = 0
upper_blue2 = 0
lower_blue3 = 0
upper_blue3 = 0

# 콜백 함수 정의, 트랙바 생성시 필요로 하는 더미 함수.
def nothing(x):
    pass


def mouse_callback(event, x, y, flags, param):
    global hsv, lower_blue1, upper_blue1, lower_blue2, upper_blue2, lower_blue3, upper_blue3, threshold

    # 마우스 왼쪽 버튼 누를시 위치에 있는 픽셀값을 읽어와서 HSV로 변환.
    if event == cv.EVENT_LBUTTONDOWN:
        print(img_color[y, x])
        color = img_color[y, x]

        one_pixel = np.uint8([[color]])
        hsv = cv.cvtColor(one_pixel, cv.COLOR_BGR2HSV)
        hsv = hsv[0][0]

        # 트랙바의 현재값을 가져와 threshold에 대입.
        threshold = cv.getTrackbarPos('threshold', 'img_result')

        # HSV 색공간에서 마우스 클릭으로 얻은 픽셀값과 유사한 필셀값의 범위를 정함.
        if hsv[0] < 10:
            print("case1")
            lower_blue1 = np.array([hsv[0] - 10 + 180, threshold, threshold])
            upper_blue1 = np.array([180, 255, 255])
            lower_blue2 = np.array([0, threshold, threshold])
            upper_blue2 = np.array([hsv[0], 255, 255])
            lower_blue3 = np.array([hsv[0], threshold, threshold])
            upper_blue3 = np.array([hsv[0] + 10, 255, 255])
            #     print(i-10+180, 180, 0, i)
            #     print(i, i+10)

        elif hsv[0] > 170:
            print("case2")
            lower_blue1 = np.array([hsv[0], threshold, threshold])
            upper_blue1 = np.array([180, 255, 255])
            lower_blue2 = np.array([0, threshold, threshold])
            upper_blue2 = np.array([hsv[0] + 10 - 180, 255, 255])
            lower_blue3 = np.array([hsv[0] - 10, threshold, threshold])
            upper_blue3 = np.array([hsv[0], 255, 255])
            #     print(i, 180, 0, i+10-180)
            #     print(i-10, i)
        else:
            print("case3")
            lower_blue1 = np.array([hsv[0], threshold, threshold])
            upper_blue1 = np.array([hsv[0] + 10, 255, 255])
            lower_blue2 = np.array([hsv[0] - 10, threshold, threshold])
            upper_blue2 = np.array([hsv[0], 255, 255])
            lower_blue3 = np.array([hsv[0] - 10, threshold, threshold])
            upper_blue3 = np.array([hsv[0], 255, 255])
            #     print(i, i+10)
            #     print(i-10, i)

        print(hsv[0])
        print("@1", lower_blue1, "~", upper_blue1)
        print("@2", lower_blue2, "~", upper_blue2)
        print("@3", lower_blue3, "~", upper_blue3)


cv.namedWindow('img_color')
cv.setMouseCallback('img_color', mouse_callback)

# 트랙바를 추가하여 채도(Saturation),명도(Value) 값(0~ 255)을 조정하도록 수정.
cv.namedWindow('img_result')
cv.createTrackbar('threshold', 'img_result', 0, 255, nothing)

# 트랙바의 초기값 설정.
cv.setTrackbarPos('threshold', 'img_result', 30)

# 웹캠으로부터 입력을 받기 위해 비디오 캡처 객체 생성.
cap = cv.VideoCapture(0)

while (True):
    # img_color = cv.imread('2.jpg')
    # 이미지를 웹캠으로부터 캡처하게 함.
    ret, img_color = cap.read()
    height, width = img_color.shape[:2]
    img_color = cv.resize(img_color, (width, height), interpolation=cv.INTER_AREA)

    # 원본 영상을 HSV 영상으로 변환.
    img_hsv = cv.cvtColor(img_color, cv.COLOR_BGR2HSV)

    # 범위 값으로 HSV 이미지에서 마스크를 생성.
    img_mask1 = cv.inRange(img_hsv, lower_blue1, upper_blue1)
    img_mask2 = cv.inRange(img_hsv, lower_blue2, upper_blue2)
    img_mask3 = cv.inRange(img_hsv, lower_blue3, upper_blue3)
    img_mask = img_mask1 | img_mask2 | img_mask3

    # OPEN-영상의 점으로 보이는 노이즈 제거, CLOSE-물체의 생긴 검은 구멍들을 메움.
    kernel = np.ones((11, 11), np.uint8)
    img_mask = cv.morphologyEx(img_mask, cv.MORPH_OPEN, kernel)
    img_mask = cv.morphologyEx(img_mask, cv.MORPH_CLOSE, kernel)

    # 마스크 이미지로 원본 이미지에서 범위값에 해당되는 영상 부분을 획득.
    img_result = cv.bitwise_and(img_color, img_color, mask=img_mask)

    # 물체의 위치를 추적하는 코드를 추가. 라벨링이 필요.
    numOfLabels, img_label, stats, centroids = cv.connectedComponentsWithStats(img_mask)

    # 라벨링->물체의 중심 좌표, 영역의 크기, 외각 박스 좌표를 얻을 수 있음.
    for idx, centroid in enumerate(centroids):
        if stats[idx][0] == 0 and stats[idx][1] == 0:
            continue

        if np.any(np.isnan(centroid)):
            continue

        x, y, width, height, area = stats[idx]
        centerX, centerY = int(centroid[0]), int(centroid[1])
        print(centerX, centerY)

        if area > 50:
            cv.circle(img_color, (centerX, centerY), 10, (0, 0, 255), 10)
            cv.rectangle(img_color, (x, y), (x + width, y + height), (0, 0, 255))

    cv.imshow('img_color', img_color)
    cv.imshow('img_mask', img_mask)
    cv.imshow('img_result', img_result)

    # ESC 키누르면 종료
    if cv.waitKey(1) & 0xFF == 27:
        break

cv.destroyAllWindows()
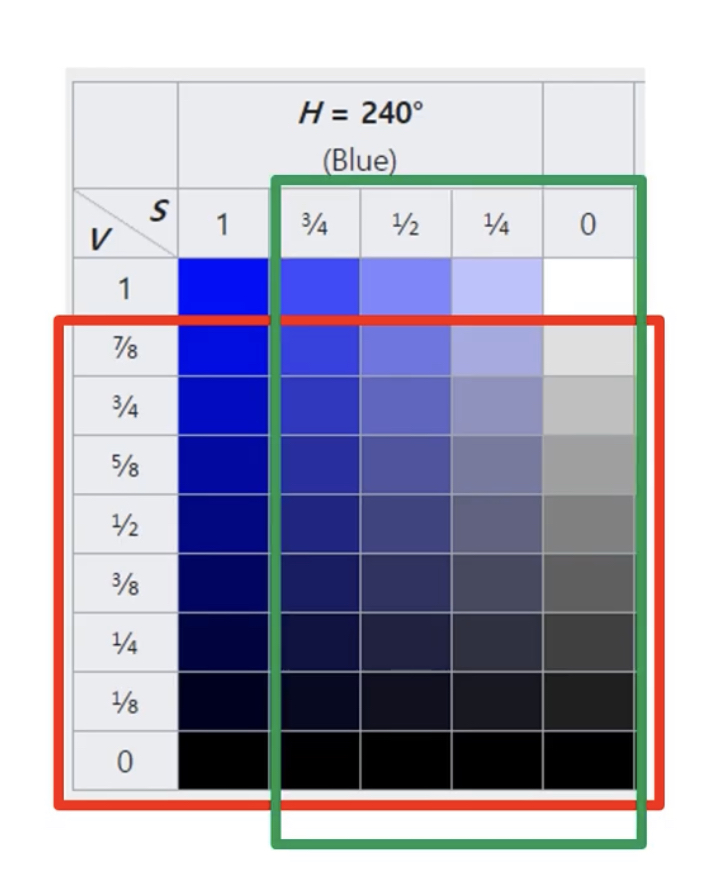
조명차이 등 TEST 환경 차이로 HSV 값이 다를 수 있다.
색조(Hue) 값이 같더라도 채도(Saturation),명도(Value)에 따라 결과가 다를 수 있기 때문에 추가한 트랙바를 이용하여 채도(Saturation),명도(Value) 값을 수정한다.