1. 캐릭터 임포트
1) 새 캐릭터 만들기
- 캐릭터 클래스 추가 : [새로운 c++클래스...]를 선택해 새 부모 클래스를 선택함
- 부모 클래스 선택 > Character > 다음 > 이름 : FPSCharacter
- Character class에 걷기, 달리기, 점프와 같은 이족보행 동작이 기본내장되어있음
2) FPSCharacter.cpp
- 클래스가 제대로 사용중인지 확인하기 위한 text출력 코드
if (GEngine)
{
    GEngine->AddOnScreenDebugMessage(-1, 5.0f, FColor::Red,
        TEXT("We are using FPSCharacter!"));
}
3) C++ FPS 캐릭터 클래스를 블루프린트로 확장
- FPSCharacter 클래스 > FPSCharacter 기반 블루프린트 클래스 생성 > BP_FPSCharacter
4) 기본 폰 클래스 설정
- 세팅 > 프로젝트 > 맵&모드 > Default Pawn Class를 BP_FPSCharacter로 설정
5) 결과
- We are using FPSCharacter! 문구 확인 가능

2.캐릭터 이동
1) 축 매핑
-
축 매핑(Axis Mappings) : 키보드, 마우스, 컨트롤러 입력을 친근한 이름으로 매핑시킨 뒤 나중에 이동 등의 게임 동작에 바인딩 할 수 있음
-
축 매핑은 지속적으로 풀링되어, 부드러운 전환 및 게임 동작이 가능함
-
하드웨어 축은 "눌렀다"&"안눌렀다"와 같이 구분되는 것이 아닌 연속적인 입력 수치를 제공함

2) 캐릭터 이동 함수 구현
-
FPSCharacter.h
- 매핑에 바인딩할 함수를 생성
UFUNCTION() void MoveForward(float AxisValue); UFUNCTION() void MoveRight(float AxisValue); -
FPSCharacter.cpp
AFPSCharacter::SetupPlayerInputComponent() { InputComponent->BindAxis("MoveForward", this, &AFPSCharacter::MoveForward); InputComponent->BindAxis("MoveRight", this, &AFPSCharacter::MoveRight); } -
MoveForward : X축으로 움직이도록
-
MoveRight : Y축으로 움직이도록
void AFPSCharacter::MoveForward(float AxisValue)
{
    FVector Direction = FRotationMatrix(Controller->
    GetControlRotation()).GetScaledAxis(EAxis::X);
    AddMovementInput(Direction, AxisValue);
}

void AFPSCharacter::MoveRight(float AxisValue)
{
    FVector Direction = FRotationMatrix(Controller->
    GetControlRotation()).GetScaledAxis(EAxis::Y);
    AddMovementInput(Direction, AxisValue);
}
3) 결과
- WASD 키를 눌러 캐릭터가 전후좌우로 움직이는 것을 확인 가능
3. 마우스 카메라 컨트롤 구현
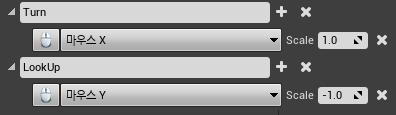
1) 축 매핑
- 마우스 축 매핑 추가
2) 입력 처리 구현
- Character 베이스 클래스는 카메라 회전 컨트롤에 대해 필수 함수를 제공하니 바인딩만 하면 됨
AFPSCharacter::SetupPlayerInputComponent()
{
  InputComponent->BindAxis("Turn", this, &AFPSCharacter::AddControllerYawInput);
  InputComponent->BindAxis("LookUp", this, &AFPSCharacter::AddControllerPitchInput);
}
3) 결과
- 마우스를 이용해 카메라를 컨트롤 가능함
4.캐릭터 점프 구현
1) 액션 매핑
- 액션 매핑 : 별도의 이벤트에 대한 입력
- 스페이스 바 액션 매핑 추가

2) 입력 처리 구현
-
FPSChararcter.h
UFUNCTION() void StartJump(); UFUNCTION() void StopJump(); -
FPSCharacter.cpp
void AFPSCharacter::StartJump()
{
    bPressedJump = true;
}

void AFPSCharacter::StopJump()
{
    bPressedJump = false;
}
InputComponent->BindAction("Jump", IE_Pressed, this, &AFPSCharacter::StartJump); InputComponent->BindAction("Jump", IE_Released, this, &AFPSCharacter::StopJump);
3) 결과
- 스페이스 바를 다운하면 캐릭터가 점프한다.

그냥 하자