
redux-saga란 앞선 포스트에서 언급했다시피 Redux Middleware 라이브러리 중 하나이다. 앞에서 설명했던 redux-thunk도 많이 쓰이긴 하지만 간단한 어플리케이션에서만 쓰이며, 주로 redux-saga를 사용한다. 예제와 함께 redux-saga에 대해서 다뤄보자! 🏃♂️
redux-saga 란?
정의
redux-saga란 Action을 모니터링하고 있다가, 특정 Action이 발생하게 되면 이에 따라 특정 작업을 하는 방식으로 사용한다.
이때 특정 작업이란, 특정 JavaScript를 실행하는 것 일수도 있고, 다른 Action을 Dispatch 하는 것 일수도 있고, 현재 State를 불러오는 것 일수도 있다.
redux-thunk에서는 다룰수 없었지만 redux-saga에서는 처리할 수 있는 작업은 다음과 같다.
1. 비동기 작업을 할 때 기존 요청을 취소 처리 할 수 있다.
2. 특정 Action이 발생했을 때 이에 따라 다른 Action이 Dispatch 되게 하거나, JavaScript 코드를 실행 할 수 있다.
3. API 요청이 실패했을 때 재요청하는 작업이 가능하다.
redux-saga에선 JavaScript의 Generator라는 개념을 사용하기 때문에 해당 개념을 알아야한다 !
Action 모니터링 예제
redux-saga는 Action을 모니터링 한다고 했는데 Generator를 이용해서 어떻게 모니터링 하는지 예제 코드를 살펴보자.
function * watchAction() {
  console.log('Action 모니터링 시작');
  while(true){
    const action = yield;
    if(action.type === 'CREATE'){
      console.log('CREATE 액션 감지');
    }
    if(action.type === 'DELETE'){
      console.log('DELETE 액션 감지');
    }
  }
}
Redux의 Reducer 처럼 Action의 type에 따라서 다른 행동을 하는 코드를 다음과 같이 작성하고 실행하게 되면 다음과 같은 결과가 나타난다.

redux-saga 로그인 예제
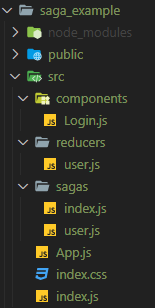
우선 예제는 위와 같은 구조를 띄고 있으며 각각의 코드들을 살펴보자!
reducers/user.js
export const initialState = {
    logInLoading : false,  // 로그인 시도중
    logInDone : false,
    logInError : null,
};

export const LOG_IN_REQUEST = 'LOG_IN_REQUEST';
export const LOG_IN_SUCCESS = 'LOG_IN_SUCCESS';
export const LOG_IN_FAILURE = 'LOG_IN_FAILURE';

export const loginRequestAction = () =>{
    console.log('reducer / loginRequestAction ');
    return {
        type: LOG_IN_REQUEST,
    }
};

const reducer = (state=initialState, action) => {
    switch(action.type) {
        case LOG_IN_REQUEST:{
            console.log('reducer / 로그인 요청');
            return {
                ...state,
                logInLoading : true,
                logInDone : false,
                logInError : null,
            };
        }
        case LOG_IN_SUCCESS:{
            console.log('reducer / 로그인 완료');
            return {
                ...state,
                logInLoading : false,
                logInDone : true,
            };
        }
        case LOG_IN_FAILURE:{
            console.log('reducer / 로그인 실패');
            return {
                logInLoading : false,
                logInError : action.error,
            };
        }
        default: {
            return{
                ...state,
            }
        }
    }
};

export default reducer;
기존에 작성했던 Reducer 예제와 비슷하게 작성했으며, 로그인 예제이기 때문에 logInLoading, logInDone, logInError 같은 State 들을 선언해주었고
LOG_IN_REQUEST, LOG_IN_SUCCESS, LOG_IN_FAILURE 같은 Action 들도 생성했다.
sagas/user.js
import { all, fork, takeLatest,delay, put} from "redux-saga/effects";
import {LOG_IN_REQUEST,LOG_IN_SUCCESS, LOG_IN_FAILURE} from '../reducers/user';

function* logIn(action) {
    try {
        console.log('saga / logIn');
        yield delay(2000);
        yield put({
            type: LOG_IN_SUCCESS,
        });
    } catch (error) {
        yield put({
            type: LOG_IN_FAILURE,
            error: error.response.data
        });
    }
}

// 이벤트 리스너 같은 역할을 한다.
function* watchLogin() {
    console.log('saga / watchLogin');
    yield takeLatest(LOG_IN_REQUEST, logIn);

}

export default function* userSaga(){
    yield all([
        fork(watchLogin),
    ])
}
위에서 선언한 Action들을 import 해주고 Generator를 통해 Event Listner 역할을 하는 watchLogin 함수를 생성하였고 만약 해당 함수가 LOG_IN_REQUEST Action을 받게 되면 실행 되는 logIn 함수도 생성한다.
yield delay(2000); 를 작성한 이유는 원래 해당 부분에 API를 연동하게 될 부분이기 때문에 서버와 통신한다고 생각하여 2초 딜레이를 준 것이다. 서버와 통신하여 로그인이 확인되면 LOG_IN_SUCCESS Action을 put 해주게 된다.
sagas/index.js
import {all, fork} from 'redux-saga/effects';
import userSaga from './user';

export default function* rootSaga(){

    // all은 배열 안에 있는 것들을 한번에 실행해준다.
    yield all([
        // fork는 generator함수를 실행하도록 하는 것 !== call
        fork(userSaga),
    ])
}
이 부분은 Saga가 여러개 선언되는 경우에 모든 generator 함수들을 실행하도록 하기 위해 생성하는 코드이다. 이번 예제에서는 Saga가 하나뿐이지만 작성하였다.
components/Login.js
import React, {useState} from 'react';
import { useDispatch } from 'react-redux';
import { loginRequestAction } from '../reducers/user';

const Login = () => {
    const [email, setEmail] = useState('');
    const [password, setPassword] = useState('');
    const dispatch = useDispatch();

    const onChangeEmail = (e) => {
        setEmail(e.target.value);
    };

    const onChangePassword = (e) => {
        setPassword(e.target.value);
    }

    const onSubmitFrom =(e)=>{
        e.preventDefault();
        dispatch(loginRequestAction({email, password}));
    };

    return (
        <form onSubmit={onSubmitFrom}>
            <input type="email" value={email} onChange={onChangeEmail} required></input>
            <input value={password} onChange={onChangePassword} type="password" required></input>
            <button type="primary">로그인</button>
        </form>
    );
};

export default Login;
이 코드는 간단하게 Email과 Password를 입력하여 dispatch를 통해서 loginRequestAction을 발생시키고 있다.
src/index.js
import React from 'react';
import ReactDOM from 'react-dom';
import { Provider } from 'react-redux';
import {createStore, applyMiddleware} from 'redux';
import reducer from './reducers/user';
import './index.css';
import App from './App';

import createSagaMiddleware from 'redux-saga';
import rootSaga from './sagas';

const sagaMiddleware = createSagaMiddleware();

const store = createStore(reducer, applyMiddleware(sagaMiddleware));

sagaMiddleware.run(rootSaga);

ReactDOM.render(
  <Provider store={store}>
    <App/>
  </Provider>,
  document.getElementById('root')
);
createSagaMiddleware()함수를 통해 sagaMiddleware를 생성하고 redux 예제에서와 같이 생성한 store 안에 applyMiddleware(sagaMiddleware)를 통해 redux-saga를 적용시켜준다. 적용시킨 후에 sagaMiddleware.run(rootSaga); 를 통해 Saga를 실행시킨다.
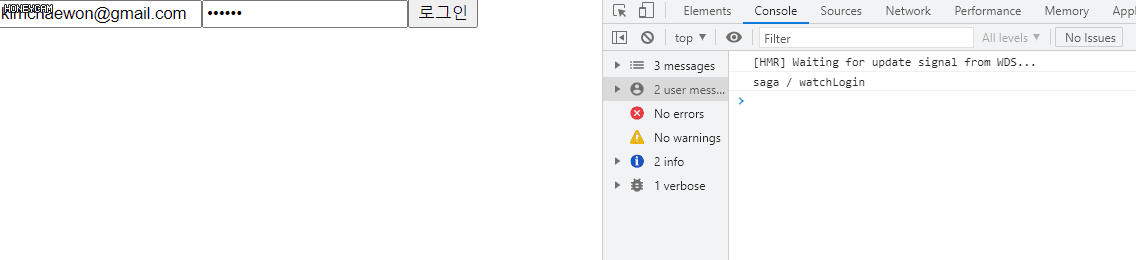
실행 결과를 확인하게 되면 우선 첫번째로 saga에 선언된 watchLogin()이 수행되고 있는 것을 확인할 수 있고 로그인을 하게 되면 dispatch 된 loginRequestAction 실행되고 reducer안에 들어가 LOG_IN_REQUEST Action에 해당되는 동작이 수행된다. 그 후 watchLogin() 을 통해 감지된 LOG_IN_REQUEST에 의하여 logIn() 함수가 실행되게 되고 delay 생성 후에 LOG_IN_SUCCESS Action을 put을 통해 Dispatch 한다. 그럼 최종적으로 reducer 안에 들어가 LOG_IN_SUCCESS Action에 해당되는 동작이 수행되면 로그인이 완료되게 된다.
한마디로 정리하면 다음과 같은 과정을 거쳐 로그인이 완료된다 !
saga(Action 감시중)-> view -> reducer(Action 생성) -> reducer(Action 수행) -> saga(API, Action 생성) -> reducer(Action 수행)
전체 코드는 여기서 확인이 가능하다.
redux-saga 주요 Effect
| 이름 | 설명 |
|---|---|
| delay | 설정된 시간 이후에 resolve 하는 Promise 객체를 리턴한다. |
| put | 특정 Action을 Dispatch 한다. |
| fork | Generator 함수를 실행한다. (but !== call) |
| takeEvery | 들어오는 모든 Action에 대해 특정 작업을 처리한다. |
| takeLatest | 기존에 진행 중이던 작업이 있다면 취소 처리하고 가장 마지막으로 실행된 작업만 수행한다 |
| call | 함수의 첫 번째 파라미터는 함수, 나머지 파라미터는 해당 함수에 넣을 인수이다. Saga 함수 안의 로직이 동기적으로 처리되도록 도와준다. |
| all | Generator 함수를 배열 형태로 넣어주면, 해당 함수들이 병행적으로 동시에 실행되고, 전부 resolve 될 때 까지 기다린다. |
강의를 통해 처음 써봤던 redux-saga, 아직 혼자서 써본적이 없어서 예제도 최대한 배웠던 내용을 기반으로 작성했고 프로젝트에 지금 당장 쓰라고 하면 구현하다가 날밤을 세울것 같다... 😥
그래도 복잡하지만 왜 쓰는지 (API 사용하기 위해서) 왜 thunk 보다 좋은지는 확 와닿는 라이브러리라고 생각한다!(그래서 더 문제지만..)

saga이해하는데 어려움이 있었는데 감사합니다 많은 도움 되었습니다~! b